

自从COVID-19出现在世界范围内,电子商务已经爆炸性增长。根据国际贸易管理局的数据,在2020年,COVID前和COVID后的电子商务收入有19%的增长。因此,企业家们转向了Shopify、WordPress(及其插件wooCommerce)和Squarespace等在线平台来建立他们的网店。
通过Shopify,用户不仅可以建立一个在线商店,而且由于他们的Storefront API,开发人员可以创建一个自定义的客户端应用程序来连接到它。
在这篇文章中,你将学习如何建立一个Shopify商店并获得你的Storefront API令牌。一旦获得令牌,你将创建一个Next.js应用程序,用假数据列出和显示你的产品。最后,您将把您的Next.js应用程序连接到您的Shopify应用程序,以获取您的真实产品。
创建一个Shopify商店(可选)
如果你已经建立了一个Shopify商店,你可以跳过这一步,进入第2步。
如果没有,请到Shopify的网站上注册一个免费试用。一旦完成,你可以开始创建一些集合,用来对你的产品进行分类。
要创建一个集合,进入产品,然后是集合。接下来,点击创建集合。输入一个标题,并选择手动集合类型。通过后者,你可以手动添加产品到这个集合。
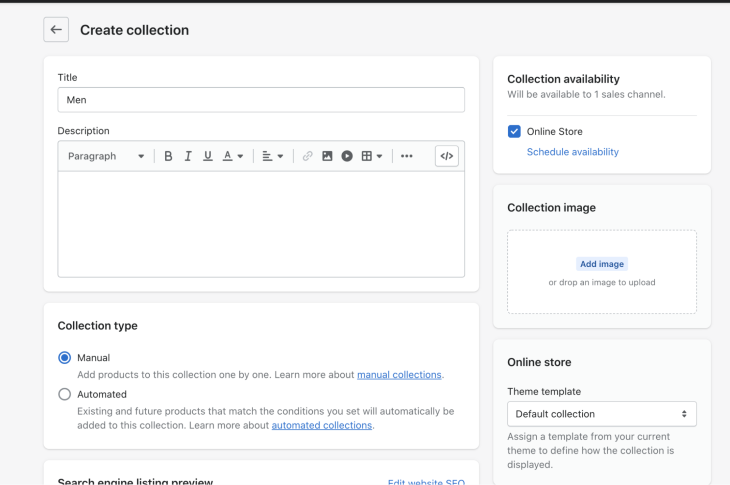
在本教程中,需要两个集合:男性和女性。
一旦你的集合设置好了,点击产品,然后添加产品。
要创建一个产品,这里有一些步骤需要遵循:
- 输入一个标题
- 在媒体文件输入中上传一张图片
- 选择一个类型(例如,鞋)。
- 选择一个系列(如女式或男式)。
- 输入一个价格
- 在库存部分,在可用栏中添加一个数量
- 将产品状态设置为活动
- 最后,点击保存。这将在你的商店中创建一个活跃的产品。重复这些步骤几次,以填充你的商店。例如,这里是一个有一些鞋子的网上商店。
获取Shopify的Storefront API token
一旦你的商店建立起来,你将需要一个API令牌来从第三方应用程序访问它。进入应用程序,点击为你的商店开发应用程序,并通过步骤来启用应用程序的开发。
一旦该功能被启用,点击创建一个应用程序,并填写你的应用程序名称。
一旦你的应用程序被创建,点击你的新应用程序并前往配置。在Storefront API部分,点击配置。
接下来,在Storefront API访问范围下,选择所有的复选框。这将授予你从你的商店获取数据的能力,如你的产品,而不需要认证。点击保存。
为了获得您的Storefront访问令牌,您将需要安装您新创建的应用程序,所以点击绿色的安装按钮。
现在你可以通过回到你的应用程序和API凭证来检索你的访问令牌。记下这个令牌,因为你以后会需要它。
设置Next.js应用程序
在本教程中,你将使用MUI。这个组件库允许你获得预建的组件,以更快地构建UI。
值得庆幸的是,MUI还附带了一个Next.js的启动项目,你可以通过运行这个命令来获得:
curl https://codeload.github.com/mui/material-ui/tar.gz/master | tar -xz --strip=2 material-ui-master/examples/nextjs
不幸的是,前面的命令将以默认的名字nextjs 。如果你想重命名它,请运行:
    mv nextjs <your_app_name> # Mac
    ren nextjs <your_app_name> # Windows
完成后,进入你的项目并安装依赖项。
    cd <your_app_name>
    npm install
    npm run dev
有了一些假的数据,创建你的用户界面会更容易。为此,在你的根文件夹内创建一个data.js ,并添加一些假的产品。
    const PRODUCTS = [
      {
        handle: 1,
        name: 'Women Black Shoes',
        price: '14.99',
        collection: 'women',
        image: 'https://external-content.duckduckgo.com/iu/?u=http%3A%2F%2Fcohenwoodworking.com%2Fwp-content%2Fuploads%2F2016%2F09%2Fimage-placeholder-500x500.jpg&f=1&nofb=1'
      },
      {
        handle: 2,
        name: 'Women Brown Shoes',
        price: '14.99',
        collection: 'women',
        image: 'https://external-content.duckduckgo.com/iu/?u=http%3A%2F%2Fcohenwoodworking.com%2Fwp-content%2Fuploads%2F2016%2F09%2Fimage-placeholder-500x500.jpg&f=1&nofb=1'
      },
      {
        handle: 3,
        name: 'Women Purple Shoes',
        price: '14.99',
        collection: 'women',
        image: 'https://external-content.duckduckgo.com/iu/?u=http%3A%2F%2Fcohenwoodworking.com%2Fwp-content%2Fuploads%2F2016%2F09%2Fimage-placeholder-500x500.jpg&f=1&nofb=1'
      }
    ];

    export default PRODUCTS;
用Next.js创建电子商务商店的主页
在你的Next.js根文件夹内,创建一个components 文件夹。
在这个文件夹中,你将创建一个组件来列出你的产品,名为ProductList 。MUI有一些预置的组件来创建一个列表,并在其下方以网格格式提供图像和标题。
这些组件被称为。ImageList,ImageListItem, 和ImageListItemBar 。你可以在这里找到相关文档。
在你的components 文件夹中,创建ProductsList.js 。从MUI导入所有必要的组件并设置你的网格。假设你的组件将接收一个产品数组,并对其进行映射以创建一个带有图片和标题的单一产品条目。
 import * as React from 'react';
    import Typography from '@mui/material/Typography';
    import ImageList from '@mui/material/ImageList';
    import ImageListItem from '@mui/material/ImageListItem';
    import ImageListItemBar from '@mui/material/ImageListItemBar';


    export default function ProductsList({products}) {
      return (
        <ImageList cols={5} gap={20}>
          {products.map((product) => (
            <ImageListItem key={product.image}>
              {/* Product's image*/}
              <img
                src={`${product.image}?w=250&fit=crop&auto=format`}
                srcSet={`${product.image}?w=250&fit=crop&auto=format&dpr=2 2x`}
                alt={product.name}
                loading="lazy"
              />
              {/* Product's name + price under the image */}
              <ImageListItemBar
                title={product.name}
                subtitle={<span>Price: {product.price}</span>}
                position="below"
              />
            </ImageListItem>
          ))}
        </ImageList>
      )
    };
你将需要的另一个组件是一个导航栏。你可以使用MUI的AppBar 和Toolbar 来创建一个。在里面,将你的收藏品作为文本添加。你将在后面学习如何设置路由。
这是你的Navigation.js 组件的结果:
  import * as React from 'react';
    import AppBar from '@mui/material/AppBar';
    import Toolbar from '@mui/material/Toolbar';
    import Typography from '@mui/material/Typography';


    export default function Navigation() {
      return (
        <AppBar position="static">
          <Toolbar>
            <Typography mr={2}>All products</Typography>
            <Typography mr={2}>Women</Typography>
            <Typography>Men</Typography>
          </Toolbar>
        </AppBar>
      )
    };
最后,在你的应用程序的主页上使用你新创建的组件,ProductsList 和Navigation.js 。这个页面可以在URL上找到,并从pages/index.js 文件中渲染出来。
注意:如果你不熟悉Next.js的页面功能和它的渲染,请查看 文档。
在 index.js, import Navigation, ProductLists ,和你的假数据。你可以将你的数据传入你的产品列表。
  import * as React from 'react';
    import Container from '@mui/material/Container';
    import Box from '@mui/material/Box';


    import Navigation from '../components/Navigation';
    import ProductsList from '../components/ProductsList';
    import PRODUCTS from '../data.js';


    export default function Index() {
      return (
        <Box>
          <Navigation />
          <Container maxWidth="lg">
            <ProductsList products={PRODUCTS} />
          </Container>
        </Box>
      );
    }
到这一步,一旦你刷新你的页面,你应该看到这个:
在电子商务应用程序中创建不同的收藏页面
现在你的主页已经设置好了,你需要收藏页。大多数网上商店将他们的产品分成不同的类别,这样用户就更容易浏览他们的目录。因此,我们将创建一个特定的集合。
Next.js提供动态路由。如果你对它不熟悉,它允许你创建路由,如/collections/[collectionName 。通过这样做,/collections/women 或/collections/men 等URL将使用同一个.js 页面。
在你的pages 文件夹内,创建一个collections 文件夹,并在其中创建一个[collectionName].js 文件。这个组件将与你的主页非常相似。然而,你将过滤你的产品,只从正确的集合中获取产品。
值得庆幸的是,Next.js也配备了一个useRouter 钩子,你可以从URL中获得查询参数。一旦你有了collectionName ,你就可以在过滤产品的时候使用它。最后,将你过滤后的产品列表传递给ProductsList 。
 import * as React from 'react';
    import { useRouter } from 'next/router'


    import Container from '@mui/material/Container';
    import Box from '@mui/material/Box';


    import Navigation from '../../components/Navigation';
    import BreadcrumbsNavigation from '../../components/BreadcrumbsNavigation';
    import ProductsList from '../../components/ProductsList';
    import PRODUCTS from '../../data.js';


    export default function CollectionPage() {
      const router = useRouter()
      const { collectionName } = router.query
      const products = PRODUCTS.filter(product => product.collection === collectionName)
      return (
        <Box>
          <Navigation />
          <Container maxWidth="lg">
            <BreadcrumbsNavigation collection={collectionName} />
            <ProductsList products={products} />
          </Container>
        </Box>
      );
    }
注意你的集合页面使用了一个名为BreadcrumbsNavigation 的自定义组件。这是为你的商店渲染自定义面包屑。
为了创建这个组件,在你的components 文件夹中,创建一个BreadcrumbsNavigation.js 。MIU提供了一个Breadcrumbs 组件供你使用。添加到这里,Link 组件允许你添加路由以回到你的主页。
这里是最终的结果:
    import * as React from 'react';


    import Box from '@mui/material/Box';
    import Breadcrumbs from '@mui/material/Breadcrumbs';
    import Typography from '@mui/material/Typography';
    import Link from '@mui/material/Link';


    export default function BreadcrumbsNavigation({title}) {
      return (
        <Box mt={2}>
          <Breadcrumbs separator="›" aria-label="breadcrumb">
            <Link underline="hover" key="1" color="inherit" href="/">
              Products
            </Link>
            <Typography key="3" color="text.primary">
              {title && title.replace(/^\w/, c => c.toUpperCase())}
            </Typography>
          </Breadcrumbs>
        </Box>
      )
    }
在Navigation.js ,导入你刚才使用的MUI的Link 组件,在你的应用栏上为你的主页和你的收藏添加一些路由:
    import * as React from 'react';


    import AppBar from '@mui/material/AppBar';
    import Toolbar from '@mui/material/Toolbar';
    import Typography from '@mui/material/Typography';
    import Link from '@mui/material/Link';


    export default function Navigation() {
      return (
        <AppBar position="static">
          <Toolbar>
            <Link href="/" underline="none" color="inherit"><Typography mr={2}>All products</Typography></Link>
            <Link href="/collections/women" underline="none" color="inherit"><Typography mr={2}>Women</Typography></Link>
            <Link href="/collections/men" underline="none" color="inherit"><Typography>Men</Typography></Link>
          </Toolbar>
        </AppBar>
      )
    };
在你的 ProductList.js ,你可以在没有产品的情况下添加一个检查。
    import * as React from 'react';


    import Box from '@mui/material/Box';
    import Typography from '@mui/material/Typography';
    ...


    export default function ProductsList({products}) {
      return (
        <Box>
          {
            (products && products.length > 0) ?
            <ImageList cols={5} gap={20}>
              ...
            </ImageList>:
            <Typography variant="body1" align="center">There are no products in this collection</Typography>
          }
        </Box>
      )
    };
如果你前往 [http://localhost:3000/collections/women](http://localhost:3000/collections/women)的时候,你现在应该看到这个:
在Next.js和Shopify中创建一个产品页面
设置好主页和收藏品页面后,您就可以进入产品页面了。和收藏品页面一样,Next.js的动态路由可以用来设置该页面。
创建一个products 文件夹。在里面添加一个名为[productHandle].js 的新文件。无论你是想使用ID还是像 black-converse 这样的句柄,作为productHandle ,这个页面将呈现你的产品页面。
从URL中获得productHandle 参数后,你可以用它来抓取你的产品。为了显示你的产品图片,Next.js提供了一个 [Image](https://nextjs.org/docs/basic-features/image-optimization)组件,它带有内置的图像优化功能。
下面是一个产品页面的结果:
  import * as React from 'react';
    import { useRouter } from 'next/router';
    import Image from 'next/image';


    import Container from '@mui/material/Container';
    import Box from '@mui/material/Box';
    import Grid from '@mui/material/Grid'
    import Typography from '@mui/material/Typography';
    import Button from '@mui/material/Button';


    import Navigation from '../../components/Navigation';
    import BreadcrumbsNavigation from '../../components/BreadcrumbsNavigation';
    import ProductsList from '../../components/ProductsList';
    import PRODUCTS from '../../data.js';


    export default function ProductPage() {
        const router = useRouter()
      // Get productHandle from url: /products/[productHandle]
      const { productHandle } = router.query
      // Get product data
      const product = PRODUCTS.find(product => product.handle === parseInt(productHandle))
      const { name, image, price } = product || {}


      return (
        <Box>
          <Navigation />
          {product &&
            <Container maxWidth="lg">
              <BreadcrumbsNavigation title={name} />
                <Grid container direction="row">
                  <Grid item xs={6}>
                    <Image
                      src={image}
                      alt={`Picture of ${name}`}
                      width={500}
                      height={500}
                    />
                  </Grid>
                  <Grid item xs={6}>
                    <Typography variant="h3" my={2}>{name}</Typography>
                    <Grid mt={4}>
                      <Typography variant="h6" component="span">Price: </Typography>
                      <Typography variant="body1" component="span">{price}</Typography>
                    </Grid>
                    <Grid mt={1}>
                      <Button variant="contained">Add to cart</Button>
                    </Grid>
                  </Grid>
                </Grid>
            </Container>
          }
        </Box>
      );
    }
如果你最终使用Image 组件,你将需要把你的图像的域添加到next.config.js ,像这样:
  module.exports = {
      reactStrictMode: true,
      images: {
        domains: ['external-content.duckduckgo.com'],
      },
    };
当改变 next.config.js ,你将不得不重新启动你的服务器。
最后,让我们实现对你的产品页面的路由。为此,回到你的components/ProductsList.js ,当用户点击产品列表中的图片时,使用Next.js路由器来导航到你的产品页面。在你的ImageListItem 上添加onClick ,连同光标样式,并创建一个goToProductPage 来导航。
这里是最终的结果:
import * as React from 'react';
    import { useRouter } from 'next/router'


    ...


    export default function ProductsList({products}) {
      const router = useRouter()
      // Navigate to product's page
      const goToProductPage = productHandle => router.push(`/products/${productHandle}`)


      return (
        <Box>
          {
            (products && products.length > 0) ?
            <ImageList cols={5} gap={20}>
              {products.map((product) => (
                <ImageListItem
                  key={product.image}
                  style={{cursor: 'pointer'}}
                  onClick={() => goToProductPage(product.handle)}>
                  ...
                </ImageListItem>
              ))}
            </ImageList>:
            <Typography variant="body1" align="center">There are no products in this collection</Typography>
          }
        </Box>
      )
    };
一旦呈现,这里是你将得到的:
使用Shopify店面API检索你的产品
你的客户端应用程序现在已经设置好了。然而,它依靠的是假的数据。为了完成你的项目,需要从你的Shopify商店获取数据并加以使用。
要做到这一点,你将需要Shopify JavaScript Buy SDK,你可以通过安装必要的软件包得到它。
npm install shopify-buy
还记得我们在本文开头得到的Storefront API令牌吗?你将把它们储存在环境变量中。在你的根项目中,创建一个名为.env.local 的文件,并添加你的令牌,以及你的Shopify域名。
  SHOPIFY_STORE_FRONT_ACCESS_TOKEN=*****
    SHOPIFY_STORE_DOMAIN=********
你也可以在你的Shopify商店里点击设置来找到你的域名。
一旦你的变量设置好了,在你的根项目中创建一个lib 文件夹,并在里面创建一个shopify.js 文件。在这个文件中,你将导入你的shopify-buy 库,并使用你的变量创建一个Shopify客户端。
一旦你对Shopify进行了API调用,返回的响应将需要被字符串化和解析,以便以后作为JSON对象使用。因此,创建一个parseShopifyResponse 函数,这样你就可以在你的应用程序中反复使用它。
  import Client from "shopify-buy";
    export const shopifyClient = Client.buildClient({
      storefrontAccessToken: process.env.SHOPIFY_STORE_FRONT_ACCESS_TOKEN,
      domain: process.env.SHOPIFY_STORE_DOMAIN,
    });


    export const parseShopifyResponse = (response) =>  JSON.parse(JSON.stringify(response));
让我们继续为您的主页获取您的所有产品。在 index.js ,使用Next.js的 [getServerSideProps](https://nextjs.org/docs/basic-features/data-fetching/get-server-side-props)来在页面被请求时进行API调用。通过shopifyClient.product.fetchAll() ,你可以获取你商店中的所有产品。一旦数据被返回,它将作为道具被传递到你的主页和你的ProductsList 组件中。
   import * as React from 'react';
    import Container from '@mui/material/Container';
    import Box from '@mui/material/Box';


    import Navigation from '../components/Navigation';
    import ProductsList from '../components/ProductsList';
    import { shopifyClient, parseShopifyResponse } from '../lib/shopify'


    export default function Index({products}) {
      return (
        <Box>
          <Navigation />
          <Container maxWidth="lg">
            <ProductsList products={products} />
          </Container>
        </Box>
      );
    }


    export const getServerSideProps = async () => {
      // Fetch all the products
      const products = await shopifyClient.product.fetchAll();


      return {
       props: {
        products: parseShopifyResponse(products),
      },
     };
    };
来自你的虚拟数据的格式与Shopify将返回的格式不一样。你将需要调整ProductsList.js ,以适应这个新的数据。在这个文件中,让我们创建一个Product 组件并从你的产品中抓取ID、标题、图片、价格和手柄。
Shopify的API响应可能有点令人困惑。例如,你的产品的价格将在variants 对象中。这里有完整的文档,可以更好地了解产品的结构。
Shopify的产品也有一个handle 字段,在你创建产品时生成。一个标记为 "Black converses "的产品会有一个句柄,如black-converses 。这对SEO非常有帮助,因为像productId/1 这样的URL字符串是首选。你将在导航到你的产品页面时使用它的路由。
这里是更新后的结果:
  import * as React from 'react';
    import { useRouter } from 'next/router'


    import Box from '@mui/material/Box';
    import Typography from '@mui/material/Typography';
    import ImageList from '@mui/material/ImageList';
    import ImageListItem from '@mui/material/ImageListItem';
    import ImageListItemBar from '@mui/material/ImageListItemBar';


    const Product = ({product, goToProductPage}) => {
      const { id, title, images, variants, handle } = product
      const { src: productImage } = images[0]
      const { price } = variants[0]
      return (
        <ImageListItem
          style={{cursor: 'pointer'}}
          onClick={() => goToProductPage(handle)}>
          <img
            src={`${productImage}?w=250&auto=format`}
            srcSet={`${productImage}?w=250&auto=format&dpr=2 2x`}
            alt={title}
            loading="lazy"
          />
          <ImageListItemBar
            title={title}
            subtitle={<span>Price: {price}</span>}
            position="below"
          />
        </ImageListItem>
      )
   }
    export default function ProductsList({products}) {
      const router = useRouter()
      // Navigate to product page with handle i.e /products/black-converses
      const goToProductPage = productHandle => router.push(`/products/${productHandle}`)


      return (
        <Box>
          {
            (products && products.length > 0) ?
            <ImageList cols={5} gap={20}>
              {products.map((product) => (
                <Product
                  key={product.handle}
                  product={product}
                  goToProductPage={goToProductPage}
                />
              ))}
            </ImageList>:
            <Typography variant="body1" align="center">There are no products in this collection</Typography>
          }
        </Box>
      )
    };
现在,你可以继续更新你的产品页面。在你的products/[productHandle].js ,从你的查询中抓取手柄。Shopify JS SDK有一个叫fetchByHandle 的函数,可以从手柄中获取一个产品。使用你的productHandle 来获取你的产品,并把它添加到你的道具中。
现在,你将需要更新你的产品页面,就像你对产品列表所做的那样。你可以用同样的方法抓取你的标题、图片和价格,并在你的页面上使用它们。
    import * as React from 'react';
    import Image from 'next/image'


    import Container from '@mui/material/Container';
    import Box from '@mui/material/Box';
    import Grid from '@mui/material/Grid'
    import Typography from '@mui/material/Typography';
    import Button from '@mui/material/Button';


    import Navigation from '../../components/Navigation';
    import BreadcrumbsNavigation from '../../components/BreadcrumbsNavigation';
    import ProductsList from '../../components/ProductsList';
    import { shopifyClient, parseShopifyResponse } from '../../lib/shopify'


    export default function ProductPage({product}) {


      const { id, title, images, variants, handle } = product
      const { src: productImage } = images[0]
      const { price } = variants[0]


      return (
        <Box>
          <Navigation />
          {product &&
            <Container maxWidth="lg">
              <BreadcrumbsNavigation title={title} />
                <Grid container direction="row">
                  <Grid item xs={6}>
                    <Image
                      src={productImage}
                      alt={`Picture of ${title}`}
                      width={500} automatically provided
                      height={500} automatically provided
                    />
                  </Grid>
                  <Grid item xs={6}>
                    <Typography variant="h3" my={2}>{title}</Typography>
                    <Grid mt={4}>
                      <Typography variant="h6" component="span">Price: </Typography>
                      <Typography variant="body1" component="span">{price}</Typography>
                    </Grid>
                    <Grid mt={1}>
                      <Button variant="contained">Add to cart</Button>
                    </Grid>
                  </Grid>
                </Grid>
            </Container>
          }
        </Box>
      );
    }


    export const getServerSideProps = async ({params}) => {
      const { productHandle } = params
      // Fetch one product
      const product = await shopifyClient.product.fetchByHandle(productHandle);


      return {
       props: {
        product: parseShopifyResponse(product),
      },
     };
    };
对于你的收藏品的页面,不幸的是,你将需要一点过滤功能。目前,Shopify JS SDK只提供了通过集合的ID来获取产品的选项,但没有提供手柄。在collections/[collectionName].js ,你可以使用client.collection.fetchAllWithProducts() 来获取所有的集合和它们的产品。
一旦你有了这些产品,你就可以通过检查它的句柄并将其传递给你的道具来抓取正确的产品。
    import * as React from 'react';


    import Container from '@mui/material/Container';
    import Box from '@mui/material/Box';


    import Navigation from '../../components/Navigation';
    import BreadcrumbsNavigation from '../../components/BreadcrumbsNavigation';
    import ProductsList from '../../components/ProductsList';
    import { shopifyClient, parseShopifyResponse } from '../../lib/shopify'


    export default function CollectionPage({products, collectionName}) {
      return (
        <Box>
          <Navigation />
          <Container maxWidth="lg">
            <BreadcrumbsNavigation title={collectionName} />
            <ProductsList products={products} />
          </Container>
        </Box>
      );
    }


    export const getServerSideProps = async ({params}) => {
      const { collectionName } = params
      // Fetch all the collections
      const collectionsData = await shopifyClient.collection.fetchAllWithProducts();
      const collections = parseShopifyResponse(collectionsData);
      // Get the right one
      const collection = collections.find(collection => collection.handle === collectionName)


      return {
       props: {
        collectionName,
        products: collection.products,
      },
     };
    };
最后,如果你使用的是Image 组件,你需要更新next.config.js 来添加Shopify的图片域。
   module.exports = {
      reactStrictMode: true,
      images: {
        domains: ['external-content.duckduckgo.com', 'cdn.shopify.com'],
      },
    };
最终的结果是这样的:
完整的代码库可以在这个GitHub repo中找到。
总结
在这篇文章中,你学到了如何建立一个Shopify商店,启用Storefront API,并获得你的访问令牌。然后,您发现了如何创建Next.js应用程序,并通过创建一个主页,以及收藏和产品页面来设置您的前端。最后,你安装了Shopify JS SDK,并学习了如何使用它来从你的网上商店获取产品。
从那里,可以实现更多的功能。无论是创建购物车,向其中添加产品,还是完成结账,Shopify的JS SDK都可以帮助你实现你的目标。
