

概述
由于Python编程语言提供了多种开源库,因此使用Python进行运动检测很容易。运动检测在现实世界中有许多应用。例如,它可以用于在线考试的监考,或用于商店、银行等的安全目的。
简介
Python编程语言是一种开源的库丰富的语言,它为用户提供了大量的应用,并拥有众多的用户。因此,它在市场上快速发展。由于Python语言的语法简单,容易发现错误,而且调试过程快,使其更方便用户使用,所以它的好处不胜枚举。
为什么要学习Python?一个图示。
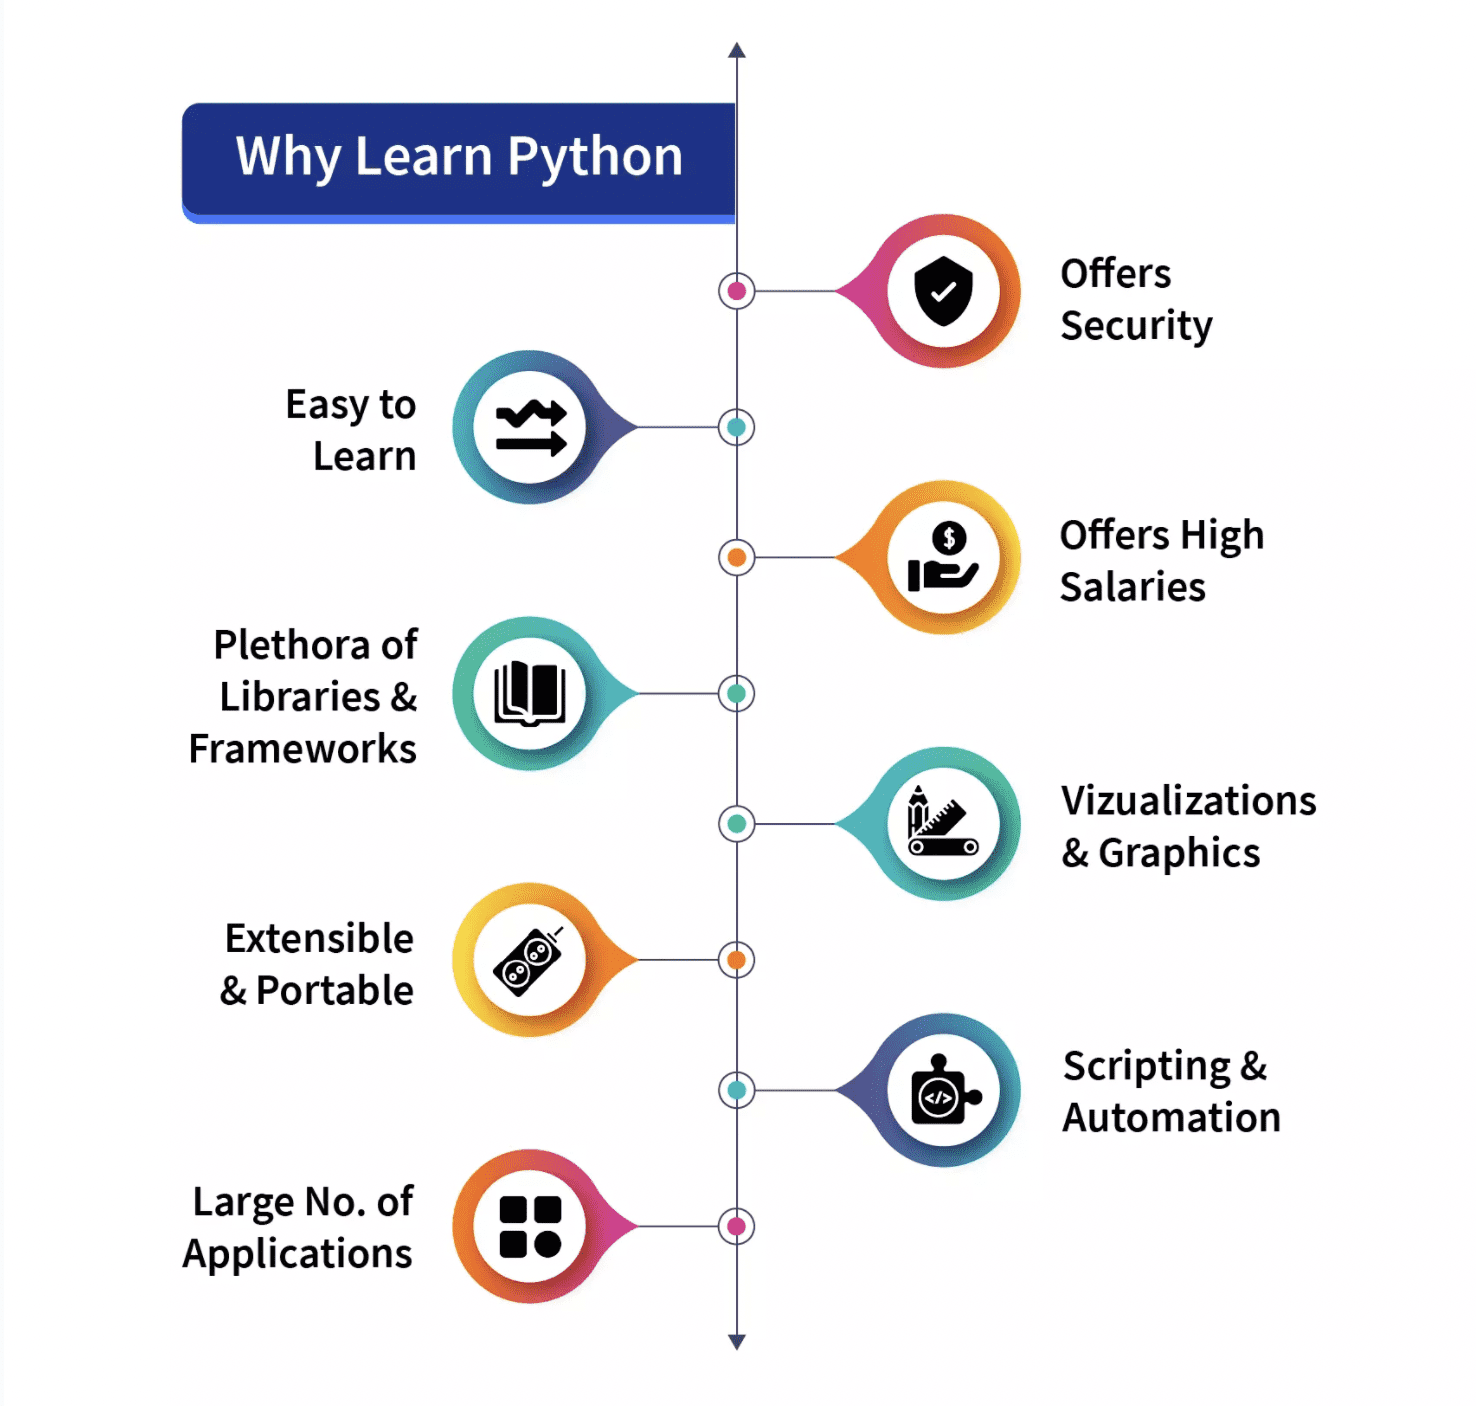
资料来源:《中国日报》。Scaler Topics
Python设计于1991年,它是由Python软件基金会开发的。有许多版本的Python被发布。在这些版本中,python2和python3是最有名的。目前,python3被广泛使用,python3的用户正在迅速增加。在这个项目或脚本中,我们将使用python3。
什么是运动检测?
根据物理学原理,当一个物体没有运动,没有速度,那么它就被认为是处于静止状态,而恰恰相反,当一个物体没有完全静止,并且在某个方向上有一些运动或速度,无论是左-右、前-后或上-下,那么它就被认为是在运动。在这篇文章中,我们将尝试对其进行检测。
来源:gtycat
运动检测在现实生活中有很多实现或使用,它可以证明自己的价值,例如使用网络摄像头监考在线考试(我们将在本文中实现),作为一个保安,等等。
在这篇文章中,我们将尝试实现一个脚本,通过这个脚本,我们将使用台式机或笔记本电脑的网络摄像头检测运动。我们的想法是,我们将采取两帧视频,并试图找到它们之间的差异。如果两帧之间有某种差异,那么很明显,摄像机前面的物体有某种运动,从而产生了这种差异。
重要的程序库
在我们开始执行代码之前,让我们看看我们将通过我们的代码使用的一些模块或库,用于网络摄像头的运动检测。正如我们所讨论的,库在python的名声中起着重要的作用,让我们看看我们需要什么。
- OpenCV
- Pandas
上述两个库,OpenCV和Pandas都是纯粹的基于python的、免费的、开源的库,我们将在Python3版本的python编程语言中使用它们。
1.1.OpenCV
OpenCV是一个开源的库,可以与许多编程语言如C++、Python等一起使用。它被用来处理图像和视频,通过使用或与python的panda/NumPy库集成,我们可以最好地利用OpenCV的功能。
2.2.潘达。
正如我们所讨论的,"Pandas"是Python的一个开源库,为数据分析提供了丰富的内置工具,因此它被广泛用于数据科学和数据分析的领域。pandas为我们提供了数据框架形式的数据结构,有助于操作和存储表格数据到一个二维数据结构。
以上讨论的两个模块都不是在python中内置的,我们必须在使用前先安装它们。除此之外,还有两个模块,我们将在我们的项目中使用。
- Python DateTime模块
- Python时间模块
这两个模块都是在Python中内置的,不需要再安装它们。这些模块分别处理与日期和时间有关的功能。
代码实现
到目前为止,我们已经看到了我们将在代码中使用的库,让我们开始实施,视频只是许多静态图像或帧的组合,所有这些帧的组合创造了一个视频:
导入所需的库
在本节中,我们将导入所有的库,如pandas和panda。然后我们从DateTime模块中导入cv2、time和DateTime函数。
# Importing the Pandas libraries
import pandas as panda

# Importing the OpenCV libraries
import cv2

# Importing the time module
import time

# Importing the datetime function of the datetime module
from datetime import datetime
初始化我们的数据变量
在这一节中,我们初始化了我们的一些变量,我们将在代码中进一步使用这些变量。我们将初始状态定义为 "无",并将运动跟踪存储在另一个变量motionTrackList中。
我们定义了一个列表 "motionTime "来存储运动被发现的时间,并使用熊猫的模块初始化了dataFrame列表。
# Assigning our initial state in the form of variable initialState as None for initial frames
initialState = None

# List of all the tracks when there is any detected of motion in the frames
motionTrackList= [ None, None ]

# A new list ‘time’ for storing the time when movement detected
motionTime = []

# Initialising DataFrame variable ‘dataFrame’ using pandas libraries panda with Initial and Final column
dataFrame = panda.DataFrame(columns = ["Initial", "Final"])
主要的捕捉过程
在这一节中,我们将执行我们的主要运动检测步骤。让我们按步骤来理解它们。
- 首先,我们将使用cv2模块开始捕获视频,并将其存储在视频变量中。
- 然后我们将使用一个无限的while循环来捕捉视频中的每一帧。
- 我们将使用read()方法来读取每一帧,并将它们存储到各自的变量中。
- 我们定义了一个变量motion并将其初始化为零。
- 我们又创建了两个变量grayImage和grayFrame,使用cv2函数cvtColor和GaussianBlur来寻找运动的变化。
- 如果我们的initialState是None,那么我们就把当前的greyFrame分配给initialState,否则就使用'continue'关键字来停止下一个进程。
- 在下一节中,我们计算了我们在当前迭代中创建的初始帧和灰度帧之间的差异。
- 然后我们将使用cv2的阈值和扩张函数来突出初始帧和当前帧之间的变化。
- 我们将从当前图像或帧中找到移动物体的轮廓,并通过使用矩形函数在其周围创建一个绿色的边界来表明移动物体。
- 在这之后,我们将把当前检测到的元素添加到motionTrackList中。
- 我们通过使用imshow方法显示所有的帧,如灰度和原始帧等。
- 此外,我们使用cv2模块的witkey()方法创建了一个键来结束这个过程,我们可以通过使用'm'键来结束我们的过程。
# starting the webCam to capture the video using cv2 module
video = cv2.VideoCapture(0)
# using infinite loop to capture the frames from the video
while True:
# Reading each image or frame from the video using read function
check, cur_frame = video.read()
# Defining 'motion' variable equal to zero as initial frame
var_motion = 0
# From colour images creating a gray frame
gray_image = cv2.cvtColor(cur_frame, cv2.COLOR_BGR2GRAY)
# To find the changes creating a GaussianBlur from the gray scale image
gray_frame = cv2.GaussianBlur(gray_image, (21, 21), 0)
# For the first iteration checking the condition
# we will assign grayFrame to initalState if is none
if initialState is None:
initialState = gray_frame
continue
# Calculation of difference between static or initial and gray frame we created
differ_frame = cv2.absdiff(initialState, gray_frame)
# the change between static or initial background and current gray frame are highlighted
thresh_frame = cv2.threshold(differ_frame, 30, 255, cv2.THRESH_BINARY)[1]
thresh_frame = cv2.dilate(thresh_frame, None, iterations = 2)
# For the moving object in the frame finding the coutours
cont,_ = cv2.findContours(thresh_frame.copy(),
cv2.RETR_EXTERNAL, cv2.CHAIN_APPROX_SIMPLE)
for cur in cont:
if cv2.contourArea(cur) < 10000:
continue
var_motion = 1
(cur_x, cur_y,cur_w, cur_h) = cv2.boundingRect(cur)
# To create a rectangle of green color around the moving object
cv2.rectangle(cur_frame, (cur_x, cur_y), (cur_x + cur_w, cur_y + cur_h), (0, 255, 0), 3)
# from the frame adding the motion status
motionTrackList.append(var_motion)
motionTrackList = motionTrackList[-2:]
# Adding the Start time of the motion
if motionTrackList[-1] == 1 and motionTrackList[-2] == 0:
motionTime.append(datetime.now())
# Adding the End time of the motion
if motionTrackList[-1] == 0 and motionTrackList[-2] == 1:
motionTime.append(datetime.now())
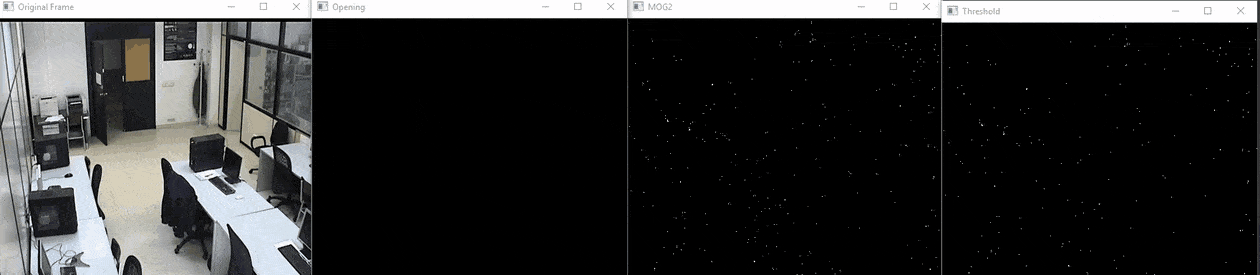
# In the gray scale displaying the captured image
cv2.imshow("The image captured in the Gray Frame is shown below: ", gray_frame)
# To display the difference between inital static frame and the current frame
cv2.imshow("Difference between the inital static frame and the current frame: ", differ_frame)
# To display on the frame screen the black and white images from the video
cv2.imshow("Threshold Frame created from the PC or Laptop Webcam is: ", thresh_frame)
# Through the colour frame displaying the contour of the object
cv2.imshow("From the PC or Laptop webcam, this is one example of the Colour Frame:", cur_frame)
# Creating a key to wait
wait_key = cv2.waitKey(1)
# With the help of the 'm' key ending the whole process of our system
if wait_key == ord('m'):
# adding the motion variable value to motiontime list when something is moving on the screen
if var_motion == 1:
motionTime.append(datetime.now())
break
完成代码
关闭循环后,我们将把我们的数据从dataFrame和motionTime列表中添加到CSV文件中,最后关闭视频。
# At last we are adding the time of motion or var_motion inside the data frame
for a in range(0, len(motionTime), 2):

   dataFrame = dataFrame.append({"Initial" : time[a], "Final" : motionTime[a + 1]}, ignore_index = True)


# To record all the movements, creating a CSV file
dataFrame.to_csv("EachMovement.csv")

# Releasing the video
video.release()

# Now, Closing or destroying all the open windows with the help of openCV
cv2.destroyAllWindows()
过程总结
我们已经创建了代码,现在让我们再次简要地讨论一下这个过程。
首先,我们使用设备的网络摄像头拍摄了一段视频,然后以输入视频的初始帧为参考,并不时地检查接下来的帧。如果发现有与第一帧不同的帧,就说明有运动存在。这将被标记在绿色的矩形中。
合并代码
我们已经看到了不同部分的代码。现在,让我们把它结合起来。
# Importing the Pandas libraries
import pandas as panda

# Importing the OpenCV libraries
import cv2

# Importing the time module
import time

# Importing the datetime function of the datetime module
from datetime import datetime

# Assigning our initial state in the form of variable initialState as None for initial frames
initialState = None

# List of all the tracks when there is any detected of motion in the frames
motionTrackList= [ None, None ]

# A new list 'time' for storing the time when movement detected
motionTime = []

# Initialising DataFrame variable 'dataFrame' using pandas libraries panda with Initial and Final column
dataFrame = panda.DataFrame(columns = ["Initial", "Final"])

# starting the webCam to capture the video using cv2 module
video = cv2.VideoCapture(0)

# using infinite loop to capture the frames from the video
while True:

   # Reading each image or frame from the video using read function

   check, cur_frame = video.read()


   # Defining 'motion' variable equal to zero as initial frame

   var_motion = 0


   # From colour images creating a gray frame

   gray_image = cv2.cvtColor(cur_frame, cv2.COLOR_BGR2GRAY)


   # To find the changes creating a GaussianBlur from the gray scale image

   gray_frame = cv2.GaussianBlur(gray_image, (21, 21), 0)


   # For the first iteration checking the condition

   # we will assign grayFrame to initalState if is none

   if initialState is None:

       initialState = gray_frame

       continue


   # Calculation of difference between static or initial and gray frame we created

   differ_frame = cv2.absdiff(initialState, gray_frame)


   # the change between static or initial background and current gray frame are highlighted


   thresh_frame = cv2.threshold(differ_frame, 30, 255, cv2.THRESH_BINARY)[1]

   thresh_frame = cv2.dilate(thresh_frame, None, iterations = 2)


   # For the moving object in the frame finding the coutours

   cont,_ = cv2.findContours(thresh_frame.copy(),

                      cv2.RETR_EXTERNAL, cv2.CHAIN_APPROX_SIMPLE)


   for cur in cont:

       if cv2.contourArea(cur) < 10000:

           continue

       var_motion = 1

       (cur_x, cur_y,cur_w, cur_h) = cv2.boundingRect(cur)


       # To create a rectangle of green color around the moving object

       cv2.rectangle(cur_frame, (cur_x, cur_y), (cur_x + cur_w, cur_y + cur_h), (0, 255, 0), 3)


  # from the frame adding the motion status

   motionTrackList.append(var_motion)

   motionTrackList = motionTrackList[-2:]


   # Adding the Start time of the motion

   if motionTrackList[-1] == 1 and motionTrackList[-2] == 0:

       motionTime.append(datetime.now())


  # Adding the End time of the motion

   if motionTrackList[-1] == 0 and motionTrackList[-2] == 1:

       motionTime.append(datetime.now())


  # In the gray scale displaying the captured image

   cv2.imshow("The image captured in the Gray Frame is shown below: ", gray_frame)


   # To display the difference between inital static frame and the current frame

   cv2.imshow("Difference between the  inital static frame and the current frame: ", differ_frame)


   # To display on the frame screen the black and white images from the video

   cv2.imshow("Threshold Frame created from the PC or Laptop Webcam is: ", thresh_frame)


   # Through the colour frame displaying the contour of the object

   cv2.imshow("From the PC or Laptop webcam, this is one example of the Colour Frame:", cur_frame)


   # Creating a key to wait

   wait_key = cv2.waitKey(1)


   # With the help of the 'm' key ending the whole process of our system

   if wait_key == ord('m'):

       # adding the motion variable value to motiontime list when something is moving on the screen

       if var_motion == 1:

           motionTime.append(datetime.now())

       break

# At last we are adding the time of motion or var_motion inside the data frame
for a in range(0, len(motionTime), 2):

   dataFrame = dataFrame.append({"Initial" : time[a], "Final" : motionTime[a + 1]}, ignore_index = True)


# To record all the movements, creating a CSV file
dataFrame.to_csv("EachMovement.csv")

# Releasing the video
video.release()

# Now, Closing or destroying all the open windows with the help of openCV
cv2.destroyAllWindows()
结果
运行上述代码后得出的结果将与下面的内容类似。
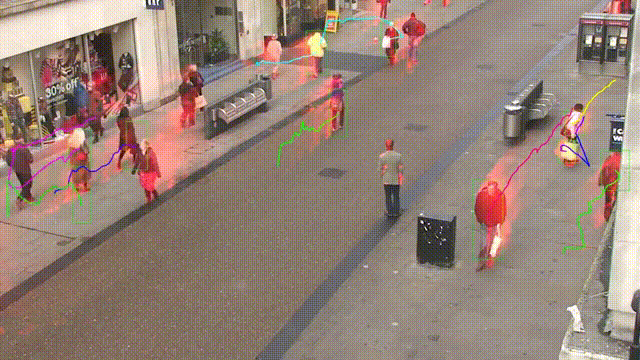
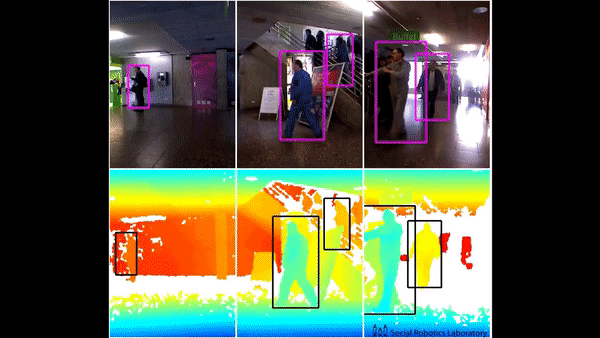
在这里,我们可以看到视频中的人的运动已经被跟踪了。因此,可以看到相应的输出。
然而,在这段代码中,跟踪将在移动物体周围的矩形框的帮助下完成,类似于下面所看到的。这里需要注意的是,该视频是一个安全摄像机的录像,已经完成了检测。
结论
-
Python编程语言是一种开放源码的丰富语言,为用户提供了许多应用。
-
当一个物体不动,没有速度,那么它就被认为是静止的,而恰恰相反,当一个物体没有完全静止,那么它就被认为是在运动。
-
OpenCV是一个开源的库,可以用于许多编程语言,通过与python的panda/NumPy库集成,我们可以最好地利用OpenCV的功能。
-
其主要思想是,每个视频都是由许多被称为帧的静态图像组合而成的,而帧之间的差异被用于检测
