

在本教程中,我们将探讨三种日期/时间选择器,你可以在Django项目中轻松使用。我们将首先探讨如何手动操作,然后是如何设置一个自定义小部件,最后是如何使用一个支持日期时间选择器的第三方Django应用程序。
绪论
日期选择器的实现主要是在前端完成的。
实现的关键部分是保证Django能够以正确的格式接收日期输入值,同时保证Django在渲染带有初始数据的表单时能够重现该格式。
我们还可以使用自定义部件来为前端和后端提供更深层次的整合,也可以促进整个项目更好的重用。
在接下来的章节中,我们将探讨以下日期选择器:
Tempus Dominus Bootstrap 4Docs来源
Fengyuan Chen's DatepickerDocsSource
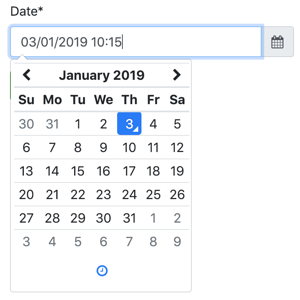
腾邦的Bootstrap 4
这是一个很好的JavaScript库,与Bootstrap 4整合得很好。缺点是它需要moment.js,并且需要Font-Awesome来制作图标。
如果你已经在使用Bootstrap 4+jQuery,那么使用这个库是有意义的,否则CSS和JS的列表可能会显得有点不堪重负。
要安装它,你可以使用他们的CDN或从他们的GitHub发布页面下载最新版本。
如果你从发布页面下载了代码,从build文件夹中抓取处理后的代码。
下面是日期选择器的一个静态HTML例子:
<!doctype html>
<html lang="en">
  <head>
    <meta charset="utf-8">
    <meta name="viewport" content="width=device-width, initial-scale=1, shrink-to-fit=no">
    <title>Static Example</title>

    <!-- Bootstrap 4 -->
    <link rel="stylesheet" href="https://stackpath.bootstrapcdn.com/bootstrap/4.2.1/css/bootstrap.min.css" integrity="sha384-GJzZqFGwb1QTTN6wy59ffF1BuGJpLSa9DkKMp0DgiMDm4iYMj70gZWKYbI706tWS" crossorigin="anonymous">
    <script src="https://code.jquery.com/jquery-3.3.1.slim.min.js" integrity="sha384-q8i/X+965DzO0rT7abK41JStQIAqVgRVzpbzo5smXKp4YfRvH+8abtTE1Pi6jizo" crossorigin="anonymous"></script>
    <script src="https://cdnjs.cloudflare.com/ajax/libs/popper.js/1.14.6/umd/popper.min.js" integrity="sha384-wHAiFfRlMFy6i5SRaxvfOCifBUQy1xHdJ/yoi7FRNXMRBu5WHdZYu1hA6ZOblgut" crossorigin="anonymous"></script>
    <script src="https://stackpath.bootstrapcdn.com/bootstrap/4.2.1/js/bootstrap.min.js" integrity="sha384-B0UglyR+jN6CkvvICOB2joaf5I4l3gm9GU6Hc1og6Ls7i6U/mkkaduKaBhlAXv9k" crossorigin="anonymous"></script>

    <!-- Font Awesome -->
    <link href="https://stackpath.bootstrapcdn.com/font-awesome/4.7.0/css/font-awesome.min.css" rel="stylesheet" integrity="sha384-wvfXpqpZZVQGK6TAh5PVlGOfQNHSoD2xbE+QkPxCAFlNEevoEH3Sl0sibVcOQVnN" crossorigin="anonymous">

    <!-- Moment.js -->
    <script src="https://cdnjs.cloudflare.com/ajax/libs/moment.js/2.23.0/moment.min.js" integrity="sha256-VBLiveTKyUZMEzJd6z2mhfxIqz3ZATCuVMawPZGzIfA=" crossorigin="anonymous"></script>

    <!-- Tempus Dominus Bootstrap 4 -->
    <link rel="stylesheet" href="https://cdnjs.cloudflare.com/ajax/libs/tempusdominus-bootstrap-4/5.1.2/css/tempusdominus-bootstrap-4.min.css" integrity="sha256-XPTBwC3SBoWHSmKasAk01c08M6sIA5gF5+sRxqak2Qs=" crossorigin="anonymous" />
    <script src="https://cdnjs.cloudflare.com/ajax/libs/tempusdominus-bootstrap-4/5.1.2/js/tempusdominus-bootstrap-4.min.js" integrity="sha256-z0oKYg6xiLq3yJGsp/LsY9XykbweQlHl42jHv2XTBz4=" crossorigin="anonymous"></script>

  </head>
  <body>

    <div class="input-group date" id="datetimepicker1" data-target-input="nearest">
      <input type="text" class="form-control datetimepicker-input" data-target="#datetimepicker1"/>
      <div class="input-group-append" data-target="#datetimepicker1" data-toggle="datetimepicker">
        <div class="input-group-text"><i class="fa fa-calendar"></i></div>
      </div>
    </div>

    <script>
      $(function () {
        $("#datetimepicker1").datetimepicker();
      });
    </script>

  </body>
</html>
直接使用
现在的挑战是如何将这个输入片段与Django表单集成。
forms.py
from django import forms

class DateForm(forms.Form):
    date = forms.DateTimeField(
        input_formats=['%d/%m/%Y %H:%M'],
        widget=forms.DateTimeInput(attrs={
            'class': 'form-control datetimepicker-input',
            'data-target': '#datetimepicker1'
        })
    )
模板
<div class="input-group date" id="datetimepicker1" data-target-input="nearest">
  {{ form.date }}
  <div class="input-group-append" data-target="#datetimepicker1" data-toggle="datetimepicker">
    <div class="input-group-text"><i class="fa fa-calendar"></i></div>
  </div>
</div>

<script>
  $(function () {
    $("#datetimepicker1").datetimepicker({
      format: 'DD/MM/YYYY HH:mm',
    });
  });
</script>
脚本标签可以放在任何地方,因为片段$(function () { ... }); ,当页面准备好时将运行datetimepicker的初始化。唯一的要求是,这个脚本标签要放在jQuery脚本标签的后面。
自定义小部件
你可以在任何你想要的应用程序中创建widget,这里我将考虑我们有一个名为core的Django应用程序。
core/widgets.py
from django.forms import DateTimeInput

class BootstrapDateTimePickerInput(DateTimeInput):
    template_name = 'widgets/bootstrap_datetimepicker.html'

    def get_context(self, name, value, attrs):
        datetimepicker_id = 'datetimepicker_{name}'.format(name=name)
        if attrs is None:
            attrs = dict()
        attrs['data-target'] = '#{id}'.format(id=datetimepicker_id)
        attrs['class'] = 'form-control datetimepicker-input'
        context = super().get_context(name, value, attrs)
        context['widget']['datetimepicker_id'] = datetimepicker_id
        return context
在上面的实现中,我们生成了一个唯一的IDdatetimepicker_id ,并且还将其包含在widget的上下文中。
然后前端的实现是在widget的HTML片段中完成的。
widgets/bootstrap_datetimepicker.html
<div class="input-group date" id="{{ widget.datetimepicker_id }}" data-target-input="nearest">
  {% include "django/forms/widgets/input.html" %}
  <div class="input-group-append" data-target="#{{ widget.datetimepicker_id }}" data-toggle="datetimepicker">
    <div class="input-group-text"><i class="fa fa-calendar"></i></div>
  </div>
</div>

<script>
  $(function () {
    $("#{{ widget.datetimepicker_id }}").datetimepicker({
      format: 'DD/MM/YYYY HH:mm',
    });
  });
</script>
注意我们是如何利用内置的django/forms/widgets/input.html 模板的。
现在是使用方法。
core/forms.py
from .widgets import BootstrapDateTimePickerInput

class DateForm(forms.Form):
    date = forms.DateTimeField(
        input_formats=['%d/%m/%Y %H:%M'],
        widget=BootstrapDateTimePickerInput()
    )
现在简单地渲染这个字段。
模板
{{ form.date }}
拥有小部件的好处是,你的表单可以有几个使用小部件的日期字段,你可以简单地渲染整个表单,比如:
<form method="post">
  {% csrf_token %}
  {{ form.as_p }}
  <input type="submit" value="Submit">
</form>
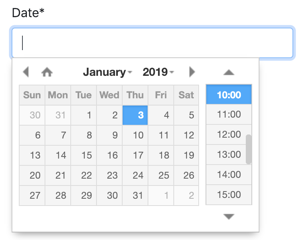
XDSoft DateTimePicker
XDSoft DateTimePicker是一个非常通用的日期选择器,它不依赖于moment.js或Bootstrap,尽管它在Bootstrap网站上看起来不错。
它很容易使用,而且非常简单明了。
下面是一个静态的例子,这样你就可以看到最低要求和所有的部分是如何组合在一起的:
<!doctype html>
<html lang="en">
<head>
  <meta charset="utf-8">
  <meta name="viewport" content="width=device-width, initial-scale=1, shrink-to-fit=no">
  <title>Static Example</title>

  <!-- jQuery -->
  <script src="https://code.jquery.com/jquery-3.3.1.slim.min.js" integrity="sha384-q8i/X+965DzO0rT7abK41JStQIAqVgRVzpbzo5smXKp4YfRvH+8abtTE1Pi6jizo" crossorigin="anonymous"></script>

  <!-- XDSoft DateTimePicker -->
  <link rel="stylesheet" href="https://cdnjs.cloudflare.com/ajax/libs/jquery-datetimepicker/2.5.20/jquery.datetimepicker.min.css" integrity="sha256-DOS9W6NR+NFe1fUhEE0PGKY/fubbUCnOfTje2JMDw3Y=" crossorigin="anonymous" />
  <script src="https://cdnjs.cloudflare.com/ajax/libs/jquery-datetimepicker/2.5.20/jquery.datetimepicker.full.min.js" integrity="sha256-FEqEelWI3WouFOo2VWP/uJfs1y8KJ++FLh2Lbqc8SJk=" crossorigin="anonymous"></script>
</head>
<body>

  <input id="datetimepicker" type="text">

  <script>
    $(function () {
      $("#datetimepicker").datetimepicker();
    });
  </script>

</body>
</html>
直接使用
一个与Django的基本整合看起来是这样的。
forms.py
from django import forms

class DateForm(forms.Form):
    date = forms.DateTimeField(input_formats=['%d/%m/%Y %H:%M'])
简单的表单,默认的小部件,没有什么特别的。
现在在模板上使用它。
模板
{{ form.date }}

<script>
  $(function () {
    $("#id_date").datetimepicker({
      format: 'd/m/Y H:i',
    });
  });
</script>
id_date 是Django为表单字段生成的默认ID (id_ +name)。
自定义部件
core/widgets.py
from django.forms import DateTimeInput

class XDSoftDateTimePickerInput(DateTimeInput):
    template_name = 'widgets/xdsoft_datetimepicker.html'
widgets/xdsoft_datetimepicker.html
{% include "django/forms/widgets/input.html" %}

<script>
  $(function () {
    $("input[name='{{ widget.name }}']").datetimepicker({
      format: 'd/m/Y H:i',
    });
  });
</script>
为了有一个更通用的实现,这次我们选择字段来初始化组件,使用它的名字而不是它的id,如果用户改变了id前缀。
现在是使用方法:
core/forms.py
from django import forms
from .widgets import XDSoftDateTimePickerInput

class DateForm(forms.Form):
    date = forms.DateTimeField(
        input_formats=['%d/%m/%Y %H:%M'],
        widget=XDSoftDateTimePickerInput()
    )
模板
{{ form.date }}
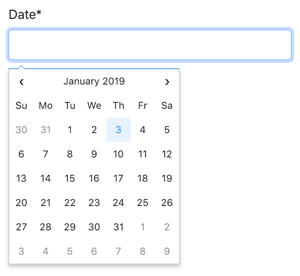
这是一个非常漂亮和简约的日期选择器。不幸的是,它不支持时间。但如果你只需要日期,这是一个不错的选择。
要安装这个日期选择器,你可以使用他们的CDN或者从他们的GitHub发布页面下载源代码。请注意,他们不提供编译/处理的JavaScript文件。但你可以使用CDN将这些文件下载到你的本地机器。
<!doctype html>
<html lang="en">
<head>
  <meta charset="utf-8">
  <meta name="viewport" content="width=device-width, initial-scale=1, shrink-to-fit=no">
  <title>Static Example</title>
  <style>body {font-family: Arial, sans-serif;}</style>

  <!-- jQuery -->
  <script src="https://code.jquery.com/jquery-3.3.1.slim.min.js" integrity="sha384-q8i/X+965DzO0rT7abK41JStQIAqVgRVzpbzo5smXKp4YfRvH+8abtTE1Pi6jizo" crossorigin="anonymous"></script>

  <!-- Fengyuan Chen's Datepicker -->
  <link rel="stylesheet" href="https://cdnjs.cloudflare.com/ajax/libs/datepicker/0.6.5/datepicker.min.css" integrity="sha256-b88RdwbRJEzRx95nCuuva+hO5ExvXXnpX+78h8DjyOE=" crossorigin="anonymous" />
  <script src="https://cdnjs.cloudflare.com/ajax/libs/datepicker/0.6.5/datepicker.min.js" integrity="sha256-/7FLTdzP6CfC1VBAj/rsp3Rinuuu9leMRGd354hvk0k=" crossorigin="anonymous"></script>
</head>
<body>

  <input id="datepicker">

  <script>
    $(function () {
      $("#datepicker").datepicker();
    });
  </script>

</body>
</html>
直接使用
与Django的基本集成(注意我们现在使用的是DateField 而不是DateTimeField )。
forms.py
from django import forms

class DateForm(forms.Form):
    date = forms.DateTimeField(input_formats=['%d/%m/%Y %H:%M'])
模板
{{ form.date }}

<script>
  $(function () {
    $("#id_date").datepicker({
      format:'dd/mm/yyyy',
    });
  });
</script>
自定义小工具
core/widgets.py
from django.forms import DateInput

class FengyuanChenDatePickerInput(DateInput):
    template_name = 'widgets/fengyuanchen_datepicker.html'
widgets/fengyuananchen_datepicker.html
{% include "django/forms/widgets/input.html" %}

<script>
  $(function () {
    $("input[name='{{ widget.name }}']").datepicker({
      format:'dd/mm/yyyy',
    });
  });
</script>
使用方法:
core/forms.py
from django import forms
from .widgets import FengyuanChenDatePickerInput

class DateForm(forms.Form):
    date = forms.DateTimeField(
        input_formats=['%d/%m/%Y %H:%M'],
        widget=FengyuanChenDatePickerInput()
    )
模板
{{ form.date }}
结论
无论你使用何种日期/时间选择器,其实现都非常相似。希望本教程提供了一些关于如何将这种前端库集成到Django项目中的见解。
