

为Rails测试设置Gitlab CI的指南
在这篇文章中,我将指导你完成在Gitlab CI上设置一个Rails应用程序的步骤。我们将创建一个新的应用程序,并将其配置为在 Gitlab CI 上执行测试。
创建一个新的Ruby on rails应用程序
$ rails new sample_rails_ci_setup
创建应用程序后,需要将其推送到 Gitlab。使用Gitlab上的说明来创建新项目并推送代码。
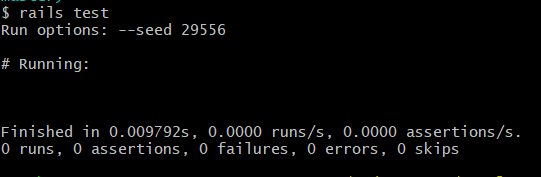
在CLI中通过下达命令验证测试命令是否成功运行rails test
为 CI/CD 管线创建配置文件
Gitlab 使用一个.gitlab-ci.yml 文件作为 CI 管线中要执行的指令。让我们先在项目的根目录下创建该文件。
注意:你可以使用YAML Linter来验证.yml 文件的缩进是否正确。(http://www.yamllint.com/)
使用样本脚本验证成功执行
让我们通过给出一个示例脚本来检查Gitlab CI/CD流水线是否执行了.gitlab-ci.yml 中的命令:
stages:
    - build
    - test

build-job:
    stage: build
    script:
        - echo "Hello"
test-job:
    stage: test
    script:
        - echo "This job tests something"
这里:
stages是执行中涉及的步骤。构建阶段的命令将首先被执行,然后是测试阶段的命令。script我们在这里写下需要执行的命令。
为了更好地理解,我添加了两个阶段build &test 。因为我们正在进行测试工作,所以我们现在不会使用构建阶段。
让我们提交并推送更改到Gitlab,并验证构建和测试工作是否成功执行。

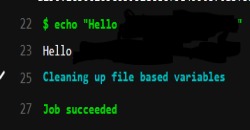
示例脚本在流水线上成功执行了。
测试用脚本
现在测试用的示例代码已经成功执行,让我们用bundle exec rails test 命令替换测试 rails 应用程序的脚本:
stages:
    - test
test-job:
    stage: test
    script:
        - bundle exec rails test
提交修改并推送到Gitlab。
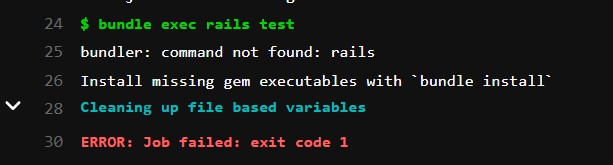
接下来,我们会遇到以下错误
bundler: command not found: rails
安装bundler
让我们来安装bundler gem。这里我指定的是与我的本地bundler版本相匹配的版本。另外,在下一步中,给bundle install 一个命令,以安装我们Gemfile中的所有宝石:
stages:
    - test
test-job:
    stage: test
    script:
        - gem install bundler -v 2.1.4
        - bundle install
        - bundle exec rails test
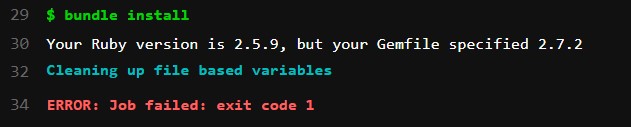
在运行时,它显示:
Your Ruby version is 2.5.9, but your Gemfile specified 2.7.2
使用正确的 ruby 版本
似乎Gitlab目前默认使用ruby v2.5.9。由于我们使用的是ruby v2.7.2,让我们指定CI使用相同的ruby版本进行测试,并使用图像密钥image: ruby:2.7.2
在指定版本之前,请确认你目前使用的是哪个版本。检查 ruby 版本的命令是ruby -v
stages:
  - test
test-job:
  stage: test
  image: ruby:2.7.2
  script:
    - gem install bundler -v 2.1.4
    - bundle install
    - bundle exec rails test
现在,让我们把这些修改提交到Gitlab,并检查rails测试命令是否运行:
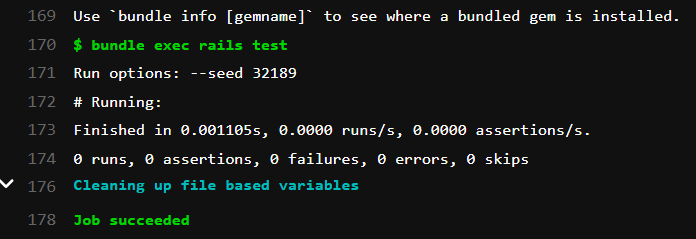
测试成功执行!
设置Postgresql作为测试的数据库
既然我们在生产中使用postgres,那么我们在测试环境中也使用同样的数据库。而且PostgreSQL也是Ruby on Rails项目中最流行的选择:
stages:
    - test
test-job:
    stage: test
    image: ruby:2.7.2
    services:
        - postgres:12.0
    variables:
        POSTGRES_USER: depot_postgresql
        POSTGRES_PASSWORD: depot_postgresql
        DB_USERNAME: depot_postgresql
        DB_PASSWORD: depot_postgresql
        DB_HOST: postgres
        RAILS_ENV: test
        DISABLE_SPRING: 1
        BUNDLE_PATH: vendor/bundle
    script:
        - gem install bundler -v 2.1.4
        - bundle install
        - bundle exec rails db:create db:schema:load --trace
        - bundle exec rails test
在这段代码中,我们包含了postgres服务的12.0版本和ENV变量,用于设置postgres用户和测试用数据库。命令bundle exec rails db:create db:schema:load --trace 将创建一个数据库,它也将从schema.rb文件中加载数据库。
更新数据库.yml以使用postgres而不是sqlite数据库
在你的database.yml文件中:
test:
  adapter: postgresql
  encoding: unicode
  pool: <%= ENV['DB_POOL'] %>
  username: <%= ENV['DB_USERNAME'] %>
  password: <%= ENV['DB_PASSWORD'] %>
  host: <%= ENV['DB_HOST'] %>
  port: 5432
  database: depot_test
现在,将修改推送到Gitlab
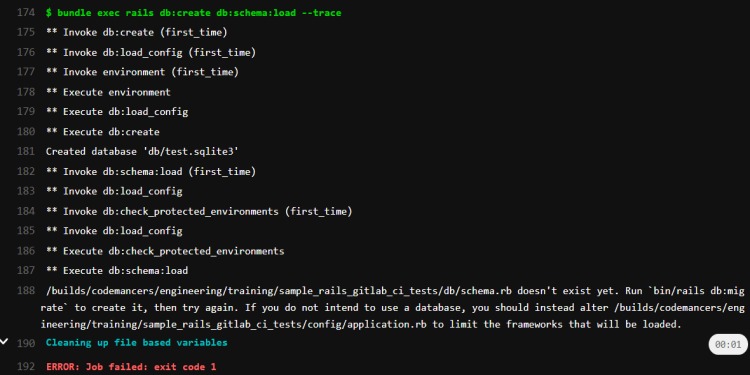
出现上述错误是因为db/config中不存在schema.rb文件,让我们通过迁移数据库来创建schema.rb。
迁移数据库
现在,我们可以给出命令bundle exec rails db:migrate 来迁移数据库了:
stages:
    - test
test-job:
    stage: test
    image: ruby:2.7.2
    services:
      - postgres:12.0
    variables:
      POSTGRES_USER: depot_postgresql
      POSTGRES_PASSWORD: depot_postgresql
      DB_USERNAME: depot_postgresql
      DB_PASSWORD: depot_postgresql
      DB_HOST: postgres
      RAILS_ENV: test
      DISABLE_SPRING: 1
      BUNDLE_PATH: vendor/bundle
    script:
      - gem install bundler -v 2.1.4
      - bundle install
      - bundle exec rails db:migrate
      - bundle exec rails db:create db:schema:load --trace
      - bundle exec rails test

测试成功地执行了!

这是在Gitlab CI上设置rails测试的一个类似TDD的基本步骤设置指南。
