

GraphQL在前端和后端开发人员中越来越受欢迎。它允许前端团队只请求他们需要的数据,同时防止后端端点的爆炸,因为所有的操作都可以通过一个简单的端点来处理所有正在工作的模型。
在本教程中,你将学习如何用Laravel建立GraphQL API,这是一个免费的开源PHP Web应用框架。然后,你将确保API的安全,以便只有通过Okta登录的授权用户才能访问它。
建立项目
创建一个新的Laravel项目的推荐方法是使用Laravel Sail, 一个为Laravel的Docker环境设计的命令行界面.首先, 创建一个目录来存放这个项目的两套代码--一套用于后台,一套用于前端。确保你有最新版本的Docker和Docker Compose的设置。如果你需要帮助, 查看Docker的指南以及Docker Compose的文档.
为了引导本教程中的Laravel项目, 你可以从laravel.build 。 不建议将互联网上的脚本管到Bash中,所以要先检查脚本。如果你导航到这个演示代码, 你会看到生成的脚本.你可以把 "graphql-demo "改为你想要的项目名称。如果你觉得没问题,就把它粘贴到你的终端,或者用curl -s "https://laravel.build/graphql-demo?with=mysql" | bash ,直接把它输送到Bash。
这将创建一个新的目录, 命名为你所使用的路径参数(graphql-demo, 在本例中), 并为你设置Laravel.一旦脚本完成了对Sail的Docker Image的下载, 它将提示你运行cd graphql-demo && ./vendor/bin/sail up 。因为你会反复调用Sail, 所以给它做一个别名。你可以使用alias sail=./vendor/bin/sail 。
在运行up 命令后, 你会发现Laravel在http://localhost 。
Laravel模型
接下来设置你的Laravel模型和迁移。为了获得更多有趣的工作数据, 创建一些相互关联的模型.这类似于建立一个问题跟踪系统.该系统将有以下模型。
- 用户
- 问题
- 评论
如果你想从GitHub的公共仓库中复制这些文件,模型可以在这里找到, 而迁移可以在这里找到.
如果你愿意自己制作这些模型,可以用Laravel的Artisan CLI工具执行一个命令。因为你使用的是Sail,所以用sail php artisan <command> 。
然后运行下面的命令:
sail php artisan make:model -m Issue
sail php artisan make:model -m Comment
默认情况下,用户模型和迁移已经存在。
Laravel的迁移
由于使用了-m 标志,上面的命令也创建了必要的迁移。按照这里的步骤来更新它们。
用户:
<?php
// database/migrations/2014_10_12_000000_create_users_table.php

use Illuminate\Database\Migrations\Migration;
use Illuminate\Database\Schema\Blueprint;
use Illuminate\Support\Facades\Schema;

class CreateUsersTable extends Migration
{
   /**
    * Run the migrations.
    *
    * @return void
    */
   public function up()
   {
       Schema::create('users', function (Blueprint $table) {
           $table->id();
           $table->string('name');
           $table->string('email')->unique();
           $table->timestamp('email_verified_at')->nullable();
           $table->string('password');
           $table->rememberToken();
           $table->timestamps();
       });
   }

   /**
    * Reverse the migrations.
    *
    * @return void
    */
   public function down()
   {
       Schema::dropIfExists('users');
   }
}
问题:
<?php
// database/migrations/2021_11_14_031132_create_issues_table.php

use Illuminate\Database\Migrations\Migration;
use Illuminate\Database\Schema\Blueprint;
use Illuminate\Support\Facades\Schema;

class CreateIssuesTable extends Migration
{
   /**
    * Run the migrations.
    *
    * @return void
    */
   public function up()
   {
       Schema::create('issues', function (Blueprint $table) {
           $table->id('id');
           $table->unsignedBigInteger('author_id');
           $table->unsignedBigInteger('assignee_id');
           $table->string('title');
           $table->text('description');
           $table->timestamps();
       });
   }

   /**
    * Reverse the migrations.
    *
    * @return void
    */
   public function down()
   {
       Schema::dropIfExists('issues');
   }
}
评论:
<?php
// database/migrations/2021_11_14_030557_create_comments_table.php

use Illuminate\Database\Migrations\Migration;
use Illuminate\Database\Schema\Blueprint;
use Illuminate\Support\Facades\Schema;

class CreateCommentsTable extends Migration
{
   /**
    * Run the migrations.
    *
    * @return void
    */
   public function up()
   {
       Schema::create('comments', function (Blueprint $table) {
           $table->id('id');
           $table->unsignedBigInteger('issue_id');
           $table->string('content');
           $table->unsignedBigInteger('author_id');
           $table->timestamps();
       });
   }

   /**
    * Reverse the migrations.
    *
    * @return void
    */
   public function down()
   {
       Schema::dropIfExists('comments');
   }
}
关系
接下来在模型上定义一些关系,将所有的东西联系在一起。你的模型应该看起来像这里的模型。
用户:
<?php
// app/Models/User.php

namespace App\Models;

use Illuminate\Contracts\Auth\MustVerifyEmail;
use Illuminate\Database\Eloquent\Factories\HasFactory;
use Illuminate\Database\Eloquent\Relations\HasMany;
use Illuminate\Foundation\Auth\User as Authenticatable;
use Illuminate\Notifications\Notifiable;
use Laravel\Sanctum\HasApiTokens;

class User extends Authenticatable
{
   use HasApiTokens, HasFactory, Notifiable;

   /**
    * The attributes that are mass assignable.
    *
    * @var string[]
    */
   protected $fillable = [
       'name',
       'email',
       'password',
   ];

   /**
    * The attributes that should be hidden for serialization.
    *
    * @var array
    */
   protected $hidden = [
       'password',
       'remember_token',
   ];

   /**
    * The attributes that should be cast.
    *
    * @var array
    */
   protected $casts = [
       'email_verified_at' => 'datetime',
   ];

   public function issues(): HasMany {
       return $this->hasMany(Issue::class, 'author_id', 'id');
   }

   public function comments(): HasMany {
       return $this->hasMany(Comment::class);
   }
}
问题:
<?php
// app/Models/Issue.php

namespace App\Models;

use Illuminate\Database\Eloquent\Factories\HasFactory;
use Illuminate\Database\Eloquent\Model;
use Illuminate\Database\Eloquent\Relations\BelongsTo;
use Illuminate\Database\Eloquent\Relations\HasMany;

class Issue extends Model
{
   use HasFactory;

   public function author(): BelongsTo {
           return $this->belongsTo(User::class, 'author_id');
   }

   public function assignee(): BelongsTo {
           return $this->belongsTo(User::class, 'assignee_id');
   }

   public function comments(): HasMany {
           return $this->hasMany(Comment::class);
   }
}
评论:
<?php
// app/Models/Comment.php

namespace App\Models;

use Illuminate\Database\Eloquent\Factories\HasFactory;
use Illuminate\Database\Eloquent\Model;
use Illuminate\Database\Eloquent\Relations\BelongsTo;

class Comment extends Model
{
   use HasFactory;

   public function issue(): BelongsTo {
           return $this->belongsTo(Issue::class);
   }

   public function author(): BelongsTo {
           return $this->belongsTo(User::class, 'author_id');
   }
}
工厂和播种机
添加播种机和工厂,这样你就有一些数据可以使用。这允许你生成尽可能多的模型实例,以及你刚刚定义的预先填充的关系。运行以下程序。
sail php artisan make:seeder SimpleSeeder
sail php artisan make:factory IssueFactory
sail php artisan make:factory CommentFactory
这些类中的每一个都需要调整,以确保它们生成的数据是正确的。按如下所示修改它们。
database/factories/IssueFactory.php:
<?php

namespace Database\Factories;

use Illuminate\Database\Eloquent\Factories\Factory;

class IssueFactory extends Factory
{
   /**
    * Define the model's default state.
    *
    * @return array
    */
   public function definition()
   {
       return [
           'title' => $this->faker->sentence,
           'description' => $this->faker->sentence,
       ];
   }
}
database/factories/CommentFactory.php:
<?php

namespace Database\Factories;

use Illuminate\Database\Eloquent\Factories\Factory;

class CommentFactory extends Factory
{
   /**
    * Define the model's default state.
    *
    * @return array
    */
   public function definition()
   {
       return [
           'content' => $this->faker->sentence
       ];
   }
}
database/seeders/SimpleSeeder.php:
<?php

namespace Database\Seeders;

use App\Models\Comment;
use App\Models\Issue;
use App\Models\User;
use Illuminate\Database\Seeder;

class SimpleSeeder extends Seeder
{
   /**
    * Run the database seeds.
    *
    * @return void
    */
   public function run()
   {
       User::factory()
           ->has(
               Issue::factory()
                   ->for(User::factory(), 'assignee')
                   ->has(
                       Comment::factory()
                           ->for(User::factory(), 'author')
                           ->count(3)
                   )
                   ->count(5)
           )
           ->count(10)
           ->create();
   }
}
一旦你更新了这些类,请更新DatabaseSeeder.php ,调用新的SimpleSeeder 。
<?php
// database/seeders/DatabaseSeeder.php

namespace Database\Seeders;

use Illuminate\Database\Seeder;

class DatabaseSeeder extends Seeder
{
   /**
    * Seed the application's database.
    *
    * @return void
    */
   public function run()
   {
       $this->call(SimpleSeeder::class);
   }
}
为了确保一切都在按预期进行,运行你刚刚创建的迁移和播种机。这将使你的数据库中充满可以被GraphQL API使用的记录。执行下面的命令。
sail php artisan migrate:fresh --seed
接下来,你将安装GraphQL服务器。
安装Lighthouse
在Laravel中,有几个不同的GraphQL包。本教程将重点介绍Lighthouse,因为它有最小的模板,可以让你快速使用GraphQL。就像上面的php artisan 命令一样, 如果你想和Sail一起安装composer依赖项,请添加sail 前缀。
安装GraphQL依赖项。
sail composer require nuwave/lighthouse mll-lab/laravel-graphql-playground
Lighthouse将为你创建服务器,而Playground允许你在没有外部工具的情况下测试你的模式。
一旦两个依赖都安装完毕,运行以下命令,从Lighthouse发布模式和配置文件。
sail php artisan vendor:publish --tag=lighthouse-schema
sail php artisan vendor:publish --tag=lighthouse-config
将GraphQL API路由添加到CORS配置文件中。导航到config/cors.php ,并更新paths 阵列,以包括'graphql' ,像这样。
'paths' => ['api/*', 'sanctum/csrf-cookie', 'graphql'],
最后,在graphql/schema.graphql 更新Lighthouse的模式。将其内容改为如下。
type Query {
   users: [User!]! @all
   user(id: Int! @eq): User @find

   issues: [Issue!]! @all
   issue(id: Int! @eq): Issue @find
}

type User {
   id: ID!
   name: String!
   issues: [Issue!]! @hasMany
}

type Issue {
   id: ID!
   title: String!
   description: String!
   author: User! @belongsTo
   assignee: User! @belongsTo
   comments: [Comment!]! @hasMany
}

type Comment {
   id: ID!
   content: String!
   issue: Issue! @belongsTo
   author: User! @belongsTo
}
这个文件描述了哪些类型可以通过GraphQL访问,它们暴露了哪些属性,以及它们可以遵循的关系。
不使用授权的演示
导航到游乐场网站:http://localhost/graphql-playground 。该界面将允许你用你刚刚制作的后台尝试GraphQL。在左边输入以下查询,然后点击播放按钮。
query GetIssues {
  issues {
    id
    title
    description
    author {
      name
    }
    assignee {
      name
    }
    comments {
      id
      content
      author {
        name
      }
    }
  }
}
你应该在右边看到你的种子数据,在你的查询中指定的形状。
接下来,你将为你的 GraphQL API 添加认证,并允许用户通过 Okta 登录。
添加认证
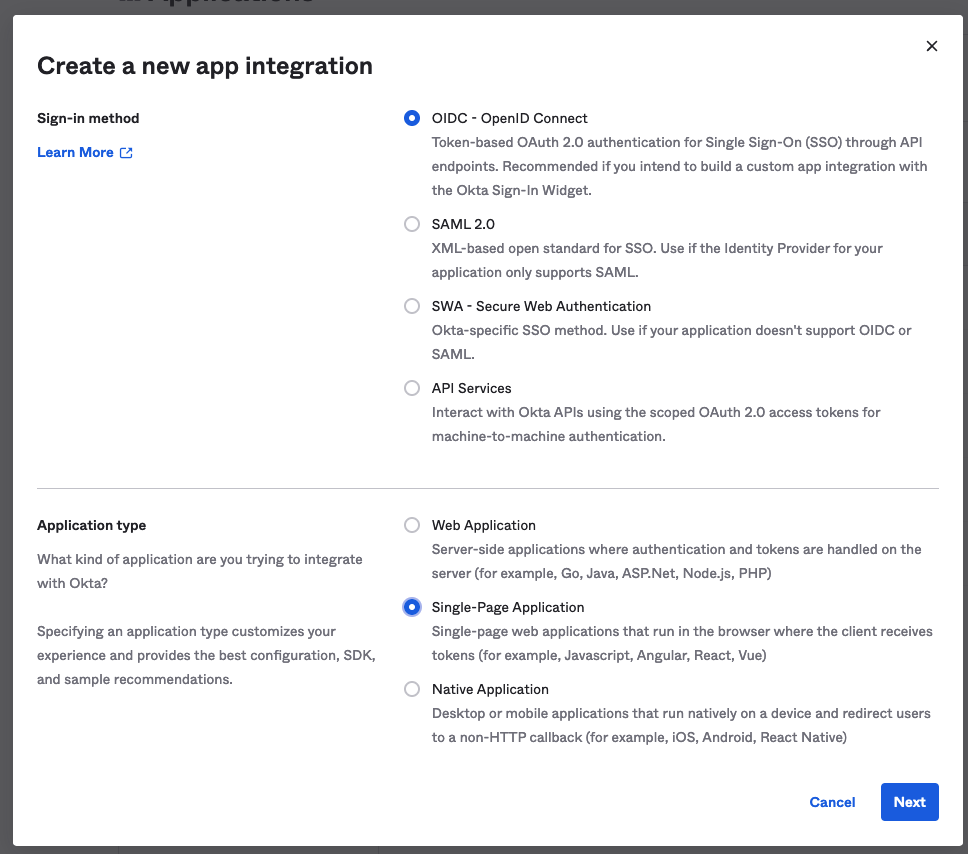
为了给你的API添加认证,你需要做一些配置。进入Okta开发者门户,注册一个开发者账户,这样你就可以为你的前端创建一个应用程序。要做到这一点,在侧边栏中导航到应用程序>应用程序,并选择创建应用程序集成。选择OIDC作为您的登录方式,并将您的应用程序类型设置为 "单页应用程序"。
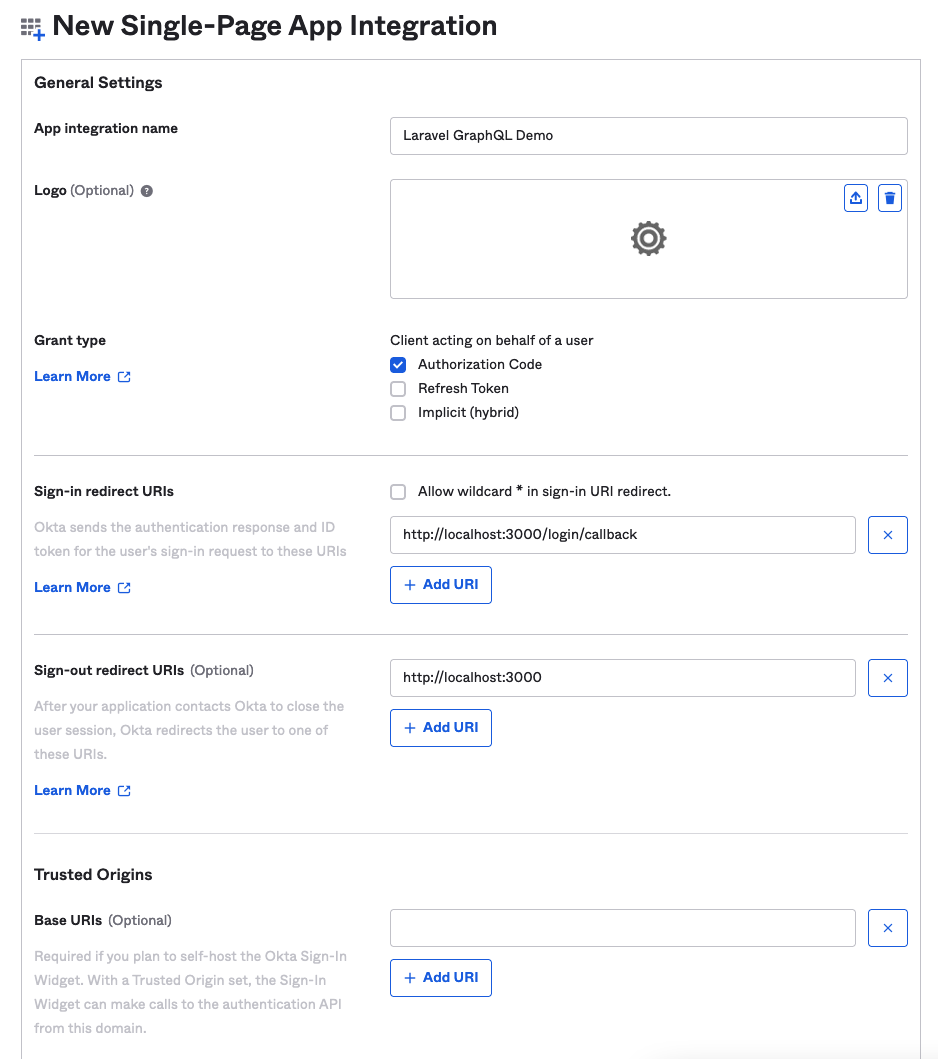
在下一页,给你的应用程序集成一个名字,如 "Laravel GraphQL Demo",保持授予类型为 "授权代码",并将签入重定向和签出重定向URI改为3000端口,而不是8080。对于 "受控访问",选择允许我的组织中的每个人访问,因为访问级别对这个教程来说并不重要。
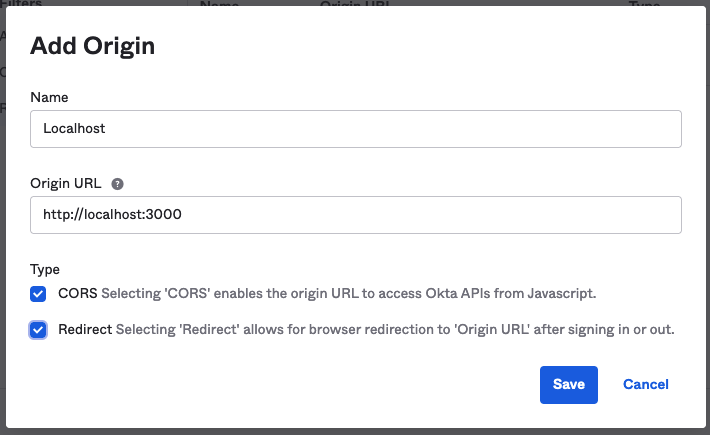
你将会得到你的客户ID--请确保记下它。您将可以看到您的Okta域名,您也应该记下它。在你离开Okta网站之前,导航到安全 > API,看到你的发行商URI。注意这一点,然后转到 "受信任的来源"标签。点击添加原点,将原点URL设置为http://localhost:3000 ,选择CORS和重定向复选框,并点击保存。这将避免前台的问题。
安装软件包
回到你的终端,运行sail composer require okta/jwt-verifier firebase/php-jwt 。这将安装验证Okta访问令牌所需的软件包。然后运行sail php artisan make:middleware VerifyJwt ,为你的中间件创建一个新类。打开它,并按如下方式设置其内容。
<?php

namespace App\Http\Middleware;

use Closure;
use Illuminate\Http\Request;
use Illuminate\Support\Facades\Log;
use Okta\JwtVerifier\Adaptors\FirebasePhpJwt;
use Okta\JwtVerifier\JwtVerifierBuilder;

class VerifyJwt
{
   /**
    * Handle an incoming request.
    *
    * @param  \Illuminate\Http\Request  $request
    * @param  \Closure  $next
    * @return mixed
    */
   public function handle(Request $request, Closure $next)
   {
       $jwtVerifier = (new JwtVerifierBuilder())
           ->setAdaptor(new FirebasePhpJwt())
           ->setAudience('api://default')
           ->setClientId(env('OKTA_CLIENT_ID'))
           ->setIssuer(env('OKTA_ISSUER_URI'))
           ->build();

       try {
           $jwtVerifier->verify($request->bearerToken());
           return $next($request);
       } catch (\Exception $exception) {
           Log::error($exception);
       }

       return response('Unauthorized', 401);

   }
}
一旦这个类被附加到Lighthouse的中间件配置中,它将允许你保护你的GraphQL API免受没有有效令牌的请求。客户端ID和发行者来自环境变量,需要在你的.env文件中设置。打开该文件并添加以下内容。
OKTA_CLIENT_ID=<the client ID you noted earlier>
OKTA_ISSUER_URI=< the issuer URI you noted earlier>
打开config/lighthouse.php ,更新 "中间件 "数组,将中间件添加到Lighthouse中。
...
'middleware' => [
   // Verify BearerToken from Okta
   \App\Http\Middleware\VerifyJwt::class,

   \Nuwave\Lighthouse\Support\Http\Middleware\AcceptJson::class,

   // Logs in a user if they are authenticated. In contrast to Laravel's 'auth'
   // middleware, this delegates auth and permission checks to the field level.
   \Nuwave\Lighthouse\Support\Http\Middleware\AttemptAuthentication::class,

   // Logs every incoming GraphQL query.
   // \Nuwave\Lighthouse\Support\Http\Middleware\LogGraphQLQueries::class,
],
...
你可以将JWT验证添加到API路由防护中,但上述方法对本教程来说是可行的。graphql-playground ,因为它没有一个令牌,所以不应该能够到达你的API。为了得到一个令牌,你将配置一个简单的前端应用程序,让你登录到Okta,然后使用该令牌来调用你的API。
如果你只是想确定你的API是有效的,你可以从GitHub的公共版本中克隆出前端程序。你需要在App.js 文件中插入你的客户ID和发行者URL,但它应该可以开箱即用。要构建前台,请继续阅读。
构建前台
由于这是为了测试,你将用React、Okta官方React库和Apollo客户端构建一个简单的前端。
如果你没有Node.js和npm,你可以用nvm - node版本管理器来启动和运行。
从父目录(包含你的Laravel项目目录),运行npx create-react-app graphql-demo-frontend 。
这将创建一个最小的React应用程序,让你构建你的前端。要安装依赖性, 运行npm install @apollo/client graphql @okta/okta-react @okta/okta-auth-js react-router-dom@^5.1.6 。
React应用程序在src/ 目录中会有一些文件, 但其中大部分是不需要的.把它们全部删除,然后创建以下文件。
index.js
index.js 文件将你的React应用程序挂载到它的根DOM节点上,但它也处理Apollo客户端的创建,并从本地存储中获取Okta JWT。
注意:在本教程中使用本地存储是没有问题的,但在生产中不要采取这种方法,因为底层库的变化以及它们如何存储令牌可能会破坏它。
import React from 'react';
import ReactDOM from 'react-dom';
import App from './App';

import { ApolloClient, InMemoryCache, ApolloProvider, from, createHttpLink } from '@apollo/client';
import { setContext } from '@apollo/client/link/context';

const oktaTokenStorage = JSON.parse(localStorage.getItem('okta-token-storage'));
const accessToken = oktaTokenStorage?.accessToken?.accessToken;

const httpLink = createHttpLink({
  uri: 'http://localhost/graphql',
});

// inject the access token into the Apollo Client
const authLink = setContext((_, { headers }) => {
  const token = accessToken;
  return {
        headers: {
          ...headers,
          authorization: token ? `Bearer ${token}` : "",
        }
  }
});

const client = new ApolloClient({
  cache: new InMemoryCache(),
  link: from([authLink, httpLink])
});

ReactDOM.render(
  <React.StrictMode>
        <ApolloProvider client={client}>
          <App />
        </ApolloProvider>
  </React.StrictMode>,
  document.getElementById('root')
);
App.js
这个文件包含了应用程序的主要部分,并设置了Okta客户端。在这里使用你的发行者URI和客户端ID。
import React from 'react';
import { SecureRoute, Security, LoginCallback } from '@okta/okta-react';
import { OktaAuth, toRelativeUrl } from '@okta/okta-auth-js';
import { BrowserRouter as Router, Route, useHistory } from 'react-router-dom';
import Home from './Home';
import IssueTracker from './IssueTracker';

const oktaAuth = new OktaAuth({
  issuer: <your issuer URI>, // issuer URL
  clientId: <your client ID>, // client id for SPA app
  redirectUri: window.location.origin + '/login/callback'
});

const App = () => {
  const history = useHistory();
  const restoreOriginalUri = async (_oktaAuth, originalUri) => {
      history.replace(toRelativeUrl(originalUri || '/', window.location.origin));
  };

  return (
    <Security oktaAuth={oktaAuth} restoreOriginalUri={restoreOriginalUri}>
      <Route path='/' exact={true} component={Home} />
      <SecureRoute path='/issue-tracker' component={IssueTracker} />
      <Route path='/login/callback' component={LoginCallback} />
    </Security>
  );
};

const AppWithRouterAccess = () => (
  <Router>
        <App />
  </Router>
);

export default AppWithRouterAccess;
Home.js
这个组件就像一个仪表盘,如果用户没有通过认证,就提示他们通过Okta登录,如果他们通过了认证,就给他们提供问题跟踪器的链接。
import { useOktaAuth } from "@okta/okta-react";

const Home = () => {
    const { oktaAuth, authState } = useOktaAuth();

    const login = async () => oktaAuth.signInWithRedirect();
    const logout = async () => oktaAuth.signOut('/');

    if (!authState) {
        return <div>Loading...</div>;
    }

    if (!authState.isAuthenticated) {
        return (
            <div>
                <p>Not Logged in yet</p>
                <button onClick={login}>Login</button>
            </div>
        );
    }

    return (
        <div>
            <p>Logged in!</p>
            <p>
                <a href="/issue-tracker">go to Issue Tracker</a>
            </p>
            <button onClick={logout}>Logout</button>
        </div>
    );
};

export default Home;
IssueTracker.js
这个组件使用你先前在graphql-playground中尝试的查询,以其所需的形式获取数据。因为访问令牌被注入到Apollo客户端,所以尽管你设置了中间件,前端还是能够查询后端。当数据返回时,该组件将其渲染为一个列表。
import * as React from 'react';

import { useQuery, gql } from "@apollo/client";

const ISSUES = gql`
query GetIssues {
  issues {
    id,
    title,
    description,
    author {
      name
    },
    assignee {
      name
    },
    comments {
      id,
      content,
      author {
        name
      }
    }
  }
}
`

export default function IssueTracker() {

    const { loading, error, data } = useQuery(ISSUES);

    console.log({ loading, error, data })

    if (loading) {
        return <div>loading...</div>
    }

    if (error) {
        return <div>
            <code>error.message</code>
        </div>
    }

    return <ul>
        {data.issues.map((issue) => {
            return <li>
                <div>
                    <p>title: {issue.title}</p>
                    <p>description: {issue.description}</p>
                    <p>author: {issue.author.name}</p>
                    <p>assignee: {issue.assignee.name}</p>
                </div>
            </li>
        })}
    </ul>
};
运行前台
有了这些组件,运行npm run start ,前端将在localhost:3000 。浏览那里,当你点击登录时,你会看到Okta的登录界面。使用你的Okta开发者账户凭证登录,你将被重定向到主页组件。你应该看到一个链接,带你到 "问题跟踪器"。点击这个链接,你会看到由GraphQL API的数据填充的页面。
