

在今天的教程中,我们将创建一个简单的回顾性应用。它将保存讨论的主题信息,并实时显示给用户,这样他们就可以在当前的会议中轻松看到之前、当前和未来的主题。代码是用.NET 5编写的。它被分为几个服务,每一个服务都负责一个上下文。
我们假设每个服务都应该包含健康检查、OpenAPI文档,并通过
docker-compose
作为一个数据存储,我们将使用MongoDB。
回顾性应用的架构
该应用程序将分为3个服务
:-Facade 是一个应用程序的前端,将客户的请求引导到下面提到的其他服务。
-Topic 负责将回顾性主题保存到数据库(MongoDB)。
-Notification 收集来自其他服务的所有通知,并将它们推送给订阅的服务/客户。在本演示中,我们可以假设它的工作方式类似于推送通知。
它们之间的通信是通过发布/订阅完成的。
以下是架构图:
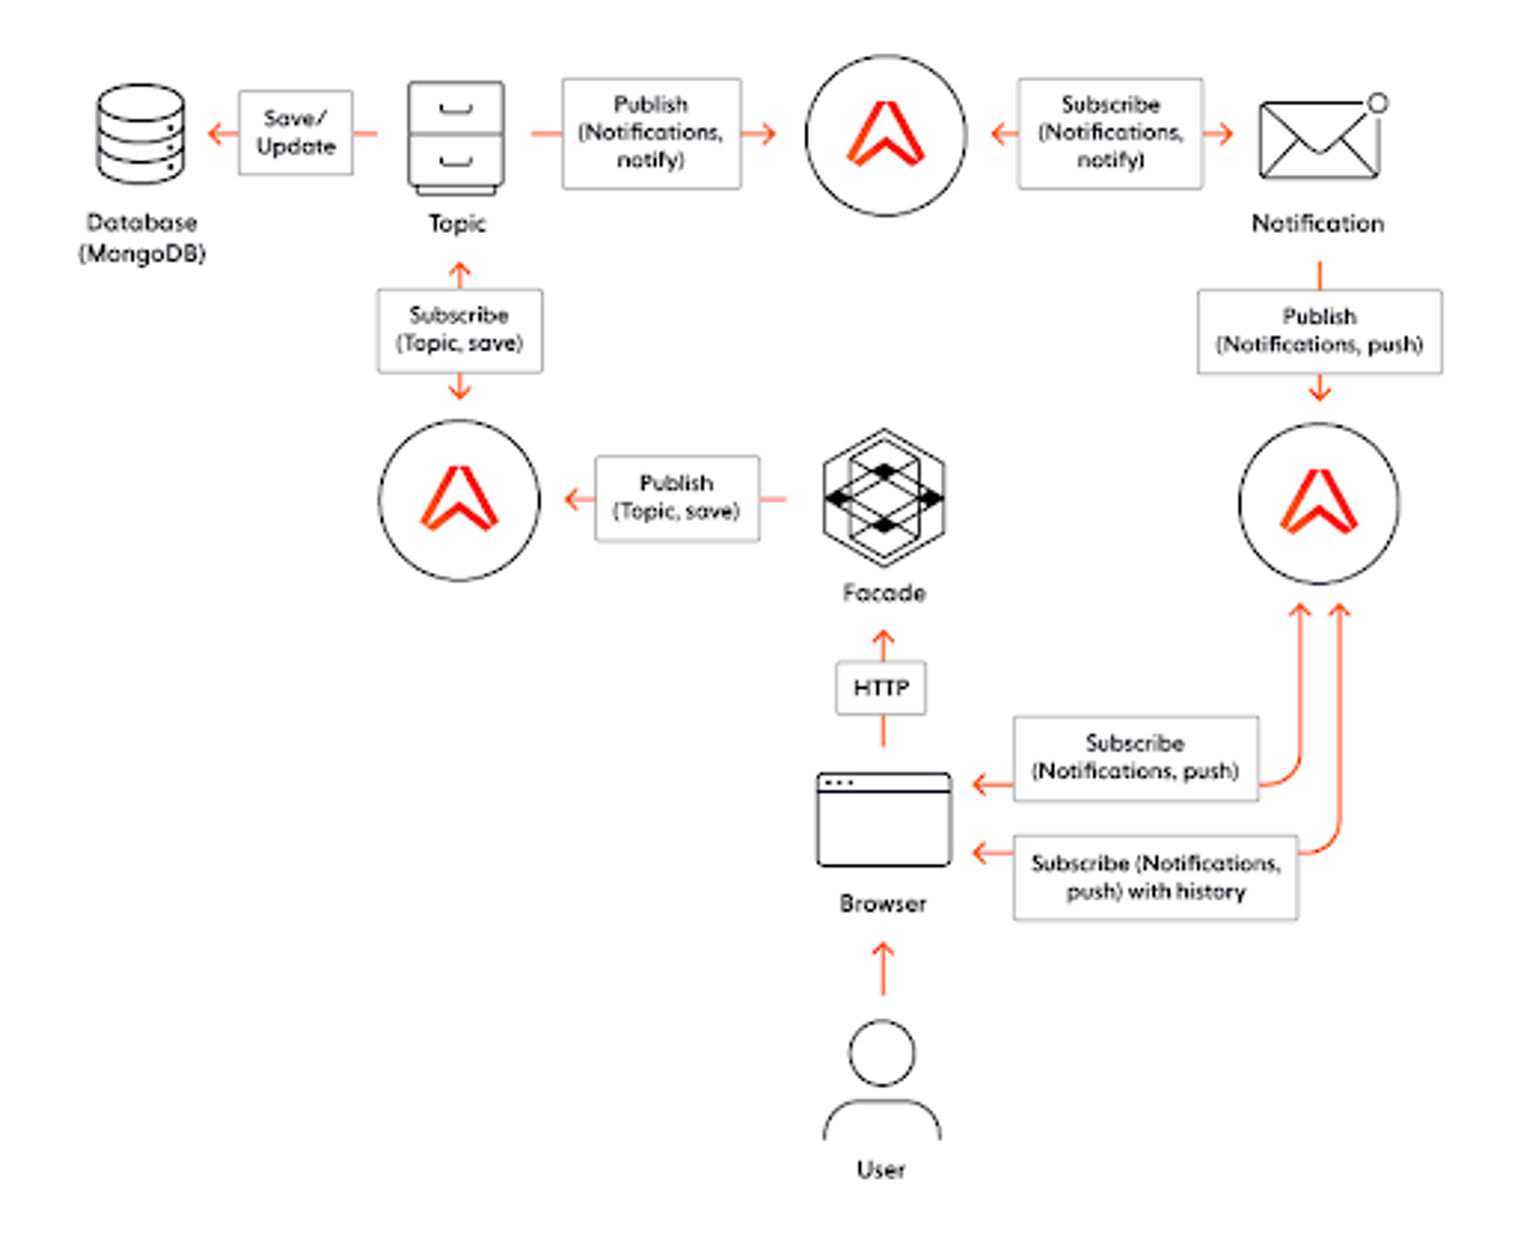
实时全栈应用的架构图。
为了简化上述内容,我们将使用一个开箱即用的pub/sub服务。Ably符合这个要求,原因如下。
什么是Ably?
Ably提供了几种服务,包括pub/sub、消息的历史持久性、移动应用的推送通知等。它还有一个可供使用的.NET库。
作为一个简短的介绍,我想描述一下Ably中使用的一些基本术语:
-Channel 是连接到它的服务/客户端的通信源。
-Message Type ,用于区分通过单一通道发送的不同类型的数据。服务可以订阅一个(多个)具体的类型或所有的类型。
深入到代码中
我们现在就可以检查一下代码是什么样子的。
界面
第一个服务,Facade ,向客户显示信息。服务是用.NET 5(C#)编写的。它是一个WebAPI,前端部分用Angular 8编写。
OpenAPI和健康检查
这个服务只依赖于Ably,因为启动文件包含了检查Ably状态的配方,并通过Swashbuckle生成OpenAPI文档。
public void ConfigureServices(IServiceCollection services)
{
    var config = Configuration
        .GetSection("Ably")
        .Get<AblyConfig>();
    var ably = newAblyRealtime(config.ApiKey);

    services.AddSwaggerGen(c =>
    {
        c.SwaggerDoc("v1",newOpenApiInfo{Title="WebAppAPI",Version="v1"});
    });
    services.AddHealthChecks()
        .AddCheck(
            "AblyChannel",
            newAblyChannelHealthCheck(
                ably,
                "Topic"
            )
        )
        .AddCheck(
            "AblyTimer",
            newAblyTimerHealthCheck(
                ably,
                "Topic",
                FSharpOption<TimeSpan>.Some(TimeSpan.FromSeconds(1)),
                FSharpOption<TimeSpan>.Some(TimeSpan.FromSeconds(1))
            )
        );
    services
        .AddHealthChecksUI(s =>
            s
                .SetEvaluationTimeInSeconds(60)
                .AddHealthCheckEndpoint("Self",$"http://{Dns.GetHostName()}/health"))
                .AddInMemoryStorage();
        );
    …
    services.AddAutofac();
    …
}

public void Configure(IApplicationBuilder app,IWebHostEnvironment env)
{
    …
    app.UseSwagger();
    app.UseSwaggerUI(c =>
    {
        c.SwaggerEndpoint("/swagger/v1/swagger.json","DashboardAPIV1");
    });

    app.UseEndpoints(endpoints =>
    {
        endpoints.MapControllerRoute(
            name:"default",
            pattern:"{controller}/{action=Index}/{id?}");
        endpoints.MapHealthChecksUI( setup =>
            {
                setup.UIPath="/ui-health";
                setup.ApiPath="/api-ui-health";
            }
        );
        endpoints.MapHealthChecks(
            "/health",
            newHealthCheckOptions {
                Predicate=( _ => true),
                ResponseWriter=UIResponseWriter.WriteHealthCheckUIResponse
            }
        );
    });

    ...
}
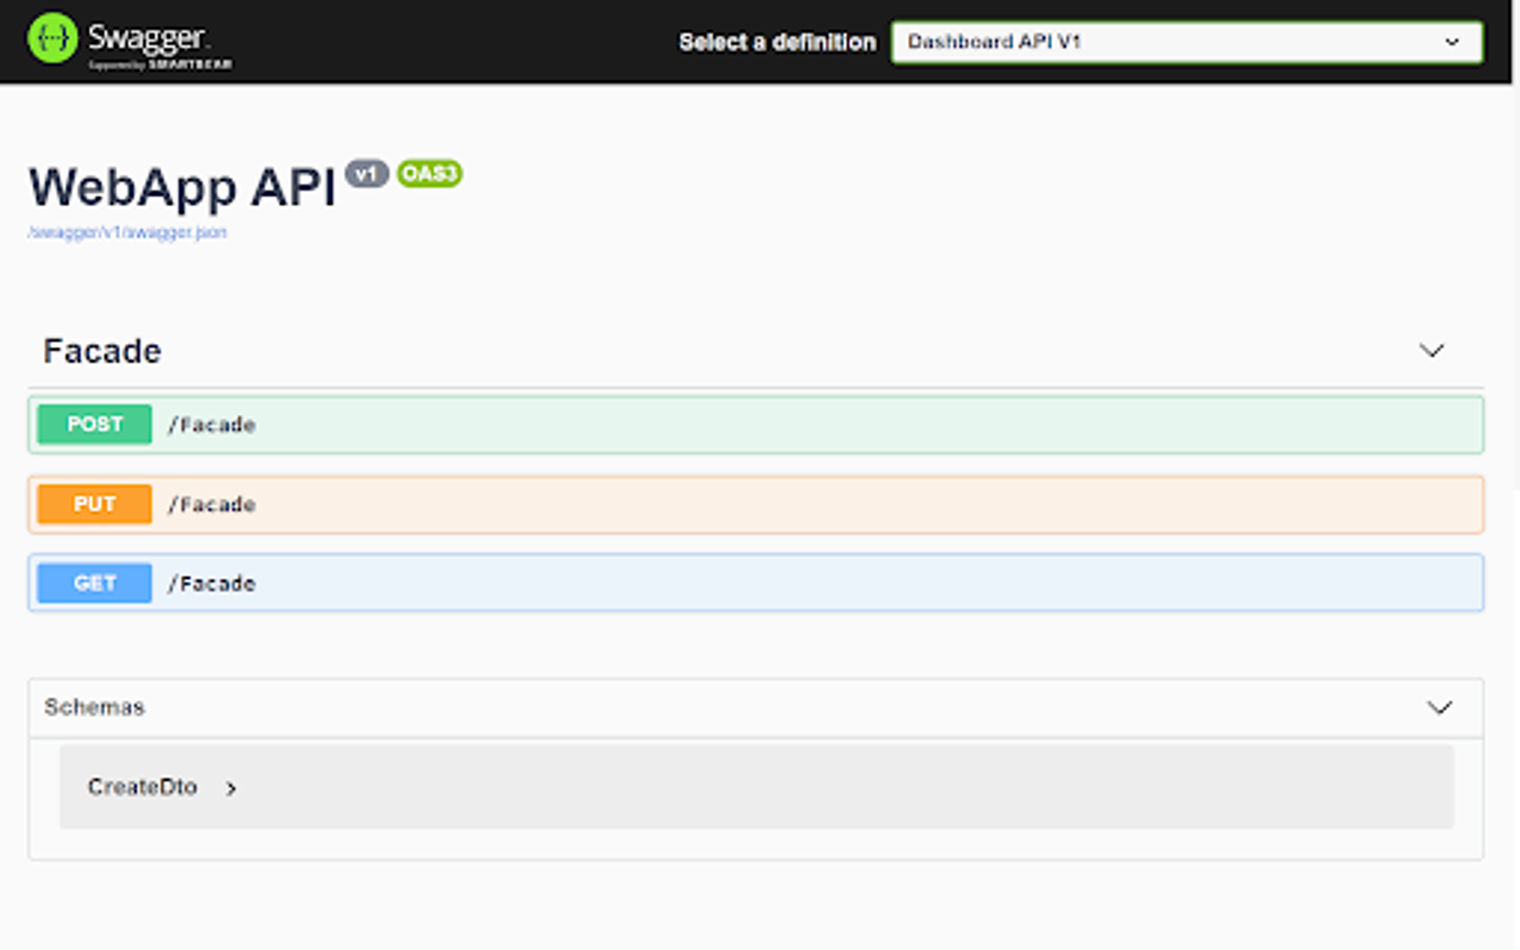
为Facade生成的Swagger方法规范
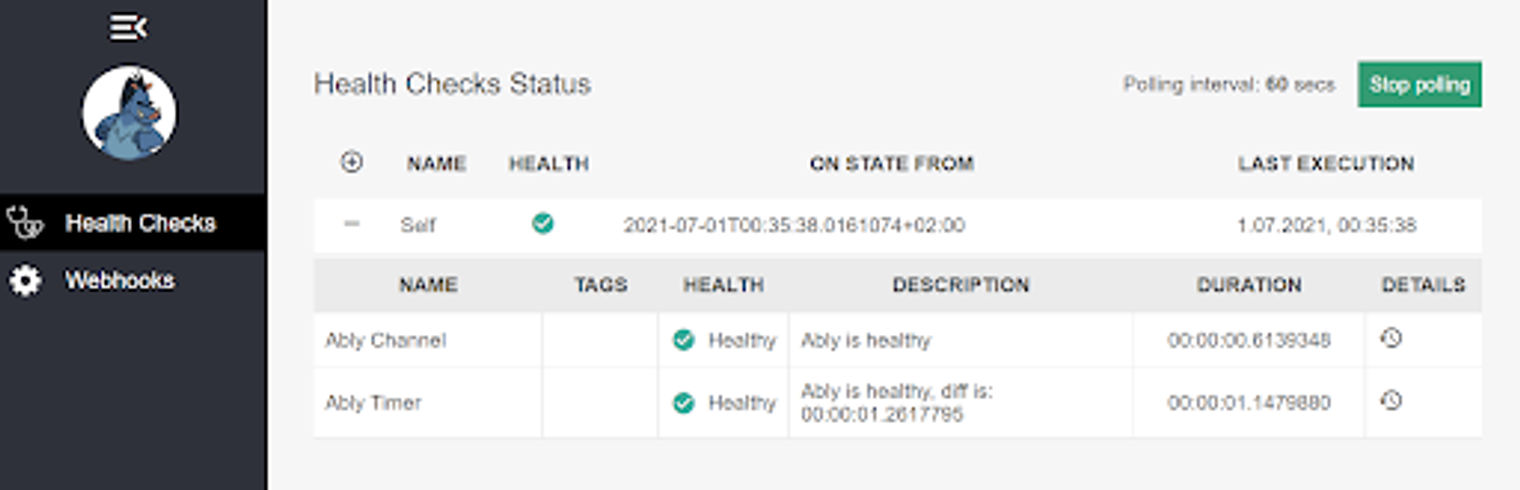
健康检查的仪表板视图。
行动
服务包含一个单一的控制器,有两个动作:POST 和PUT (GET 动作在这里只是为了测试目的)。POST 创建一个主题,PUT 更新它:
[HttpPost]
public async Task<StatusCodeResult> Save([FromBody]CreateDto create)
{
    var data = new Topic
        (
            name: Name.NewName("name"),
            id: Identifier.NewId(""),
            creator: Creator.NewCreator(create.Creator),
            description: Description.NewDescription(create.Description),
            done: Done.NewDone(false)
        );

    var channel = _ably.Channels.Get(_ablyConfig.Topic.Name);
    var result = await channel.PublishAsync(_ablyConfig.Topic.MessageType,data);
    if (!result.IsFailure)
        returnOk();
    _logger.LogError(result.Error.Message);
    return new StatusCodeResult(500);
}
看一下代码,我们可以看到用户的请求带着DTO对象来到一个控制器动作。然后这个对象被转化为一个消息,被Topic 服务所知道。之后,该消息通过Ably通过topic 通道发送。
Ably注册
这里我们使用了一个注入到控制器中的Ably服务,但值得展示一下它的注册情况。我们使用Autofac作为DI,整个代码在下面:
public class WebAppModule : Module
{
    private readonly AblyConfig _config;

    public WebAppModule(AblyConfig config) => _config = config;

    protected override void Load(ContainerBuilder builder)
    {
        base.Load(builder);

        builder.Register(_ => _config).AsSelf().SingleInstance();
        builder.Register(_ => new AblyRealtime(_config.ApiKey)).AsSelf().SingleInstance();
    }
}
public void ConfigureContainer(ContainerBuilder builder) =>
    builder.RegisterModule(new WebAppModule(Configuration
        .GetSection("Ably")
        .Get<AblyConfig>()));
public class Program
{
    public static Task Main(string[] args) =>
        CreateWebHostBuilder(args).Build().RunAsync();

    private static IHostBuilder CreateWebHostBuilder(string[] args) =>
        Host.CreateDefaultBuilder(args)
            .UseServiceProviderFactory(new AutofacServiceProviderFactory())
            .ConfigureWebHostDefaults(wb =>
            {
                wb.UseStartup<Startup>();
                wb.ConfigureLogging((ctx, lg) =>
                {
                    lg.ClearProviders();
                    lg.AddDebug();
                    lg.AddConsole();
                });
            });
}
应用程序的用户界面(在Angular 8中)
前面提到的前端部分是用Angular 8编写的。看一下代码,我们有两个主要的Angular组件。
-Home-component.ts 显示主页面,其中有一个实际主题的列表和一个添加新主题的表单。
-Activity-component.ts 显示了一个包含所有用户活动的页面。
主页组件
显示主页面的第一个组件被分为两部分。第一部分显示了一个添加新主题的表单,它被提取为一个单独的组件(create-component.ts),它看起来如下所示:
export class CreateComponent {
  public model: Create = { Description: "", Creator: "" };
  constructor(
    private readonly http: HttpClient,
    @Inject('BASE_URL') private readonly baseUrl: string) {
  }

  public onSubmit = () =>
    this.http.post(
        `${this.baseUrl}Facade`,
        JSON.stringify(this.model),
      { headers: { 'content-type': 'application/json'}})
      .toPromise()
      .then(_ => this.reset());

  public reset = () =>
    this.model = { Description: "", Creator: "" }
}
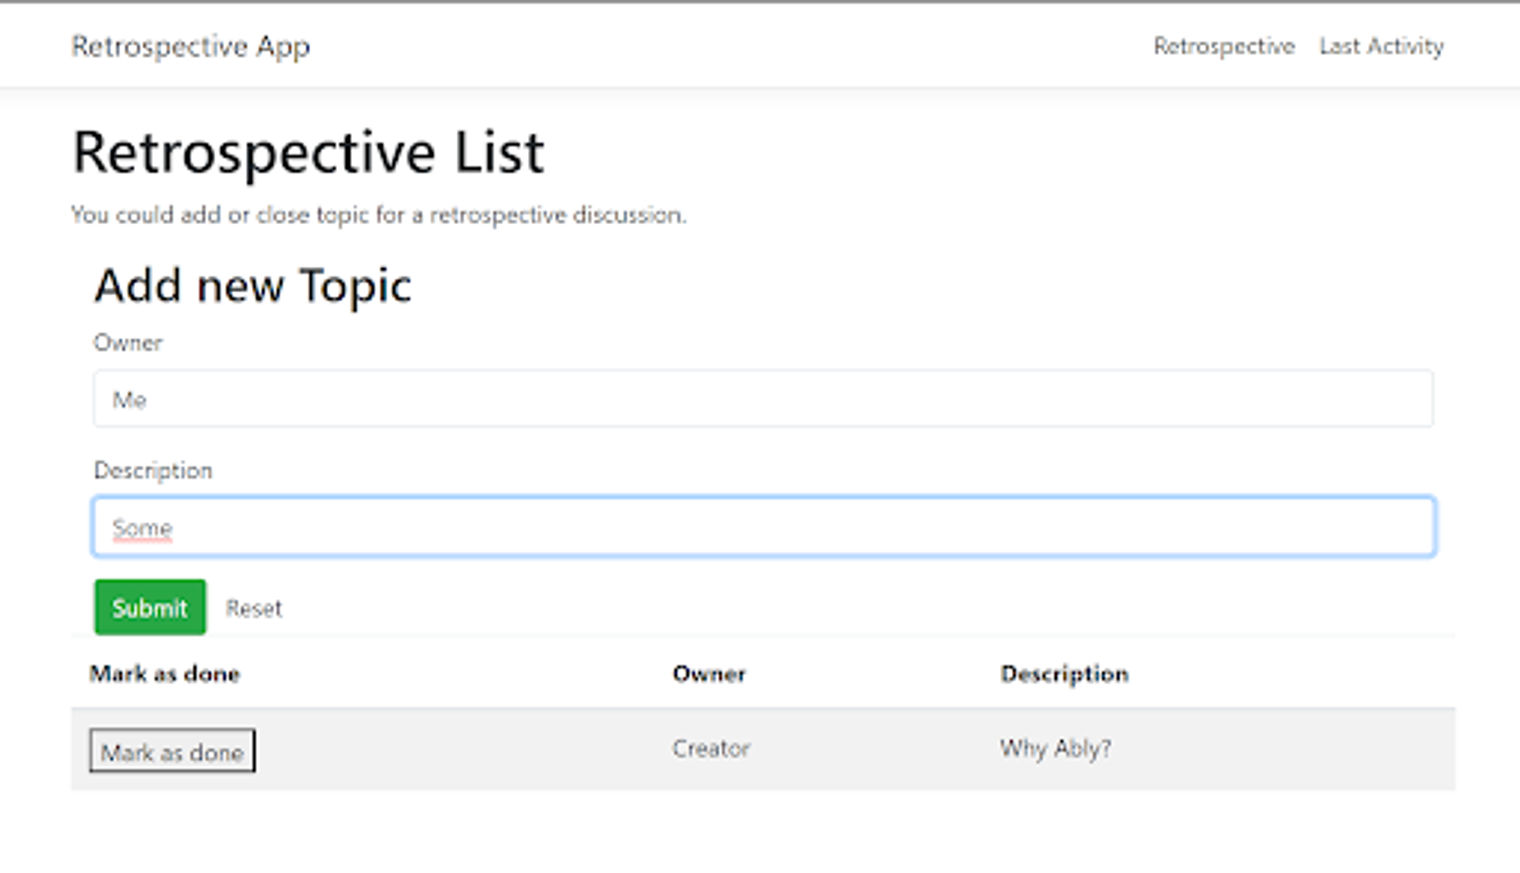
回溯列表的组件视图。
在组件视图中,我们看到一个创建新话题的表单来讨论。表单逻辑里面发生了什么?我们从表单中映射数据,并在点击提交按钮后将其发送到服务器。
主页组件的第二部分包含一个表格,里面有所有被创建和讨论的主题。当我们创建一个话题时,它不会立即显示在列表中,因为它是通过Aply通道来自服务器的。
为了接收这样的消息,我们要附加到一个Ably频道(Notification channel)。
export class HomeComponent {
  public topics: Topic [];

  constructor(
    private readonly http: HttpClient,
    private readonly changeDetector: ChangeDetectorRef,
    @Inject('BASE_URL') private readonly baseUrl: string) {
    this.http.get(`${this.baseUrl}Facade`)
      .toPromise()
      .then((e: AblyConfig) => {
        let client = new Ably.Realtime({ key: e.apiKey });
        let channel = client.channels.get(e.push.name);
        channel.subscribe(e.push.messageType, msg => {
            let additionalData = JSON.parse(msg.data).AdditionalData.Item;
            let newRecord = JSON.parse(additionalData);
            this.topics = [newRecord, ...this.topics];

            this.changeDetector.detectChanges();
          })
        });
    this.topics = [];
  }

  public markAsDone (model) {
    this.http.post(
      `${this.baseUrl}Facade`,
      JSON.stringify(model),
      { headers: { 'content-type': 'application/json'}})
      .toPromise()
      .then(_ => {
        this.topics = this.topics.filter(x => x !== model);
        this.changeDetector.detectChanges();
      });
  }
}
请注意,创建一个Ably对象,附加到一个通道,并监听一个传入的消息,所需的代码与我们在服务器端显示的非常相似。
简而言之,我们获取频道,订阅它,当有感兴趣的消息传来时,我们就更新主页组件的模型。还请注意markAsDone 方法,该方法处理将一个话题标记为 "已经讨论过",这反过来又触发了对某个话题的更新。
活动反馈
第二个主要组件(activity-component.ts )负责显示应用程序中发生的所有事件的历史。它看起来与主页相似,但信息的到达方式略有不同。
export class ActivityComponent {
  public activities: Topic [];
  constructor(
    private readonly http: HttpClient,
    private readonly changeDetector: ChangeDetectorRef,
    @Inject('BASE_URL') private readonly baseUrl: string) {
    this.http.get(`${this.baseUrl}Facade`)
      .toPromise()
      .then((e: AblyConfig) => {
        let client = new Ably.Realtime({ key: e.apiKey });
        let channel = client.channels.get(e.push.name);
        channel.attach(err => {
          channel.history({untilAttach: true}, (error, results) => {
            let isMsg = (maybeMsg: PaginatedResult<Message> | undefined):
              maybeMsg is PaginatedResult<Message> =>
                (maybeMsg as PaginatedResult<Message>) !== undefined;

            if (isMsg(results))
              this.activities =
                  results
                  .items
                  .map(msg => {
                    if (msg.name === e.push.messageType) {
                      let additionalData = JSON.parse(msg.data).AdditionalData.Item;
                      return JSON.parse(additionalData);
                    }
                    else {
                      return { Creator: "Server request", Description: "Server request", Id: msg.id, Done: false };
                    }
                  });
            else
              this.activities = [];
            this.changeDetector.detectChanges();
          })})
      });
  }
}
我们不获取频道,而是直接附加到频道上,收听过去24小时内通过这个特定频道传来的所有消息。坚持信息是在Ably平台上为每个频道设置的。我们不能以编程的方式来设置它,而是通过频道页面来设置。
信息保留
要设置信息保留,我们需要进入Ably仪表盘并导航到渠道页面。
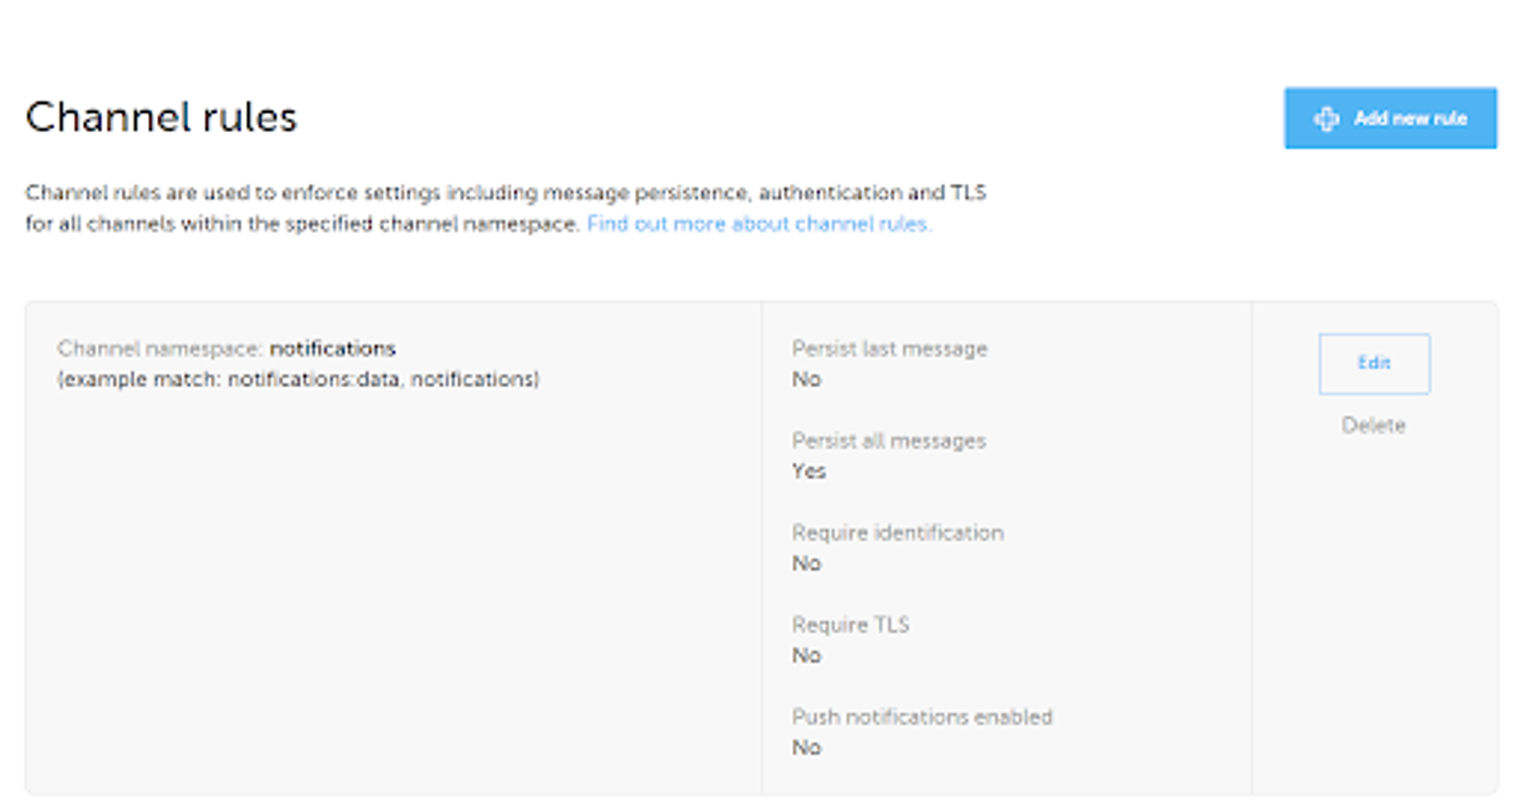
Ably仪表盘上的频道规则视图。
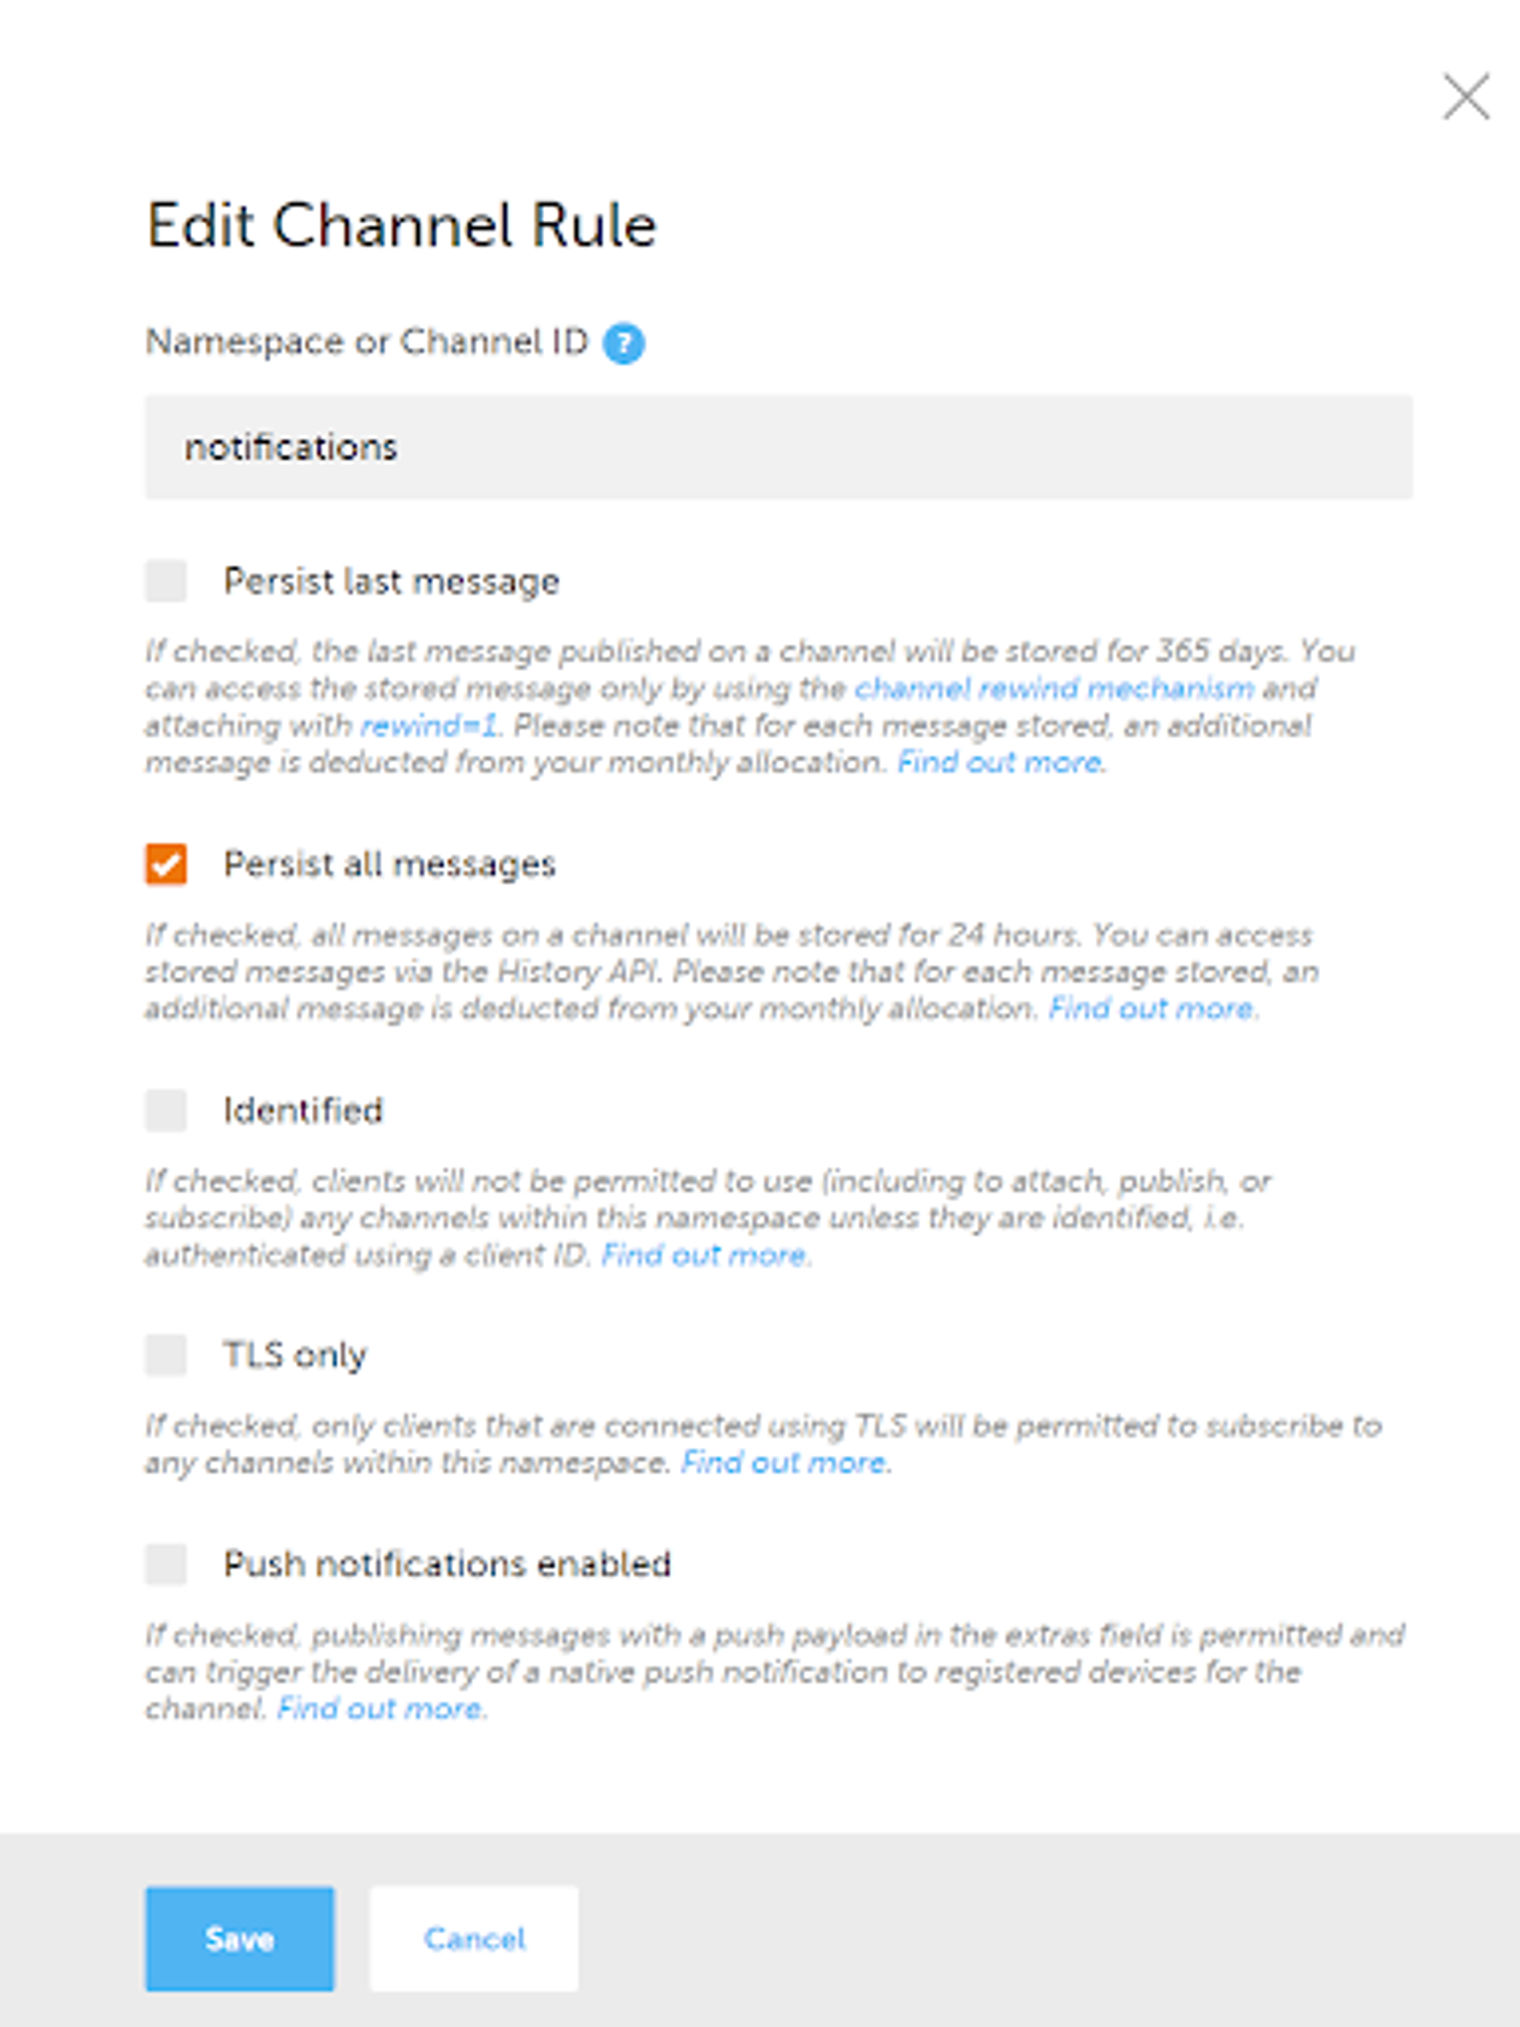
在Ably仪表盘上编辑频道规则页面
启用 "保留所有消息",就可以了。

Retrospective应用程序的最后活动仪表板
现在我们知道它在客户端和Facade 方面是如何工作的。我们还可以转发到Topic 和
Notification
服务。
主题
Topic 是一个用.NET 5(F#)编写的WebAPI。它使用MongoDB作为数据库。它有3个主要职责:
- 接收和处理关于新主题的消息。
- 保存主题到数据库。
- 通知已处理的主题。
处理信息
Topic 订阅所有感兴趣的信息,特别是那些旨在创建或更新主题的信息。该服务的主要职责是根据要求处理通过Ably通道发送的上述消息:
member private this.ConfigureHandlers (di: DI) (logger: ILogger<Startup>) =
    let channel = di.ably.Channels.Get di.ablyConfig.Topic.Name
    channel.Subscribe(
        di.ablyConfig.Topic.MessageType,
        fun msg ->
            async {
                match! Topic.Application.Topics.Save.trySave di msg.Data CancellationToken.None with
                | Choice1Of2 result -> logger.LogDebug $"Process message: {result}"
                | Choice2Of2 err -> logger.LogError $"Error occurred while processing message: {err}"
                ()
            } |> Async.RunSynchronously)
当新消息到来时,我们接收它并将其映射到业务模型中:
type InvalidTopicFormat = exn

[<RequireQualifiedAccess>]
module Save =
    let save
        (di: DI)
        topic
        token =
        async {
            let! result = Repository.create token di.config topic

            match result with
            | Choice1Of2 (DTOResult.Create data) ->
                let serializedData = JsonSerializer.Serialize(data, Serialization.serializerOpt)
                let (Topic.Contract.Id id) = data.Id
                let msg = {
                    Id = Identifier (Guid.NewGuid())
                    RelatedId = Id id
                    AdditionalData = AdditionalData serializedData
                }
                let channel = di.ably.Channels.Get di.ablyConfig.Notification.Name
                let! pubResult = channel.PublishAsync (di.ablyConfig.Notification.MessageType, msg) |> Async.AwaitTask
                if pubResult.IsFailure then
                    return Choice2Of2 (pubResult.Error.AsException ())
                else return result
            | Choice1Of2 res ->
                di.logger.Log(LogLevel.Warning, $"Expected to get a create result, but got something else: {res}")
                return result
            | Choice2Of2 ex ->
                di.logger.Log(LogLevel.Error, $"Error occurred while processing data in repository: {ex.Message}")
                return result
        }

    let trySave
        (di: DI)
        (topic: obj)
        token =
        async {
            try
                let deserializedTopic = (topic :?> JObject).ToObject<Topic>()
                return! save di deserializedTopic token
            with msg ->
                return
                    msg.Message
                    |> InvalidTopicFormat
                    |> Choice2Of2
        }
保存数据到MongoDB
然后,我们将其保存到MongoDB,并以docker镜像的形式运行(与.NET服务的方式相同):
version: '3'
volumes:
  retrospectiveLocalDb:
  retrospectiveLocalDbConfig:
services:
  database:
    image: db
    build:
      context: ./storage/mongo
      dockerfile: ./Dockerfile
    environment:
      - MONGO_INITDB_ROOT_USERNAME=sample
      - MONGO_INITDB_ROOT_PASSWORD=Sample123!
    volumes:
      - retrospectiveLocalDb:/data/db
      - retrospectiveLocalDbConfig:/data/configdb
    ports:
      - '27017-27019:27017-27019'
FROM mongo:4.2.3
COPY init-mongo.js /docker-entrypoint-initdb.d/
db = db.getSiblingDB('admin')
db.createUser(
    {
        user: "admin",
        pwd: "123",
        roles: [
            { role: "readWrite", db: "admin" }
        ]
    });

db = db.getSiblingDB('retrospective')
db.createUser(
    {
        user: "admin",
        pwd: "123",
        roles: [
            { role: "readWrite", db: "retrospective" }
        ]
    });
let private queryDb token config ``type`` (model: Option<Topic>) =
    match ``type`` with
    | TopicOperation.Create ->
        async {
            let fOpt = InsertOneOptions ()

            let! _ =
                connection config
                |> Query.insertOne token fOpt model.Value
            return QueryResult.Create model.Value
        }
    | TopicOperation.Update ->
        async {
            let fOpt = FindOneAndReplaceOptions<Topic> ()
            fOpt.ReturnDocument <- ReturnDocument.After
            let filter =
                Filter.eq (fun (x: Topic) -> x._id) model.Value._id

            let! result =
                connection config
                |> Query.updateWhole token fOpt model.Value filter
            return QueryResult.Update result
        }
    | ...

...

let private query token config data ``type`` =
    async {
        let! mapped = ToDomain.map data
        return! mapped |> (queryDb token config ``type``)
    }

...

let create token config data =
    async {
        let! result = query token config (Some data) TopicOperation.Create
        return result |> ToDTO.map
    } |> Async.Catch
这段代码看起来并不太复杂。简单地从对象映射到对象,并保存到数据库。当保存成功时,我们希望将这一事实告知客户端应用程序。因为我们的项目可以包含很多其他的服务,我们创建了一个服务,它将把各种推送消息聚集在一个地方。
将消息转发到通知书
我们将所有被成功保存的聚合消息映射到一个由Notification服务接受的对象,并通过Ably通道将其发送给它.与 Facade 发送数据给Topic 服务的方式相同,只是我们使用的是不同的通道和消息类型。
...
match result with
| Choice1Of2 (DTOResult.Create data) ->
    let serializedData = JsonSerializer.Serialize(data, Serialization.serializerOpt)
    let (Topic.Contract.Id id) = data.Id
    let msg = {
        Id = Identifier (Guid.NewGuid())
        RelatedId = Id id
        AdditionalData = AdditionalData serializedData
    }
    let channel = di.ably.Channels.Get di.ablyConfig.Notification.Name
    let! pubResult = channel.PublishAsync (di.ablyConfig.Notification.MessageType, msg) |> Async.AwaitTask
    if pubResult.IsFailure then
        return Choice2Of2 (pubResult.Error.AsException ())
    else return result
| Choice1Of2 res ->
    di.logger.Log(LogLevel.Warning, $"Expected to get a create result, but got something else: {res}")
    return result
| Choice2Of2 ex ->
    di.logger.Log(LogLevel.Error, $"Error occurred while processing data in repository: {ex.Message}")
    return result
…
开放API和健康检查
与Facade 相比,Topic 服务依赖于两件事。第一个是Ably。第二个是我们在健康检查中描述的MongoDB。
member this.ConfigureServices(services: IServiceCollection) =
    let config = Config ()
    this.Configuration.Bind config
    let ably = new AblyRealtime (config.Ably.ApiKey)
    let loggerFactory =
            LoggerFactory.Create(fun builder ->
            builder.AddConsole() |> ignore
            );
    let logger = loggerFactory.CreateLogger<Startup>()

    let di = DI.create config ably logger
    services.AddSingleton<DI> (fun _ -> di) |> ignore

    this.ConfigureHandlers di logger

    services.AddSwaggerGen(fun c ->
            c.SwaggerDoc("v1", OpenApiInfo(Title = "Topic Api", Version = "v1"))
    ) |> ignore

    services.AddHealthChecks()
        .AddCheck(
            "Ably Channel",
            AblyChannelHealthCheck(
                ably,
                "Topic"
            )
        )
        .AddCheck(
            "Ably Timer",
            AblyTimerHealthCheck(
                ably,
                "Topic",
                TimeSpan.FromSeconds 1.,
                TimeSpan.FromSeconds 1.
            )
        )
        .AddMongoDb((MongoConfig.map config.MongoDb).GetConnectionString(), name = "MongoDB")
    |> ignore
    services
        .AddHealthChecksUI(fun s ->
            s
                .SetEvaluationTimeInSeconds(60)
                .AddHealthCheckEndpoint("Self", $"http://{Dns.GetHostName()}/health")
            |> ignore)
        .AddInMemoryStorage() |> ignore
    ...

member this.Configure(app: IApplicationBuilder, env: IWebHostEnvironment) =
    ...
    app.UseSwagger(fun opt -> ()) |> ignore
    app.UseSwaggerUI(fun opt ->
            opt.SwaggerEndpoint("/swagger/v1/swagger.json", "Topic Api V1")
            opt.RoutePrefix <- String.Empty
    ) |> ignore
    ...
    app.UseEndpoints(fun endpoints ->
            endpoints.MapControllers() |> ignore
            endpoints.MapHealthChecksUI(fun setup ->
                setup.UIPath <- "/ui-health"
                setup.ApiPath <- "/api-ui-health"
            ) |> ignore
            endpoints.MapHealthChecks(
                "/health",
                HealthCheckOptions(
                    Predicate = (fun _ -> true),
                    ResponseWriter = Func<HttpContext, HealthReport, Task>(fun (context) (c: HealthReport) -> UIResponseWriter.WriteHealthCheckUIResponse(context, c))
                )
            ) |> ignore
        ) |> ignore

Swagger的主题API方法定义
我们还定义了一些HTTP端点,只是为了测试目的。你可以在OpenAPI文档中看到它们,如下:
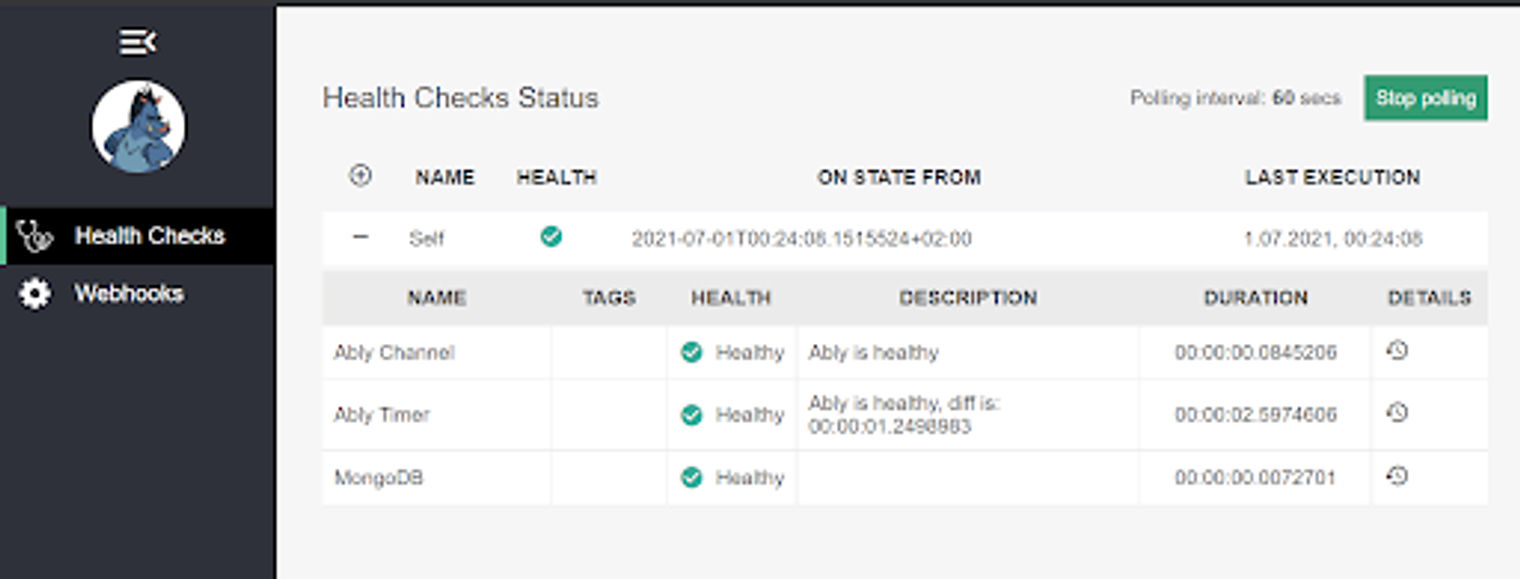
健康检查的仪表板视图。
通知服务
现在我们可以切换到Notification 服务。这又是一个用.NET 5(F#)编写的WebAPI。
处理Ably消息
与Topic 服务类似,Notification 服务依附于Ably通道,以获取具体通道上的新消息,然后在它们进来时进行处理。
member private this.ConfigureHandlers (ably: AblyRealtime) (config: AblyConfig) (logger: ILogger) =
    let channel = ably.Channels.Get config.Channels.Notification.Name
    channel.Subscribe(
        config.Channels.Notification.MessageType,
        fun msg -> WebApi.Notifications.Save.handle ably config msg.Data logger |> Async.RunSynchronously)
在Notification 服务中处理消息基本上意味着映射一个消息,然后通过Ably通道将其发送给所有感兴趣的客户/服务。在我们的方案中,它是Facade 的TypeScript部分。
转发通知(推送)消息到所有客户端
let private serializerOpt =
    let options = JsonSerializerOptions()
    JsonFSharpConverter(
        unionEncoding = (
            // Base encoding:
            JsonUnionEncoding.Untagged
            // Additional options:
            ||| JsonUnionEncoding.UnwrapOption
            ||| JsonUnionEncoding.UnwrapRecordCases
        )
    )
    |> options.Converters.Add

    options

let internal handle (ably: AblyRealtime) (ablyConfig: AblyConfig) (msg: obj) (logger: ILogger) =
    try
        let deserialized = (msg :?> JObject).ToObject<Notification.Contract.Message>()
        async {
            let channel = ably.Channels.Get ablyConfig.Channels.Push.Name
            let msg = JsonSerializer.Serialize(deserialized, serializerOpt)
            let! _ = channel.PublishAsync (ablyConfig.Channels.Push.MessageType, msg) |> Async.AwaitTask
            ()
        }
    with er ->
        logger.LogError $"Error occurred while processing notification message: {er.Message}"
        async {
            let channel = ably.Channels.Get ablyConfig.Channels.Push.Name
            let! _ = channel.PublishAsync (ablyConfig.Channels.Push.MessageType, er.Message) |> Async.AwaitTask
            ()
        }
通过省略后端代码,Facade 聆听所有的通知。我们定义了一个更强大的消息序列化类型(由Fsharp.System.Text.Json 完成),因为我们想序列化所有F#特定的类型,如Unions 和Records ,使它们可以通过TypeScript轻松接近。
OpenAPI和健康检查
最后我们配置了startup.fs 文件的一小部分,在那里我们定义了健康检查和OpenAPI信息。类似于Facade ,从外部来看,Notification 服务只依赖于Ably服务。
member this.ConfigureServices(services: IServiceCollection) =
    let config = Config ()
    this.Configuration.Bind config
    let ably = new AblyRealtime (config.Ably.ApiKey)
    services.AddSingleton<AblyRealtime>(fun _ -> ably) |> ignore
    services.AddSingleton<Config> (fun _ -> config) |> ignore

    let loggerFactory =
            LoggerFactory.Create(fun builder ->
            builder.AddConsole() |> ignore
            );
    let logger = loggerFactory.CreateLogger();
    this.ConfigureHandlers ably config.Ably logger

    services.AddSwaggerGen(fun c ->
            c.SwaggerDoc("v1", OpenApiInfo(Title = "Notification Api", Version = "v1"))
    ) |> ignore

    services.AddHealthChecks()
        .AddCheck(
            "Ably Channel",
            AblyChannelHealthCheck(
                ably,
                "Notification"
            )
        )
        .AddCheck(
            "Ably Timer",
            AblyTimerHealthCheck(
                ably,
                "Topic",
                TimeSpan.FromSeconds 1.,
                TimeSpan.FromSeconds 1.
            )
        ) |> ignore
    services
        .AddHealthChecksUI(fun s ->
            s
                .SetEvaluationTimeInSeconds(60)
                .AddHealthCheckEndpoint(
                    "Self",
                    $"http://{Dns.GetHostName()}/health"
                ) |> ignore)
        .AddInMemoryStorage() |> ignore

    ...

member this.Configure(app: IApplicationBuilder, env: IWebHostEnvironment) =
    ...
    app.UseSwagger(fun opt -> ()) |> ignore
    app.UseSwaggerUI(fun opt ->
            opt.SwaggerEndpoint("/swagger/v1/swagger.json", "Notification Api V1")
            opt.RoutePrefix <- String.Empty
    ) |> ignore
    ...
    app.UseEndpoints(fun endpoints ->
            endpoints.MapControllers() |> ignore
            endpoints.MapHealthChecksUI(fun setup ->
                setup.UIPath <- "/ui-health"
                setup.ApiPath <- "/api-ui-health"
            ) |> ignore
            endpoints.MapHealthChecks(
                "/health",
                HealthCheckOptions(
                    Predicate = (fun _ -> true),
                    ResponseWriter = Func<HttpContext, HealthReport, Task>(fun (context) (c: HealthReport) -> UIResponseWriter.WriteHealthCheckUIResponse(context, c))
                )
            ) |> ignore
        ) |> ignore
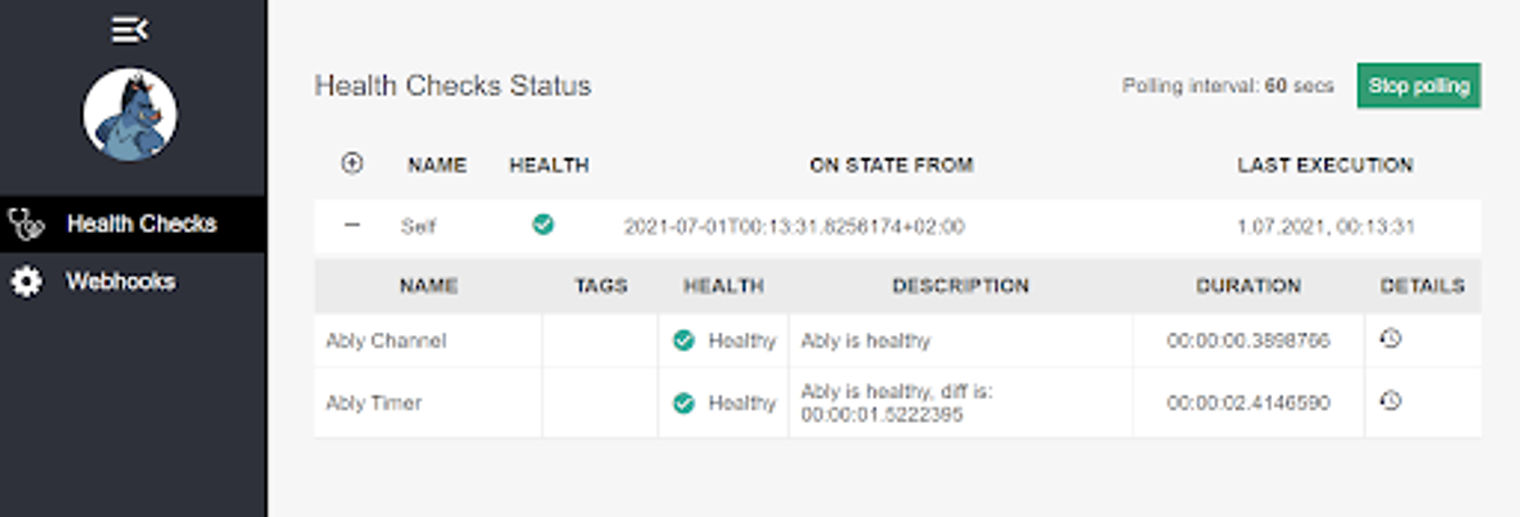
健康检查的仪表板视图
摘要
这就是整个 "企业 "应用程序,给你一些关于如何在你的应用程序中使用Ably的图片。源代码可在此获得。
一次性运行
要运行整个应用程序,你可以简单地运行docker compose up ,因为docker-compose 文件已经到位了。
version: '3'
volumes:
  retrospectiveLocalDb:
  retrospectiveLocalDbConfig:
services:
  database:
    image: db
    build:
      context: ./storage/mongo
      dockerfile: ./Dockerfile
    environment:
      - MONGO_INITDB_ROOT_USERNAME=sample
      - MONGO_INITDB_ROOT_PASSWORD=Sample123!
    volumes:
      - retrospectiveLocalDb:/data/db
      - retrospectiveLocalDbConfig:/data/configdb
    ports:
      - '27017-27019:27017-27019'
  topic:
    image: topic
    build:
      context: ./src
      dockerfile: ./Topic/Dockerfile
    ports:
      - '2137:80'
    depends_on:
      - database
    environment:
      MongoDB__Host: database
    hostname: topic
  notification:
    image: notification
    build:
      context: ./src
      dockerfile: ./Notification/Dockerfile
    ports:
      - '2138:80'
    hostname: notification
  facade:
    image: facade
    build:
      context: ./src
      dockerfile: ./Facade/Dockerfile
    ports:
      - '2111:5000'
    depends_on:
      - notification
      - topic
    hostname: facade
通过这个简单的 "企业 "应用程序的例子,我们可以看到,你可以用.NET、Angular、MongoDB和Ably构建一个实时全栈应用程序。
关于Ably
Ably是一个企业级的 pub/sub消息平台,它使高效设计、快速发货和无缝扩展直接交付给终端用户的关键实时功能变得容易。Ably每天为数千家公司的数百万用户提供数十亿条实时信息。
Ably平台的数学模型是围绕着 "可靠性的四大支柱 "来设计的,以确保信息不会丢失,同时还能通过 安全、可靠和 高度可用的 全球边缘网络以低延迟交付。试试Ably的API,看看为什么从初创公司到工业巨头的开发者都选择在Ably上构建,以简化工程,尽量减少DevOps的开销,并提高开发速度。
