

微服务不是每个人都喜欢的,也不应该是。不是每个问题都能或应该由微服务来解决。有时建立一个简单的单体是一个更好的选择。微服务是针对规模和可扩展性很重要的用例的解决方案。几年前,微服务大行其道,特别是由Netflix、Spotify、Google等公司推出。虽然炒作已经平息了一些,但真正的用例仍然存在。随着云计算技术的不断进步,由于有许多好处,将微服务作为云原生服务来构建是大势所趋。
今天我们将探讨如何构建一个云原生Java微服务栈,利用服务网提供大部分的分布式系统需求,我们将使用Kubernetes将其部署到云中。
因此,这就是我们今天要做的事情:
- 使用JHipster、Spring Boot和Spring Cloud构建一个Java微服务栈
- 创建一个谷歌Kubernetes引擎(GKE)集群
- 将Istio服务网部署到集群上
- 设置监控和可观察性
- 将微服务部署到集群中并进行监控
让我们开始吧!
前提条件
- 一个谷歌云平台账户
- 在你的机器上安装Docker
- 在你的机器上安装了Node.js
- 在你的机器上安装了JHipster
- 在您的机器上安装并配置了谷歌云SDK
- kubectl或KDash
- 对Java、Spring、容器和Kubernetes的基本了解
目录
- 为什么使用服务网构建云原生微服务?
- 使用JHipster构建一个Java微服务栈
- 创建一个GKE集群并安装Istio
- 将微服务栈部署到GKE上
- 了解更多关于Java微服务、Istio、Kubernetes和JHipster的信息
为什么使用服务网构建云原生微服务?
在我们深入探讨构建云原生微服务栈之前,让我们看看什么是服务网状结构以及使用服务网状结构的好处。
服务网提供的功能有助于解决常见的分布式微服务挑战。比如服务发现、路由、负载平衡等等。今天我们将使用Istio,它是目前最流行的服务网状结构解决方案之一。Istio是为分布式应用架构定制的,特别是那些你可能在Kubernetes中运行的应用。Istio与Kubernetes玩得很好,好到你可能认为它是Kubernetes平台本身的一部分。Istio并不是周围唯一的服务网,我们还有Linkerd和Consul这样的平台,它们也很受欢迎。
Istio具体提供了以下功能:
- 通过TLS实现服务与服务之间的安全通信。当然,支持基于身份的认证和授权。
- 服务发现,这样你的微服务可以互相发现。
- 服务的自动负载平衡
- 流量控制功能,如路由、断路、重试、故障转移和故障注入。
- 一个可插拔的策略层,可以执行诸如访问控制、速率限制、A/B测试、流量分割、配额等功能。
- 它还为集群内从入口到出口以及吊舱之间的所有流量提供自动指标、日志和跟踪。
什么是Istio服务网?
让我们快速了解一下Istio的内部结构。Istio的架构可以分为两个不同的平面。
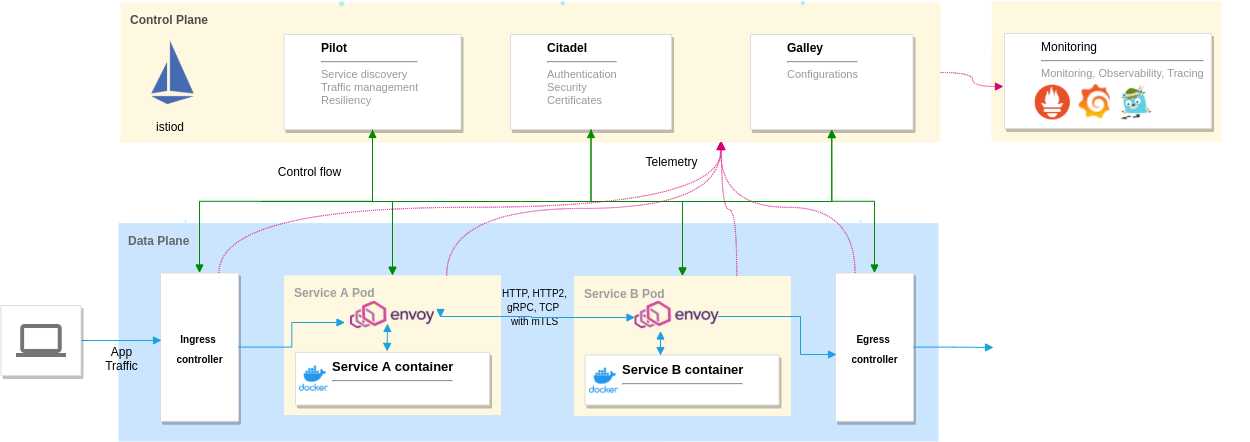
控制平面:它由istiod demon组成,它管理和配置envoy代理来路由流量。控制平面还执行策略和收集遥测数据,包括流量管理的Pilot、管理安全的Citadel和管理配置的Galley等组件。
数据平面:它由Envoy代理组成,作为侧翼部署到我们的应用容器。Envoy是一个高性能、轻量级的分布式代理。它控制着它所连接的容器的所有传入和传出的流量。
我们可以使用Grafana、Prometheus、Kiali和Zipkin等工具进行监控和观察,因为它们与Istio提供的遥测数据配合良好。你可以使用这些工具,也可以使用你现有的监控栈。
使用JHipster构建一个Java微服务栈
在你继续之前,确保你已经安装了JHipster。如果没有,请使用命令npm -g install generator-jhipster 来安装。在写这篇文章的时候,我使用的是JHipster7.8.1版本。
我们将使用JHipster领域语言(JDL)来定义我们的微服务、实体和部署选项。但首先,让我们看一下我们今天要构建的架构。
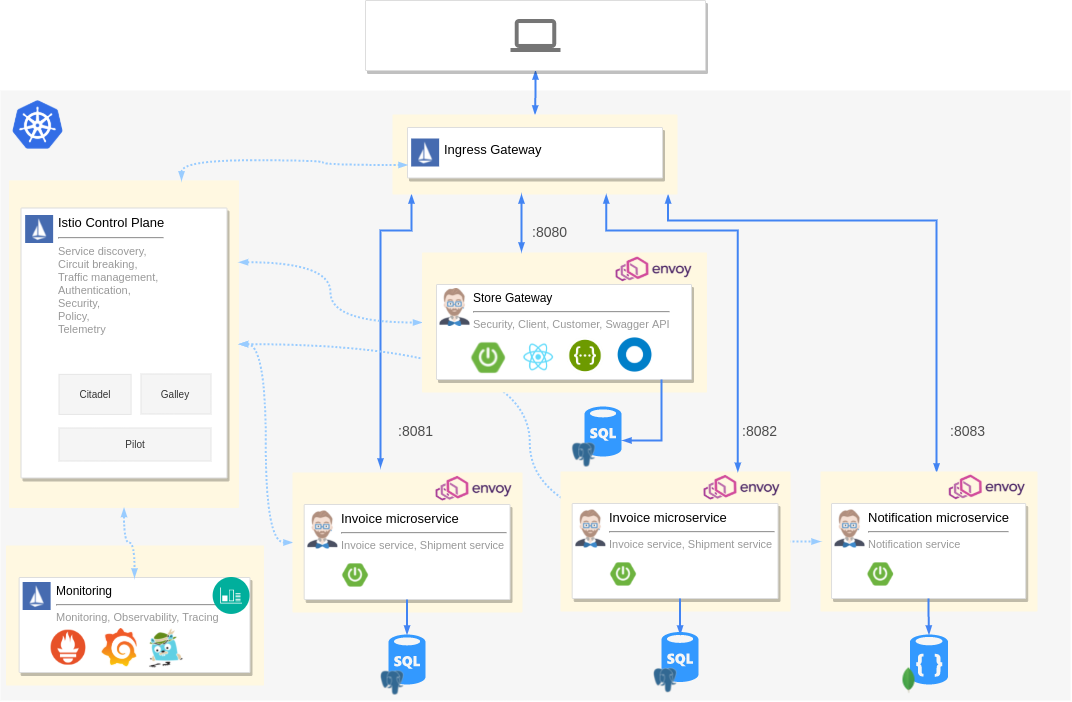
我们有Istio控制平面,负责政策、负载平衡等。我们还有Istio Ingress网关,将所有外部流量路由到我们的应用程序。我们有四个微服务。首先是一个由JHipster创建的网关应用程序,作为我们的React GUI和认证层。其余的是提供API的服务。我们的每个容器都会有一个envoy代理作为自动注入的边车。我们将Grafana、Prometheus、Zipkin和Kiali与Istio提供的遥测数据挂钩,这样我们就可以对集群进行监控和观察。每个微服务也有自己的数据库。
如果你不愿意自己构建应用程序,可以从GitHub上克隆这个例子。
git clone https://github.com/oktadev/okta-java-spring-k8s-istio-microservices-example.git
这不是一个过于复杂的架构,但也不是那么简单。首先,让我们用JDL定义我们的微服务。创建一个名为app.jdl 的文件,并在其中粘贴以下内容。
application {
  config {
    baseName store
    applicationType gateway
    packageName com.okta.developer.store
    serviceDiscoveryType no
    authenticationType jwt
    prodDatabaseType postgresql
    cacheProvider hazelcast
    buildTool gradle
    clientFramework react
  }
  entities *
}

application {
  config {
    baseName product
    applicationType microservice
    packageName com.okta.developer.product
    serviceDiscoveryType no
    authenticationType jwt
    prodDatabaseType postgresql
    cacheProvider hazelcast
    buildTool gradle
    serverPort 8081
  }
  entities Product, ProductCategory, ProductOrder, OrderItem
}

application {
  config {
    baseName invoice
    applicationType microservice
    packageName com.okta.developer.invoice
    serviceDiscoveryType no
    authenticationType jwt
    prodDatabaseType postgresql
    buildTool gradle
    serverPort 8082
  }
  entities Invoice, Shipment
}

application {
  config {
    baseName notification
    applicationType microservice
    packageName com.okta.developer.notification
    serviceDiscoveryType no
    authenticationType jwt
    databaseType mongodb
    cacheProvider no
    enableHibernateCache false
    buildTool gradle
    serverPort 8083
  }
  entities Notification
}
每个应用都定义了它的名称、包名、认证类型、数据库等。关于所有支持的选项和配置,请参考JDL应用程序文档。每个应用程序还定义了applicationType 和它所服务的实体。接下来,将实体定义添加到你刚刚创建的app.jdl 。
/**
 * Entities for Store Gateway
 */
// Customer for the store
entity Customer {
  firstName String required
  lastName String required
  gender Gender required
  email String required pattern(/^[^@\s]+@[^@\s]+\.[^@\s]+$/)
  phone String required
  addressLine1 String required
  addressLine2 String
  city String required
  country String required
}

enum Gender {
  MALE, FEMALE, OTHER
}

relationship OneToOne {
  Customer{user(login) required} to User
}

service Customer with serviceClass
paginate Customer with pagination

/**
 * Entities for product microservice
 */
// Product sold by the Online store
entity Product {
  name String required
  description String
  price BigDecimal required min(0)
  itemSize Size required
  image ImageBlob
}

enum Size {
  S, M, L, XL, XXL
}

entity ProductCategory {
  name String required
  description String
}

entity ProductOrder {
  placedDate Instant required
  status OrderStatus required
  code String required
  invoiceId Long
  customer String required
}

enum OrderStatus {
  COMPLETED, PENDING, CANCELLED
}

entity OrderItem {
  quantity Integer required min(0)
  totalPrice BigDecimal required min(0)
  status OrderItemStatus required
}

enum OrderItemStatus {
  AVAILABLE, OUT_OF_STOCK, BACK_ORDER
}

relationship ManyToOne {
  OrderItem{product(name) required} to Product
}

relationship OneToMany {
  ProductOrder{orderItem} to OrderItem{order(code) required}
  ProductCategory{product} to Product{productCategory(name)}
}

service Product, ProductCategory, ProductOrder, OrderItem with serviceClass
paginate Product, ProductOrder, OrderItem with pagination
microservice Product, ProductOrder, ProductCategory, OrderItem with product

/**
 * Entities for Invoice microservice
 */
// Invoice for sales
entity Invoice {
  code String required
  date Instant required
  details String
  status InvoiceStatus required
  paymentMethod PaymentMethod required
  paymentDate Instant required
  paymentAmount BigDecimal required
}

enum InvoiceStatus {
  PAID, ISSUED, CANCELLED
}

entity Shipment {
  trackingCode String
  date Instant required
  details String
}

enum PaymentMethod {
  CREDIT_CARD, CASH_ON_DELIVERY, PAYPAL
}

relationship OneToMany {
  Invoice{shipment} to Shipment{invoice(code) required}
}

service Invoice, Shipment with serviceClass
paginate Invoice, Shipment with pagination
microservice Invoice, Shipment with invoice

/**
 * Entities for notification microservice
 */
entity Notification {
  date Instant required
  details String
  sentDate Instant required
  format NotificationType required
  userId Long required
  productId Long required
}

enum NotificationType {
  EMAIL, SMS, PARCEL
}

microservice Notification with notification
我们为每个服务定义实体,并将这些实体标记为微服务实体。我们还定义了实体之间的关系、枚举和其他选项,如分页、服务层等。请参考JDL实体和关系文档以了解更多的可能性。
现在,我们准备运行JHipster。在你保存JDL的文件夹上打开一个终端窗口,运行以下命令。
mkdir jhipster-istio
cd jhipster-istio

jhipster jdl app.jdl --fork
这将创建具有所有实体和指定配置的应用程序。在store文件夹上运行下面的命令,你应该可以看到正在运行的网关应用程序。
./gradlew # starts the Spring Boot application
创建一个GKE集群并安装Istio
为了将堆栈部署到谷歌Kubernetes引擎,我们需要创建一个集群并安装Istio。因此,让我们开始使用Google Cloud SDK创建一个集群。
创建一个集群
确保你从命令行登录到gcloud CLI,并运行以下命令来创建一个GKE集群。
# set region and zone
gcloud config set compute/region europe-west1
gcloud config set compute/zone europe-west1-b
# Create a project and enable container APIs
gcloud projects create jhipster-demo-okta # You need to also enable billing via GUI
gcloud config set project jhipster-demo-okta
gcloud services enable container.googleapis.com

# Create GKE Cluster
gcloud container clusters create hello-hipster \
   --num-nodes 4 \
   --machine-type n1-standard-2
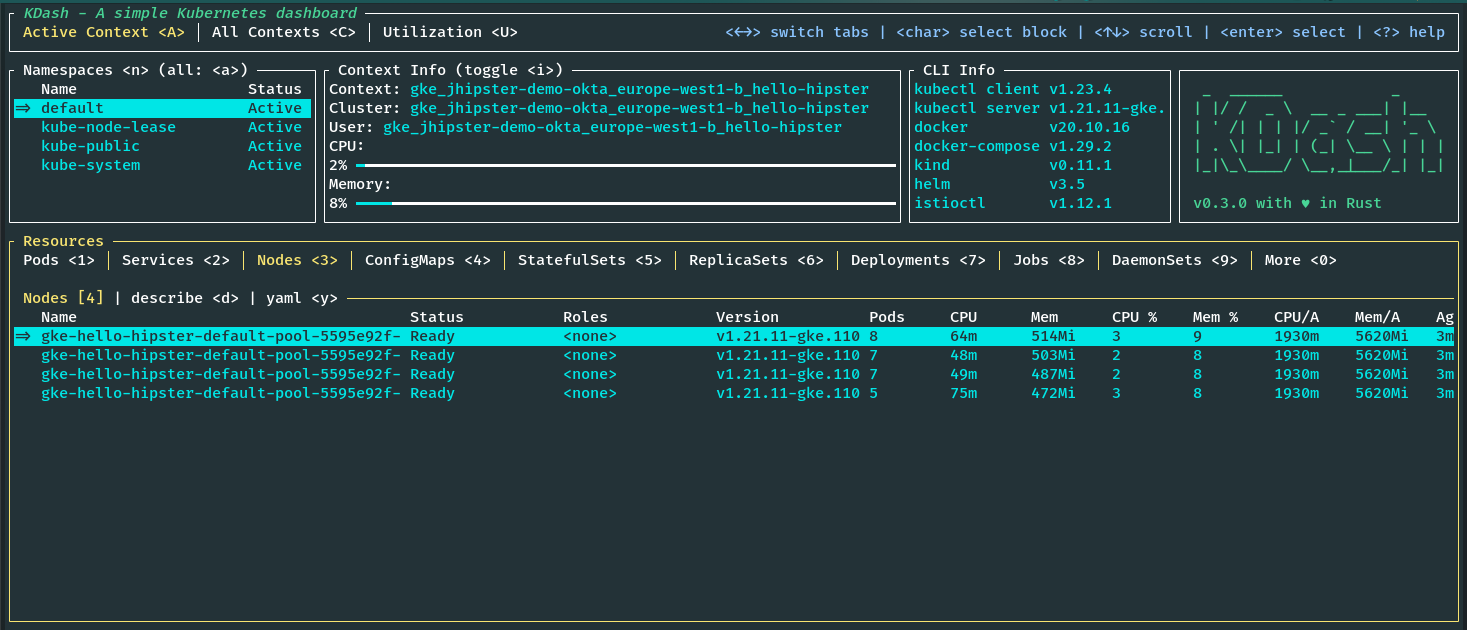
这可能需要5到15分钟。--machine-type ,这很重要,因为我们需要比默认设置中的可用CPU更多。一旦集群被创建,它应该被自动设置为当前的Kubernetes环境。你可以通过运行kubectl config current-context 来验证这一点。如果新集群没有被设置为当前上下文,你可以通过运行gcloud container clusters get-credentials hello-hipster 。
安装Istio到集群
截至目前,我使用的是Istio 1.13.4版本。你可以通过运行以下命令来安装istioctl,最好是在你的主目录下。
export ISTIO_VERSION=1.13.4
curl -L https://istio.io/downloadIstio | sh -
cd istio-$ISTIO_VERSION
export PATH=$PWD/bin:$PATH
现在你应该能够从命令行中运行istioctl。现在,我们可以使用CLI来安装Istio到GKE集群。Istio提供了几个Helm配置文件。我们将使用演示配置文件进行演示。你也可以选择生产或开发配置文件。该命令应安装Istio,并在我们的集群上设置所需的一切。
istioctl install --set profile=demo -y
注意:如果你遇到任何防火墙或用户权限问题,请参考Istio的GKE设置指南。
一旦安装完成,我们需要获取Istio入口网关的外部IP。如果你使用KDash,你可以在服务选项卡上看到它,或者你可以使用kubectl运行以下命令来获取它。
kubectl get svc istio-ingressgateway -n istio-system
安装可观察性工具
Istio还为大多数流行的监控和可观察性工具提供了附加组件。让我们在集群上安装Grafana、Prometheus、Kiali和Zipkin。这些都是预先配置好的,以便与Istio提供的遥测数据一起工作。确保你在安装Istio的文件夹中,比如istio-1.13.4。
cd istio-$ISTIO_VERSION
kubectl apply -f samples/addons/grafana.yaml
kubectl apply -f samples/addons/prometheus.yaml
kubectl apply -f samples/addons/kiali.yaml
kubectl apply -f samples/addons/extras/zipkin.yaml
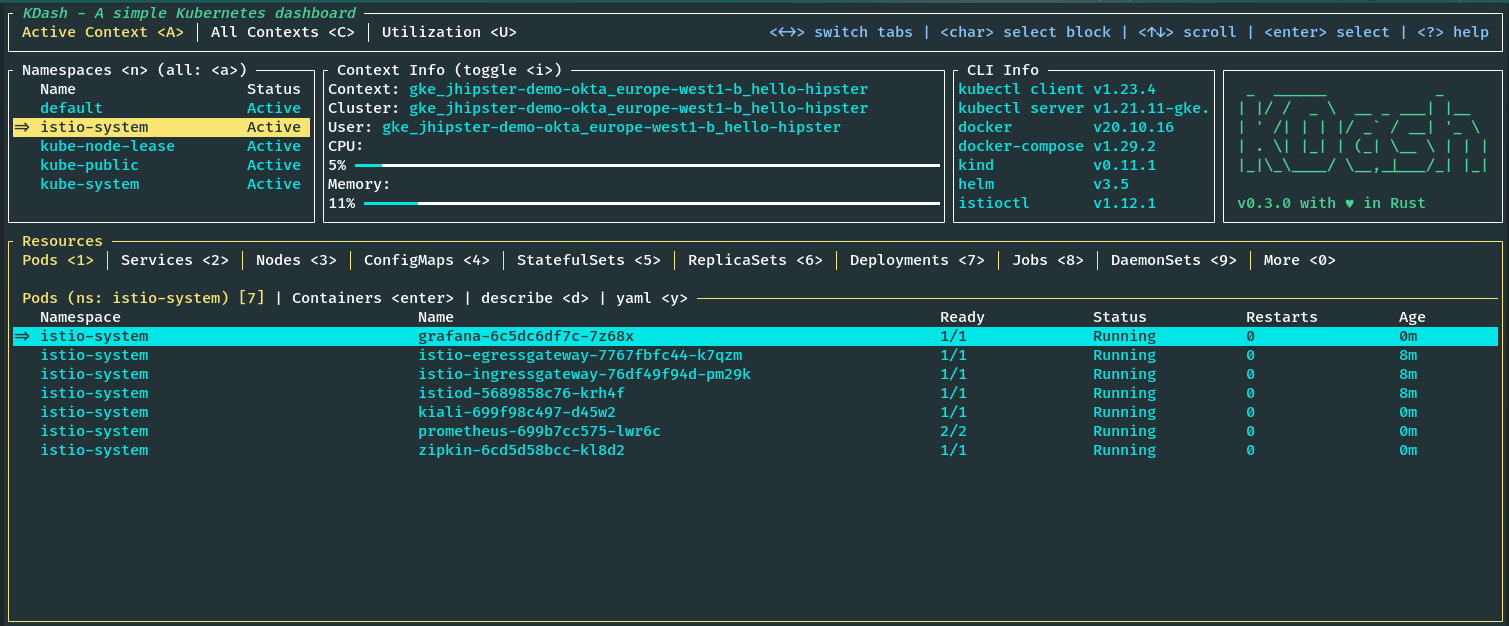
如果我们看一下istio-system命名空间,我们可以看到所有的Istio组件与Grafana、Prometheus、Kiali和Zipkin一起运行。你也可以通过运行以下命令看到这一点。
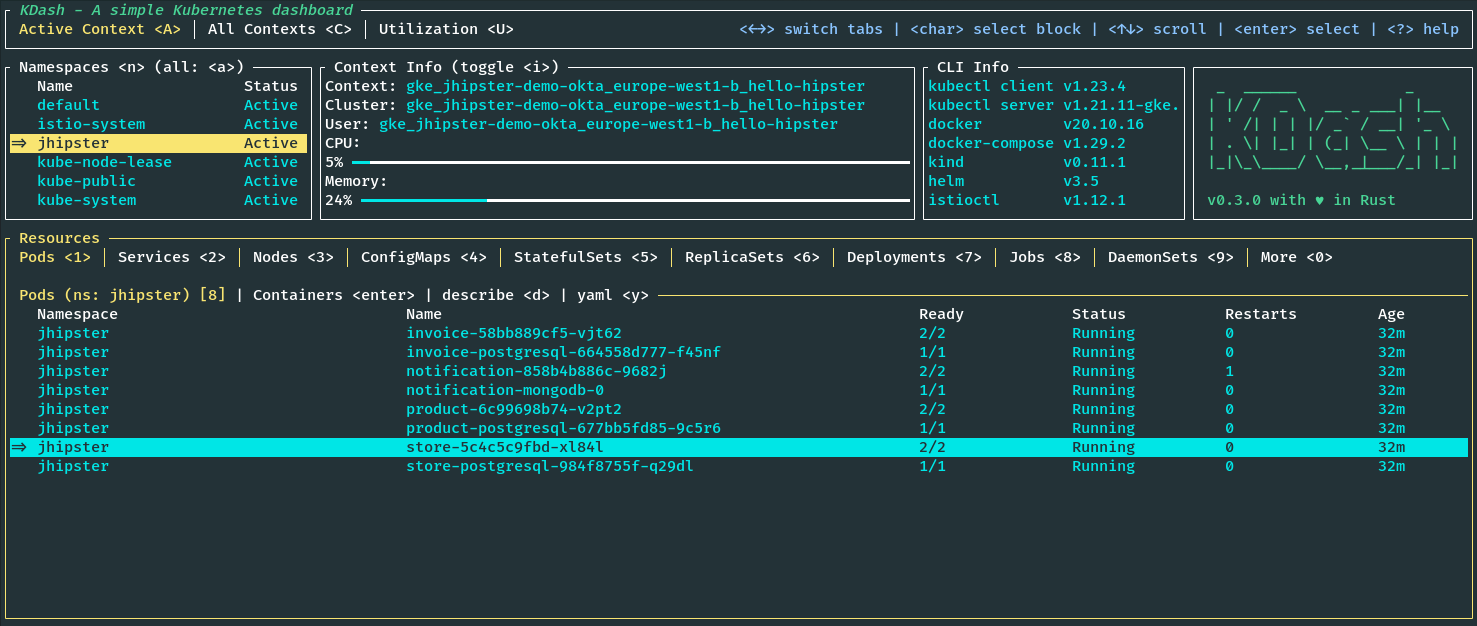
kubectl get pods -n istio-system
将微服务栈部署到GKE上
我们的集群已经准备好了,而且我们已经安装了Istio。现在,我们可以把我们的微服务栈部署到集群上。首先,我们需要为我们的部署和服务创建Kubernetes清单,并为Istio配置。JHipster又一次发挥了作用。我们可以使用JDL部署配置,用一个命令轻松地为我们的堆栈生成Kubernetes设置。
创建Kubernetes清单
创建一个新的JDL文件,例如deployment.jdl ,并添加以下内容。
// will be created under 'kubernetes' folder
deployment {
  deploymentType kubernetes
  appsFolders [store, invoice, notification, product]
  dockerRepositoryName "<your-docker-repository-name>"
  serviceDiscoveryType no
  istio true
  kubernetesServiceType Ingress
  kubernetesNamespace jhipster
  ingressDomain "<istio-ingress-gateway-external-ip>.nip.io"
  ingressType gke
}
我希望这是不言自明的。你可以参考JDL部署文档中的所有可用选项。我们已经启用了Istio,并将入口域设置为我们前面提到的Istio入口网关的外部IP。请确保使用你有推送权限的docker repo。
现在,从你运行先前jhipster jdl 命令的根文件夹中运行以下命令。
jhipster jdl deployment.jdl
这将创建一个新的文件夹,kubernetes,包含所有需要的Kubernetes清单,如部署、服务、Istio虚拟服务、网关等,用于所有的应用程序、数据库和监控。
每个服务也将有一个Istio虚拟服务和目标规则。例如,发票服务将有以下定义流量策略的目标规则。
apiVersion: networking.istio.io/v1beta1
kind: DestinationRule
metadata:
  name: invoice-destinationrule
  namespace: jhipster
spec:
  host: invoice
  trafficPolicy:
    loadBalancer:
      simple: RANDOM
    connectionPool:
      tcp:
        maxConnections: 30
        connectTimeout: 100ms
      http:
        http1MaxPendingRequests: 10
        http2MaxRequests: 100
        maxRequestsPerConnection: 10
        maxRetries: 5
    outlierDetection:
      consecutive5xxErrors: 5
      interval: 30s
      baseEjectionTime: 60s
  subsets:
    - name: v1
      labels:
        version: "v1"
它还包括以下定义路由的虚拟服务。你也可以使用虚拟服务在同一应用的两个版本之间做流量分割,以及其他事情。
apiVersion: networking.istio.io/v1beta1
kind: VirtualService
metadata:
  name: invoice-virtualservice
  namespace: jhipster
spec:
  hosts:
    - invoice
  http:
    - route:
        - destination:
            host: invoice
            subset: "v1"
          weight: 100
      retries:
        attempts: 3
        perTryTimeout: 2s
网关是为商店应用程序定义的,因为它也是我们的GUI。
apiVersion: networking.istio.io/v1beta1
kind: Gateway
metadata:
  name: store-gateway
  namespace: jhipster
  labels:
    gateway: store-gateway
    istio: ingressgateway
spec:
  selector:
    istio: ingressgateway
  servers:
    - port:
        number: 80
        name: http
        protocol: HTTP
      hosts:
        - store.jhipster.34.76.233.160.nip.io
    - port:
        number: 80
        name: http2
        protocol: HTTP2
      hosts:
        - store.jhipster.34.76.233.160.nip.io
---
apiVersion: networking.istio.io/v1beta1
kind: VirtualService
metadata:
  name: store-gw-virtualservice
  namespace: jhipster
  labels:
    service: store-gw-virtualservice
spec:
  hosts:
    - store.jhipster.34.76.233.160.nip.io
  gateways:
    - store-gateway
  http:
    - match:
        - uri:
            prefix: /services/invoice/
      rewrite:
        uri: /
      route:
        - destination:
            host: invoice
    - match:
        - uri:
            prefix: /services/notification/
      rewrite:
        uri: /
      route:
        - destination:
            host: notification
    - match:
        - uri:
            prefix: /services/product/
      rewrite:
        uri: /
      route:
        - destination:
            host: product
    - route:
        - destination:
            host: store
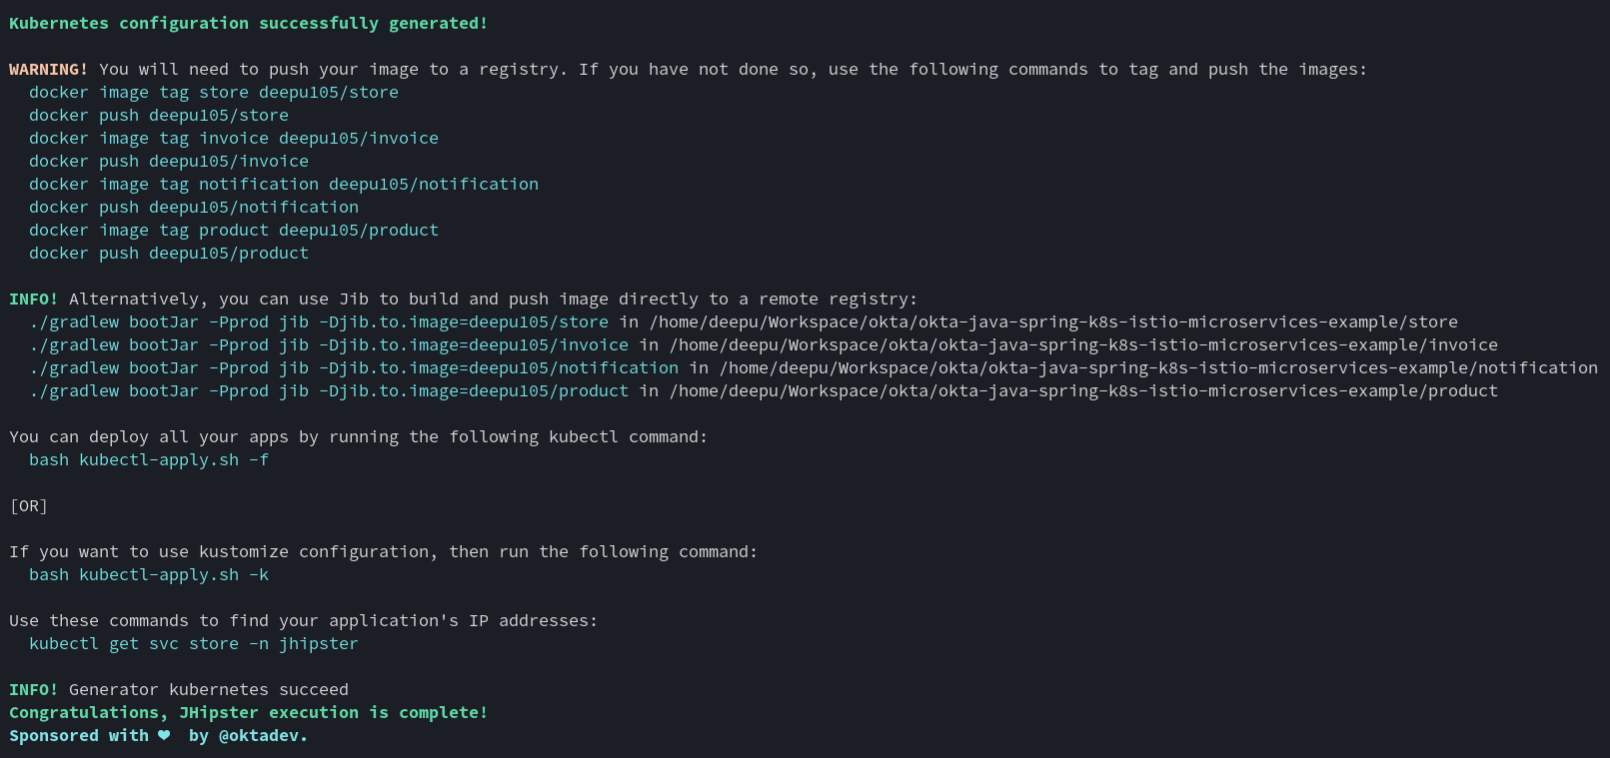
正如你所看到的,也有许多有用的命令印在控制台,你可以用它来做部署。
部署到GKE
我们现在已经准备好部署了。首先,我们需要构建并推送镜像到注册表。我们可以使用JHipster提供的方便的Jib命令。导航到每个微服务文件夹并运行下面的命令。
cd store && ./gradlew bootJar -Pprod jib -Djib.to.image=yourDockerRepository/store
cd invoice && ./gradlew bootJar -Pprod jib -Djib.to.image=yourDockerRepository/invoice
cd notification && ./gradlew bootJar -Pprod jib -Djib.to.image=yourDockerRepository/notification
cd product && ./gradlew bootJar -Pprod jib -Djib.to.image=yourDockerRepository/product
一旦镜像被推送到Docker注册中心,我们就可以使用JHipster提供的方便的脚本来部署堆栈了。导航到JHipster创建的kubernetes 文件夹,并运行以下命令。
cd kubernetes
./kubectl-apply.sh -f
一旦部署完成,我们必须等待pods处于RUNNING状态。有用的链接将被打印在终端上;记下它们。
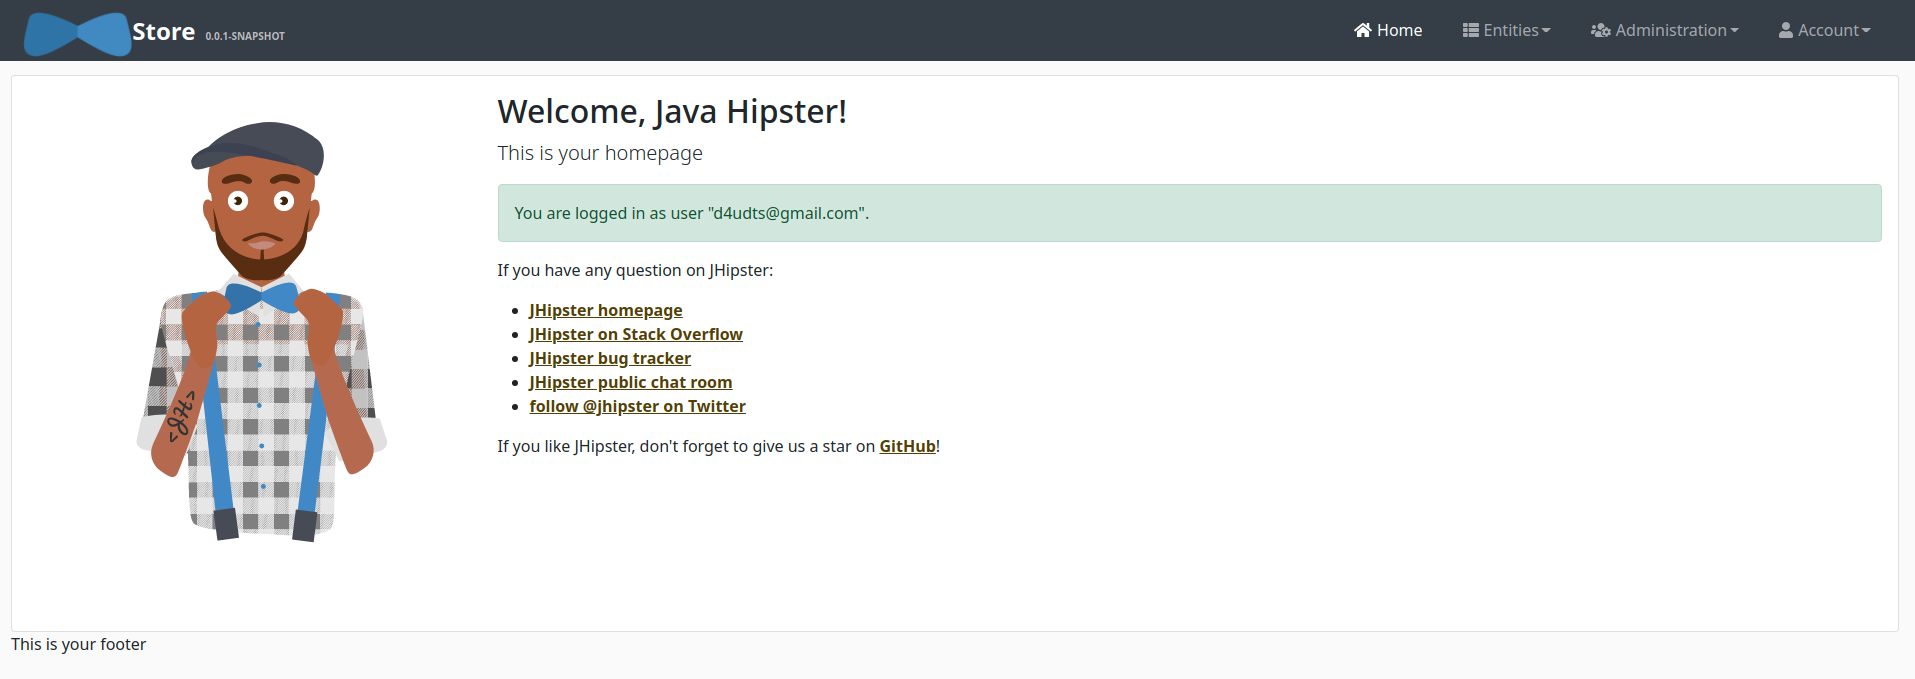
现在你可以通过给定的http://store.jhipster.<istio-ingress-gateway-external-ip>.nip.io URI访问应用程序,并用默认的凭证登录。
注意:目前,JHipster的OIDC设置不能与Istio一起使用,在JHipster问题跟踪器中有一个公开问题。替代解决方案是使用一个外部授权服务器,比如Open Policy Agent。我们将在以后的博文中介绍这个问题。
监控和可观察性
既然我们部署了可观察性的工具,让我们看看我们有什么。
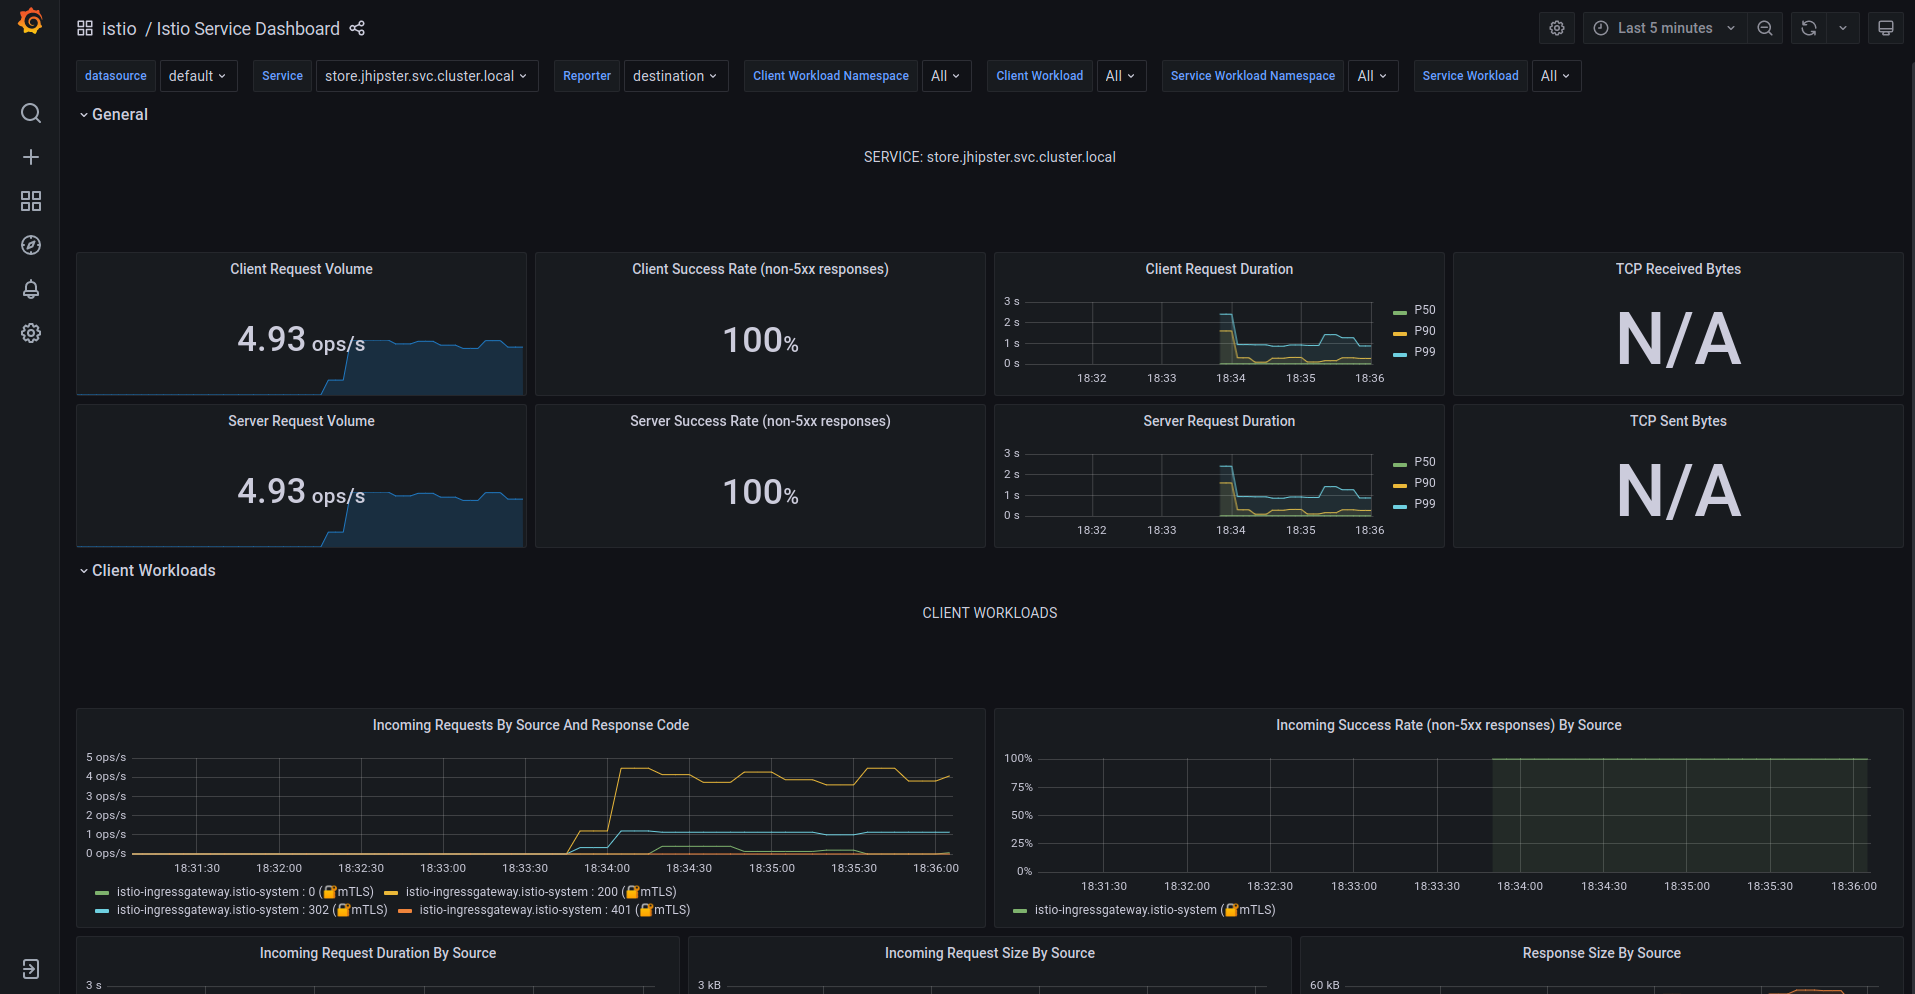
Grafana
首先是Grafana和Prometheus的指标和仪表盘。点击前一个部署步骤中的Grafana的URI。点击左上角的General,然后点击istio文件夹。你应该看到多个预先配置的仪表盘。你可以在这里监控工作负载的性能和istio系统本身。如果你愿意,你也可以创建你自己的仪表盘。Prometheus提供了Grafana上的可视化数据。
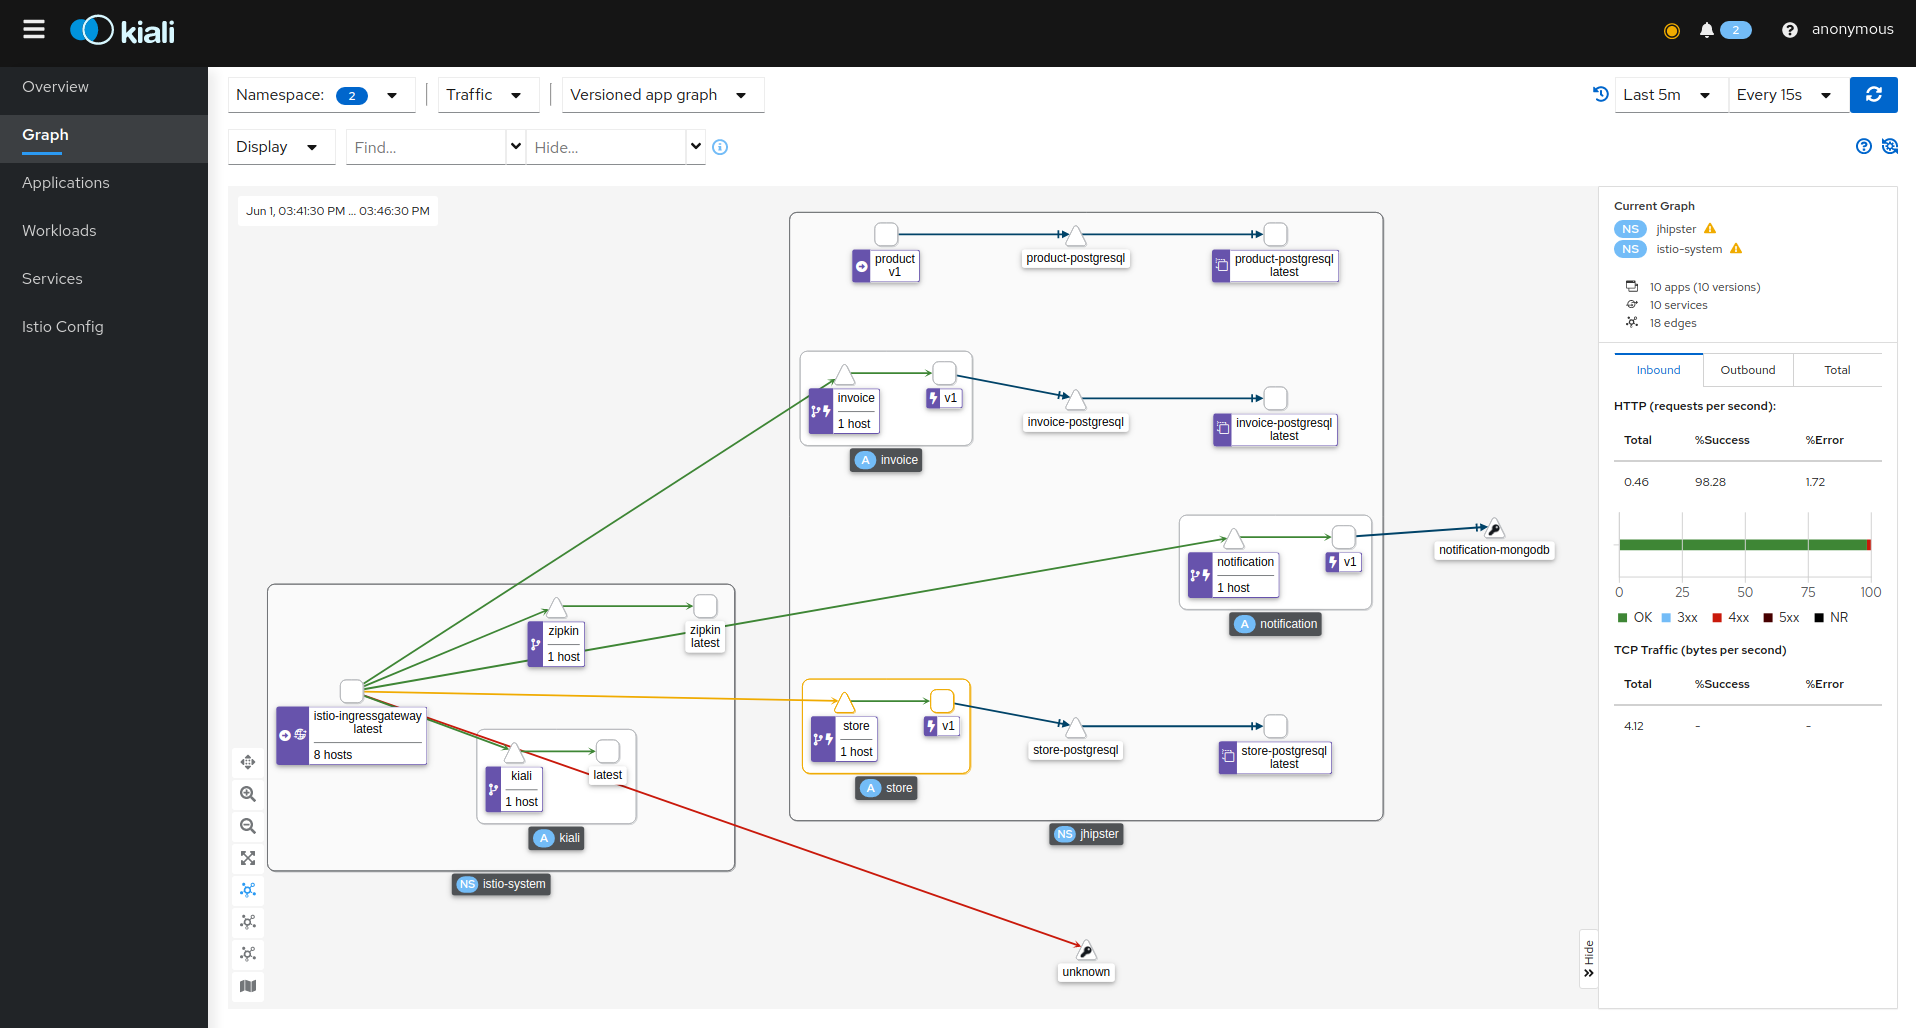
Kiali
Kiali是Istio服务网的管理控制台,它提供了一个Web界面来可视化服务网的网络拓扑。你可以用它来探索你的集群的网络拓扑结构,并看到流经它的网络流量。点击左侧菜单上的图表,可以看到网络拓扑结构。
Zipkin
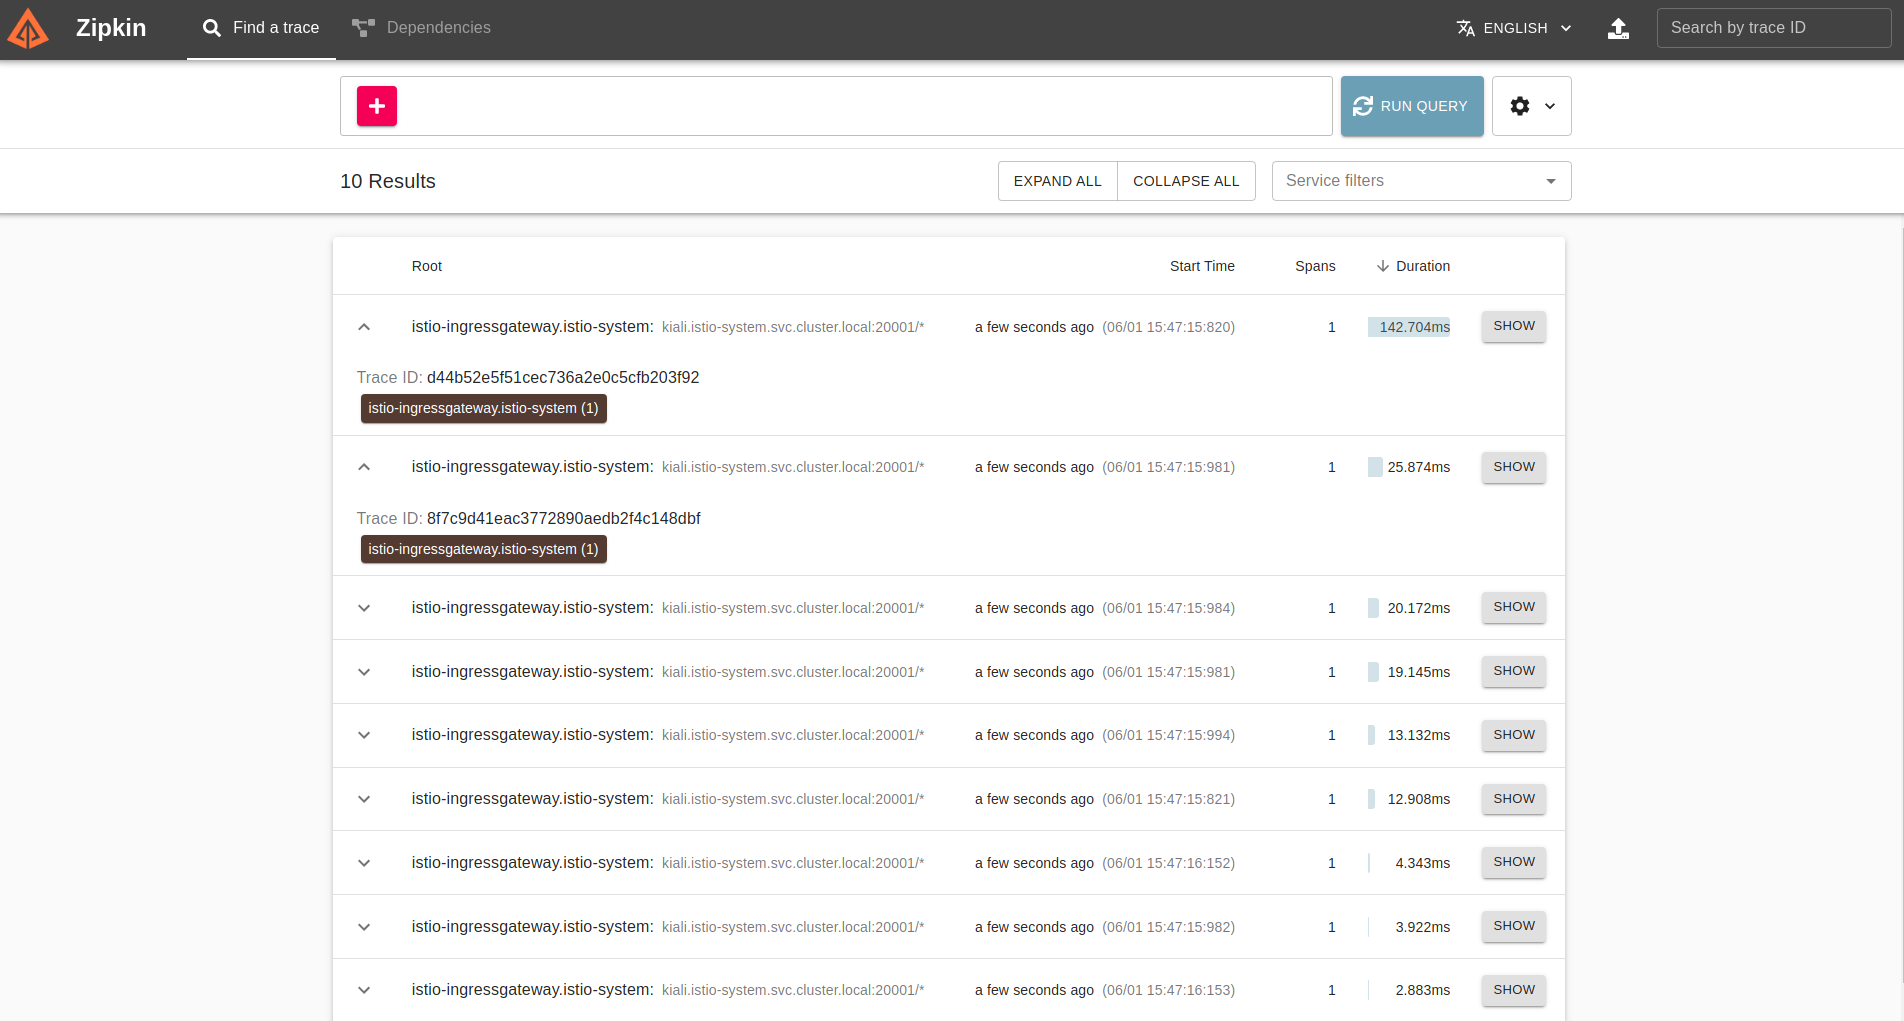
Zipkin是一个针对分布式系统的分布式跟踪解决方案。它是一个捕捉分布式跟踪的工具,并提供一个集中的跟踪视图。这对于一个微服务的设置是至关重要的,因为一个请求可能跨越多个服务,而调试需要追踪它们。点击主屏幕上的RUN QUERY来获取最近的跟踪,并点击其中的SHOW。
清理GCP集群
一旦你完成了实验,请确保删除你创建的集群,这样你就不会被谷歌开出一大笔账单。你可以从Google Cloud Console GUI或通过命令行使用以下命令删除集群。
gcloud container clusters delete hello-hipster
