

在这篇文章中,我将解释如何在Azure中运行的无服务器应用程序中使用WebSockets实时分发数据。我将使用的背景是一个多人高级龙与地下城(ADnD)风格的游戏,它是基于回合制的,具有实时状态更新。
你会学到
- 如何在C# Azure函数中使用无服务器WebSockets来发布消息
- 如何在JavaScript前端中使用无服务器WebSockets来接收消息
- 如何在Azure函数中使用持久实体来保持状态
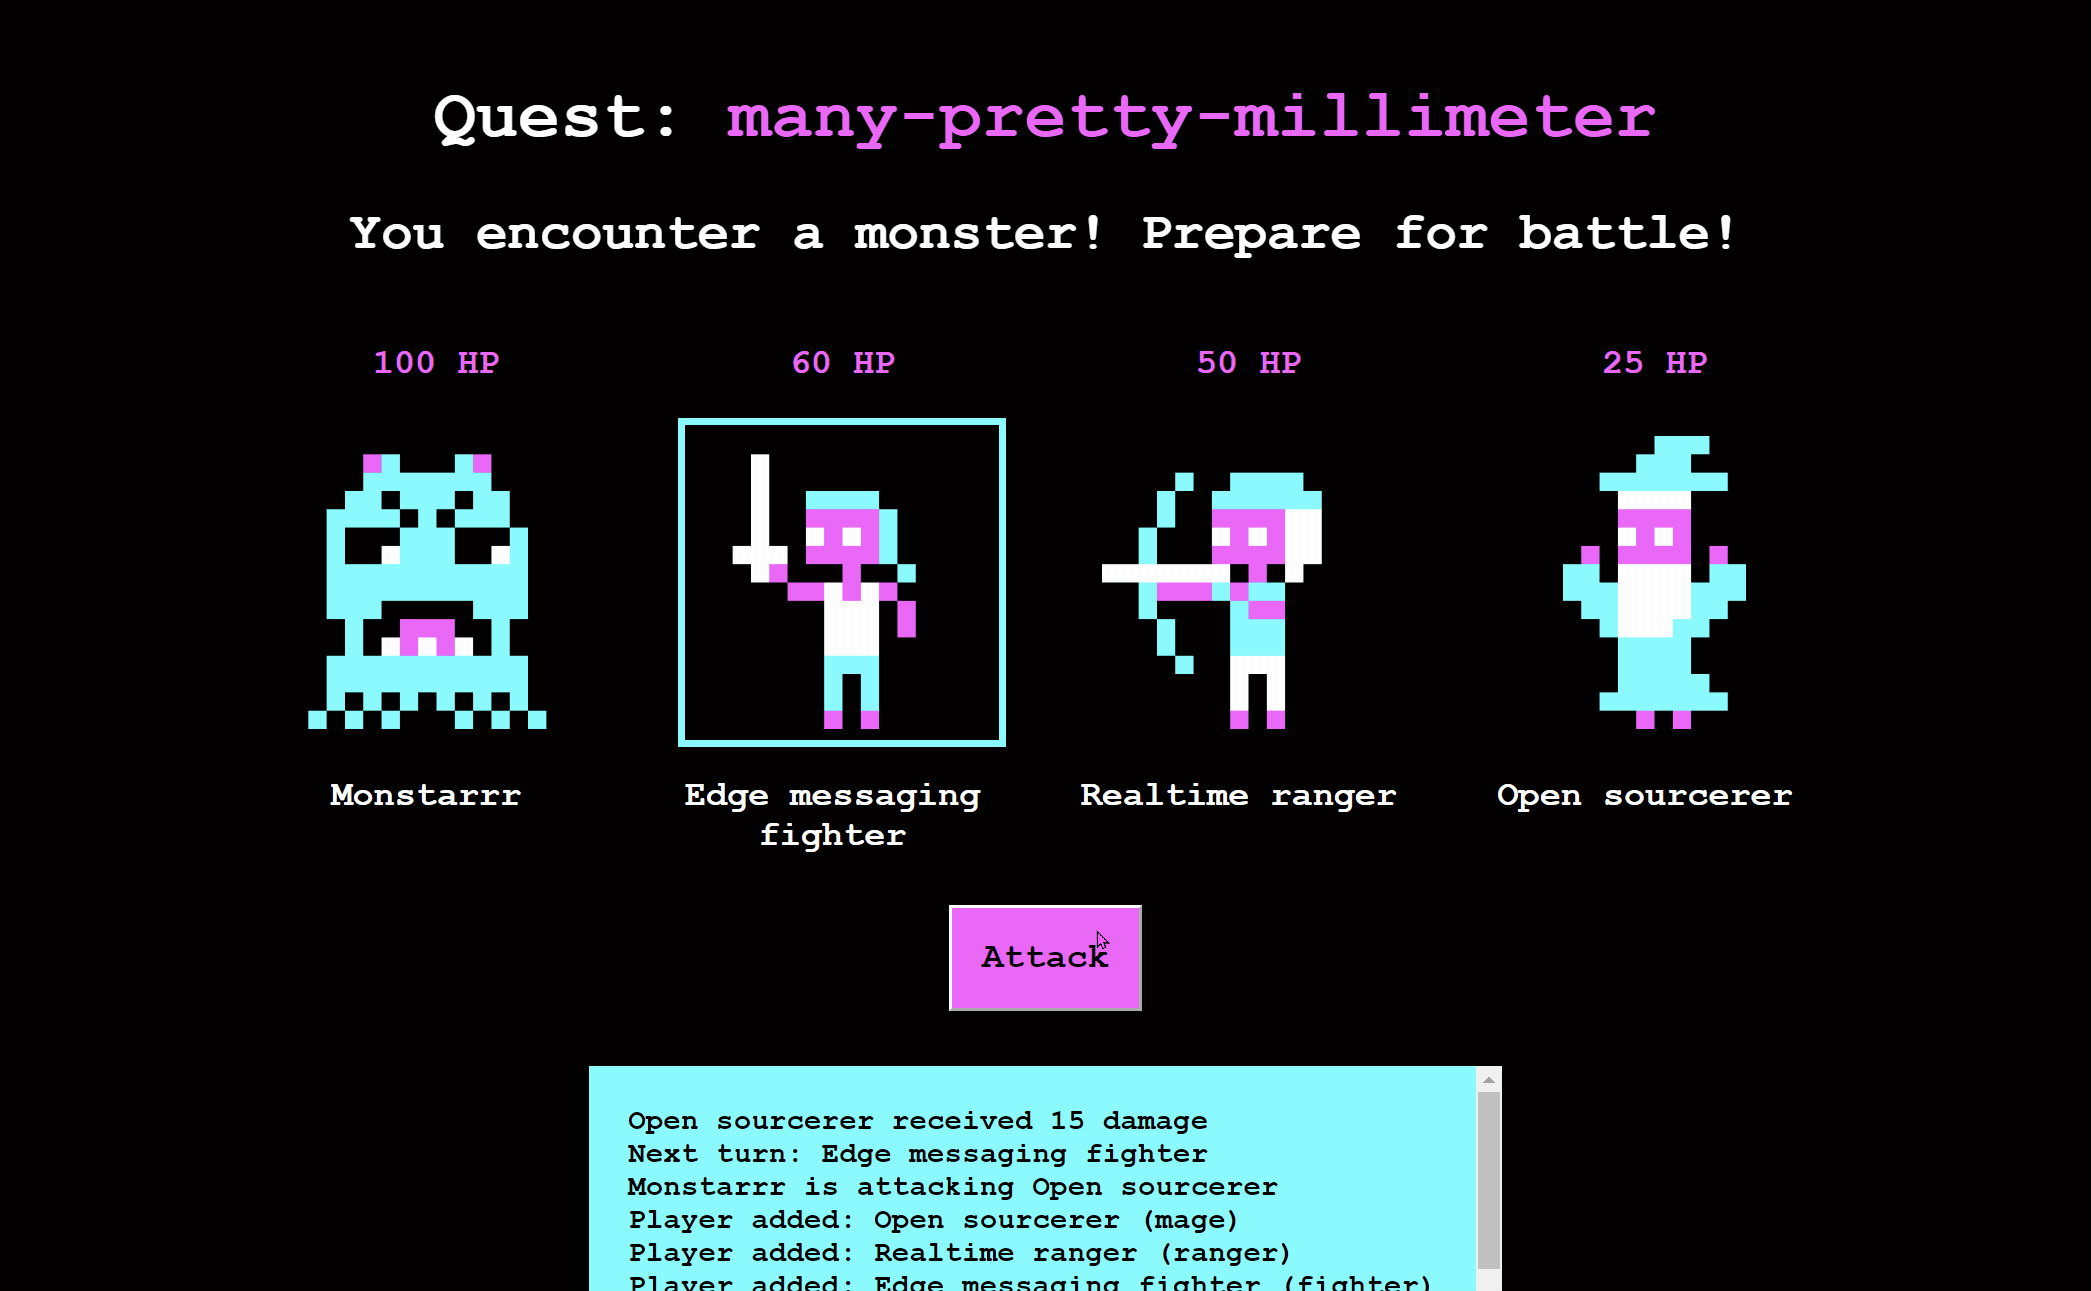
TLDR:玩实战游戏,或者看看GitHub repo中的源代码。
无服务器应用中的状态分布很复杂
在无服务器应用程序中以及在许多客户端设备上处理状态是一件困难的事情。首先,无服务器函数通常是无状态的,因此它们可以轻松扩展,而不会产生副作用,例如无服务器实例之间的状态不一致。其次,以可靠和可扩展的方式跨设备同步状态对自己来说是个挑战。客户端可能会暂时失去连接,消息可能会丢失或不符合顺序。
这篇文章的重点是使用正确的云服务,以可靠和可扩展的方式管理游戏逻辑和数据的同步。让我们假设我们有以下要求:
- 开发人员应该快速启动并运行,以制作出一个原型。
- 运行维护应该是最小的。
- 游戏逻辑应该在云中运行,并通过HTTP API公开。
- 少量的游戏数据应该被持久化。
- 后台提供的游戏数据应实时分布在所有玩家身上。
- 客户端设备应该应对临时的连接问题,并应按顺序接收信息。
技术栈
符合上述要求的一个好的解决方案是拥有一个无服务器的应用程序,它可以快速构建,维护量低,并且可以负担得起开始使用。
玩家的行动会触发基于HTTP的Azure函数,处理游戏逻辑。Ably处理函数和客户端之间的数据分配。
这些是用于游戏的高级组件:
- Azure Functions是Azure的一个无服务器计算产品。它被用来创建客户端可以交互的HTTP API。
- 实体函数,是Azure函数的扩展,用于保存游戏和玩家状态的小片段。
- Ably,一个边缘消息解决方案,提供无服务器的WebSockets来实时分发数据。
- VueJS,一个著名的前端框架。
- Azure Static Web Apps,一个提供静态文件的托管解决方案。

图1:玩家设备和无服务器应用程序之间的通信。
游戏的API
游戏的API暴露了几个HTTP端点,这些端点是用C#(.NET 6)Azure函数实现的:
- CreateQuest;由第一个开始新任务的玩家触发。
- GetQuestExists;由想加入任务的玩家触发,以确定他们是否提供了一个有效的任务ID。
- AddPlayer;由玩家在选择了他们的角色和名字后触发。
- ExecuteTurn;当玩家想要攻击时,由他们触发。
- CreateTokenRequest;提供一个认证令牌,在通过前端连接到Ably时触发。
所有的Azure函数都只是几行代码。大部分的游戏逻辑是在GameEngine,GameState, 和Player 类中实现的。所有与游戏互动有关的函数只调用GameEngine 类中的方法。GameEngine 类负责游戏流程,以及更新游戏和玩家对象的状态。
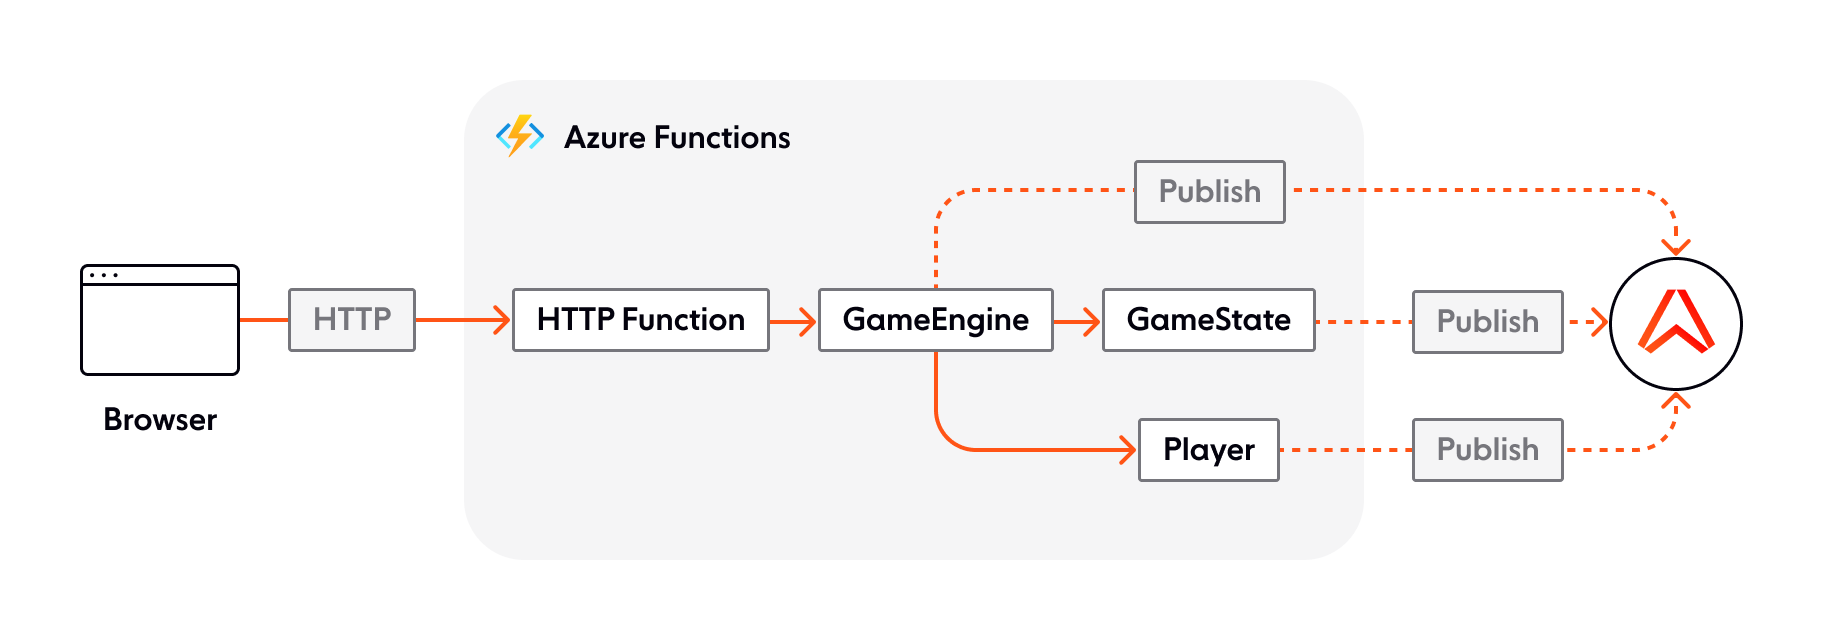
图2:HTTP Azure函数内的通信流。
创建一个新的任务
为了说明Azure函数和GameEngine 、GameState 、Player 类是如何协同工作的,我将从Azure函数开始展示CreateQuest 的功能,最后用Ably发布消息。
CreateQuest函数
当玩家点击开始任务按钮时,CreateQuest HTTP函数被触发。一个新的任务ID会在客户端生成,并在请求中提供:
public class CreateQuest
{
    // Only showing the class members relevant for this blog section.
    // For the full implementation see https://github.com/ably-labs/serverless-websockets-quest/blob/main/api/Functions/CreateQuest.cs

    [FunctionName(nameof(CreateQuest))]
    public async Task<IActionResult> Run(
        [HttpTrigger(AuthorizationLevel.Anonymous, "post", Route = null)] HttpRequestMessage req,
        [DurableClient] IDurableClient durableClient,
        ILogger log)
    {
        if (req.Content != null)
        {
            var questId = await req.Content.ReadAsStringAsync();
            var channel = _realtime.Channels.Get(questId);
            var gameEngine = new GameEngine(durableClient, questId, channel);
            var gamePhase = await gameEngine.CreateQuestAsync();
            return new OkObjectResult(gamePhase);
        }
        else
        {
            return new BadRequestObjectResult("QuestId is required");
        }
    }
}
如果请求是有效的,这个函数将调用GameEngine 类中的CreateQuestAsync() 方法。
GameEngine - CreateQuestAsync
GameEngine 负责大部分的游戏流程,并使用GameState 和Player 类来协调行动:
public class GameEngine
{
    // Only showing the class members relevant for this blog section.
    // For the full implementation see https://github.com/ably-labs/serverless-websockets-quest/blob/main/api/Models/GameEngine.cs

    public async Task<string> CreateQuestAsync()
    {
        var nextGamePhase = GamePhases.Character;
        await InitializeGameStateAsync(nextGamePhase);
        return nextGamePhase;
    }

    private async Task InitializeGameStateAsync(string phase)
    {
        var monsterEntityId = new EntityId(nameof(Player), Player.GetEntityId(_questId, CharacterClassDefinitions.Monster.Name));
        await _durableClient.SignalEntityAsync<IPlayer>(monsterEntityId, proxy => proxy.InitPlayer(
            new object[] {
                _questId,
                CharacterClassDefinitions.Monster.Name,
                CharacterClassDefinitions.Monster.CharacterClass,
                CharacterClassDefinitions.Monster.InitialHealth
            }));

        var gameStateEntityId = new EntityId(nameof(GameState), _questId);
        await _durableClient.SignalEntityAsync<IGameState>(gameStateEntityId, proxy => proxy.InitGameState(new[] { _questId, phase }));
        await _durableClient.SignalEntityAsync<IGameState>(gameStateEntityId, proxy => proxy.AddPlayerName(CharacterClassDefinitions.Monster.Name));
    }
}
InitializeGameStateAsync 方法负责:
- 创建怪物,一个
Player(一个非玩家角色,NPC)。 - 创建初始
GameState,其中包含任务ID和游戏阶段的名称。 - 将怪物添加到
GameState的玩家列表中。
有状态的实体功能
GameState 和Player 类是所谓的实体函数,这些函数是有状态的。它们的状态被持久化在一个被抽象出来的Azure存储账户中。你可以通过两种方式与实体互动:
- 信令 (
SignalEntityAsync),这涉及到单向的(fire and forget)通信。 - 读取状态 (
ReadEntityStateAsync),这涉及到双向通信。
关于实体函数的更多信息,请看Azure文档。
我选择了Entity Functions,因为它们可以快速上手,而且是存储小对象的理想选择。实体函数不需要额外的Azure服务,因为普通的函数应用已经有了一个存储账户。对于像这样的演示来说是非常理想的。
不过,实体函数也有缺点。首先,实体优先考虑耐久性而不是延迟。这意味着它不是存储数据的最快方式。这是因为信令任务被发送到一个存储队列,该队列以一定的(可配置)频率被轮询。默认配置还强制要求对信令任务进行批量处理,这在这个游戏环境中是不可取的。我改变了host.json文件中的maxQueuePollingInterval 和maxEntityOperationBatchSize 设置,以便有一个可接受的延迟和一致性:
{
    "version": "2.0",
    "extensions": {
        "durableTask": {
          ...
          "storageProvider" : {
            "maxQueuePollingInterval": "00:00:01"
          },
          "maxEntityOperationBatchSize": 1
        }
    },
    ...
}
阅读Azure文档,了解更多与实体函数有关的性能和规模。
Player 实体函数
Player 实体函数负责维护游戏中玩家的状态。游戏中有四个玩家:怪物(NPC),和3个真正的玩家。每个人都有自己的Player 实体函数:
[JsonObject(MemberSerialization.OptIn)]
public class Player : IPlayer
{
    // Only showing the class members relevant for this blog section.
    // For the full implementation see https://github.com/ably-labs/serverless-websockets-quest/blob/main/api/Models/Player.cs

    [JsonProperty("questId")]
    public string QuestId { get; set; }

    [JsonProperty("playerName")]
    public string PlayerName { get; set; }

    [JsonProperty("characterClass")]
    public string CharacterClass { get; set; }

    [JsonProperty("health")]
    public int Health { get; set; }

    public async Task InitPlayer(object[] playerFields)
    {
        QuestId = (string)playerFields[0];
        PlayerName = (string)playerFields[1];
        CharacterClass = (string)playerFields[2];
        Health = Convert.ToInt32(playerFields[3]);
        await _publisher.PublishAddPlayer(QuestId, PlayerName, CharacterClass, Health);
    }
}
一旦一个Player 实体被初始化,就会有一条消息被发布到Ably频道。已经加入任务的玩家都订阅了这个频道,并会收到新玩家加入的消息:
对实体函数的操作建议通过接口来实现,以确保类型检查。然而,对实体接口有一些限制,如Azure文档中所述。一个限制是,接口方法不能有一个以上的参数。由于我想一次性初始化一个
Player实体并设置多个参数,而不是单独设置每个参数,所以我决定提供一个对象数组作为参数。这就需要将数组元素铸造/转换为正确的类型。这并不理想,但它是可行的。
GameState 实体函数
GameState 实体函数负责维护游戏的状态,如任务ID、玩家名字和游戏阶段(开始、角色选择、播放、结束):
[JsonObject(MemberSerialization.OptIn)]
public class GameState : IGameState
{
    // Only showing the class members relevant for this blog section.
    // For the full implementation see https://github.com/ably-labs/serverless-websockets-quest/blob/main/api/Models/GameState.cs

    [JsonProperty("questId")]
    public string QuestId { get; set; }

    [JsonProperty("phase")]
    public string Phase { get; set; }

    public async Task InitGameState(string[] gameStateFields)
    {
        QuestId = gameStateFields[0];
        Phase = gameStateFields[1];
        await _publisher.PublishUpdatePhase(QuestId, Phase);
    }

    [JsonProperty("players")]
    public List<string> PlayerNames { get; set; }

    public async Task AddPlayerName(string playerName)
    {
        if (PlayerNames == null)
        {
            PlayerNames =  new List<string> { playerName };
        }
        else
        {
            PlayerNames.Add(playerName);
        }

        if (IsPartyComplete)
        {
            await UpdatePhase(GamePhases.Play);
            await Task.Delay(2000);
            await AttackByMonster();
        }
    }

    public async Task UpdatePhase(string phase)
    {
        Phase = phase;
        await _publisher.PublishUpdatePhase(QuestId, Phase);
    }

    private async Task AttackByMonster()
    {
        var playerAttacking = CharacterClassDefinitions.Monster.Name;
        var playerUnderAttack = GetRandomPlayerName();
        var damage = CharacterClassDefinitions.GetDamageFor(CharacterClassDefinitions.Monster.CharacterClass);
        await _publisher.PublishPlayerAttacking(QuestId, playerAttacking, playerUnderAttack, damage);
        await Task.Delay(1000);
        var playerEntityId = new EntityId(nameof(Player), Player.GetEntityId(QuestId, playerUnderAttack));
        Entity.Current.SignalEntity<IPlayer>(playerEntityId, proxy => proxy.ApplyDamage(damage));
        await Task.Delay(1000);
        var nextPlayerName = GetNextPlayerName(CharacterClassDefinitions.Monster.Name);
        await _publisher.PublishPlayerTurnAsync(QuestId, $"Next turn: {nextPlayerName}", nextPlayerName);
    }
}
GameState 也执行一些动作,如向Player 实体发出信号和发布消息,这在AttackByMonster 方法中可以看到:
请注意,
AttackByMonster方法包含对Task.Delay()的两次调用。这是为了在发布关于自动怪物攻击的消息之间增加一点延迟。如果没有延迟,与真正的玩家相比,行动就会快得多。由于这是一个回合制游戏,有实时的状态更新,这对我来说似乎更自然。
发布信息
API中游戏逻辑功能的最后一步是向加入任务的玩家发布消息。由于有几个类需要访问这个功能,为了便于使用,我把它包装在一个Publisher 类中:
public class Publisher
{
    // Only showing the class members relevant for this blog section.
    // For the full implementation see https://github.com/ably-labs/serverless-websockets-quest/blob/main/api/Models/Publisher.cs

    public async Task PublishAddPlayer(string questId, string playerName, string characterClass, int health)
    {
        if (_ablyClient != null)
        {
            var channel = _ablyClient.Channels.Get(questId);
            await channel.PublishAsync(
                "add-player",
                    new
                    {
                        name = playerName,
                        characterClass = characterClass,
                        health = health
                    }
                );
        }
    }

    public async Task PublishUpdatePhase(string questId, string phase, bool? teamHasWon = null)
    {
        if (_ablyClient != null)
        {
            var channel = _ablyClient.Channels.Get(questId);
            await channel.PublishAsync(
                "update-phase",
                new
                {
                    phase = phase,
                    teamHasWon = teamHasWon
                }
            );
        }
    }
}
发布消息是API中最简单的部分。上面代码样本中的_ablyClient 是Ably REST客户端的一个实例,负责向一个频道发布消息。使用REST客户端是因为代码是在一个短暂的Azure函数中运行的,不需要双向的WebSocket连接。客户端检索通道,在这种情况下是quest ID,然后调用PublishAsync ,接受事件名称和有效载荷。
客户端接收消息
客户端使用基于WebSockets的实时Ably客户端,订阅通过API发布的消息。根据收到的消息类型,游戏进展到下一阶段,本地玩家状态被更新。因此,即使这是一个回合制游戏,API中的更新也会导致与玩家的实时通信,以更新他们的本地玩家状态。
客户端需要连接到Ably以实时接收信息。当玩家开始一个新的任务或加入一个任务时,createRealtimeConnection 函数被调用:
async createRealtimeConnection(clientId: string, questId: string) {
    if (!this.isConnected) {
        const realtimeClient = new Realtime.Promise({
            authUrl: `/api/CreateTokenRequest/${clientId}`,
            echoMessages: false,
        });
        this.realtimeClient = realtimeClient;
        realtimeClient.connection.on("connected", async (message: Types.ConnectionStateChange) => {
            this.isConnected = true;
            const messageText = `Ably connection status: ${realtimeClient.connection.state}`;
            this.writeMessage(messageText);
            await this.attachToChannel(questId);
        });

        realtimeClient.connection.on("disconnected", () => {
            this.isConnected = false;
            const messageText = `Ably connection status: ${realtimeClient.connection.state}`;
            this.writeMessage(messageText);
        });
    }
},
async attachToChannel(channelName: string) {
    const channelInstance = this.realtimeClient?.channels.get(
        channelName,
        {
            params: { rewind: "2m" },
        }
    );
    this.channelInstance = channelInstance;
    this.subscribeToMessages();
},
当一个新的Realtime 对象的实例被创建时,通过调用API中的CreateTokenRequest 端点来设置authUrl 。这将返回一个JWT令牌,用于与Ably进行认证。这种方法可以防止任何API密钥出现在前端,并有可能在源控制中结束。
一旦建立连接,客户端就会附着在通道上(以questId 命名)并订阅Ably发布的消息。
作为一个玩家攻击时前端如何更新的例子,让我们看看player-under-attack 消息是如何处理的:
subscribeToMessages() {

    // Only showing the functions relevant for this blog section.
    // For the full implementation see https://github.com/ably-labs/serverless-websockets-quest/blob/main/src/stores/index.ts

    this.channelInstance?.subscribe(
        "player-under-attack",
        (message: Types.Message) => {
            this.handlePlayerIsUnderAttack(message);
        }
    );
},

handlePlayerIsUnderAttack(message: Types.Message) {
    if (this.teamHasWon !== undefined) return;
    const playerName: string = message.data.name;
    const characterClass: CharacterClass = message.data.characterClass as CharacterClass;
    const health: number = message.data.health;
    const damage: number = message.data.damage;
    const isDefeated: boolean = message.data.isDefeated;
    const messageText = `${playerName} received ${damage} damage`;
    this.writeMessage(messageText);
    this.updatePlayer(playerName, characterClass, health, damage, isDefeated, false, true);
},

updatePlayer(playerName: string, characterClass: CharacterClass, health: number, damage: number, isDefeated: boolean, isAvailable: boolean, isUnderAttack: boolean) {
    if (characterClass === CharacterClass.Fighter) {
        this.$patch({
            fighter: {
                name: playerName,
                health: health,
                damage: damage,
                isAvailable: isAvailable,
                isUnderAttack: isUnderAttack,
                isDefeated: isDefeated
            },
        });
        setTimeout(() => this.fighter.damage = 0, 3000);
    } else if (characterClass === CharacterClass.Ranger) {
        // Update ranger object
    } else if (characterClass === CharacterClass.Mage) {
        // Update mage object
    } else if (characterClass === CharacterClass.Monster) {
        // Update monster object
    }
},
本地Vue商店(Pinia)包含每个球员的定义。存储器会根据Ably推送的消息来更新数据。
Vue组件,如PlayerUnit ,使用本地数据存储来显示角色信息:
<!-- See https://github.com/ably-labs/serverless-websockets-quest/blob/main/src/components/PlayerUnit.vue for the full implementation. -->

<template>

    <div v-if="!props.isPlayerSelect">
        <p v-if="props.useHealth">
            <span class="health">{{ targetPlayer.health }} HP</span>
            <span class="damage" v-if="showDamage()">-{{ targetPlayer.damage }}</span>
        </p>
        <p class="stats" v-if="props.showStats">
            <span>Damage caused:</span>
            <span class="info">{{ targetPlayer.totalDamageApplied }}</span>
        </p>
        <img v-bind:class="{ isActive: isActive(), isDefeated: targetPlayer.isDefeated }" :alt="targetPlayer.characterClass" :src="getAsset()" />
        <figcaption>{{ targetPlayer.name }}</figcaption>
    </div>

    <div v-if="props.isPlayerSelect">
        <input type="radio" :id="targetPlayer.characterClass" name="character" :value="targetPlayer.characterClass" v-model="store.characterClass" @click="store.playerName=getName()" :disabled="isDisabled()" />
        <label :for="targetPlayer.characterClass">
            <img :alt="targetPlayer.characterClass" :src="getAsset()" />
            <figcaption>{{ getName() }}</figcaption>
        </label>
    </div>

</template>
在本地运行
要在本地运行该解决方案,你需要以下依赖项:
- .NET 6.C# Azure Functions所需的.NET运行时间。
- Node 16.Vue前端所需的JavaScript运行时间。
- Azure Functions核心工具:这是VSCode的Azure Functions扩展的一部分,当在VSCode中打开此 repo时,应推荐安装。
- Azurite:这是一个本地存储模拟器,是Entity Functions所需要的。当在VSCode中打开此 repo时,会出现一条安装此扩展的信息。
- Azure Static Web Apps CLI。这是开发和部署Azure Static Web Apps的命令行界面。通过在终端运行此命令来全局安装此工具:
npm install -g @azure/static-web-apps-cli。 - 注册一个免费的Ably账户,创建一个新的应用程序,并复制API密钥。
操作步骤
-
克隆或分叉Serverless WebSockets QuestGitHub repo。
-
在根文件夹中运行
npm install。 -
将
api\local.settings.json.example文件重命名为api\local.settings.json。 -
在
local.settings.json文件的ABLY_APIKEY字段中复制/粘贴Ably的API密钥。 -
启动Azurite (VSCode:
CTRL+SHIFT+P -> Azurite: Start) -
在根文件夹中运行
swa start。你会看到这个错误信息,这其实是一个警告,你可以在本地运行解决方案时忽略它:
Function app contains non-HTTP triggered functions. Azure Static Web Apps managed functions only support HTTP functions. To use this function app with Static Web Apps, see 'Bring your own function app'.终端最终会输出这条信息,表明模拟的静态Web应用正在运行:
Azure Static Web Apps emulator started at http://localhost:4280. Press CTRL+C to exit. -
打开浏览器并导航到
http://localhost:4280/
部署到云中
要让整个解决方案在Azure云中运行,你需要一个Azure账户,以及一个GitHub账户。
免费的Azure静态Web应用(SWA)层带有管理Azure函数。这些是包含在静态Web应用服务中的功能。这些托管函数的缺点是只支持HTTP触发函数。我们的游戏API也使用实体函数。为了让静态网络应用程序与我们的API一起工作,我们需要:
- 将API单独部署到一个专门的函数应用中。
- 使用Azure Static Web Apps的标准(非免费)层。
- 更新SWA的配置,以表明正在使用一个专用的函数应用程序。
部署步骤
-
我创建了一个GitHub工作流来:
-
创建Azure资源
-
构建C# API
-
将API部署到Function App上
这个方法使用了Azure登录动作,需要创建Azure服务委托人,在这个README中有更详细的解释。
-
-
在Azure门户中使用这个快速启动创建了SWA资源。这将产生一个生成的GitHub工作流,它将被包含在GitHub仓库中。
-
按照这些说明来配置SWA,使其使用专门的功能应用。
总结
使用无服务器技术是在云中快速启动和运行的好方法,而且不用担心服务器的维护问题。通过将无服务器函数(Azure Functions)与无服务器WebSockets(Ably)相结合,你可以构建一个具有成本效益且能自动扩展的实时解决方案。
虽然这个演示是围绕着游戏概念进行的,但其他实时和协作体验也很适合这种技术栈。这些包括聊天应用程序、位置跟踪应用程序和实时监控仪表板。
你已经学会了如何从Azure Functions后端发布消息,并在VueJS前端接收消息,为玩家创造一个实时体验。
我鼓励你分叉GitHub上的存储库,看看你是否可以扩展它(添加一个可以治疗其他玩家的牧师?)如果你有任何与这个项目有关的问题或建议,请不要犹豫,在Twitter上联系我,或加入我们的Discord服务器。
