

我们每天都在开发新的功能,修复错误,最重要的是,重构大量的代码。从小型到大型,所有的应用程序都需要自动化测试,以确保它们在其他开发人员添加新功能时不会中断。
React Native应用也不例外,有几个库可以让测试体验变得快乐和有趣。以Semaphore的开源演示应用程序为例,你将学到:
- 在你的React Native应用中使用哪些工具来实现自动化测试。
- 如何设置工具和运行测试。
- 如何编写单元、集成和端到端测试。
要求
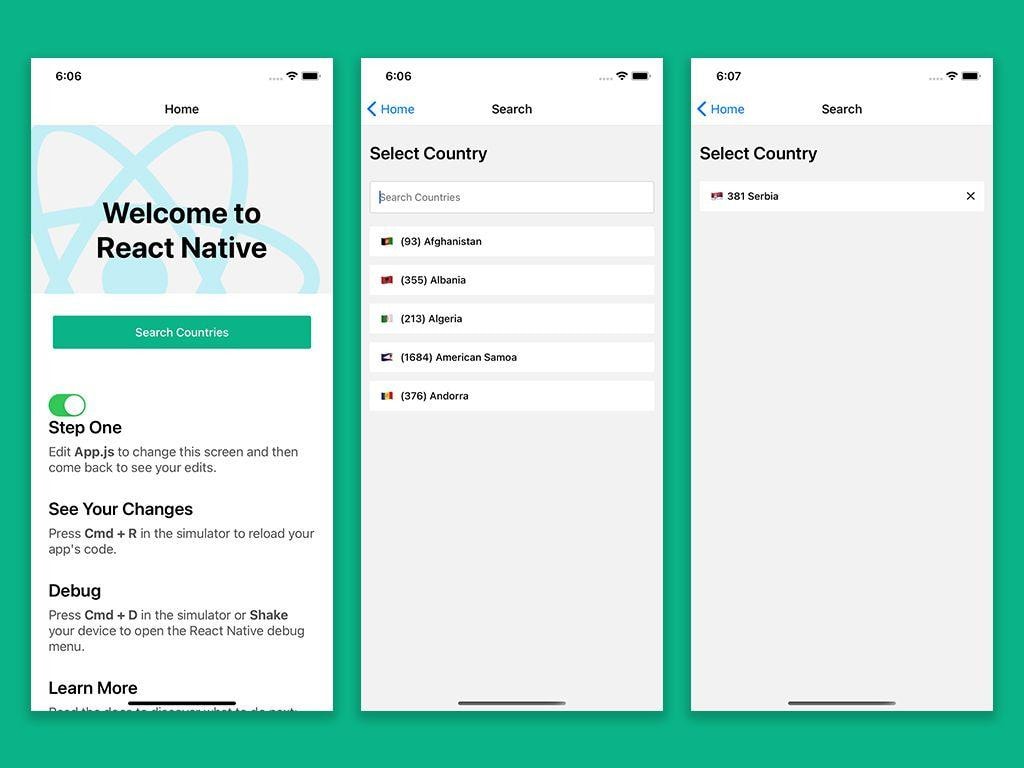
为了了解React Native应用的UI测试,我们开发了一个小型应用来搜索和存储国家数据:
semaphoreci-demos / semaphore-demo-react-native
这个应用使用了react-navigation,react-native-vector-icons,和async-storage。下面是我们的用户界面的几个截图:
用打字和提示设置质量检查
随着应用程序规模的增长,我们测试的执行将变得更加昂贵。因此,最好提前计划以节省时间,并确保我们的代码中没有任何基本问题,如错别字。
静态打字和提示可以帮助我们避免此类问题,在构建和测试过程中节省大量的处理。TypeScript和Eslint可以成为为我们的应用程序设置类型和提示的超级有用的工具。感谢在react-native-cli和react-native-typescript-template上工作的牛人,我们有一个很好的现成的工具箱来启动一个React Native项目。
单元测试
单元测试确保你的应用程序的各个单元在隔离状态下按预期工作。
在我们的React Native应用中,我们使用 Jest 作为一个测试框架*。Jest是一个令人愉快的JavaScript测试框架,重点在于简单*。凭借其零配置设置和并行化能力,Jest是最广泛采用的测试框架之一。它为React Native应用程序进行了预配置。
添加React Native测试库
如上所述,我们的测试将更侧重于用户行为而不是实现细节。React-test-renderer可以帮助我们渲染我们组件的纯JavaScript对象,而不依赖DOM或任何其他渲染器。测试用户行为将需要我们与这些组件进行交互。建立在react-test-renderer之上的React-Native测试库(RNTL)提供了一个简单的API来对react-native组件执行用户交互。
下面是我们如何将RNTL添加到我们的应用程序中:
yarn add -D @testing-library/react-native
编写测试
UI测试中最基本的单元是组件。为了介绍API并熟悉我们想要实现的东西,我们将分享一个简单的Button组件的测试。下面是对它的测试:
import 'react-native';import React from 'react';
import {render, fireEvent} from '@testing-library/react-native';

// import { render } from 'utils/testWrapper';
import Button from '../index';

// Describing a test suite
describe('<Button />', () => {
  // Describing our test
  it('Calls onPress', async () => {
    // Mocking onPress method so we can check if its called or not
    const onPress = jest.fn();

    // test id to be applied on our button component
    const testID = 'button';

    // Rendering Button component using react-native-test-renderer.
    const {getByTestId} = await render(
      <Button testID={testID} onPress={onPress} label="Button" />,
    );

    // Grabbing our button component to perform actions on it.
    const button = getByTestId(testID);

    /**
     * RNTL gives us API to fire events on node
     * Here we are firing on press event
     */
    fireEvent.press(button);

    // Asserting if given mock method is called or not.
    expect(onPress).toHaveBeenCalledTimes(1);
  });
});
这里没有什么新东西:首先,我们用RNTL的渲染器在props中用模拟方法渲染了我们的组件。接下来,我们在我们的组件上触发了一个按压事件,因此断言,它随后调用了我们通过props提供的模拟方法。如果这个测试通过了,我们就可以确定我们的Button是按预期工作的。
让我们跳到一个现实生活中的例子。如前所述,该应用程序将允许用户选择他们的国家。为此,我们有一个CountriesAutocomplete 组件,它提供了一个 TextInput 和一个列表。就像其他的自动完成一样,它将根据用户的输入来呈现结果。下面是这个组件的测试套件的样子:
import 'react-native';import React from 'react';
import {render, fireEvent} from '@testing-library/react-native';

import CountriesAutocomplete from '../index';

const COUNTRY_NAME = 'Serbia';

// Describing a test suite
describe('<CountriesAutocomplete />', () => {
  // Describing our test
  it('Displays Searched Item', async () => {
    // Mocking onPress method so we can check if its called or not
    const onSelect = jest.fn();

    // Rendering Button component using RNTL.
    const autocomplete = await render(
      <CountriesAutocomplete onSelect={onSelect} />,
    );

    // Grabbing our input to perform actions on it.
    const inputTestID = 'countriesAutocompleteInput';
    const textInput = autocomplete.getByTestId(inputTestID);

    /**
     * RNTL gives us API to fire events on node
     * Here we are firing on changeText event
     */
    fireEvent(textInput, 'focus');
    fireEvent.changeText(textInput, COUNTRY_NAME);
    expect(textInput.props.value).toBe(COUNTRY_NAME);

    // Grabbing our input to perform actions on it.
    const listItemTestID = `listItem-${COUNTRY_NAME}`;
    const firstListItem = autocomplete.getByTestId(listItemTestID);
    expect(firstListItem).toBeTruthy();
  });

  it('onSelect is called when item is pressed', async () => {
    // Mocking onPress method so we can check if its called or not
    const onSelect = jest.fn();

    // Rendering Button component using react-native-test-renderer.
    const {getByTestId} = await render(
      <CountriesAutocomplete onSelect={onSelect} />,
    );

    // Grabbing our input to perform actions on it.
    const inputTestID = 'countriesAutocompleteInput';
    const textInput = getByTestId(inputTestID);

    /**
     * RNTL gives us API to fire events on node
     * Here we are firing on focus & changeText event
     */
    fireEvent(textInput, 'focus');
    fireEvent.changeText(textInput, COUNTRY_NAME);

    // Grabbing our input to perform actions on it.
    const listItemTestID = `listItem-${COUNTRY_NAME}`;
    const firstListItem = getByTestId(listItemTestID);
    fireEvent.press(firstListItem);

    expect(onSelect).toHaveBeenCalledTimes(1);
  });
});
该套件有两个测试。第一个测试断言,当用户输入文本时,该组件的列表会出现。另外,结果应该与输入相匹配。第二个测试断言,当用户从列表中选择一个项目时,它应该调用我们通过props提供的模拟函数。
执行测试
Jest搜索所有的测试文件并通过一个命令执行它们。这里就是我们的执行和结果的样子:

在UI领域,单元测试可能不足以确保你的用户不会面临任何bug。但实用的单元测试可以帮助你更有信心地专注于集成组件。
集成测试
一旦我们确定我们的组件是按预期工作的,我们就可以检查它们是否能与其他的组件很好地运作。集成测试是UI测试中最关键的部分,可以给你很大的信心,使你的应用程序的功能运行良好。
编写测试案例
对于国家选择功能的集成测试,我们将测试我们的搜索屏幕。 这个屏幕应该呈现Countries Autocomplete和选定的国家。它还会将选择的国家存储在React Native提供的AsyncStorage中。此外,再次选择所选择的国家应该从AysncStorage中移除它。
装备环境
RNTL在无头模式下渲染React组件,这意味着在执行过程中,本地库将不可用。然而,Jest允许我们对本地库的方法进行模拟。这里是我们的模拟文件:
/**
 * Mocking all required for react-navigation
 */
import 'react-native-gesture-handler/jestSetup';

jest.mock('react-native-iphone-x-helper', () => ({
  getStatusBarHeight: jest.fn(),
  getBottomSpace: jest.fn(),
}));

jest.mock('@react-native-community/masked-view', () => ({}));

/* Silence the warning: Animated: `useNativeDriver` is
 * not supported because the native animated module is missing
 */
jest.mock('react-native/Libraries/Animated/NativeAnimatedHelper');

/**
 * Mocking Async Storage
 */
jest.mock('@react-native-async-storage/async-storage', () => ({
  setItem: jest.fn(),
  getItem: jest.fn(),
  removeItem: jest.fn(),
}));
正如你所看到的,我们已经模拟了AsyncStorage的setItem,getItem,removeItem 方法,使我们的集成测试与平台无关。
编写集成测试
我们将用RNTL编写我们的集成测试,将我们的功能集分为三个小测试:
import 'react-native';import React from 'react';
import {render, fireEvent} from '@testing-library/react-native';
import AsyncStorage from '@react-native-async-storage/async-storage';

import SearchScreen, {COUNTRY_LOCAL_STORAGE_KEY} from '../index';

const COUNTRY_NAME = 'Serbia';
const COUNTRY_DETAILS =
  '{"name":"Serbia","native":"Србија","phone":"381","continent":"EU","capital":"Belgrade","currency":"RSD","languages":["sr"],"emoji":"🇷🇸","emojiU":"U+1F1F7 U+1F1F8"}';

// Describing a test suite
describe('<SearchScreen />', () => {
  it('Displays selected country', async () => {
    /**
     * Rendering screen
     */
    const screen = await render(<SearchScreen />);

    /*
     * Grabbing our input to perform actions on it.
     */
    const inputTestID = 'countriesAutocompleteInput';
    const textInput = screen.getByTestId(inputTestID);

    /**
     * Here we are firing on focus & changeText event
     */
    fireEvent(textInput, 'focus');
    fireEvent.changeText(textInput, COUNTRY_NAME);

    /**
     * Selecting item from list
     */
    const listItemTestID = `listItem-${COUNTRY_NAME}`;
    const firstListItem = screen.getByTestId(listItemTestID);
    fireEvent.press(firstListItem);

    /**
     * Grabbing & asserting selected item's name
     */
    const selectedCountryName = screen.getByTestId('selectedItemName');
    expect(selectedCountryName).toBeTruthy();
    expect(selectedCountryName.children).toContain(COUNTRY_NAME);
  });

  it('Stores selected country in local storage', async () => {
    /**
     * Rendering screen
     */
    const screen = await render(<SearchScreen />);

    /**
     * Here we are searching & selecting country
     */
    const inputTestID = 'countriesAutocompleteInput';
    const textInput = screen.getByTestId(inputTestID);

    fireEvent(textInput, 'focus');
    fireEvent.changeText(textInput, COUNTRY_NAME);

    const listItemTestID = `listItem-${COUNTRY_NAME}`;
    const firstListItem = screen.getByTestId(listItemTestID);
    fireEvent.press(firstListItem);

    /**
     * Asserting country storage.
     */
    expect(AsyncStorage.setItem).toHaveBeenCalledWith(
      COUNTRY_LOCAL_STORAGE_KEY,
      COUNTRY_DETAILS,
    );
  });

  it('Removes selected country from local storage', async () => {
    /**
     * Rendering screen
     */
    const screen = await render(<SearchScreen />);

    /**
     * Here we are searching, selecting country & removing
     */
    const inputTestID = 'countriesAutocompleteInput';
    const textInput = screen.getByTestId(inputTestID);

    fireEvent(textInput, 'focus');
    fireEvent.changeText(textInput, COUNTRY_NAME);

    const listItemTestID = `listItem-${COUNTRY_NAME}`;
    const firstListItem = screen.getByTestId(listItemTestID);
    fireEvent.press(firstListItem);

    const selectedItem = screen.getByTestId('selectedItem');
    fireEvent.press(selectedItem);

    /**
     * Asserting country deletion.
     */
    expect(AsyncStorage.removeItem).toHaveBeenCalledWith(
      COUNTRY_LOCAL_STORAGE_KEY,
    );
  });
});
下面是每个测试的总结。
- 显示所选国家:我们断言,当用户在搜索屏幕上点击一个项目时,国家名称会自动完成,屏幕上会显示该项目为所选。
- 在本地存储中存储所选国家:我们断言搜索屏幕应该通过调用AsyncStorage的
setItem方法在本地存储中存储所选项目。 - 从本地存储中移除所选国家:我们断言,当用户点击所选项目时,使用AsyncStorage的
removeItem方法将其从本地存储中移除。
执行集成测试
现在是时候看看我们所有的组件是否能一起工作了;执行方式将与单元测试相同。输出结果见下文:

用Detox进行端到端测试
现在我们已经确定我们的不同组件在一起工作良好,我们可以开始进行端到端测试(E2E)。在最简单的情况下,E2E测试就像开发机器人,执行一个真正的用户对你的应用程序的所有可能的动作。
E2E旨在复制真实的用户场景,以验证我们的应用程序在现实生活中的使用情况。为了实现这一目标,我们必须在一个与最终用户的环境相似的环境中执行我们的测试。对于移动应用程序,这意味着我们应该在真实设备或模拟器上进行测试。
有几个工具可用于移动应用程序的E2E测试。我们已经选择了 解毒Detox*:一个用于移动应用的灰盒端到端测试和自动化库*。Detox是为react-native建立的,并提供优秀的开发者体验,这是它被选中背后的关键因素。Detox的用户交互的API使其更容易以用户实际使用的方式测试应用程序。
平台设置
让我们开始设置Detox,将包和它的类型添加到我们的应用程序中:
yarn add detox @types/detox -D
就像其他测试依赖一样,我们将把Detox和类型作为开发依赖添加。安装完成后,是时候配置Detox了。 在这篇文章中,我们将只触及一些基本的东西来让我们的测试运行,但如果你想真正深入了解,你可以在深入指南中了解更多细节。
下面我们定义了Detox的配置:.detoxrc.js:
module.exports = {  "configurations": {
    "ios.sim.debug": {
      "binaryPath": "ios/build/Build/Products/Debug-iphonesimulator/ReactNativeSemaphoreNew.app",
      "build": "xcodebuild ONLY_ACTIVE_ARCH=YES -workspace ios/ReactNativeSemaphoreNew.xcworkspace -scheme ReactNativeSemaphoreNew -configuration Debug -sdk iphonesimulator -derivedDataPath ios/build -UseModernBuildSystem=YES",
      "type": "ios.simulator",
      "name": "iPhone 11"
    },
    "ios.sim.release": {
      "binaryPath": "ios/build/Build/Products/Release-iphonesimulator/ReactNativeSemaphoreNew.app",
      "build": "xcodebuild ONLY_ACTIVE_ARCH=YES -workspace ios/ReactNativeSemaphoreNew.xcworkspace -scheme ReactNativeSemaphoreNew -configuration Release -sdk iphonesimulator -derivedDataPath ios/build -UseModernBuildSystem=YES",
      "type": "ios.simulator",
      "name": "iPhone 11"
    },
    "android.emu.debug": {
      "binaryPath": "android/app/build/outputs/apk/debug/app-debug.apk",
      "build": "cd android && ./gradlew assembleDebug assembleAndroidTest -DtestBuildType=debug && cd ..",
      "type": "android.emulator",
      "name": "Pixel_4_API_28"
    },
    "android.emu.release": {
      "binaryPath": "android/app/build/outputs/apk/release/app-release.apk",
      "build": "cd android && ./gradlew assembleRelease assembleAndroidTest -DtestBuildType=release && cd ..",
      "type": "android.emulator",
      "name": "Nexus_S_API_24"
    }
  },
  "test-runner": "jest"
};
正如你所看到的,我们把我们的配置分为四个不同的部分,两个用于Android,两个用于iOS。两个操作系统都有测试调试和发布版本的配置。每个配置都有一个构建命令、二进制路径、类型和名称。
测试设置
继续我们的测试套件,我们将使用Jest,就像我们在单元和集成测试中一样。我们将在项目的根部创建一个e2e目录,其中包含configs.json ,由Detox读取JS环境设置。这就是它的模样:
{
    "setupFilesAfterEnv": ["./init.js"],
    "testEnvironment": "node",
    "reporters": ["detox/runners/jest/streamlineReporter"],
    "verbose": true,
    "preset": "ts-jest"
}
Detox将在测试执行的最开始执行configs中定义的初始化文件。在我们的例子中,它是init.js ,如下图所示:
const detox = require('detox');const adapter = require('detox/runners/jest/adapter');
const specReporter = require('detox/runners/jest/specReporter');

const config = require('../.detoxrc.js');

// Set the default timeout
jest.setTimeout(1000000);
jasmine.getEnv().addReporter(adapter);

// This takes care of generating status logs on a per-spec basis. By default, jest only reports at file-level.
// This is strictly optional.
jasmine.getEnv().addReporter(specReporter);

/**
 * beforeAll
 * This will be executed before our testing begins,
 * We have initialized detox with our configs here.
 */
beforeAll(async () => {
  await detox.init(config);
});

/**
 * beforeEach
 * This will be executed before each of our tests suite,
 * It can be used for several cleanup tasks.
 */
beforeEach(async () => {
  await adapter.beforeEach();
});

/**
 * afterAll
 * This will be executed after all of our tests suite,
 * Here we have add detox cleanup to.
 */
afterAll(async () => {
  await adapter.afterAll();
  await detox.cleanup();
});
这个文件定义了在我们的测试套件之前、之间和之后要执行的任务。我们也可以将每个钩子用于许多不同的清理和设置任务。
编写E2E测试
最后,是时候建立一些实际的测试了。我们将使用一个简单的测试套件来验证用户界面和主屏幕上的切换按钮行为:
import {expect, device, element, by} from 'detox';
describe('HomeScreen UI', () => {
  /**
   * beforeEach
   */
  beforeEach(async () => {
    await device.reloadReactNative();
  });

  /**
   * Most basic test
   */
  it('should show app screen text', async () => {
    await expect(element(by.text('Step One'))).toBeVisible();
    element(by.id('homeScreen')).scroll(200, 'down');
    await expect(element(by.text('See Your Changes'))).toBeVisible();
  });

  /**
   * Tests toggle behavior
   */
  it('should show switch and toggle it on', async () => {
    const isAndroid = device.getPlatform() === 'android';

    await expect(element(by.id('toggle'))).toBeVisible();
    if (!isAndroid) {
      await expect(element(by.id('toggle'))).toHaveValue('0');
      await element(by.id('toggle')).longPress();
      await expect(element(by.id('toggle'))).toHaveValue('1');
    }
  });
});
我们将保持简单,以熟悉Detox的API。下面你可以看到我们在这个套件中所做的总结。
- Detox将在套件中定义的每个测试之前运行
beforeEach钩子。由于这个套件中的所有测试都是独立的,我们将重新加载React Native以获得一个新的运行。 - 第一个测试验证了屏幕的内容。对于尺寸较小的设备,我们必须稍微滚动一下我们的屏幕,以确保所需的内容是可见的。
- 我们断言,当用户按动开关时,开关的值应该是切换的。
现在我们将添加一个套件来验证国家选择流程。正如前面定义的,这个功能允许我们的用户选择他们的国家。应用程序会保存它,所以当用户再次打开应用程序时,他们可以看到他们选择的国家。
import {expect, device, element, by} from 'detox';
const COUNTRY_NAME = 'Serbia';
const OTHER_COUNTRY_NAME = 'United States';

describe('Select Country', () => {
  /**
   * Check for UI
   */
  it('should show app search screen button', async () => {
    await expect(element(by.id('searchButton'))).toBeVisible();
  });

  /**
   * Verify navigation
   */
  it('should navigate to search screen', async () => {
    await element(by.id('searchButton')).tap();
    await expect(element(by.id('searchScreen'))).toBeVisible();
  });

  /**
   * Search & Select
   */
  it('should search & select country', async () => {
    await element(by.id('countriesAutocompleteInput')).typeText(COUNTRY_NAME);
    await element(by.id(`listItem-${COUNTRY_NAME}`)).tap();
    await expect(element(by.id('selectedItem'))).toBeVisible();
  });

  /**
   * Relaunch app & verify saved data
   */
  it('should show selected country on next launch', async () => {
    await device.reloadReactNative();
    await element(by.id('searchButton')).tap();
    await expect(element(by.id('selectedItemName'))).toHaveLabel(COUNTRY_NAME);
  });

  /**
   * Remove selected item
   */
  it('should remove selected country on press', async () => {
    await element(by.id('selectedItem')).tap();
    await expect(element(by.id('countriesAutocompleteInput'))).toBeVisible();
  });

  /**
   * Re-Iterate selection and removal
   */
  it('should select & remove country again', async () => {
    await element(by.id('countriesAutocompleteInput')).typeText(
      OTHER_COUNTRY_NAME,
    );
    await element(by.id(`listItem-${OTHER_COUNTRY_NAME}`)).tap();
    await expect(element(by.id('selectedItemName'))).toHaveLabel(
      OTHER_COUNTRY_NAME,
    );
    await element(by.id('selectedItem')).tap();
    await expect(element(by.id('countriesAutocompleteInput'))).toBeVisible();
  });

  /**
   * Relaunch app & verify data is removed
   */
  it('should persist removal of country on next launch', async () => {
    await device.reloadReactNative();
    await element(by.id('searchButton')).tap();
    await expect(element(by.id('countriesAutocompleteInput'))).toBeVisible();
  });
});
在这里,我们将测试流程分为几个小步骤,以使其更容易阅读:
- 检查用户界面:我们断言主屏幕上有一个用于导航搜索屏幕的按钮。
- 验证导航:我们断言,当用户点击适当的按钮时,搜索屏幕应该出现。
- 搜索和选择:我们通过点击搜索结果来搜索和选择一个国家。我们断言所选择的国家会如期显示。
- 重新启动应用程序并验证保存的数据:为了模仿应用程序再次启动时的情况,我们重新加载了React Native。在导航到搜索屏幕后,我们断言它显示了我们在上一步中选择的国家。
- 删除所选项目:我们断言,按下所选项目就会被删除,允许用户再次搜索一个国家。
- 重申选择和删除:为了对单一会话功能更有信心,我们用另一个国家重申了选择和删除流程。
- 重新启动应用程序并验证数据删除:就像我们重新启动我们的应用程序以检查它是否永久地存储了我们所选择的国家一样,我们对删除也做了同样的断言。
这个简短的测试套件涵盖了大部分的边缘情况。
执行E2E测试
为了执行我们的测试,我们将使用Detox构建应用程序并运行测试:
detox build --configuration ios.sim.debug
detox test --configuration ios.sim.debug

🥳它成功了!是不是感觉很好?
一言以蔽之
刚接触测试驱动开发(TDD)的开发者对自动化测试并不熟悉。他们通常对测试所创造的价值与编写测试的时间有疑问。这些争论大多源于社区中流传的几个神话。但实际情况是,自动化测试是确保软件在成长过程中不被破坏的唯一途径。
正如Alan Page所说:
"如果我们想认真对待质量问题,现在是时候厌倦寻找错误,并开始从一开始就防止它们的发生。"
你可以在这里找到我们的示例应用程序的回购
semaphoreci-demos / semaphore-demo-react-native
我们很高兴看到你希望我们为你测试其他什么功能。请随时打开问题和发送PR。
测试愉快 🚀
