

用Rust进行嵌入式编程需要一个全新的知识库。使用Raspberry Pi Zero W,你可以快速启动并运行嵌入式Rust。
本文将从一个嵌入式的*"Hello World "*开始,然后推进到一个文本到Morse代码的翻译器,指导你完成这一过程:
如何设置Pi
格式化SD卡
使用Raspberry Pi Imager,可以从Raspberry Pi软件网页上下载:
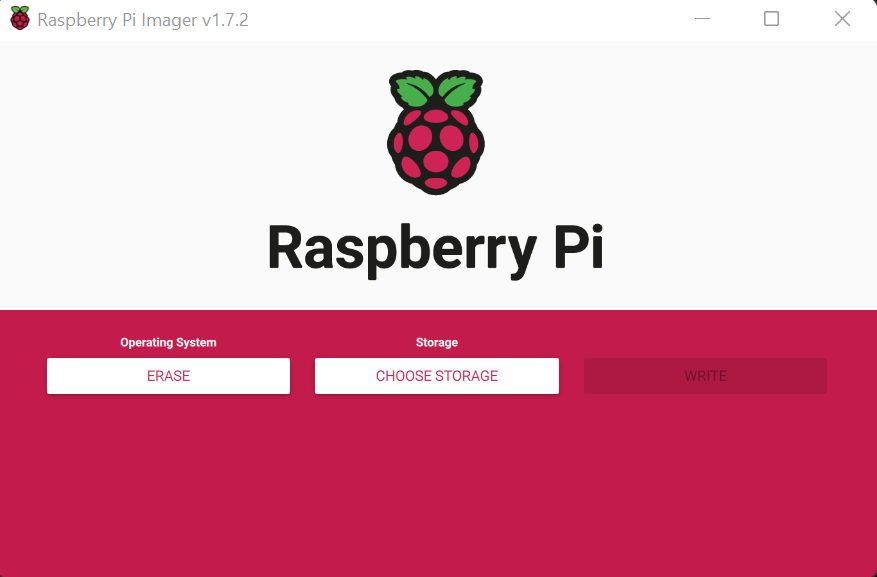
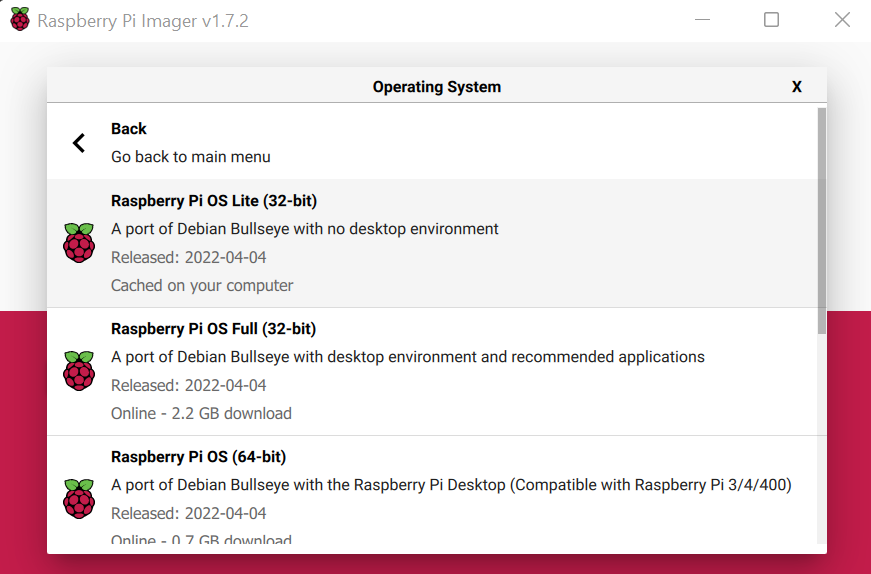
闪存发行版
我建议使用Raspberry Pi OS Lite。这是一个无头发行版,这意味着它没有图形用户界面:
配置Wifi和SSH
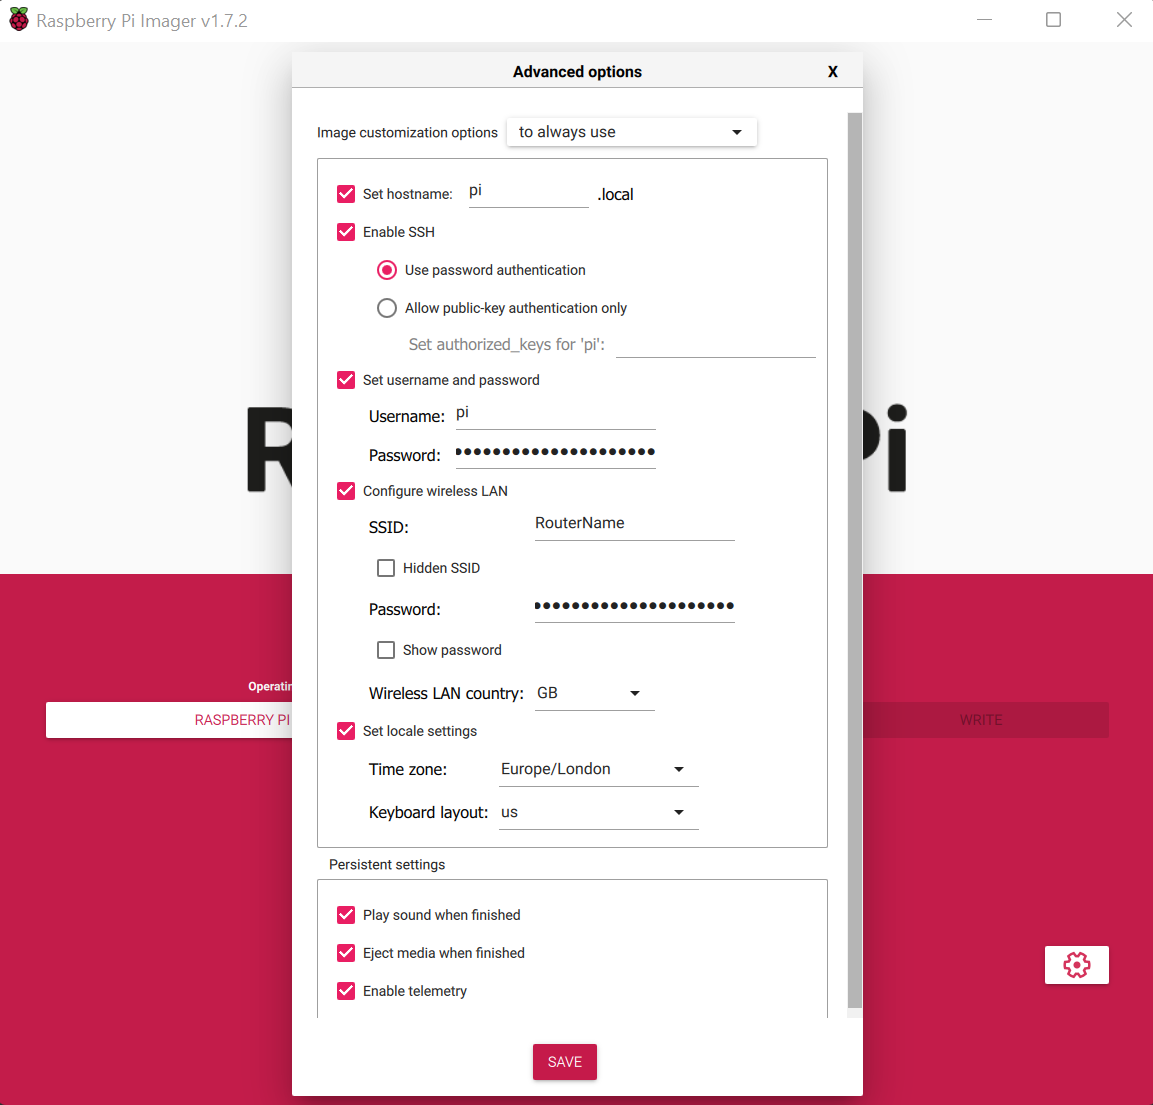
一旦完成了这些,你就可以把SD卡插入Raspberry Pi,并给它通电。
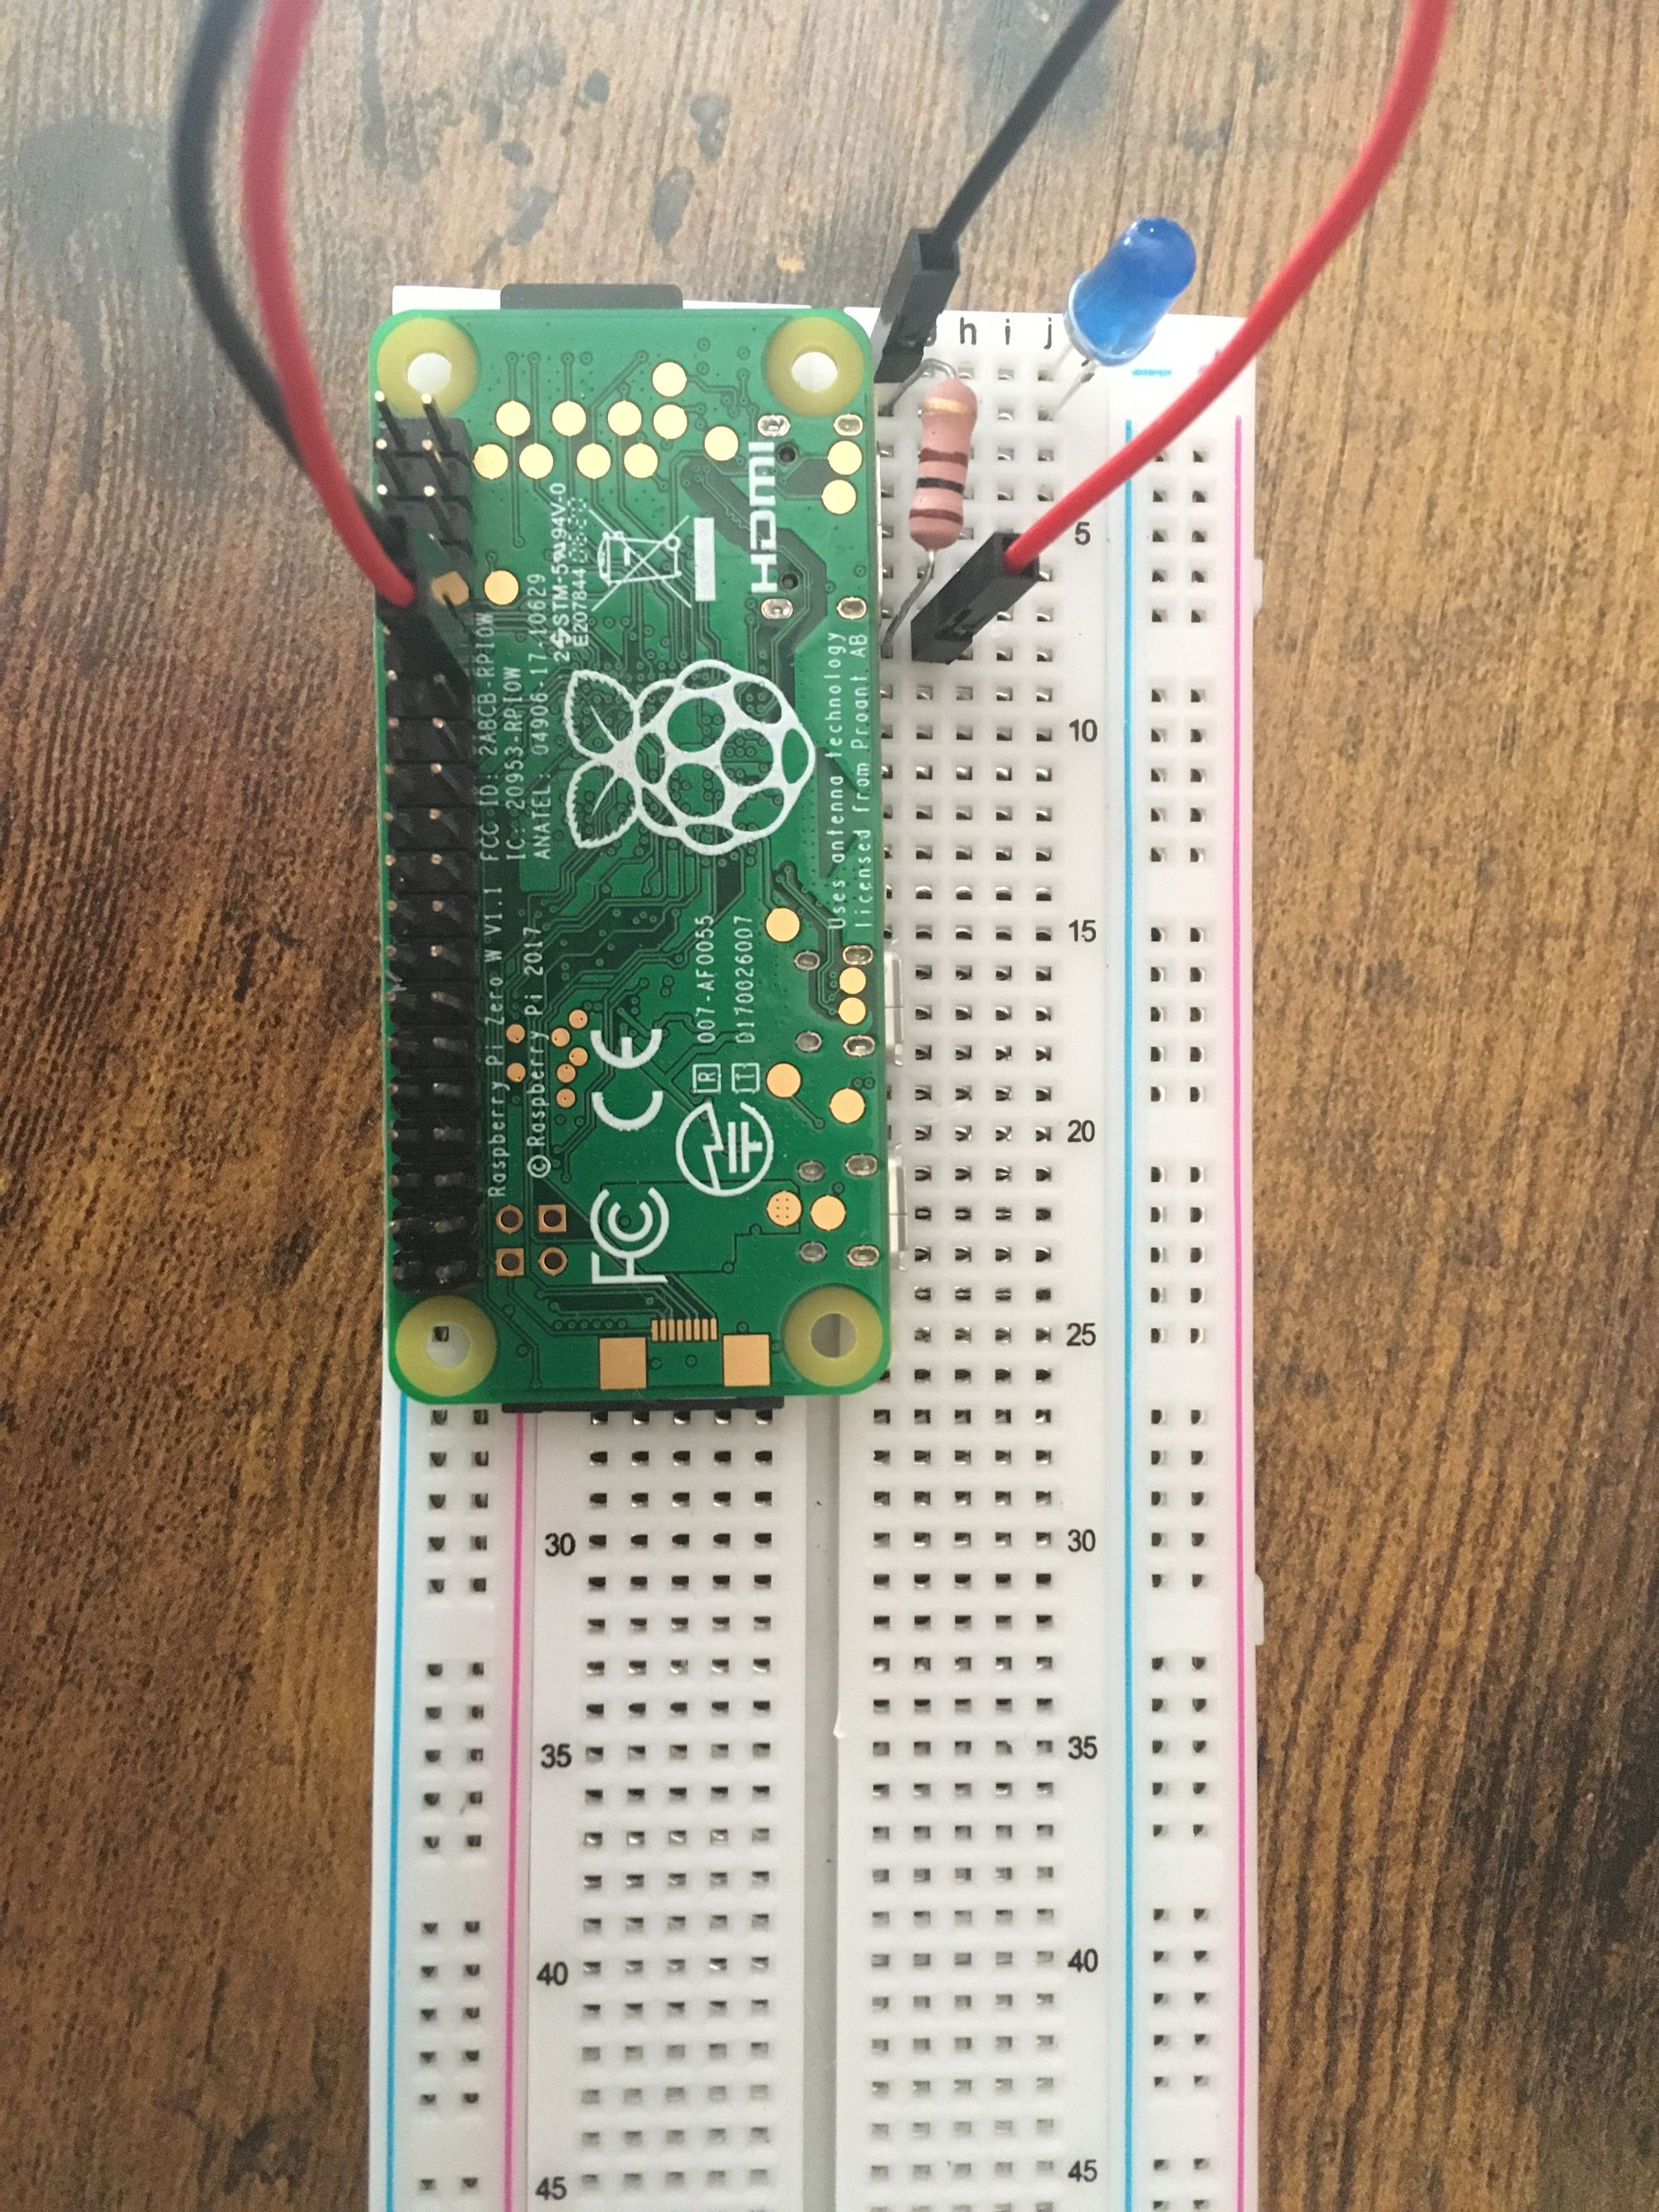
完成电路
电路图
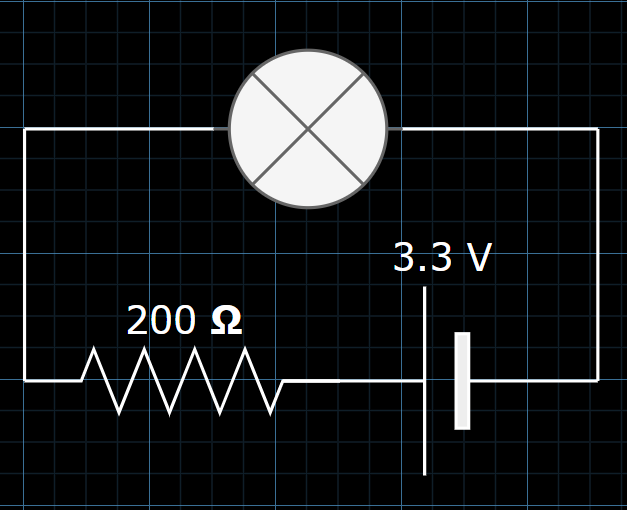
Pi的引脚
如下图所示,将负极连接到地,正极连接到BCM的第17针:
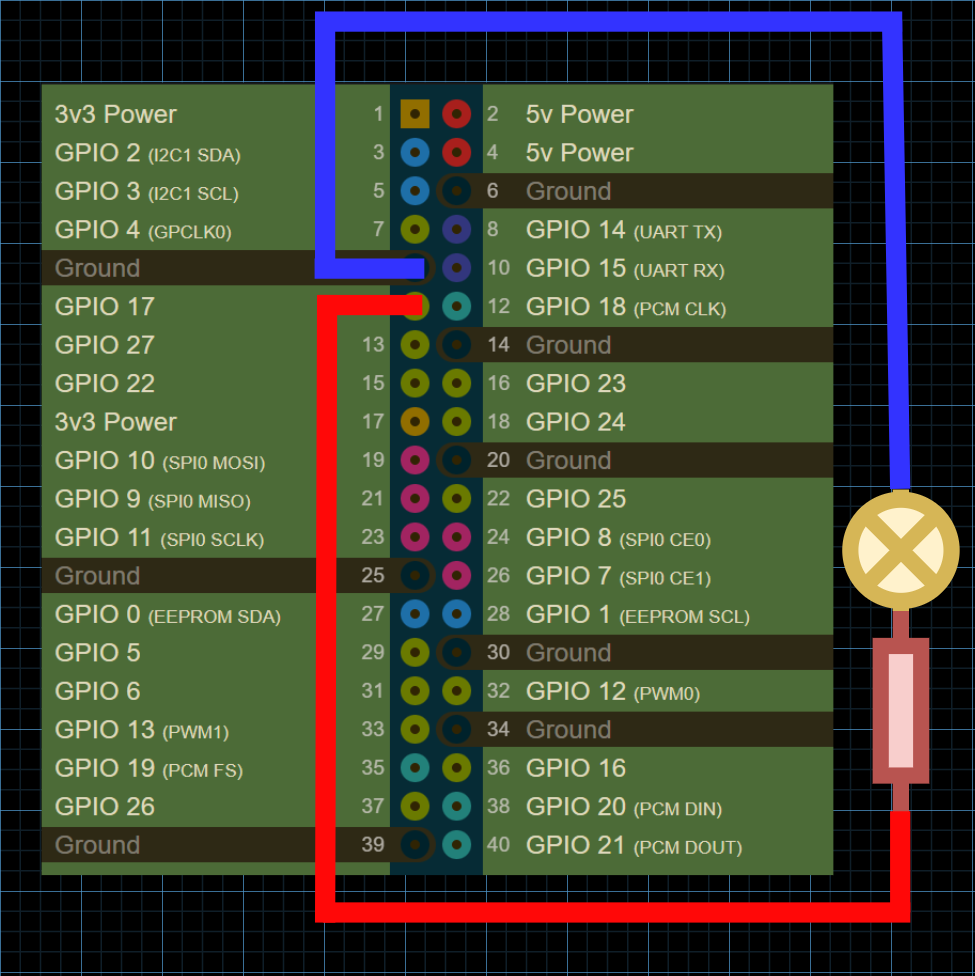
引脚图可以在这里看到:https://pinout.xyz/
如何设置交叉编译
安装目标
使用rustup ,为你的Raspberry Pi安装必要的目标:
my-pc$ rustup add target arm-unknown-linux-gnueabihf
关于Rust中目标的更多信息,请参见附录。
指定链接器
将raspberrypi/tools 仓库下载到一个名为rpi_tools 的目录中:
my-pc:~ $ git clone https://github.com/raspberrypi/tools $HOME/rpi_tools
使用你喜欢的文本编辑器编辑~/.cargo/config 文件:
my_pc:~ $ sudo nano ~/.cargo/config
告诉Cargo为你的目标使用一个特定的链接器版本:
[target.arm-unknown-linux-gnueabihf]
linker = "/rpi_tools/arm-bcm2708/arm-rpi-4.9.3-linux-gnueabihf/bin/arm-linux-gnueabihf-gcc"
如何为一个嵌入式的 "Hello World "编程
首先创建一个新的Rust项目,并在你喜欢的文本编辑器中打开main.rs 文件:
my-pc:~ $ cargo new blink
my-pc:~ $ cd blink
my-pc:~/blink $ nano src/main.rs
导入rust_gpiozero crate,并对一个LED进行编程,使其每秒在开和关之间交替进行:
use rust_gpiozero::*;

fn main() {
    // Create a new LED attached to Pin 17
    let mut led = LED::new(17);

    led.blink(1.0, 1.0);

    led.wait();
}
确保将依赖关系添加到Cargo.toml 文件中:
[dependencies]
rust-gpiozero = "0.2.1"
成功地退出程序
自rustc 1.61.0 [1]以来,您可以使用std::process::ExitCode 结构来指定返回给进程父代的状态代码:
use std::process::ExitCode;
fn main() -> ExitCode {
    // ...
    if error {
      return ExitCode::from(1);
    }
    ExitCode::SUCCESS
}
否则,你可以简单地返回一个Result :
fn main() -> Result<(), std::io::Error> {
  // ...
  Ok(())
}
如何交叉编译程序
建立一个针对所需架构的程序版本:
my-pc:~/blink $ cargo build --release --target=arm-unknown-linux-gnueabihf
如何将二进制文件传输到Pi上
使用scp ,通过SSH将编译好的二进制文件从你的主机传输到Raspberry Pi:
my-pc:~/blink $ scp target/arm-unknown-linux-gnueabihf/release/blink pi@192.168.1.199:~/blink
注意:你的Pi的本地IP可能会有所不同。
如何用SSH进入Pi
通过Raspberry Pi的本地IP地址进行SSH并登录到它:
my-pc:~ $ ssh pi@192.168.1.199
运行程序
在Raspberry Pi上,运行编译好的二进制文件:
pi:~ $ ./blink
如何编写一个文本到摩尔斯代码的翻译器
下面是一个应用程序的例子,它可以逐行读取stdin,将输入的内容翻译成莫尔斯码,并根据字符的莫尔斯码来切换LED的开关:
use rust_gpiozero::*;
use std::io::{BufRead, self};
use std::collections::HashMap;
use std::thread::sleep;
use std::time::Duration;

fn main() -> Result<(), std::io::Error> {
    println!("Starting...\n- Type in text to turn into Morse Code\n- Type `quit()` to quit\n");
    // Create a new LED attached to Pin 17
    let led = LED::new(17);

    /// Length of a dot in milliseconds
    const DOT_DELAY: u64 = 80;
    /// Length of a dash in milliseconds
    const DASH_DELAY: u64 = DOT_DELAY * 3;
    /// Delay between inputs in milliseconds
    const PUSH_DELAY: u64 = DOT_DELAY;
    /// Delay between letters in milliseconds
    const LETTER_DELAY: u64 = DOT_DELAY * 3;
    /// Delay between words in milliseconds
    const WORD_DELAY: u64 = DOT_DELAY * 7;

    let morse_code_alphabet: HashMap<char, &'static str> =
    [
        ('a', ".-"),
        ('b', "-..."),
        ('c', "-.-."),
        ('d', "-.."),
        ('e', "."),
        ('f', "..-."),
        ('g', "--."),
        ('h', "...."),
        ('i', ".."),
        ('j', ".---"),
        ('k', "-.-"),
        ('l', ".-.."),
        ('m', "--"),
        ('n', "-."),
        ('o', "---"),
        ('p', ".--."),
        ('q', "--.-"),
        ('r', ".-."),
        ('s', "..."),
        ('t', "-"),
        ('u', "..-"),
        ('v', "...-"),
        ('w', ".--"),
        ('x', "-..-"),
        ('y', "-.--"),
        ('z', "--.."),
        ('1', ".----"),
        ('2', "..---"),
        ('3', "...--"),
        ('4', "....-"),
        ('5', "....."),
        ('6', "-...."),
        ('7', "--..."),
        ('8', "---.."),
        ('9', "----."),
        ('0', "-----"),
        ('.', ".-.-.-"),
        (',', "--..--"),
        ('?', "..--.."),
        ('\'', ".----."),
        ('!', "-.-.--"),
        ('/', "-..-."),
        ('(', "-.--."),
        (')', "-.--.-"),
        ('&', ".-..."),
        (':', "---..."),
        (';', "-.-.-."),
        ('=', "-...-"),
        ('+', ".-.-."),
        ('-', "-....-"),
        ('_', "..--.-"),
        ('"', ".-..-."),
        ('$', "...-..-"),
        ('@', ".--.-."),
        (' ', " "),
    ].iter().cloned().collect();

    // Read standard input per line
    for line_res in io::stdin().lock().lines() {
        let line = line_res?;
        if line == "quit()" {
            break;
        }
        // Turn line into morse code
        let mut morse = String::new();
        for c in line.chars() {
            if let Some(morse_code_char) = morse_code_alphabet.get(&c) {
                morse.push_str(morse_code_char);
                // Separate characters with a comma
                morse.push_str(",");
            }
        }
        // Blink LED based on characters
        for c in morse.chars() {
            match c {
                '.' => {
                    led.on();
                    sleep(Duration::from_millis(DOT_DELAY));
                    led.off();
                    sleep(Duration::from_millis(PUSH_DELAY));
                },
                '-' => {
                    led.on();
                    sleep(Duration::from_millis(DASH_DELAY));
                    led.off();
                    sleep(Duration::from_millis(PUSH_DELAY));
                },
                ',' => {
                    sleep(Duration::from_millis(LETTER_DELAY));
                },
                ' ' => {
                    sleep(Duration::from_millis(WORD_DELAY));
                },
                _ => {
                    println!("Unknown character: {}", c);
                    break;
                }
            }
        }
        sleep(Duration::from_millis(WORD_DELAY));
    }

    // Free the variable and associated resources
    led.close();

    Ok(())
}
附录
目标
在Rust中,目标是指程序所编译的平台(架构)。Cargo会根据文件系统的布局自动检测目标[2]。
你可以看到内置目标的列表,通过运行:
rustc --print target-list
# OR
rustup target list
在这里,你可以通过运行以下命令来为你的项目添加一个新的目标:
rustup target add <target>
给定的目标通常是以三重形式出现的[3]:
- 架构
- 供应商
- 操作系统类型
- 环境类型
这被称为 "目标三要素",因为第四部分是可选的。
