

Kubernetes数据库操作员对于构建可扩展的数据库服务器作为数据库(DB)集群是很有用的。但由于你必须创建以YAML文件表示的新工件,因此将现有的数据库迁移到Kubernetes需要大量的手工工作。本文介绍了一个新的开源工具,名为KonveyorTackle-DiVA-DOA(数据密集型有效性分析器-数据库操作员适应)。它能自动生成部署就绪的工件,用于数据库操作员迁移。而它是通过以数据为中心的代码分析来实现的。
什么是Tackle-DiVA-DOA?
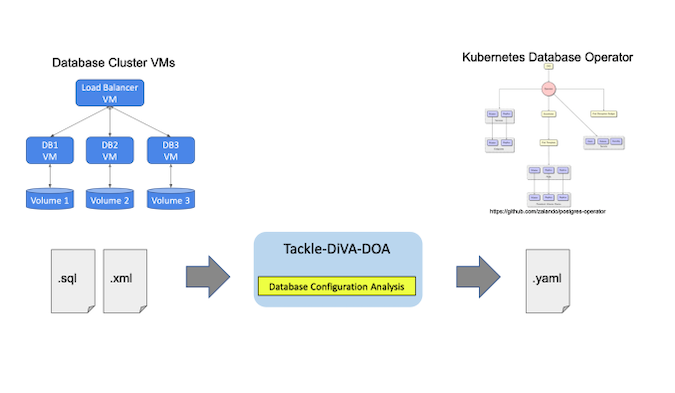
Tackle-DiVA-DOA(简称DOA)是Konveyor Tackle中一个开源的以数据为中心的数据库配置分析工具。它导入目标数据库配置文件(如SQL和XML),并生成一套Kubernetes工件,用于数据库迁移到Zalando Postgres Operator等运营商。
图片由 (Yasuharu Katsuno and Shin Saito, CC BY-SA 4.0)
DOA找到并分析了使用数据库管理系统(DBMS)的现有系统的设置。然后,它生成Kubernetes和Postgres运营商的清单(YAML文件),用于部署一个同等的数据库集群。
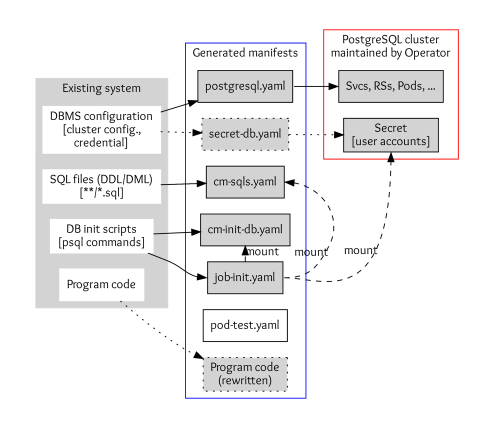
Image by: (Yasuharu Katsuno and Shin Saito, CC BY-SA 4.0)
应用程序的数据库设置包括DBMS配置、SQL文件、DB初始化脚本和访问DB的程序代码。
-
DBMS配置包括DBMS的参数、集群配置和凭证。DOA将配置存储到
postgres.yaml,如果你需要自定义凭证,则将秘密存储到secret-db.yaml。 -
SQL文件用于定义和初始化数据库中的表、视图和其他实体。这些存储在Kubernetes ConfigMap定义中
cm-sqls.yaml。 -
数据库初始化脚本通常会创建数据库和模式,并授予用户对数据库实体的访问权,以便SQL文件能够正常工作。DOA试图从脚本和文件中找到初始化要求,如果找不到就猜测。结果也将被存储在一个名为
cm-init-db.yaml的ConfigMap中。 -
**访问数据库的代码,**如主机和数据库名称,在某些情况下被嵌入程序代码中。这些都是重写的,以便与迁移后的DB集群一起工作。
教程
DOA被期望在一个容器中运行,并附带一个脚本来构建它的镜像。确保Docker和Bash已经安装在你的环境中,然后运行如下的构建脚本。
$ cd /tmp
$ git clone https://github.com/konveyor/tackle-diva.git
$ cd tackle-diva/doa
$ bash util/build.sh
…
docker image ls diva-doa
REPOSITORY   TAG       IMAGE ID       CREATED        SIZE
diva-doa     2.2.0     5f9dd8f9f0eb   14 hours ago   1.27GB
diva-doa     latest    5f9dd8f9f0eb   14 hours ago   1.27GB
这将构建DOA并将其打包为容器镜像。现在DOA已经可以使用了。
下一步执行捆绑的run-doa.sh wrapper脚本,它可以运行DOA容器。指定目标数据库应用程序的Git仓库。这个例子在TradeApp应用中使用了Postgres数据库。你可以用-o选项来指定输出文件的位置,用-i 选项来指定数据库初始化脚本的名称。
$ cd /tmp/tackle-diva/doa
$ bash run-doa.sh -o /tmp/out -i start_up.sh \
      https://github.com/saud-aslam/trading-app
[OK] successfully completed.
/tmp/out/ 目录和/tmp/out/trading-app ,一个带有目标应用程序名称的目录,被创建。在这个例子中,应用程序的名称是trading-app ,它是GitHub仓库的名称。生成的工件(YAML文件)也在应用名称目录下生成。
$ ls -FR /tmp/out/trading-app/
/tmp/out/trading-app/:
cm-init-db.yaml  cm-sqls.yaml  create.sh*  delete.sh*  job-init.yaml  postgres.yaml  test/

/tmp/out/trading-app/test:
pod-test.yaml
每个YAML文件的前缀表示该文件定义的资源种类。例如,每个cm-*.yaml 文件定义了一个ConfigMap,而job-init.yaml 定义了一个Job资源。在这一点上,secret-db.yaml ,DOA使用Postgres操作员自动生成的凭证。
现在你有了在Kubernetes实例上部署PostgreSQL集群所需的资源定义。你可以使用实用脚本create.sh 来部署它们。或者,你也可以使用kubectl create 命令。
$ cd /tmp/out/trading-app
$ bash create.sh  # or simply “kubectl apply -f .”

configmap/trading-app-cm-init-db created
configmap/trading-app-cm-sqls created
job.batch/trading-app-init created
postgresql.acid.zalan.do/diva-trading-app-db created
Kubernetes资源被创建,包括postgresql (由Postgres操作员创建的数据库集群的资源)、service 、rs 、pod 、job 、cm 、secret 、pv 、pvc 。例如,你可以看到四个名为trading-app-* 的数据库pod,因为数据库实例的数量在postgres.yaml 中被定义为四个。
$ kubectl get all,postgresql,cm,secret,pv,pvc
NAME                                        READY   STATUS      RESTARTS   AGE
…
pod/trading-app-db-0                        1/1     Running     0          7m11s
pod/trading-app-db-1                        1/1     Running     0          5m
pod/trading-app-db-2                        1/1     Running     0          4m14s
pod/trading-app-db-3                        1/1     Running     0          4m

NAME                                      TEAM          VERSION   PODS   VOLUME   CPU-REQUEST   MEMORY-REQUEST   AGE   STATUS
postgresql.acid.zalan.do/trading-app-db   trading-app   13        4      1Gi                                     15m   Running

NAME                            TYPE        CLUSTER-IP      EXTERNAL-IP   PORT(S)    AGE
service/trading-app-db          ClusterIP   10.97.59.252    <none>        5432/TCP   15m
service/trading-app-db-repl     ClusterIP   10.108.49.133   <none>        5432/TCP   15m

NAME                         COMPLETIONS   DURATION   AGE
job.batch/trading-app-init   1/1           2m39s      15m
请注意,Postgres操作员带有一个用户界面(UI)。你可以在用户界面上找到创建的集群。你需要导出端点URL来在浏览器上打开用户界面。如果你使用minikube,请按以下步骤操作。
$ minikube service postgres-operator-ui
然后自动打开一个浏览器窗口,显示UI。

图片由: (Yasuharu Katsuno and Shin Saito, CC BY-SA 4.0)
现在你可以使用一个测试pod来访问数据库实例。DOA还生成了一个用于测试的pod定义。
$ kubectl apply -f /tmp/out/trading-app/test/pod-test.yaml # creates a test Pod
pod/trading-app-test created
$ kubectl exec trading-app-test -it -- bash  # login to the pod
数据库主机名和访问数据库的凭证被注入到pod中,所以你可以使用它们访问数据库。执行psql metacommand来显示所有的表和视图(在数据库中)。
# printenv DB_HOST; printenv PGPASSWORD
(values of the variable are shown)

# psql -h ${DB_HOST} -U postgres -d jrvstrading -c '\dt'
             List of relations
 Schema |      Name      | Type  |  Owner
--------+----------------+-------+----------
 public | account        | table | postgres
 public | quote          | table | postgres
 public | security_order | table | postgres
 public | trader         | table | postgres
(4 rows)

# psql -h ${DB_HOST} -U postgres -d jrvstrading -c '\dv'
                List of relations
 Schema |         Name          | Type |  Owner
--------+-----------------------+------+----------
 public | pg_stat_kcache        | view | postgres
 public | pg_stat_kcache_detail | view | postgres
 public | pg_stat_statements    | view | postgres
 public | position              | view | postgres
(4 rows)
测试完成后,从pod中注销并删除测试pod。
# exit
$ kubectl delete -f /tmp/out/trading-app/test/pod-test.yaml
最后,使用脚本删除创建的集群。
$ bash delete.sh
