

当你整合Terraform进行配置管理时,从TrueNAS中获得更多。

图片由: 开源网
有时候,将不同的开源项目结合起来会有好处。使用Terraform和TrueNAS的协同作用就是一个完美的例子。
TrueNAS是一个基于OpenBSD的操作系统,提供网络连接的存储(NAS)和网络服务。它的主要优势之一是利用ZFS文件系统,它以企业级的可靠性和容错性而闻名。Terraform是一个配置和部署工具,体现了基础设施即代码的概念。
TrueNAS
TrueNAS有一个非常好的网络用户界面(UI)进行管理,还有一个应用编程接口(API)。Terraform可以与API集成,为你的NAS提供配置管理,我将在下面演示。
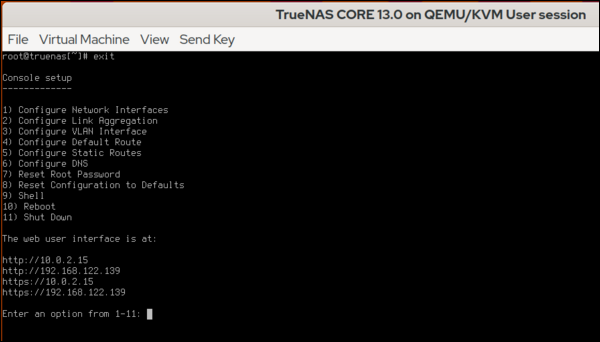
首先,我使用虚拟机管理器来配置一个虚拟机,然后安装最新版本的TrueNAS 13.0。唯一必要的输入是输入根密码。一旦它重新启动,主菜单就会出现。你还会看到HTTP管理地址。你可以从你的本地网络浏览器访问这个地址。
图片来源:《中国新闻周刊》。
(Alan Formy-Duval, CC BY-SA 4.0)
Terraform
Terraform需要安装在它可以访问TrueNAS管理URL的地方。我正在利用tfenv的优势,这是一个管理Terraform版本的工具。
$ tfenv list-remote
$ tfenv install 1.2.0
$ tfenv use 1.2.0
$ terraform -version
Terraform v1.2.0
on linux_amd64
接下来,创建一个工作目录,如~/code/terraform/truenas ,以包含与您的TrueNAS实例相关的配置文件。
$ mkdir ~/code/terraform/truenas
$ cd ~/code/terraform/truenas
创建最初的Terraform配置文件,并添加必要的指令来定义TrueNAS提供者。
$ vi main.tf
提供者将看起来像这样,其中TrueNAS实例的地址和API密钥将需要正确指定。
$ cat main.tf


terraform {
  required_providers {
    truenas = {
      source = "dariusbakunas/truenas"
      version = "0.9.0"
    }
  }
}

provider "truenas" {
  api_key = "1-61pQpp3WyfYwg4dHToTHcOt7QQzVrMtZnkJAe9mmA0Z2w5MJsDB7Bng5ofZ3bbyn"
  base_url = "http://192.168.122.139/api/v2.0"
}
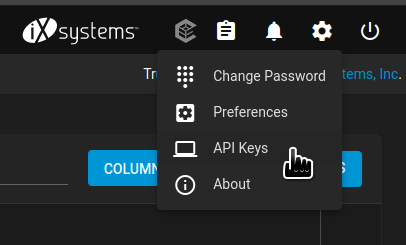
TrueNAS的API密钥是在Web UI中创建的。登录并点击右上角的小齿轮。
图片由: (Alan Formy-Duval, CC BY-SA 4.0)
这个用户界面部分使您能够创建API密钥。一旦生成,将其复制到main.tf 文件中。
初始化
在你的TrueNAS Terraform目录中,你有main.tf 文件。第一步是使用terraform init 命令进行初始化,它应该产生以下结果。
Initializing the backend...

Initializing provider plugins...
- Finding dariusbakunas/truenas versions matching "0.9.0"...
- Installing dariusbakunas/truenas v0.9.0...
- Installed dariusbakunas/truenas v0.9.0 (self-signed, key ID E44AF1CA58555E96)

Partner and community providers are signed by their developers.
If you'd like to know more about provider signing, you can read about it here:
https://www.terraform.io/docs/cli/plugins/signing.html

Terraform has created a lock file .terraform.lock.hcl to record the provider
selections it made above. Include this file in your version control repository
so that Terraform can guarantee to make the same selections by default when
you run "terraform init" in the future.

Terraform has been successfully initialized!

You may now begin working with Terraform. Try running "terraform plan" to see
any changes that are required for your infrastructure. All Terraform commands
should now work.

If you ever set or change modules or backend configuration for Terraform,
rerun this command to reinitialize your working directory. If you forget, other commands will detect it and remind you to do so if necessary.
初始化成功意味着你已经准备好开始添加资源。任何TrueNAS项目,如存储池、网络文件系统(NFS)共享或Cron作业,都是一种资源。
添加一个ZFS数据集
下面的示例资源指令定义了一个ZFS数据集。对于我的例子,我将把它添加到main.tf文件中。
resource "truenas_dataset" "pictures" {
  pool = "storage-pool"
  name = "pictures"
  comments = "Terraform created dataset for Pictures"
 }
运行命令terraform validate ,检查配置情况。
Success! The configuration is valid.
运行terraform plan ,将描述Terraform将执行的操作。现在,用terraform apply 添加新的数据集。
Terraform used the selected providers to generate the following execution plan. Resource actions are indicated with the following symbols:
  + create

Terraform will perform the following actions:

  # truenas_dataset.pictures will be created
  + resource "truenas_dataset" "pictures" {
      + acl_mode             = (known after apply)
      + acl_type             = (known after apply)
      + atime                = (known after apply)
      + case_sensitivity     = (known after apply)
      + comments             = "Terraform created dataset for Pictures"
      + compression          = (known after apply)
      + copies               = (known after apply)
      + dataset_id           = (known after apply)
      + deduplication        = (known after apply)
      + encrypted            = (known after apply)
      + encryption_algorithm = (known after apply)
      + encryption_key       = (sensitive value)
      + exec                 = (known after apply)
      + generate_key         = (known after apply)
      + id                   = (known after apply)
      + managed_by           = (known after apply)
      + mount_point          = (known after apply)
      + name                 = "pictures"
      + pbkdf2iters          = (known after apply)
      + pool                 = "storage-pool"
      + quota_bytes          = (known after apply)
      + quota_critical       = (known after apply)
      + quota_warning        = (known after apply)
      + readonly             = (known after apply)
      + record_size          = (known after apply)
      + ref_quota_bytes      = (known after apply)
      + ref_quota_critical   = (known after apply)
      + ref_quota_warning    = (known after apply)
      + share_type           = (known after apply)
      + snap_dir             = (known after apply)
      + sync                 = (known after apply)
    }

Plan: 1 to add, 0 to change, 0 to destroy.

Do you want to perform these actions?
  Terraform will perform the actions described above.
  Only 'yes' will be accepted to approve.

  Enter a value:
输入yes 来确认,然后点击回车。
truenas_dataset.pictures: Creating...
truenas_dataset.pictures: Creation complete after 0s [id=storage-pool/pictures]

Apply complete! Resources: 1 added, 0 changed, 0 destroyed.
这就是了。你可以在TrueNAS Web UI中检查这个新数据集。

图片来源: (Alan Formy-Duval, CC BY-SA 4.0)
用TrueNAS和Terraform做更多事情
Terraform的TrueNAS提供商允许你管理TrueNAS设备的更多方面。例如,你可以将这个新的数据集作为NFS或服务器信息块(SMB)共享。你还可以创建额外的数据集、cron作业和zvols。
