3.1 vuex(P105~P114)
- 定义:一个Vue插件;用于实现集中式状态(数据)管理;实现任意组件间通信。
- vuex不属于任何组件(在App之外)
- vuex工作原理:
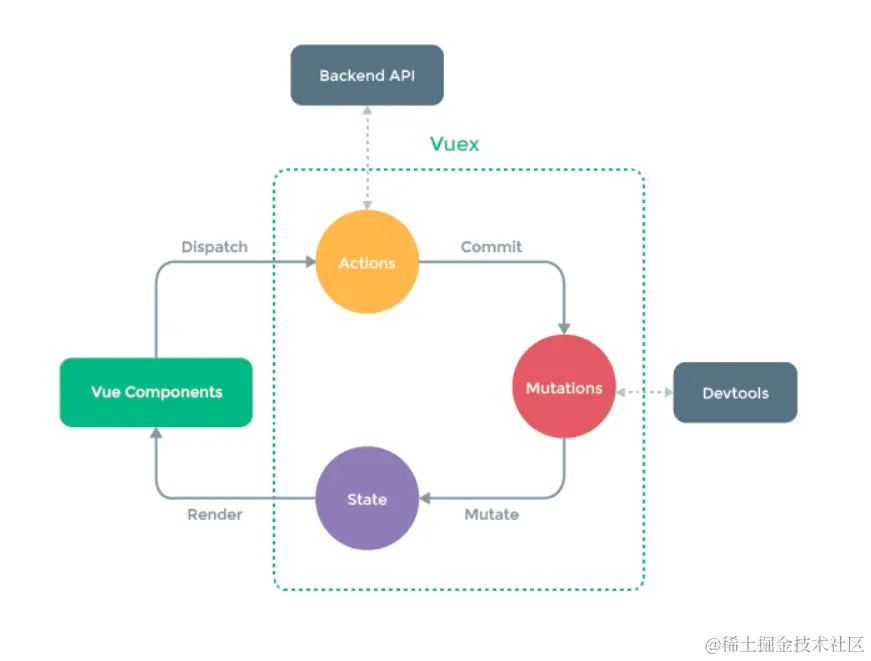
- 原理流程:
- 组件中调用vc.$store.dispatch('动作类型', 数据)
- Actions对象中,调用'动作类型'对应的函数
- 上述的函数中调用commit('动作类型', 数据)
- Mutations对象中,调用'动作类型'对应的函数
- 上述函数中会改变State对象中的数据
- (自动)渲染组件
- store管理Actions Mutations State
- 使用流程:
- npm安装
- src/store/index.js 中写store对象(包含actions mutations state对象)
- index.js中引入Vue和Vuex,并使用Vue.use(Vuex)
- main.js引入store,创建vm时使用store配置项
import Vue from "vue"
import Vuex from "vuex"
Vue.use(Vuex)
const actions = {}
const mutations = {}
const state = {}
const getters = {}
export default new Vuex.Store({
actions,
mutations,
state,
getters
})
- actions中的回调函数:actionCallBack(context, value),context可以理解为精简版store,有commit方法,value为dispatch触发回调时传入的数据(或者后端传来的数据)
- 所有的业务逻辑放在actions中
- context.dispatch(),可以调用其他的action回调
- mutations中的回调函数:mutationCallBack(state, value),可以直接拿到state
- getters配置项,用于加工state中的数据,内配置带返回值的函数,与computed相同
- mapState与mapGetters:映射state或者getters中的数据生成计算属性,使用前需要先在vue文件中引入(目的是方便书写,不用每次调用都写$store.state)
import {mapState, mapGetters} from 'vuex'
...
computed:{
...mapState({
a: 'sum',
b: 'avg'
})
...mapGetters(['sum', 'avg'])
}
- mapMutations与mapActions:在methods中生成同mutations或者actions对话的方法,与mapState类似,也有对象写法与数组写法,注意:传递参数问题。(mapActions相当于$store.dispatch,mapMutations相当于store.commit)
3.2 vuex模块化(P115~P116)
- 按功能划分模块,每个模块(对象)都有自己的一套actions、mutations、state等
const moduleA = {}
const moduleB = {}
export default new Vuex.store({
moduleA,
moduleB
})
this.$store.state.moduleA.list
this.$store.getters[moduleA/updateList]
this.$store.commit('moduleA/CHANGE', value)
- namespaced命名空间配置项:如果想用四个map方法的制定模块对象,需要在模块对象中配置namespaced为true。
...mapState('moduleA', [])
3.3 路由 vue-router(P117~P127)
- route路由 是指一对key-value的对应关系
- vue-router是插件,在main.js中引入并use,这样vm中可以加入新的配置项vue-router
- 使用流程:
- main.js中引用并使用vue-router
- src下新建router文件夹,在其中的index.js文件中配置相关内容
import VueRouter from 'vue-router'
import About from '../pages/About.vue'
import Home from '../pages /Home.vue'
export default new VueRouter({
routes:[
{
path: '/about',
component:About
},
{
path: '/home',
component:Home
}
]
})
- 在main.js中引入router,并添加在vm的配置项中
- 使用router-link标签,配合to属性使用(以a标签形式表现在页面中)实现不同页面切换的触发点
- 使用router-view标签,指定组件的呈现位置
- 不显示的路由组件被销毁了
- 每个路由组件都有自己的$route对象
- 多级路由:在children配置项中配置,router-link标签中的to属性要写完整的路由路径
{
path: '/home',
component:Home,
children:[
{
path:...,
component:...
}
]
}
- 路由传参:
- query参数:传递的参数在路由组件(接收方)的$route.query对象中保存
//to的字符串写法:在路径的后面接?,之后是要传递的参数
<router-link :to="`/home/person?id=${123}&name=${456}`"> </router-link>
//to的对象写法:推荐使用对象写法
<router-link :to="{
  path:'/home/person',
  query:{
    id: 123,
    name: 456
  }
}">
</router-link>
- params参数:传递的参数在路由组件(接收方)的$route.params对象中保存。需要在配置时的path配置项中提前声明:
{
name
path:"/home/person/:id/:name",
component: Person
children
}
//to的字符串写法:在路径的后面接/,之后是要传递的参数
<router-link :to="`/home/person/${123}/${456}`"> </router-link>
//to的对象写法:注意,此处一定要用name配置
<router-link :to="{
  name:'person',
  params:{
    id: 123,
    name: 456
  }
}">
</router-link>
- 命名路由:用于简化path,在路由组件中使用name配置项。使用时,to必须是v-bind,并且必须是对象形式。
- props配置项:用于简便传参,接收参数的组件要写props配置项
{
name
path
component:Person
props:{id: 123, name: 456}
props:true
props(route){
return {
id: route.query.id,
name: route.query.name
}
}
}
- router-link的push(默认)模式和replace(模式):控制浏览器历史记录模式
- 编程式路由导航:不使用router-link实现路由跳转,更加灵活
this.$router.push({
name
params
})
this.$router.replace({
name
params
})
- 缓存路由组件:让不展示的路由组件保持挂载不被销毁。
  <keep-alive :include="['组件名']">
    <router-view></router-view>
  </keep-alive>
- 路由独有的生命周期钩子
- activated()激活
- deactivated()失活
3.4 路由守卫(P128~P132)
- 路由守卫作用是对路由进行权限控制:例如访问组件时校验
- 全局前置路由守卫
router.beforeEach((to, from, next)=> {
})
router.afterEach((to, from)=> {
})
  beforeRouteEnter(to,from,next){
    next()
  }
  beforeRouteLeave(to,from,next){
    next()
  }
3.5 路由两种工作模式:hash与history(P133)
- 在route配置文件中的mode配置项修改
- hash模式:url中带有#,#及其后面内容为哈希值,不发送给服务器
- history模式:需要后端用中间件配合避免404问题


