重置样式 .less
* {
box-sizing: border-box;
}
html {
height: 100%;
font-size: 14px;
}
body {
height: 100%;
color: #333;
min-width: 1240px;
font: 1em/1.4 'Microsoft Yahei', 'PingFang SC', 'Avenir', 'Segoe UI', 'Hiragino Sans GB', 'STHeiti', 'Microsoft Sans Serif', 'WenQuanYi Micro Hei', sans-serif
}
ul,
h1,
h3,
h4,
p,
dl,
dd {
padding: 0;
margin: 0;
}
a {
text-decoration: none;
color: #333;
outline: none;
}
i {
font-style: normal;
}
input[type="text"],
input[type="search"],
input[type="password"],
input[type="checkbox"]{
padding: 0;
outline: none;
border: none;
-webkit-appearance: none;
&::placeholder{
color: #ccc;
}
}
img {
max-width: 100%;
max-height: 100%;
vertical-align: middle;
}
ul {
list-style: none;
}
#app {
background: #f5f5f5;
user-select: none;
}
.container {
width: 1240px;
margin: 0 auto;
position: relative;
}
.ellipsis {
white-space: nowrap;
text-overflow: ellipsis;
overflow: hidden;
}
.ellipsis-2 {
word-break: break-all;
text-overflow: ellipsis;
display: -webkit-box;
-webkit-box-orient: vertical;
-webkit-line-clamp: 2;
overflow: hidden;
}
.fl {
float: left;
}
.fr {
float: right;
}
.clearfix:after {
content: ".";
display: block;
visibility: hidden;
height: 0;
line-height: 0;
clear: both;
}
轮播图组件 vue3
<template>
<!-- 轮播图封装 -->
<div class="box" style="height: 500px">
<div class="xtx-slider" @mouseenter="clearTimer" @mouseleave="startTimer">
<ul class="slider-body">
<li class="slider-item" v-for="(item, i) in sliders" :key="i" :class="{ fade: curIndex === i }" >
<img :src="item.imgUrl" alt="" />
</li>
</ul>
<div class="slider-indicator">
<span v-for="(item, index) in sliders" :key="index" @click="curIndex = index" :class="{ active: curIndex === index }"
></span>
</div>
</div>
</div>
</template>
<script>
import { onMounted, onUnmounted, ref } from 'vue'
export default {
name: 'XtxSlider',
props: {
sliders: {
type: Array,
default: () => {
return []
}
},
autoPlay: {
type: Boolean,
default: true
}
},
setup (props) {
const curIndex = ref(0)
const timer = ref(null)
function clearTimer () {
clearInterval(timer.value)
}
function startTimer () {
initLoop()
}
function initLoop () {
if (!props.autoPlay) {
return false
}
timer.value = window.setInterval(() => {
curIndex.value++
if (curIndex.value > props.sliders.length - 1) {
curIndex.value = 0
}
}, 2000)
}
onMounted(() => {
initLoop()
})
onUnmounted(() => {
clearInterval(timer.value)
})
return {
curIndex,
clearTimer,
startTimer
}
}
}
</script>
<style scoped lang='less'>
.xtx-slider {
width: 100%;
height: 100%;
min-width: 300px;
min-height: 150px;
position: relative;
.slider {
&-body {
width: 100%;
height: 100%;
}
&-item {
width: 100%;
height: 100%;
position: absolute;
left: 0;
top: 0;
opacity: 0;
transition: opacity 0.5s linear;
&.fade {
opacity: 1;
z-index: 1;
}
img {
width: 100%;
height: 100%;
}
}
&-indicator {
position: absolute;
left: 0;
bottom: 20px;
z-index: 2;
width: 100%;
text-align: center;
span {
display: inline-block;
width: 12px;
height: 12px;
background: rgba(0, 0, 0, 0.2);
border-radius: 50%;
cursor: pointer;
~ span {
margin-left: 12px;
}
&.active {
background: #fff;
}
}
}
&-btn {
width: 44px;
height: 44px;
background: rgba(0, 0, 0, 0.2);
color: #fff;
border-radius: 50%;
position: absolute;
top: 228px;
z-index: 2;
text-align: center;
line-height: 44px;
opacity: 0;
transition: all 0.5s;
&.prev {
left: 20px;
}
&.next {
right: 20px;
}
}
}
&:hover {
.slider-btn {
opacity: 1;
}
}
}
</style>
骨架屏封装 vue3
<template>
<!-- 骨架屏封装 -->
<div class="xtx-skeleton" :style="{ width, height }" :class="{ shan: animated }">
<div class="block" :style="{ backgroundColor: bg }"></div>
</div>
</template>
<script>
export default {
name: 'XtxSkeleton',
props: {
bg: {
type: String,
default: '#efefef'
},
width: {
type: String,
default: '100px'
},
height: {
type: String,
default: '100px'
},
animated: {
type: Boolean,
default: true
}
}
}
</script>
<style scoped lang="less">
.xtx-skeleton {
display: inline-block;
position: relative;
overflow: hidden;
vertical-align: middle;
.block {
width: 100%;
height: 100%;
border-radius: 2px;
}
}
.shan {
&::after {
content: '';
position: absolute;
animation: shan 1.5s ease 0s infinite;
top: 0;
width: 50%;
height: 100%;
background: linear-gradient(
to left,
rgba(255, 255, 255, 0) 0,
rgba(255, 255, 255, 0.3) 50%,
rgba(255, 255, 255, 0) 100%
);
transform: skewX(-45deg);
}
}
@keyframes shan {
0% {
left: -100%;
}
100% {
left: 120%;
}
}
</style>
面包屑封装 vue3
<XtxBread separator=">">
    <XtxBreadItem to="/first">首页</XtxBreadItem>
    <XtxBreadItem to="/">分类页</XtxBreadItem>
    <XtxBreadItem>倒数页</XtxBreadItem>
    <XtxBreadItem to="/">最后页</XtxBreadItem>
</XtxBread>
<template>
  <div class="xtx-bread">
    <slot></slot>
  </div>
</template>

<script>
import { provide } from 'vue'
export default {
  name: 'XtxBread',
  props: {
    separator: {
      type: String
    }
  },
  setup (props) {
    provide('separator', props.separator)
  }
}
</script>
<style lang='less'  scoped>
.xtx-bread {
  display: flex;
  /deep/.xtx-bread-item:last-child {
    span {
      display: none;
    }
  }
}
</style>
<template>
<div class="xtx-bread-item">
<router-link v-if="to" :to="to">
<slot></slot>
</router-link>
<template v-else>
<slot></slot>
</template>
<span>{{ separator }}</span>
</div>
</template>
<script>
import { inject } from 'vue'
export default {
name: 'XtxBreadItem',
props: {
to: {
type: String
}
},
setup () {
const separator = inject('separator')
return { separator }
}
}
</script>
<style lang="less" scoped></style>
放大镜封装 vue3
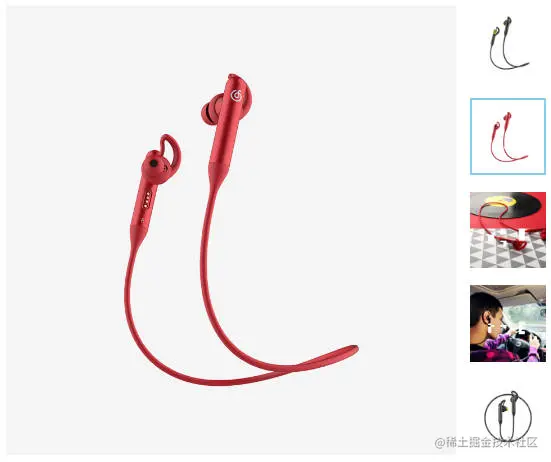
<template>
<div class="goods-image">
<div
class="large"
:style="[
{
backgroundImage: `url(${imageList[curIndex]})`,
backgroundPositionX: positionX + 'px',
backgroundPositionY: positionY + 'px',
},
]"
v-show="showFlag"
></div>
<div class="middle" ref="target">
<img :src="imageList[curIndex]" alt="" />
<div
class="layer"
:style="{ left: left + 'px', top: top + 'px' }"
v-show="showFlag"
></div>
</div>
<ul class="small">
<li
v-for="(img, i) in imageList"
:key="i"
@mouseenter="mouseEnterFn(i)"
:class="{ active: i === curIndex }"
>
<img :src="img" alt="" />
</li>
</ul>
</div>
</template>
<script>
import { ref, watch } from 'vue'
import { useMouseInElement } from '@vueuse/core'
export default {
name: 'XtxImageView',
props: {
imageList: {
type: Array,
default: () => {
return []
}
}
},
setup () {
const curIndex = ref(0)
function mouseEnterFn (i) {
curIndex.value = i
}
const target = ref(null)
const showFlag = ref(false)
const { elementX, elementY, isOutside } = useMouseInElement(target)
const left = ref(0)
const top = ref(0)
const positionX = ref(0)
const positionY = ref(0)
watch([elementX, elementY, isOutside], () => {
showFlag.value = !isOutside.value
if (isOutside.value) {
return false
}
if (elementX.value > 300) {
left.value = 200
}
if (elementX.value < 100) {
left.value = 0
}
if (elementX.value < 300 && elementX.value > 100) {
left.value = elementX.value - 100
}
if (elementY.value > 300) {
top.value = 200
}
if (elementY.value < 100) {
top.value = 0
}
if (elementY.value < 300 && elementY.value > 100) {
top.value = elementY.value - 100
}
positionX.value = -left.value * 2
positionY.value = -top.value * 2
})
return {
mouseEnterFn,
curIndex,
target,
elementX,
elementY,
left,
top,
positionX,
positionY,
showFlag
}
}
}
</script>
<style scoped lang="less">
.goods-image {
width: 480px;
height: 400px;
position: relative;
display: flex;
.middle {
width: 400px;
height: 400px;
background: #f5f5f5;
}
.large {
position: absolute;
top: 0;
left: 412px;
width: 400px;
height: 400px;
z-index: 500;
box-shadow: 0 0 10px rgba(0, 0, 0, 0.1);
background-repeat: no-repeat;
// 背景图:盒子的大小 = 2:1 将来控制背景图的移动来实现放大的效果查看 background-position
background-size: 800px 800px;
background-color: #f8f8f8;
}
.layer {
width: 200px;
height: 200px;
background: rgba(0, 0, 0, 0.2);
// 绝对定位 然后跟随咱们鼠标控制left和top属性就可以让滑块移动起来
left: 0;
top: 0;
position: absolute;
}
.small {
width: 80px;
li {
width: 68px;
height: 68px;
margin-left: 12px;
margin-bottom: 15px;
cursor: pointer;
&:hover,
&.active {
border: 2px solid skyblue;
}
}
}
}
</style>
城市选择组件 vue3
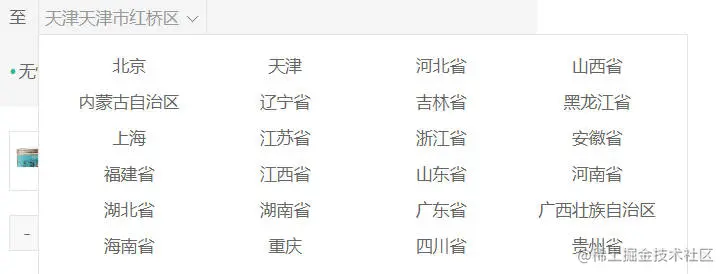
<template>
<div class="xtx-city">
<div class="select" @click="activeCity = !activeCity">
<span class="placeholder">{{
changeResult.resultAddress
? changeResult.resultAddress
: '请选择配送地址'
}}</span>
<span class="value"></span>
<i class="iconfont icon-angle-down"></i>
</div>
<div class="option" v-if="activeCity">
<span
class="ellipsis"
@click="itemHandle(i)"
v-for="i in dataList"
:key="i"
>
{{ i.name }}
</span>
</div>
</div>
</template>
<script>
import axios from 'axios'
import { ref, reactive } from 'vue'
export default {
name: 'City',
setup () {
const dataList = ref([])
const dataListCopy = ref([])
const activeCity = ref(false)
async function loadCityList () {
const res = await axios({
method: 'get',
url: 'https://.....'
})
dataList.value = res.data
dataListCopy.value = res.data
}
loadCityList()
const changeResult = reactive({
provinceCode: '',
provinceName: '',
cityCode: '',
cityName: '',
countyCode: '',
countyName: '',
resultAddress: ''
})
const itemHandle = (item) => {
dataList.value = item.areaList
if (item.level === 0) {
changeResult.provinceCode = item.code
changeResult.provinceName = item.name
}
if (item.level === 1) {
changeResult.cityCode = item.code
changeResult.cityName = item.name
}
if (item.level === 2) {
changeResult.countyCode = item.code
changeResult.countyName = item.name
changeResult.resultAddress =
changeResult.provinceName +
changeResult.cityName +
changeResult.countyName
activeCity.value = false
dataList.value = dataListCopy.value
}
}
return { dataList, activeCity, itemHandle, changeResult }
}
}
</script>
<style scoped lang="less">
.xtx-city {
display: inline-block;
position: relative;
z-index: 400;
margin-left: 10px;
.select {
border: 1px solid #e4e4e4;
height: 30px;
padding: 0 5px;
line-height: 28px;
cursor: pointer;
&.active {
background: #fff;
}
.placeholder {
color: #999;
}
.value {
color: #666;
font-size: 12px;
}
i {
font-size: 12px;
margin-left: 5px;
}
}
.option {
width: 542px;
border: 1px solid #e4e4e4;
position: absolute;
left: 0;
top: 29px;
background: #fff;
min-height: 30px;
line-height: 30px;
display: flex;
flex-wrap: wrap;
padding: 10px;
> span {
width: 130px;
text-align: center;
cursor: pointer;
border-radius: 4px;
padding: 0 3px;
&:hover {
background: #f5f5f5;
}
}
}
}
</style>


