

Auth0为您带来了新的ASP.NET Core Authentication SDK,它改善了您的开发体验,并与Auth0的功能更好地整合在一起!让我们来参观一下SDK的主要功能,看看将你的ASP.NET应用程序与Auth0整合起来变得多么容易。
SDK概述
到目前为止,你已经习惯于依靠标准的 Microsoft.AspNetCore.Authentication.OpenIdConnect包来整合你的ASP.NET应用程序和Auth0。那个库很好地完成了它的工作。然而,当你脱离了实现简单的登录和注销时,你的代码开始变得冗长,直到变得混乱。
你可以通过用C#扩展方法实现你的认证来缓解这个问题。但是,既然Auth0的专家可以为你提供一个随时可用的SDK,为什么还要自己动手呢?
ASP.NET核心认证SDK允许你写更少的代码,将Auth0认证和授权整合到你的ASP.NET应用程序中。它简化了配置,支持额外的查询参数和刷新令牌,自然支持Auth0组织和用户邀请。它实际上是一个围绕 Microsoft.AspNetCore.Authentication.OpenIdConnect库,但它为你带来了一个标准和简单的方法,将Auth0集成到你的应用程序中。
您可以将SDK用于您所有需要认证的ASP.NET应用程序,如ASP.NET MVC应用程序、Razor Web应用程序和Blazor服务器应用程序。
安装ASP.NET核心认证SDK
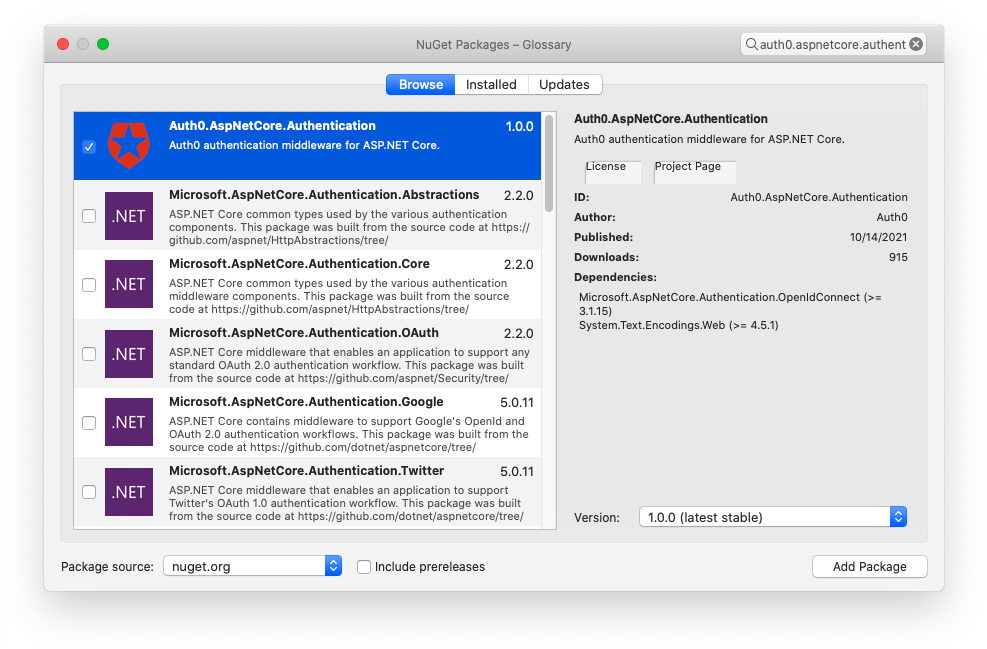
你可以通过使用Visual Studio中的NuGet Package Manager UI来安装Auth0 ASP.NET Core SDK,如下图所示。
你也可以通过在包管理器控制台运行以下命令来安装它。
Install-Package Auth0.AspNetCore.Authentication
或者你可以在终端窗口中使用以下命令。
dotnet add package Auth0.AspNetCore.Authentication
无论你选择哪种方式,你都会在你的ASP.NET项目中得到这个 Auth0.AspNetCore.Authentication在你的ASP.NET项目中的依赖性。
基本登录用例
让我们开始看看新的SDK是如何改善你的开发者体验的。当然,你需要一个Auth0账户来将你的ASP.NET应用程序与Auth0集成。如果你还没有,你可以现在就注册一个免费的。按照Auth0 ASP.NET Core Authentication SDK的快速入门,注册你的应用程序并获得你的应用程序密钥。
下面是你写的典型代码,在你的ASP.NET应用程序中启用认证,当使用 Microsoft.AspNetCore.Authentication.OpenIdConnect:
public void ConfigureServices(IServiceCollection services)
{
  services.AddAuthentication(options => {
    options.DefaultAuthenticateScheme = CookieAuthenticationDefaults.AuthenticationScheme;
    options.DefaultSignInScheme = CookieAuthenticationDefaults.AuthenticationScheme;
    options.DefaultChallengeScheme = CookieAuthenticationDefaults.AuthenticationScheme;
  })
  .AddCookie()
  .AddOpenIdConnect("Auth0", options => {
    options.Authority = $"https://{Configuration["Auth0:Domain"]}";
    options.ClientId = Configuration["Auth0:ClientId"];
    options.CallbackPath = new PathString("/callback");
    options.TokenValidationParameters = new TokenValidationParameters
    {
      NameClaimType = "name"
    };
    options.Events = new OpenIdConnectEvents
    {
      OnRedirectToIdentityProviderForSignOut = (context) =>
      {
        var logoutUri = $"https://{Configuration["Auth0:Domain"]}/v2/logout?client_id={Configuration["Auth0:ClientId"]}";

        var postLogoutUri = context.Properties.RedirectUri;
        if (!string.IsNullOrEmpty(postLogoutUri))
        {
          if (postLogoutUri.StartsWith("/"))
          {
            // transform to absolute
            var request = context.Request;
            postLogoutUri = request.Scheme + "://" + request.Host + request.PathBase + postLogoutUri;
          }
          logoutUri += $"&returnTo={ Uri.EscapeDataString(postLogoutUri)}";
        }

        context.Response.Redirect(logoutUri);
        context.HandleResponse();

        return Task.CompletedTask;
      }
    };
  });
}
我不会通过该代码来解释每一个步骤。你只需要知道它通过依靠Auth0通用登录页面在你的应用程序中实现登录和注销功能。
通过使用Auth0 ASP.NET Core Authentication SDK,你的代码会缩短如下。
public void ConfigureServices(IServiceCollection services)
{
  services.AddAuth0WebAppAuthentication(options =>
  {
    options.Domain = Configuration["Auth0:Domain"];
    options.ClientId = Configuration["Auth0:ClientId"];
  });
}
令人印象深刻,不是吗?😲
该SDK处理了所有你以前需要手动完成的配置工作。而这仅仅是个开始!
获取访问令牌
如果你想从你的ASP.NET应用程序中调用一个API呢?在这种情况下,你需要向Auth0请求一个特定受众的访问令牌。
在没有SDK的情况下,要做到这一点,需要类似于下面的代码。
public void ConfigureServices(IServiceCollection services)
{
  services.AddAuthentication(options => {
    options.DefaultAuthenticateScheme = CookieAuthenticationDefaults.AuthenticationScheme;
    options.DefaultSignInScheme = CookieAuthenticationDefaults.AuthenticationScheme;
    options.DefaultChallengeScheme = CookieAuthenticationDefaults.AuthenticationScheme;
  })
  .AddCookie()
  .AddOpenIdConnect("Auth0", options => {
    options.Authority = $"https://{Configuration["Auth0:Domain"]}";
    options.ClientId = Configuration["Auth0:ClientId"];
    //👇new code
    options.ClientSecret = Configuration["Auth0:ClientSecret"];
    options.SaveTokens = true;
    options.ResponseType = OpenIdConnectResponseType.Code;
    //👆new code
    options.CallbackPath = new PathString("/callback");
    options.TokenValidationParameters = new TokenValidationParameters
    {
      NameClaimType = "name"
    };
    options.Events = new OpenIdConnectEvents
    {
      OnRedirectToIdentityProviderForSignOut = (context) =>
      {
        var logoutUri = $"https://{Configuration["Auth0:Domain"]}/v2/logout?client_id={Configuration["Auth0:ClientId"]}";

        var postLogoutUri = context.Properties.RedirectUri;
        if (!string.IsNullOrEmpty(postLogoutUri))
        {
          if (postLogoutUri.StartsWith("/"))
          {
            // transform to absolute
            var request = context.Request;
            postLogoutUri = request.Scheme + "://" + request.Host + request.PathBase + postLogoutUri;
          }
          logoutUri += $"&returnTo={ Uri.EscapeDataString(postLogoutUri)}";
        }

        context.Response.Redirect(logoutUri);
        context.HandleResponse();

        return Task.CompletedTask;
      }
      //👇new code
      OnRedirectToIdentityProvider = context =>
      {
        context.ProtocolMessage.SetParameter("audience", Configuration["Auth0:Audience"]);
        return Task.FromResult(0);
      }
      //👆new code
    };
  });
}
基本上,你需要在之前的代码中多加几行,以便改变OAuth流程,提供客户端秘密,启用令牌保存,并将受众值附加到授权请求中。
使用SDK实现相同结果的等效代码如下。
public void ConfigureServices(IServiceCollection services)
{
  services.AddAuth0WebAppAuthentication(options =>
  {
    options.Domain = Configuration["Auth0:Domain"];
    options.ClientId = Configuration["Auth0:ClientId"];
    options.ClientSecret = Configuration["Auth0:ClientSecret"];
  })
  .WithAccessToken(options =>
  {
    options.Audience = Configuration["Auth0:Audience"];
  });
}
你对此不感到兴奋吗?💥你的代码将更简洁、更干净、更清晰
刷新令牌的魔力
万一你需要一个刷新令牌呢?🤔没有什么比这更简单了。只要设置一个标志。
public void ConfigureServices(IServiceCollection services)
{
  services.AddAuth0WebAppAuthentication(options =>
  {
    options.Domain = Configuration["Auth0:Domain"];
    options.ClientId = Configuration["Auth0:ClientId"];
    options.ClientSecret = Configuration["Auth0:ClientSecret"];
  })
  .WithAccessToken(options =>
  {
    options.Audience = Configuration["Auth0:Audience"];
    options.UseRefreshTokens = true;   //👈 new code
  });
}
将其与你需要添加到无SDK代码中的代码进行比较。
public void ConfigureServices(IServiceCollection services)
{
  services.AddAuthentication(options => {
  //...the code to configure authentication...
  })
  .AddCookie(options => {
    options.Events.OnValidatePrincipal = (context) => {
    var options = context.HttpContext.RequestServices.GetRequiredService<Auth0Options>();

    string accessToken;
    if (context.Properties.Items.TryGetValue(".Token.access_token", out accessToken))
    {
      if (options.UseRefreshTokens)
      {
        string refreshToken;
        if (context.Properties.Items.TryGetValue(".Token.refresh_token", out refreshToken))
        {
          var now = DateTimeOffset.Now;
          var expiresAt = DateTimeOffset.Parse(context.Properties.Items[".Token.expires_at"]);
          var leeway = 60;
          var difference = DateTimeOffset.Compare(expiresAt, now.AddSeconds(leeway));
          var isExpired = difference <= 0;

          if (isExpired && !string.IsNullOrWhiteSpace(refreshToken))
          {
            var result = await RefreshTokens(options, refreshToken, auth0Options.Backchannel);

            if (result != null)
            {
              context.Properties.UpdateTokenValue("access_token", result.AccessToken);
              context.Properties.UpdateTokenValue("refresh_token", result.RefreshToken);
              context.Properties.UpdateTokenValue("id_token", result.IdToken);
              context.Properties.UpdateTokenValue("expires_at", DateTimeOffset.Now.AddSeconds(result.ExpiresIn).ToString("o"));
            }
            else
            {
              context.Properties.UpdateTokenValue("refresh_token", null);
            }

            context.ShouldRenew = true;
          }
        }
      }
    }
  })
  .AddOpenIdConnect("Auth0", options => {
    //...the code to configure OpenID Connect...
  });
}
你应该处理好所有关于确定令牌到期和请求新的访问令牌的细节。Auth0 ASP.NET Core认证SDK代表你做这些。你同意这很神奇吗?✨
Auth0组织支持
不仅ASP.NET Core Authentication SDK让你处理标准的OpenID Connect和OAuth职责,而且它还简化了你使用特定Auth0功能的生活,如Auth0组织。通过使用组织,你可以代表用户的逻辑组,如团队、合作伙伴、商业客户等。他们可以有特定的政策、品牌和其他定制。因此,为了使用户能够登录到一个组织,你需要在你的ASP.NET应用程序中指定它。下面是一个例子,说明你如何通过使用SDK来完成这个任务。
public void ConfigureServices(IServiceCollection services)
{
  services.AddAuth0WebAppAuthentication(options =>
  {
    options.Domain = Configuration["Auth0:Domain"];
    options.ClientId = Configuration["Auth0:ClientId"];
    options.Organization = Configuration["Auth0:Organization"];
  });
}
很直接,对吗?🙌 当然,你可以用组织做更多的事情。请看一下ASP.NET Core Authentication SDK文档以了解更多。
定制化
在这一点上,你可能会认为,拥有一个SDK,你就必须使用它的方法来与OpenID Connect和OAuth合作。因此,你不再有在授权请求中添加额外参数的自由,比如说。或者你可能认为你不能再应用你的自定义令牌验证或自由管理OpenID Connect事件。
我有一个好消息:你不需要担心这个问题。ASP.NET核心认证SDK让你可以自由地定制许多东西。
例如,你可以在授权请求中添加自定义参数。请看下面的例子。
public void ConfigureServices(IServiceCollection services)
{
  services.AddAuth0WebAppAuthentication(options =>
  {
    options.Domain = Configuration["Auth0:Domain"];
    options.ClientId = Configuration["Auth0:ClientId"];
    options.LoginParameters = new Dictionary<string, string>() {
      { "screen_hint", "signup" }
    };
  });
}
screen_hint 在这里,你将你的ASP.NET应用程序配置为在授权请求中附加带有signup 值的参数。在这种特定情况下,用户将看到注册窗口,而不是默认的登录屏幕。
但你也可以应用你的自定义验证,就像下面这个案例一样。
public void ConfigureServices(IServiceCollection services)
{
  services.AddAuth0WebAppAuthentication(options =>
  {
    options.Domain = Configuration["Auth0:Domain"];
    options.ClientId = Configuration["Auth0:ClientId"];
    options.OpenIdConnectEvents = new OpenIdConnectEvents
    {
      OnTokenValidated = (context) =>
      {
        var birthDateClaim = context.SecurityToken.Claims.SingleOrDefault(claim => claim.Type == "birthdate")?.Value;

        if (string.IsNullOrWhiteSpace(birthDateClaim))
        {
          context.Fail("The 'birthdate' claim must be present in the ID token.");
        }

        return Task.CompletedTask;
      }
    };
  })
}
正如你所看到的,ASP.NET核心认证SDK公开了OpenIdConnectEvents 选项,让你处理由库触发的标准事件。 Microsoft.AspNetCore.Authentication.OpenIdConnect库触发的标准事件。这样,你就可以把SDK的简单性和标准库的行为结合起来,获得最大的灵活性。
总结
现在你应该对使用ASP.NET Core Authentication SDK将Auth0集成到你的ASP.NET应用程序的好处有了更清楚的认识:更少的代码、更多的可读性、灵活性和最佳实践。因此,请尝试使用SDK,并按照QuickStart的要求将您的ASP.NET应用程序与Auth0集成。查看SDK文档以了解更多。
