

在本教程中,我们将用PHP和jQuery创建一个简单的基于网络的聊天应用程序。这类实用程序非常适合作为您网站的即时支持系统。
本教程最近进行了更新,对聊天应用程序进行了改进。
简介
我们今天要建立的聊天应用程序将非常简单。它将包括一个登录和注销系统、AJAX风格的功能以及对多个用户的支持。
第1步:HTML标记
在本教程中,我们将首先创建第一个文件,称为index.php。
<!DOCTYPE html>
<html lang="en">
    <head>
        <meta charset="utf-8" />

        <title>Tuts+ Chat Application</title>
        <meta name="description" content="Tuts+ Chat Application" />
        <link rel="stylesheet" href="style.css" />
    </head>
    <body>
        <div id="wrapper">
            <div id="menu">
                <p class="welcome">Welcome, <b></b></p>
                <p class="logout"><a id="exit" href="#">Exit Chat</a></p>
            </div>

            <div id="chatbox"></div>

            <form name="message" action="">
                <input name="usermsg" type="text" id="usermsg" />
                <input name="submitmsg" type="submit" id="submitmsg" value="Send" />
            </form>
        </div>
        <script type="text/javascript" src="https://cdnjs.cloudflare.com/ajax/libs/jquery/3.5.1/jquery.min.js"></script>
        <script type="text/javascript">
            // jQuery Document
            $(document).ready(function () {});
        </script>
    </body>
</html>
- 我们用通常的DOCTYPE、html、head和body标签开始我们的HTML。在头部标签中,我们添加标题和CSS样式表(style.css)的链接。
- 在body标签里面,我们在
#wrapperdiv里面结构我们的布局。我们将有三个主要块:一个简单的菜单、我们的聊天框和我们的消息输入,每个块都有各自的div和id。#menudiv将由两个段落元素组成。第一个将是对用户的欢迎,将在左边,第二个将是一个退出链接,将在右边。我们使用flexbox而不是浮动元素进行布局。#chatboxdiv将包含我们的聊天记录。我们将使用jQuery的ajax请求从外部文件加载我们的日志。#wrapperdiv中的最后一项将是我们的表单,它将包括一个用户信息的文本输入和一个提交按钮。
- 我们最后加入我们的脚本,这样页面的加载速度会更快。我们将首先链接到Cloudflare jQuery CDN,因为我们将在本教程中使用jQuery库。我们的第二个脚本标签就是我们要做的事情。我们将在文档准备好后加载所有的代码。
第2步:CSS样式设计
我们现在将添加一些CSS,使我们的聊天应用程序看起来比默认的浏览器样式更好。下面的代码将被添加到我们的style.css文件中。
* {
    margin: 0;
    padding: 0;
  }

  body {
    margin: 20px auto;
    font-family: "Lato";
    font-weight: 300;
  }

  form {
    padding: 15px 25px;
    display: flex;
    gap: 10px;
    justify-content: center;
  }

  form label {
    font-size: 1.5rem;
    font-weight: bold;
  }

  input {
    font-family: "Lato";
  }

  a {
    color: #0000ff;
    text-decoration: none;
  }

  a:hover {
    text-decoration: underline;
  }

  #wrapper,
  #loginform {
    margin: 0 auto;
    padding-bottom: 25px;
    background: #eee;
    width: 600px;
    max-width: 100%;
    border: 2px solid #212121;
    border-radius: 4px;
  }

  #loginform {
    padding-top: 18px;
    text-align: center;
  }

  #loginform p {
    padding: 15px 25px;
    font-size: 1.4rem;
    font-weight: bold;
  }

  #chatbox {
    text-align: left;
    margin: 0 auto;
    margin-bottom: 25px;
    padding: 10px;
    background: #fff;
    height: 300px;
    width: 530px;
    border: 1px solid #a7a7a7;
    overflow: auto;
    border-radius: 4px;
    border-bottom: 4px solid #a7a7a7;
  }

  #usermsg {
    flex: 1;
    border-radius: 4px;
    border: 1px solid #ff9800;
  }

  #name {
    border-radius: 4px;
    border: 1px solid #ff9800;
    padding: 2px 8px;
  }

  #submitmsg,
  #enter{
    background: #ff9800;
    border: 2px solid #e65100;
    color: white;
    padding: 4px 10px;
    font-weight: bold;
    border-radius: 4px;
  }

  .error {
    color: #ff0000;
  }

  #menu {
    padding: 15px 25px;
    display: flex;
  }

  #menu p.welcome {
    flex: 1;
  }

  a#exit {
    color: white;
    background: #c62828;
    padding: 4px 8px;
    border-radius: 4px;
    font-weight: bold;
  }

  .msgln {
    margin: 0 0 5px 0;
  }

  .msgln span.left-info {
    color: orangered;
  }

  .msgln span.chat-time {
    color: #666;
    font-size: 60%;
    vertical-align: super;
  }

  .msgln b.user-name, .msgln b.user-name-left {
    font-weight: bold;
    background: #546e7a;
    color: white;
    padding: 2px 4px;
    font-size: 90%;
    border-radius: 4px;
    margin: 0 5px 0 0;
  }

  .msgln b.user-name-left {
    background: orangered;
  }
上面的CSS没有什么特别之处,除了一些ID或类,我们已经为其设置了一个样式,稍后会添加。


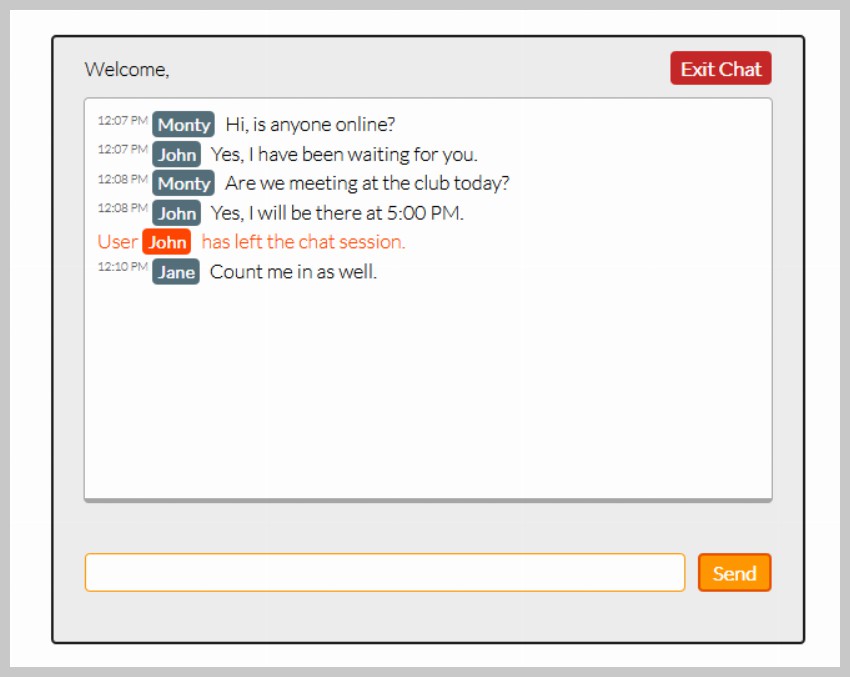
正如你在上面看到的,我们已经完成了建立聊天的用户界面。
第3步:使用PHP创建一个登录表单
现在我们将实现一个简单的表单,在继续前进之前询问用户的姓名。
<?php
session_start();
if(isset($_POST['enter'])){
if($_POST['name'] != ""){
$_SESSION['name'] = stripslashes(htmlspecialchars($_POST['name']));
}
else{
echo '<span class="error">Please type in a name</span>';
}
}
function loginForm(){
echo'
<div id="loginform">
<p>Please enter your name to continue!</p>
<form action="index.php" method="post">
<label for="name">Name —</label>
<input type="text" name="name" id="name" />
<input type="submit" name="enter" id="enter" value="Enter" />
</form>
</div>
';
}
?>
我们创建的loginForm() 函数由一个简单的登录表格组成,它询问用户的姓名。然后我们使用if和else语句来验证这个人是否输入了名字。如果这个人输入了一个名字,我们就把这个名字设为$_SESSION['name'] 。由于我们使用一个基于cookie的会话来存储名字,我们必须在向浏览器输出任何东西之前调用session_start() 。
你可能要密切注意的一点是,我们使用了htmlspecialchars() 函数,该函数将特殊字符转换为HTML实体,因此可以保护姓名变量不成为跨站脚本(XSS)的受害者。稍后,我们还将把这个函数添加到将被发布到聊天记录的文本变量中。
显示登录表格
为了在用户没有登录,因此没有创建会话的情况下显示登录表单,我们在原代码中的#wrapper div和script标签周围使用了另一个if和else语句。在相反的情况下,如果用户已经登录并创建了会话,这将隐藏登录表格并显示聊天框。
<?php
if(!isset($_SESSION['name'])){
	loginForm();
}
else{
?>
<div id="wrapper">
    <div id="menu">
        <p class="welcome">Welcome, <b><?php echo $_SESSION['name']; ?></b></p>
        <p class="logout"><a id="exit" href="#">Exit Chat</a></p>
    </div>

    <div id="chatbox">
    <?php
    if(file_exists("log.html") && filesize("log.html") > 0){

        $contents = file_get_contents("log.html");
        echo $contents;
    }
    ?>
    </div>

    <form name="message" action="">
        <input name="usermsg" type="text" id="usermsg" />
        <input name="submitmsg" type="submit" id="submitmsg" value="Send" />
    </form>
</div>
<script type="text/javascript" src="https://cdnjs.cloudflare.com/ajax/libs/jquery/3.5.1/jquery.min.js"></script>
<script type="text/javascript">
// jQuery Document
$(document).ready(function(){
});
</script>
<?php
}
?>

欢迎和注销菜单
我们还没有完成为这个聊天应用程序创建登录系统。我们仍然需要允许用户注销并结束聊天会话。如果您记得,我们最初的HTML标记包括一个简单的菜单。让我们回去添加一些PHP代码,让菜单具有更多的功能。
首先,让我们在欢迎词中加入用户的名字。我们通过输出用户名字的会话来做到这一点。
<p class="welcome">Welcome, <b><?php echo $_SESSION['name']; ?></b></p>

为了让用户注销并结束会话,我们将跳过自己,简要地使用jQuery。
<script type="text/javascript">
// jQuery Document
$(document).ready(function(){
	//If user wants to end session
	$("#exit").click(function(){
		var exit = confirm("Are you sure you want to end the session?");
		if(exit==true){window.location = 'index.php?logout=true';}
	});
});
</script>
上面的jQuery代码只是在用户点击#exit 链接时显示一个确认警报。如果用户确认退出,因此决定结束会话,那么我们就把他们送到index.php?logout=true 。这只是创建一个名为logout 的变量,其值为true 。我们需要用PHP捕捉这个变量。

if(isset($_GET['logout'])){

	//Simple exit message
	$logout_message = "<div class='msgln'><span class='left-info'>User <b class='user-name-left'>". $_SESSION['name'] ."</b> has left the chat session.</span><br></div>";
    file_put_contents("log.html", $logout_message, FILE_APPEND | LOCK_EX);

	session_destroy();
	header("Location: index.php"); //Redirect the user
}
我们现在使用isset() 函数查看是否存在一个名为 "logout "的get 变量。如果这个变量是通过一个URL传递的,比如上面提到的链接,我们就着手结束用户姓名的会话。
在用session_destroy() 函数销毁用户姓名会话之前,我们要在聊天记录中写一条简单的退出信息。它将说明用户已经离开了聊天会话。我们通过使用file_put_contents() 函数来操作我们的log.html文件来做到这一点,正如我们稍后看到的,该文件将被创建为我们的聊天日志。file_put_contents() 函数是将数据写入文本文件的便捷方式,而不是每次都使用fopen(),fwrite(), 和fclose() 。只要确保你传递适当的标志,如FILE_APPEND ,将数据附加在文件的末尾。否则,一个新的$logout_message 将会覆盖文件中以前的内容。请注意,我们已经为div添加了一个msgln 的类。我们已经为这个div定义了CSS样式。
做完这些后,我们销毁会话,并将用户重定向到同一页面,在那里将出现登录表单。
第四步:处理用户输入
在用户提交我们的表单后,我们想抓取他们的输入并将其写入我们的聊天记录。为了做到这一点,我们必须使用jQuery和PHP,在客户端和服务器端同步工作。
jQuery
几乎所有我们要用jQuery来处理的数据都是围绕jQuery的post请求进行的。
//If user submits the form
$("#submitmsg").click(function () {
    var clientmsg = $("#usermsg").val();
    $.post("post.php", { text: clientmsg });
    $("#usermsg").val("");
    return false;
});
- 在我们做任何事情之前,我们必须抓取用户的输入,或者用户在
#submitmsg输入的内容。这可以通过val()函数来实现,它可以获得表单字段中设置的值。我们现在将这个值存储在clientmsg变量中。 - 这里是我们最重要的部分:jQuery的post请求。这将发送一个POST请求到post.php文件,我们将在稍后创建。它发布客户的输入,或者已经保存在
clientmsg变量中的内容。 - 最后,我们通过设置值属性为空白来清除
#usermsg输入。
请注意,上面的代码将进入我们的脚本标签,也就是我们放置jQuery注销代码的地方。
PHP。post.php文件
目前,我们有POST数据被发送到post.php文件,每次用户提交表单并发送一个新的信息。我们现在的目标是抓取这些数据并将其写入我们的聊天记录中。
<?
session_start();
if(isset($_SESSION['name'])){
	$text = $_POST['text'];

	$text_message = "<div class='msgln'><span class='chat-time'>".date("g:i A")."</span> <b class='user-name'>".$_SESSION['name']."</b> ".stripslashes(htmlspecialchars($text))."<br></div>";

    file_put_contents("log.html", $text_message, FILE_APPEND | LOCK_EX);
}
?>
在做任何事情之前,我们必须用session_start() 函数启动post.php文件,因为我们将在这个文件中使用用户姓名的会话。
使用isset 布尔值,我们在做任何其他事情之前检查'name'的会话是否存在。我们现在抓取被jQuery发送至此文件的POST数据。我们把这个数据存储到$text 变量中。这个数据,就像所有的用户输入数据一样,将被存储在log.html文件中。我们只需使用file_put_contents() 函数将所有的数据写到文件中。
我们要写的信息将被包在.msgln div里面。它将包含由date() 函数生成的日期和时间,用户姓名的会话,以及文本,它也被htmlspecialchars() 函数包围以防止XSS。
第5步:显示聊天记录内容
用户发布的所有内容都是用jQuery处理和发布的;用PHP写到聊天记录中。唯一要做的就是用log.php向用户显示更新的聊天记录。
为了节省我们的时间,如果聊天记录有任何内容,我们将把它预装到#chatbox div。
<div id="chatbox"><?php
if(file_exists("log.html") && filesize("log.html") > 0){

	$contents = file_get_contents("log.html");
    echo $contents;
}
?></div>
我们使用与post.php文件类似的程序,只是这次我们只读取和输出文件的内容。
jQuery.ajax 请求
AJAX请求是我们所做的一切的核心。这个请求不仅允许我们在不刷新页面的情况下通过表单发送和接收数据,而且还允许我们处理请求的数据。
//Load the file containing the chat log
function loadLog(){
	$.ajax({
		url: "log.html",
		cache: false,
		success: function(html){
			$("#chatbox").html(html); //Insert chat log into the #chatbox div
	  	},
	});
}
我们把AJAX请求包在一个函数里。稍后你就会明白为什么。正如你在上面看到的,我们将只使用三个jQuery AJAX请求对象。
- **
url:**一个要请求的URL的字符串。我们将使用我们的聊天记录的文件名log.html。 - **
cache:**这将防止我们的文件被缓存。它将确保我们每次发送请求时都能得到最新的聊天记录。 - **
success:**这将允许我们附加一个函数,传递我们要求的数据。
如您所见,我们随后将我们请求的HTML数据移入#chatbox div。
自动滚动
正如您在其他聊天应用程序中看到的,如果聊天记录容器(#chatbox )溢出,内容会自动向下滚动。我们将实现一个简单而类似的功能,它将比较我们做AJAX请求前后的容器滚动高度。如果请求后的滚动高度更大,我们将使用jQuery的animate效果来滚动#chatbox div。
//Load the file containing the chat log
function loadLog(){
	var oldscrollHeight = $("#chatbox")[0].scrollHeight - 20; //Scroll height before the request
	$.ajax({
		url: "log.html",
		cache: false,
		success: function(html){
			$("#chatbox").html(html); //Insert chat log into the #chatbox div

			//Auto-scroll
			var newscrollHeight = $("#chatbox")[0].scrollHeight - 20; //Scroll height after the request
			if(newscrollHeight > oldscrollHeight){
				$("#chatbox").animate({ scrollTop: newscrollHeight }, 'normal'); //Autoscroll to bottom of div
			}
	  	},
	});
}
在我们发出请求之前,我们首先将#chatbox div的滚动高度存储到oldscrollHeight 这个变量中。在我们的请求成功返回后,我们将#chatbox div的滚动高度存储到newscrollHeight 变量中。
然后我们使用if 语句来比较这两个滚动高度变量。如果newscrollHeight 大于oldscrollHeight ,我们使用animate效果来滚动#chatbox div。
持续更新聊天记录
现在可能会出现一个问题:我们将如何持续更新在用户之间来回发送的新数据?或者换个说法,我们如何不断地发送请求来更新数据?
setInterval (loadLog, 2500); //Reload file every 2500 ms or x ms if you wish to change the second parameter
我们问题的答案在于setInterval 函数。这个函数将每隔2.5秒运行我们的loadLog() 函数,而loadLog 函数将请求更新文件并自动滚动div。

完整的代码
如果正确的代码没有放在正确的文件里,没有按照正确的顺序,聊天应用程序可能无法正常工作。为了避免任何混淆,我发布了整个代码,这些代码将被放入两个独立的文件中,称为index.php和post.php。
这里是index.php的代码。
<?php
session_start();
if(isset($_GET['logout'])){
//Simple exit message
$logout_message = "<div class='msgln'><span class='left-info'>User <b class='user-name-left'>". $_SESSION['name'] ."</b> has left the chat session.</span><br></div>";
file_put_contents("log.html", $logout_message, FILE_APPEND | LOCK_EX);
session_destroy();
header("Location: index.php"); //Redirect the user
}
if(isset($_POST['enter'])){
if($_POST['name'] != ""){
$_SESSION['name'] = stripslashes(htmlspecialchars($_POST['name']));
}
else{
echo '<span class="error">Please type in a name</span>';
}
}
function loginForm(){
echo
'<div id="loginform">
<p>Please enter your name to continue!</p>
<form action="index.php" method="post">
<label for="name">Name —</label>
<input type="text" name="name" id="name" />
<input type="submit" name="enter" id="enter" value="Enter" />
</form>
</div>';
}
?>
<!DOCTYPE html>
<html lang="en">
<head>
<meta charset="utf-8" />
<title>Tuts+ Chat Application</title>
<meta name="description" content="Tuts+ Chat Application" />
<link rel="stylesheet" href="style.css" />
</head>
<body>
<?php
if(!isset($_SESSION['name'])){
loginForm();
}
else {
?>
<div id="wrapper">
<div id="menu">
<p class="welcome">Welcome, <b><?php echo $_SESSION['name']; ?></b></p>
<p class="logout"><a id="exit" href="#">Exit Chat</a></p>
</div>
<div id="chatbox">
<?php
if(file_exists("log.html") && filesize("log.html") > 0){
$contents = file_get_contents("log.html");
echo $contents;
}
?>
</div>
<form name="message" action="">
<input name="usermsg" type="text" id="usermsg" />
<input name="submitmsg" type="submit" id="submitmsg" value="Send" />
</form>
</div>
<script type="text/javascript" src="https://cdnjs.cloudflare.com/ajax/libs/jquery/3.5.1/jquery.min.js"></script>
<script type="text/javascript">
// jQuery Document
$(document).ready(function () {
$("#submitmsg").click(function () {
var clientmsg = $("#usermsg").val();
$.post("post.php", { text: clientmsg });
$("#usermsg").val("");
return false;
});
function loadLog() {
var oldscrollHeight = $("#chatbox")[0].scrollHeight - 20; //Scroll height before the request
$.ajax({
url: "log.html",
cache: false,
success: function (html) {
$("#chatbox").html(html); //Insert chat log into the #chatbox div
//Auto-scroll
var newscrollHeight = $("#chatbox")[0].scrollHeight - 20; //Scroll height after the request
if(newscrollHeight > oldscrollHeight){
$("#chatbox").animate({ scrollTop: newscrollHeight }, 'normal'); //Autoscroll to bottom of div
}
}
});
}
setInterval (loadLog, 2500);
$("#exit").click(function () {
var exit = confirm("Are you sure you want to end the session?");
if (exit == true) {
window.location = "index.php?logout=true";
}
});
});
</script>
</body>
</html>
<?php
}
?>
这里是post.php的代码。
<?php
session_start();
if(isset($_SESSION['name'])){
    $text = $_POST['text'];

	$text_message = "<div class='msgln'><span class='chat-time'>".date("g:i A")."</span> <b class='user-name'>".$_SESSION['name']."</b> ".stripslashes(htmlspecialchars($text))."<br></div>";
    file_put_contents("log.html", $text_message, FILE_APPEND | LOCK_EX);
}
?>
进入style.css的代码已经在教程的第2步中提供。
如果你的代码似乎不工作,确保它与这里提供的代码一致。请注意,所有三个文件--index.php、post.php和style.css--都位于同一个目录中。
