

你可以使用 .NET的FluentEmail 库 快速而直观地发送电子邮件 ,但是一旦你在你的项目中发送了许多不同的电子邮件,你必须能够以一种好的方式组织你的电子邮件模板,以重复使用内容并在格式和设计方面执行一致性。幸运的是,Razor Layouts可以帮助你重用模板的部分内容,如页眉和页脚。
前提条件
在你的开发环境中,你将需要以下东西。
- Git CLI
- 一个.NET IDE(Visual Studio、带有C#插件的VS Code、JetBrains Rider或任何你选择的编辑器)
- .NET 6 SDK(早期和较新的版本也可以使用)
你可以在这个GitHub资源库中找到本教程的源代码。
设置一个SMTP服务器
为了能够大规模地发送电子邮件,你需要一个像SendGrid Email API这样的电子邮件发送服务,但是对于本地开发,你可以使用一个假的SMTP服务器,或者对于这个项目,你将使用smtp4dev,这是一个强大的工具,它允许你,通过本地SMTP服务器发送电子邮件,而不需要实际发送电子邮件给你的客户端。
打开你的控制台,运行这个命令来安装smtp4dev作为一个全局的.NET工具。
dotnet tool install -g Rnwood.Smtp4dev
然后用下面的命令运行它。
smtp4dev
在你的控制台中,你会看到smtp4dev正在本地运行。输出将显示smtp4dev用于SMTP和IMAP协议的端口,以及你可以用什么URL来访问Web用户界面,在这种情况下是https://localhost:5000 和 *https://localhost:5001**。*该界面将显示如果连接到真正的电子邮件服务而发出的电子邮件,因此你可以验证你的电子邮件是否被发送,而不需要实际发送给终端用户。

你还会看到默认使用的SMTP端口是25端口,而在你自己的机器上,服务器的主机名是localhost。在配置你的邮件应用程序时,你将需要这个端口和主机名。
让smtp4dev工具在本教程的剩余部分运行,并为以后的所有命令打开一个新的控制台。
如果你想了解更多关于smtp4dev的信息,你可以看看这篇文章,里面有一个更详细的例子。
为什么使用布局?
许多项目开始时只有一个电子邮件模板,但随着项目的发展和模板数量的增加,模板将变得更难维护。你需要在你的模板之间保持类似的设计,具体来说,你要共享一个页眉和页脚,以保持你与用户沟通的一致性。
通过单独修改每个电子邮件模板来保持这种一致性是一项复杂的任务,因为你将需要在几个模板中重复相同的代码。你可以修改一个模板的页眉,却很容易忘记在其他模板中修改同样的页眉。
你可以使用Razor Layouts来简化这个过程,而不是在每个模板中重复你的页眉和页脚,你可以用你的页眉和页脚创建一个单一的布局,同时仍然在中间渲染你的模板所特有的内容。例如,一个产品促销的模板只需要有Razor和HTML来渲染促销内容,但会被放在来自布局的页眉和页脚之间。
之前。用重复的页眉和页脚发送邮件
在之前的教程中,我解释了如何安装FluentEmail库并使用它来发送邮件。在本教程中,你将跳过这些步骤,从一个已经安装了FluentEmail的样本开始,用代码来发送两封邮件。使用git克隆以下项目。
git clone https://github.com/nescampos/tdv_razorlayouts.git
接下来,用你选择的IDE打开该项目。默认值对于本地开发来说应该是没有问题的,然而,可以随意改变突出显示的值。
using FluentEmail.Core;
using FluentEmail.Core.Models;
using FluentEmail.Razor;
using FluentEmail.Smtp;
using SendGridFluentEmailSender;
using System.Net.Mail;

string emailServer = "localhost";
int emailPort = 25;
using SmtpClient smtpClient = new SmtpClient(emailServer, emailPort);
Email.DefaultRenderer = new RazorRenderer();
Email.DefaultSender = new SmtpSender(smtpClient);

IFluentEmail firstEmail = Email
    .From("sender@localhost")
    .To("recipient@localhost")
    .Subject("Test Email")
    .Tag("test")
    .UsingTemplateFromFile(
        "FirstTemplate.cshtml",
        new FirstTemplateModel { Name = "Nestor Campos" }
    );

IFluentEmail secondEmail = Email
    .From("sender@localhost")
    .To("recipient@localhost")
    .Subject("Second Email")
    .Tag("test")
    .UsingTemplateFromFile(
        "SecondTemplate.cshtml",
        new SecondTemplateModel
        {
            Title = "Welcome to our site",
            Description = "We are sending some product discounts for you as our new customer",
            ColumnOne = "This is our first discount",
            ColumnTwo = "This is our second discount"
        }
    );


SendResponse firstEmailResponse = firstEmail.Send();
SendResponse secondEmailResponse = secondEmail.Send();

Console.WriteLine(firstEmailResponse.Successful ? "First email queued" : "First email failed to send");
Console.WriteLine(secondEmailResponse.Successful ? "Second email queued" : "Second email failed to send");
从控制台运行该应用程序。
dotnet run
让smtp4dev工具在本教程的剩余部分运行,并为以后的所有命令打开一个新的控制台。
现在,检查smtp4dev 网络门户(默认为*https://localhost:5001)*,它将显示所发送的邮件,就像你在一个真实的邮箱中收到的一样,并有相应的设计和文本。
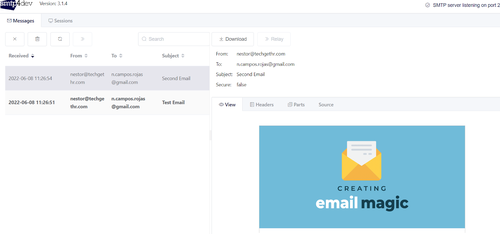
正如你所看到的,该项目工作正常,但如果你详细查看Razor 文件(.cshtml扩展名),你会发现这两个文件有很大一部分代码是重复的,当你已经有很多模板需要编码和维护时,这种管理会很复杂。在这一点上,就是Layouts 可以促进这个过程。
smtp4dev是一个有用的工具,可以测试你的代码是否正确地发送邮件,以及邮件内容是否符合你的期望。然而,不要用这个工具来验证你的电子邮件看起来和感觉是否符合预期。每个电子邮件收件箱供应商对HTML电子邮件的渲染都略有不同,所以当你设计你的HTML电子邮件时,你需要在每个电子邮件收件箱供应商如Gmail、Outlook、Apple Mail、Yahoo Mail等测试设计。
创建一个布局文件
现在,在根目录下创建一个名为*_DefaultEmailLayout**.cshtml*的文件。接下来,在该文件中添加以下代码。
<!DOCTYPE html>
<html lang="en" xmlns="http://www.w3.org/1999/xhtml" xmlns:o="urn:schemas-microsoft-com:office:office">
<head>
<meta charset="UTF-8">
<meta name="viewport" content="width=device-width,initial-scale=1">
<meta name="x-apple-disable-message-reformatting">
<title></title>
<style>
table, td, div, h1, p {font-family: Arial, sans-serif;}
</style>
</head>
<body style="margin:0;padding:0;">
<table role="presentation" style="width:100%;border-collapse:collapse;border:0;border-spacing:0;background:#ffffff;">
<tr>
<td align="center" style="padding:0;">
<table role="presentation" style="width:602px;border-collapse:collapse;border:1px solid #cccccc;border-spacing:0;text-align:left;">
<tr>
<td align="center" style="padding:40px 0 30px 0;background:#70bbd9;">
<img src="https://i.imgur.com/ntorKvb.png" alt="" width="300" style="height:auto;display:block;" />
</td>
</tr>
<tr>
@RenderBody()
</tr>
<tr>
<td style="padding:30px;background:#ee4c50;">
<table role="presentation" style="width:100%;border-collapse:collapse;border:0;border-spacing:0;font-size:9px;font-family:Arial,sans-serif;">
<tr>
<td style="padding:0;width:50%;" align="left">
<p style="margin:0;font-size:14px;line-height:16px;font-family:Arial,sans-serif;color:#ffffff;">
® Someone, Somewhere 2022<br/><a href="http://www.example.com" style="color:#ffffff;text-decoration:underline;">Unsubscribe</a>
</p>
</td>
<td style="padding:0;width:50%;" align="right">
<table role="presentation" style="border-collapse:collapse;border:0;border-spacing:0;">
<tr>
<td style="padding:0 0 0 10px;width:38px;">
<a href="http://www.twitter.com/" style="color:#ffffff;"><img src="https://i.imgur.com/PWtSlSu.png" alt="Twitter" width="38" style="height:auto;display:block;border:0;" /></a>
</td>
<td style="padding:0 0 0 10px;width:38px;">
<a href="http://www.facebook.com/" style="color:#ffffff;"><img src="https://i.imgur.com/zqdyPBl.png" alt="Facebook" width="38" style="height:auto;display:block;border:0;" /></a>
</td>
</tr>
</table>
</td>
</tr>
</table>
</td>
</tr>
</table>
</td>
</tr>
</table>
</body>
</html>
正如你所看到的,你正在创建一个通用的视图,其标题和页脚为所有电子邮件所共享,其中Layout代码中的RenderBody() 方法指定了在发送电子邮件时将被你决定使用的特定模板所取代的部分。
Razor布局文件不需要以下划线(_)开头,但这是ASP.NET Core中一个常见的命名惯例,适用于任何不是 "视图 "的Razor文件。所以布局和部分Razor文件通常以下划线为前缀。当在ASP.NET Core之外使用Razor时,遵循同样的命名惯例会很有帮助,所以你可以很容易地识别哪个Razor文件是实际的电子邮件模板,以及哪些Razor文件包含在这些模板中。
更新电子邮件模板
修改第一个模板
打开FirstTemplate.cshtml文件,用以下代码替换所有内容。
@model SendGridFluentEmailSender.FirstTemplateModel
@{
Layout = "_DefaultEmailLayout.cshtml";
}
<td style="padding:36px 30px 42px 30px;">
<table role="presentation" style="width:100%;border-collapse:collapse;border:0;border-spacing:0;">
<tr>
<td style="padding:0 0 36px 0;color:#153643;">
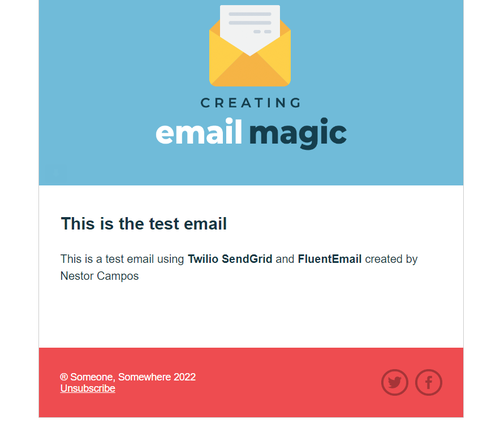
<h1 style="font-size:24px;margin:0 0 20px 0;font-family:Arial,sans-serif;">This is the test email</h1>
<p style="margin:0 0 12px 0;font-size:16px;line-height:24px;font-family:Arial,sans-serif;">This is a test email using <strong>Twilio SendGrid</strong> and <strong>FluentEmail</strong> created by @Model.Name</p>
</td>
</tr>
</table>
</td>
你刚才对这个模板所做的是指定了Layout ,在生成和发送邮件时,所有的代码将被用来渲染,你调整了这个模板的具体内容设计。
更新第二个模板
现在,打开SecondTemplate.cshtml文件,它将使用与前一个模板相同的Layout。用文件中的以下代码进行更新。
@model SendGridFluentEmailSender.SecondTemplateModel
@{
Layout = "_DefaultEmailLayout.cshtml";
}
<td style="padding:36px 30px 42px 30px;">
<table role="presentation" style="width:100%;border-collapse:collapse;border:0;border-spacing:0;">
<tr>
<td style="padding:0 0 36px 0;color:#153643;">
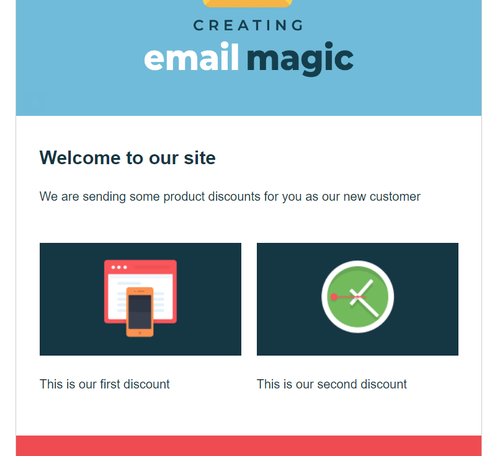
<h1 style="font-size:24px;margin:0 0 20px 0;font-family:Arial,sans-serif;">@Model.Title</h1>
<p style="margin:0 0 12px 0;font-size:16px;line-height:24px;font-family:Arial,sans-serif;">@Model.Description</p>
</td>
</tr>
<tr>
<td style="padding:0;">
<table role="presentation" style="width:100%;border-collapse:collapse;border:0;border-spacing:0;">
<tr>
<td style="width:260px;padding:0;vertical-align:top;color:#153643;">
<p style="margin:0 0 25px 0;font-size:16px;line-height:24px;font-family:Arial,sans-serif;"><img src="https://assets.codepen.io/210284/left.gif" alt="" width="260" style="height:auto;display:block;" /></p>
<p style="margin:0 0 12px 0;font-size:16px;line-height:24px;font-family:Arial,sans-serif;">@Model.ColumnOne</p>
</td>
<td style="width:20px;padding:0;font-size:0;line-height:0;"> </td>
<td style="width:260px;padding:0;vertical-align:top;color:#153643;">
<p style="margin:0 0 25px 0;font-size:16px;line-height:24px;font-family:Arial,sans-serif;"><img src="https://assets.codepen.io/210284/right.gif" alt="" width="260" style="height:auto;display:block;" /></p>
<p style="margin:0 0 12px 0;font-size:16px;line-height:24px;font-family:Arial,sans-serif;">@Model.ColumnTwo</p>
</td>
</tr>
</table>
</td>
</tr>
</table>
</td>
这个模板使用相同的Layout ,但内容不同,现在可以灵活地只调整你需要的内容,可以是这个模板的内容,也可以是页眉和页脚,如果你想为你的所有邮件做一个改变。
之后。用Razor布局发送邮件
你通过将HTML从单个邮件模板中移出,移到一个布局文件中,然后从这些单个模板中引用布局,从而消除了页眉和页脚HTML的重复性。完成这一切后,再次运行你的项目。
dotnet run
要在Visual Studio Code中运行该项目,请按Ctrl + F5 来运行。
几秒钟后,两封邮件就会到达收件人的邮箱,与下面的情况类似。
实际上,产生的HTML是第一次执行时的相同邮件,但现在它们将更容易被你管理,只关注每个模板中的重要内容,或者从*_DefaultEmailLayout.cshtml*视图中调整所有模板的整个设计。
使用SendGrid与FluentEmail
虽然在本地使用smtp4dev是非常有用的,但是当你把你的应用程序部署到生产中时,你需要使用一个真正的电子邮件服务器。一个选择是使用SendGrid电子邮件API,它可以让你大规模地发送电子邮件,同时最大限度地提高交付率。 FluentEmail对SendGrid有内置支持。你可以按照这个教程来学习如何将SendGrid与FluentEmail整合。
来自SendGrid的动态邮件模板
除了使用Razor渲染电子邮件模板外,另一个解决方案是使用SendGrid的动态电子邮件模板。动态电子邮件模板将允许你添加你自己的设计或使用默认的设计来发送你的电子邮件。你可以通过一个图形用户界面或用代码自己创建模板。这些模板使用**Handlebars模板语言**来创建动态电子邮件模板,并将数据注入你的电子邮件中。而且就像项目内的模板一样,你可以将你的数据添加到模板中,以定制交付给你的每个用户的内容。
根据你的需要,将模板存储在SendGrid中而不是你的源代码中可能是有益的,所以你可以随时更新它而不必重新部署你的.NET应用程序。最重要的是,FluentEmail通过SendWithTemplateAsync() (源代码)的方法让你很容易使用这些模板。
结语
祝贺你能坚持到最后。👏
你学会了如何通过使用Razor Layouts来开发更好的Razor电子邮件模板。我在下面列出了一些额外的资源,以防你想学习更多的东西
