

在你所在的州和全国范围内及时了解具有重大影响的法案是很重要的。然而,如果你不知道去哪里看,跟踪法案和监测它们的状态可能会很困难。
通过利用LegiScan API和Twilio的可编程短信API,你可以创建一个短信账单追踪机器人,它将在几条引导信息中搜索与你指定的关键词相关的账单。
LegiScan是一个美国的立法跟踪和信息服务,其API可用于提供特定或多个立法的JSON数据。免费的API可以在州和联邦层面上搜索相关的立法,每月有30,000次慷慨的查询限制。
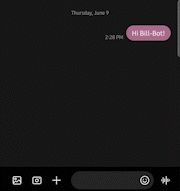
请看机器人的操作!
前提条件
要跟上这个教程,你需要以下条件。
- 一个免费或付费的Twilio账户。如果你是Twilio的新用户,请点击这里注册一个免费的Twilio账户,升级后可获得10美元的积分。
- 一个Twilio电话号码
- Node.js和npm
- Ngrok:这是一个通过将你的本地服务器连接到互联网来加速应用测试的工具
- 一个个人电话号码
设置你的开发者环境
要开始,打开你的终端窗口,导航到你将创建这个应用程序的目录。复制并粘贴下面的命令到你的终端,然后点击enter 。
mkdir bill-bot
cd bill-bot
npm init -y
npm install twilio dotenv express express-session nodemon node-fetch@2.6.7
touch index.js .env
这些命令创建了一个新的目录(名为bill-bot),导航到其中,初始化一个新的Node.js项目,安装所需的依赖项,并创建文件index.js 和*.env*。
安装的六个依赖项是。
twilio,以利用Twilio的Messaging APIdotenv, 存储你的重要证书并作为环境变量访问它们express, 构建你的服务器express-session, 追踪用户当前所处的机器人步骤nodemon在本地运行你的服务器,并在变化时自动重新启动它node-fetch, 在你的Node.js环境中利用fetch API
如果你有Node.js 18或以上版本,你不需要安装node-fetch ,因为它已经包含了。
在本教程中,你将在两个文件中进行编码:index.js和*.env*。在index.js中,你将为你的后端编写代码,解释所有的消息并作出相应的反应。在*.env*中,你将存储你对LegiScan API的访问证书。
获取你的LegiScan凭证
要使用LegiScan的API,你必须首先创建一个账户以获得你的API密钥。请务必填写所有必要的信息,并注册为免费账户类型。
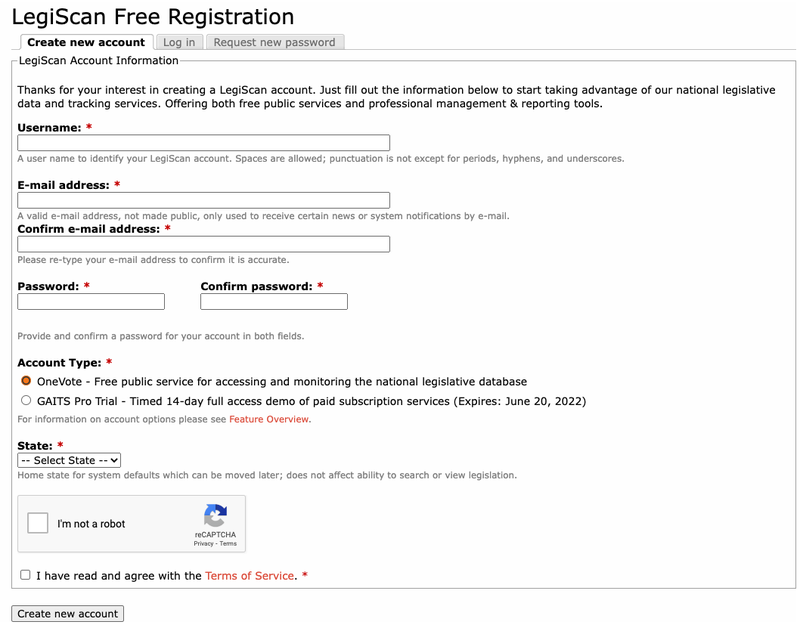
注册账户后,你需要到你输入的电子邮件地址,通过点击LegiScan的欢迎邮件中的验证链接来验证你的账户。
回到LegiScan的主页,点击页面上方导航栏中的LegiScan API 。如果你的账户验证成功,那么你将需要填写一份表格,注册一个API密钥。提交后,下一个页面应该包括你将在本教程中使用的API密钥。

保持API密钥的可访问性,在你选择的代码编辑器中打开你先前创建的*.env文件。在.env*里面,复制并粘贴下面这一行。
LEGISCAN_KEY=XXXXXX
用你的LegiScan API密钥替换XXXXXX ,然后切换到index.js文件。
处理传入的文本信息
index.js 文件将负责处理所有传入的信息,并为机器人提供适当的回应。要开始编写你的后端,复制并粘贴下面的代码到index.js。
require('dotenv').config();
const legiscanKey = process.env.LEGISCAN_KEY;

const fetch = require('node-fetch');
const express = require('express');
const session = require('express-session');
const MessagingResponse = require('twilio').twiml.MessagingResponse;

const app = express();
上面的代码初始化了之前安装的fetch,dotenv,express, 和express-session 包。它还初始化了legiscanKey 环境变量,并从twilio 包中导入了MessagingResponse 对象。
现在你已经初始化了必要的包,你还需要包括中间件来解析传入的文本信息和JSON数据。你还需要为用户启用会话,这对以后执行搜索很重要。要做到这一点,在index.js中复制并粘贴突出显示的几行代码到你现有的代码下面*。*
. . .

app.use(express.json());
app.use(express.urlencoded({extended: false}));
app.use(session({
  secret: "billbot",
  saveUninitialized: true,
  cookie: { maxAge: 5 * 1000 * 60 },
  resave: true
}));
请确保将你的秘密字符串(第5行)改为你自己代码中的独特短语或字符集。
最后,你需要设置将处理所有传入信息的路由。同样,复制并粘贴高亮的代码行在你现有的index.js的代码下面。
. . .

app.post('/webhook', async (req, res) => {

});

app.listen(3000, () => {
  console.log('Bill-Bot listening on port 3000.')
});
你现在已经完成了你的机器人后台的基本布局。这段代码创建了一个*/webhook*路由,它在你的本地服务器上的3000端口进行监听,有一个POST 端点,目前没有任何作用。现在,你需要编写代码来让机器人做一些事情。
开发你的路由
机器人的功能可以分解为以下步骤。
- 引入机器人
- 指定一个地点
- 选择法案类别
- 搜索相关的立法信息
介绍机器人
你要给用户一个关于他们将使用的机器人的简单描述,并引导他们进入下一步。像这样修改你的*/webhook*路线。
app.post('/webhook', async (req, res) => {
  const response = new MessagingResponse();
  response.message("Welcome to Bill-Bot! Bill-Bot gives you updates on hot-topic issues in the United States in the past week.\n\nPlease enter the state you would like to search bills in (abbreviations OK). Enter 'all' to search for bills across every state and on a federal level.");

  res.writeHead(200, {'Content-Type': 'text/xml'});
  res.end(response.toString());
});
这个新添加的代码将让机器人在任何人向它发送文本信息时发送一个回应。这是通过创建一个新的MessagingResponse 对象并利用message 属性来发送消息。
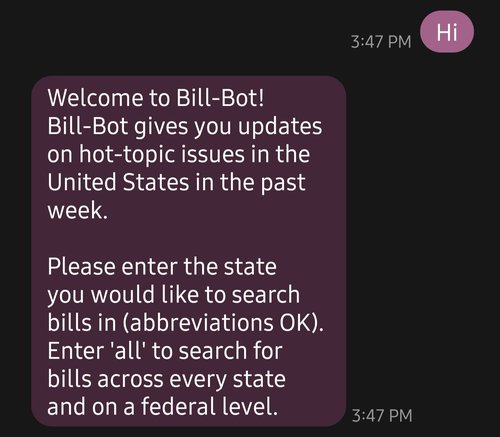
接下来,机器人还将提示用户指定他们想要查询账单的地点。如果你现在就能给这个号码发短信(你将在完成后台代码后为你的机器人设置一个电话号码),你会得到这样的回应。
该机器人工作了!现在,你将如何阅读传入的短信并获得正确的状态?
指定一个位置
首先,你需要定义每个州的名称,并将它们与适当的缩写联系起来,以适应LegiScan的API参数。做到这一点的一个方法是创建一个名为states 的新变量,这是一个具有50个属性的对象;每个州一个。
每个属性都有一个州的缩写作为它的键,并有相应的州名作为它的值。复制并粘贴你初始化MessagingResponse 变量的那一行下面的高亮文本。
. . .
const MessagingResponse = require('twilio').twiml.MessagingResponse;

// Copy this entire states object into your code
const states = {
  "AL": "alabama",
  "AK": "alaska",
  "AZ": "arizona",
  "AR": "arkansas",
  "CA": "california",
  "CO": "colorado",
  "CT": "connecticut",
  "DE": "delaware",
  "FL": "florida",
  "GA": "georgia",
  "HI": "hawaii",
  "ID": "idaho",
  "IL": "illinois",
  "IN": "indiana",
  "IA": "iowa",
  "KS": "kansas",
  "KY": "kentucky",
  "LA": "louisiana",
  "ME": "maine",
  "MD": "maryland",
  "MA": "massachusetts",
  "MI": "michigan",
  "MN": "minnesota",
  "MS": "mississippi",
  "MO": "missouri",
  "MT": "montana",
  "NE": "nebraska",
  "NV": "nevada",
  "NH": "new hampshire",
  "NJ": "new jersey",
  "NM": "new mexico",
  "NY": "new york",
  "NC": "north carolina",
  "ND": "north dakota",
  "OH": "ohio",
  "OK": "oklahoma",
  "OR": "oregon",
  "PA": "pennsylvania",
  "RI": "rhode island",
  "SC": "south carolina",
  "SD": "south dakota",
  "TN": "tennessee",
  "TX": "texas",
  "UT": "utah",
  "VT": "vermont",
  "VA": "virginia",
  "WA": "washington",
  "WV": "west virginia",
  "WI": "wisconsin",
  "WY": "wyoming"
};

const app = express();

. . .
设置好你的states 对象后,创建一个新的路由来处理你代码中的状态选择部分,在你的*/webhook*路由和监听器之间复制并粘贴高亮的代码行。
app.post('/webhook', async (req, res) => {
  ...
});

app.post('/state', async (req, res) => {
  const response = new MessagingResponse();
  const state = req.body.Body.toLowerCase();
  req.session["stateAbbreviation"] = "";

  if(state === "all") {
    req.session.stateAbbreviation = "ALL";
  } else if(Object.keys(states).includes(state.toUpperCase())) {
    req.session.stateAbbreviation = state.toUpperCase();
  } else if(Object.values(states).includes(state)) {
    req.session.stateAbbreviation = Object.keys(states)[Object.values(states).indexOf(state)];
  };

  response.message("Welcome to the new route! This should only send after a second message.");

  res.writeHead(200, {'Content-Type': 'text/xml'})
  res.end(response.toString())
});

app.listen(3000, () => {
  ...
});
现在,机器人可以读取传入的文本信息。通过使用express-session ,机器人还可以将状态缩写存储为一个变量,以便在以后机器人需要进行搜索时使用。使用前面的states 对象,机器人可以正确地解释州名或缩写(如果给出的话)。如果用户输入 "所有",那么它可以设置适当的查询参数来搜索每个州的立法和联邦立法。
然而,如果你现在给机器人发短信,它只会再次发送第一条信息,而不会有其他信息。redirect 为了解决这个问题,可以使用MessagingResponse 的属性。
乍一看,将response.redirect(‘/state’) 添加到*/webhook*路径中是有道理的,但只有这样做才能提供这种响应。

正如你所看到的,机器人正确地重定向到*/state*路由,但立即读取了输入。有一种方法可以规避这个问题,就是在用户会话中引入另一个变量,叫做menuState 。这个新变量将跟踪用户处于机器人的哪一步,然后相应地重定向他们。
首先,用下面的代码替换*/webhook*路线。
app.post('/webhook', async (req, res) => {
  const response = new MessagingResponse();

  if(req.session.menuState) {
    // If there is a menu state, then the user has logged in at least once
    // Redirect the user based on the menuState
    switch(req.session.menuState) {
      // Two steps after getting introduced to the bot:
      // 1: designating a location
      // 2: choosing a category
      // 3: search legislation
      case 1:
        response.redirect('/state')
        break;
      case 2:
        response.redirect('/category')
        break;
      case 3:
        response.redirect('/search')
        break;
    };
  } else {
    // If there is no menu state, then this is a new user
    // Initialize menuState and wait for the next message
    req.session["menuState"] = 1
    response.message("Welcome to Bill-Bot! Bill-Bot gives you updates on hot-topic issues in the United States in the past week.\n\nPlease enter the state you would like to search bills in (abbreviations OK). Enter 'all' to search for bills across every state and on a federal level.");
  };

  res.writeHead(200, {'Content-Type': 'text/xml'});
  res.end(response.toString());
});
当一个消息被发送到你的服务器时,它将总是先经过*/webhook*路由。
根据menuState 的值以及它是否存在,用户会被重定向到适当的路由。这个代码块的第25行是一个例子,说明服务器将如何允许用户在菜单中前进。
此外,这段代码引用了一个新的*/category路线,它将允许用户选择立法类别,以及一个新的/search路线,它将搜索并显示相关立法。你将在/state*路线完成后建立这两条路线。
接下来,通过在你的代码中加入突出显示的行来修改*/state*路由。
app.post('/state', async (req, res) => {
  const response = new MessagingResponse();
  const state = req.body.Body.toLowerCase();
  req.session["stateAbbreviation"] = "";

  if(state === "all") {
    req.session.stateAbbreviation = "ALL";
  } else if(Object.keys(states).includes(state.toUpperCase())) {
    req.session.stateAbbreviation = state.toUpperCase();
  } else if(Object.values(states).includes(state)) {
    req.session.stateAbbreviation = Object.keys(states)[Object.values(states).indexOf(state)];
  }

    if(!req.session.stateAbbreviation) {
      // If stateAbbreviation is not set, then an invalid input was given
      // Do not let the user progress until a valid input is given
      response.message("Error: please input a valid state name or abbreviation. Enter 'all' to search for bills across every state and on a federal level.");
    } else {
      // Let the user progress if a valid input is given
      response.message("Please enter one of the valid keywords below to search for relevant bills.\n\n\nprivacy: legislation related to personal information privacy.\n\ntrans: legislation related to transgender individuals and gender-affirming care.");
      req.session.menuState = 2;
  };

  res.writeHead(200, {'Content-Type': 'text/xml'});
  res.end(response.toString());
});
现在,/state途径将允许用户进入下一个途径,/category。此外,如果用户提供了一个无效的州名或缩写,那么他们将无法进展到这一步,直到他们这样做。如果你现在能够给机器人发短信,这将是它的样子。

选择法案类别
现在,在*/state*路线的下方和监听器的上方,添加突出显示的几行代码。
app.post('/state', async (req, res) => {
  ...
});

app.post('/category', async (req, res) => {

});

app.listen(3000, () => {
  ...
});
在本教程中,你将添加两个关键词。privacy,这将搜索与个人信息隐私有关的立法,以及trans ,这将搜索与变性人和性别确认护理有关的立法。在你完成本教程后,你将能够添加你自己的关键词和立法
在新创建的*/category*路线中,添加以下代码。
app.post('/category', async (req, res) => {
  const response = new MessagingResponse();
  const input = req.body.Body.toLowerCase();
  req.session["query"] = "";

  switch(input) {
    case "trans":
      req.session.query = 'action:week AND ("transgender" OR ("gender" AND "affirming" AND "care") OR ("biological" AND "sex") OR ("gender-affirming" AND "care"))';
      req.session.menuState = 3;
      response.message("Thank you for confirming the parameters.\n\nPlease send another message to commence the search.");
      break;
    case "privacy":
      req.session.query = 'action:week AND ("personal information" OR "personal data" OR consumer OR privacy)';
      req.session.menuState = 3;
      response.message("Thank you for confirming the parameters.\n\nPlease send another message to commence the search.");
      break;
    default:
      response.message("Please input a valid keyword. Valid keywords are 'privacy', 'trans'.");
  }

  res.writeHead(200, {'Content-Type': 'text/xml'});
  res.end(response.toString());
});
这个代码块在用户的会话中添加了一个query 变量,然后根据发送给机器人的关键词来改变它。关于如何组织你的LegiScan API查询的信息可以在这里找到,如果你需要帮助创建你自己的查询。
现在剩下的就是进行搜索了。
搜索相关的立法信息
现在,对于你的应用程序,你需要弄清楚你要如何解析从查询中返回的JSON数据。你可以自己玩玩API,了解你想返回给用户的内容,或者利用LegiScan API用户手册。
在本教程中,你将搜索过去一周中最相关的5个法案的信息,并向用户发送一个详细的信息。在*/category路线的下面和监听器的上面,添加最后的路线(/search*)。
app.post('/category', async (req, res) => {
  ...
});

// Copy the entire '/search' route into your code
app.post('/search', async (req, res) => {
  const response = new MessagingResponse();
  const data = await fetch(`https://api.legiscan.com/?key=${legiscanKey}&op=getSearch&state=${req.session?.stateAbbreviation}&query=${req.session?.query}`);
  const results = await data.json();
  const summary = results.searchresult.summary;

  if(summary.count) {
    const bills = Object.values(results.searchresult);
    response.message(`Bill-Bot has found ${summary.count} relevant bills which have been introduced or acted upon in the past week. To save data, only the 5 most relevant bills will be shown below.`);
    bills.pop() // Gets rid of the summary page
    const focusBills = bills.slice(0, 5);

    for(const bill of focusBills) {
      const billId = bill.bill_id;
      const actionDate = bill.last_action_date;
      const action = bill.last_action;
      const state = bill.state;
      const data = await fetch(`https://api.legiscan.com/?key=${legiscanKey}&op=getBill&id=${billId}`);
      const results = await data.json();
      const billData = results.bill;
      const status = billData.status;
      const statusArray = ['N/A', 'introduced', 'engrossed', 'enrolled', 'passed', 'vetoed', 'failed'];
      const statusDate = billData.status_date;
      const title = billData.title;
      const number = billData.bill_number;
      const description = billData.description;
      const titleDescriptionMatch = title == description;

      if(titleDescriptionMatch) {
        await response.message(`In ${state}, bill ${number} has been acted upon in the last week. See details below.\n\nAction: ${action}\nAction Date: ${actionDate}\n\nStatus: ${statusArray[status]}\nStatus Date: ${statusDate}\n\nTitle and Description: ${title}`);
      } else {
        await response.message(`In ${state}, bill ${number} has been acted upon in the last week. See details below.\n\nAction: ${action}\nAction Date: ${actionDate}\n\nStatus: ${statusArray[status]}\nStatus Date: ${statusDate}\n\nTitle: ${title}\n\nDescription: ${description}`);
      };
    };
  } else {
    await response.message("No new bills introduced or acted upon in the past week surrounding query in the specified location.");
  };

  response.message("Thank you for using Bill-Bot! Please send another message if you would like to perform another search.");
  req.session.destroy();

  res.writeHead(200, {'Content-Type': 'text/xml'});
  res.end(response.toString());
});


app.listen(3000, () => {
  ...
});
上面的几行代码将使用fetch API进行搜索,并返回一个包含你为本教程指定的账单参数的消息。此外,req.session.destroy() ,将从服务器上删除用户的会话,允许他们用机器人进行另一次搜索。
剩下的就是用ngrok将你的本地服务器连接到互联网上,然后通过配置电话号码的webhook将所有传入你的Twilio电话号码的短信转发到你的服务器。
用ngrok进行服务器隧道连接
将你的本地服务器端点连接到你的Twilio电话号码的第一步是将其连接到互联网。在生产环境中,你会把你的机器人部署在云端或通过一个物理服务器。
回到你的终端,确保你仍然在你项目的工作目录中,并运行以下命令。
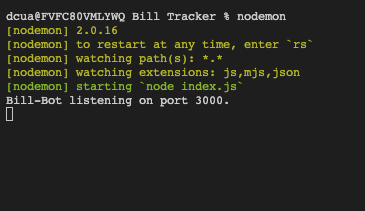
npx nodemon index.js
如果nodemon 包安装正确,你的屏幕应该看起来像这样。
现在,打开一个新的终端窗口,导航到你项目的同一工作目录。运行下面的命令。
ngrok http 3000
如果ngrok安装正确,现在的终端应该是这样的。
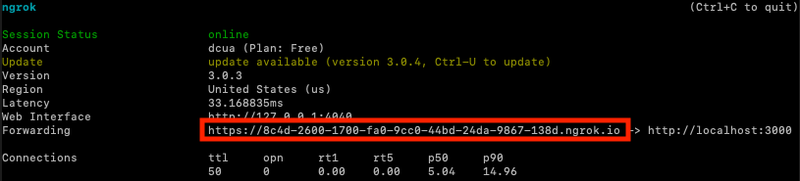
在ngrok被终止之前,所有对转发URL(红色框内)的请求将被转发到你的本地服务器,端口为3000。这个转发的URL是随机生成的,所以如果你需要重新启动ngrok,你需要把新创建的URL再次连接到你的Twilio电话号码。
配置你的Twilio电话号码网络钩子
现在,你需要通过转发的URL将你的本地服务器连接到你的Twilio电话号码。
在你的Twilio控制台的**活动号码** 部分(假设你创建了一个免费账户并购买了一个电话号码),点击你将用于Bill-Bot的电话号码。
向下滚动到 "消息"部分,将你的转发网址放在 "有消息传来 "标签下的文本框中。你还需要在你的URL末尾添加*/webhook*,以确保信息流向正确的路径。你输入的URL应该是这样的*:xxxx.ngrok.io/webhook。*
将*/webhook添加到你的URL结尾是非常重要的。没有它,你的消息将被转发到localhost:3000/端点*,而不是你做的localhost:3000/webhook 端点。
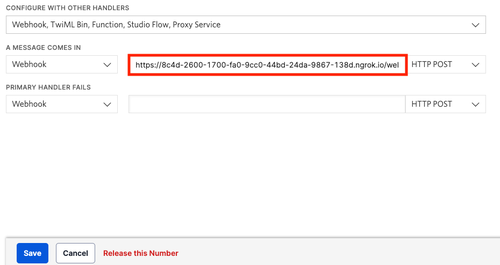
请确保左边的下拉菜单是Webhook ,右边的下拉菜单是HTTP POST。最后,点击蓝色的 " 保存"按钮。
现在你可以向你的Twilio电话号码发送消息,并与机器人互动。现在就给你的Twilio号码发短信 "Ahoy!"试试吧。
接下来是什么?
恭喜你!你刚刚完成了一个账单跟踪系统的创建。你刚刚通过Twilio的SMS API创建了一个账单跟踪机器人,现在试着定制它或添加一些新的功能。也许你想在你的机器人中加入消息调度功能?也许你想尝试用Twilio Studio的无代码解决方案来创建一个聊天机器人?试着看看你能为你的机器人添加什么,或者利用Twilio的众多API创建一个全新的机器人。
如果你觉得今天的编码已经够多了,可以考虑成为一名活动家用你的声音来教育他人,倡导立法,并为你所相信的事情站出来。你也可以参与社区服务,为一个好的事业做志愿者,或以任何方式为政治问题创造公众意识。

我迫不及待地想看到你下一步的建设!
