

从0到1打造一款安卓app之12-ViewModel+NavHostFragment+StateFlow 单向数据流示例
1.参考资料
2.Flow和StateFlow 、 SharedFlow的区别
flow的基本知识
flow的常见构建器有
flowOf()和 flow{}
public fun <T> flow(@BuilderInference block: suspend FlowCollector<T>.() -> Unit): Flow<T> = SafeFlow(block)
用法
flow {
    eimt(1)
    emit(2)
}
public fun <T> flowOf(vararg elements: T): Flow<T> = flow {
    for (element in elements) {
        emit(element)
    }
}

flowOf(1,2,3,4)
各种集合转成流 asFlow
public fun <T> Array<T>.asFlow(): Flow<T> = flow {
    forEach { value ->
        emit(value)
    }
}

public fun IntArray.asFlow(): Flow<Int> = flow {
    forEach { value ->
        emit(value)
    }
}

public fun LongArray.asFlow(): Flow<Long> = flow {
    forEach { value ->
        emit(value)
    }
}

public fun IntRange.asFlow(): Flow<Int> = flow {
    forEach { value ->
        emit(value)
    }
}

public fun LongRange.asFlow(): Flow<Long> = flow {
    forEach { value ->
        emit(value)
    }
}
callbackFlow
public fun <T> callbackFlow(@BuilderInference block: suspend ProducerScope<T>.() -> Unit): Flow<T> = CallbackFlowBuilder(block)

//使用示例
fun main() {

    fun getData(): Flow<String> = callbackFlow<String> {
        send("start")
        var count = 0
        while (count++ < 10) {
            delay(1000)
            send(count.toString())
        }
        send("over")
        close()
//        awaitClose()
    }

    runBlocking {
        getData()
            .catch { e ->
                emit("收到了异常 ${e.message}")
            }.collect {
                println("it:$it")
            }
    }

}
冷流flow
1.不收集就不会发送数据
2.多个收集方多次收集时,会从头开始发送重复的数据
private fun flowCreate(): Flow<Int> = flow {
    for (i in 1..3) {
        println("flow emit $i")
        delay(100)
        emit(i)
    }
}

fun main() = runBlocking {
    val _flow = flowCreate()

    println("start delay")
    delay(2000)
    println("在收集之前,并不会发出值")

    println("start collect1")
    _flow.collect{
        println("flow collect1 $it")
    }

    println("\nstart collect2\n")
    _flow.collect{
        println("flow collect2 $it")
    }
}

start delay
在收集之前,并不会发出值
start collect1
flow emit 1
flow collect1 1
flow emit 2
flow collect1 2
flow emit 3
flow collect1 3

start collect2

flow emit 1
flow collect2 1
flow emit 2
flow collect2 2
flow emit 3
flow collect2 3
热流SharedFlow、StateFlow
StateFlow是SharedFlow的子类,区别在于前者有多了一个value属性,可以直接获取到值(只读)
MutableStateFlow、 MutableSharedFlow分别是上面两者的子类,MutableStateFlow有一个value值可读可写
直接创建
val sharedFlow = MutableSharedFlow<String>(replay = 0,extraBufferCapacity=1,onBufferOverflow= BufferOverflow.DROP_LATEST)

val _state = MutableStateFlow(value = "start")
stateIn 把冷流转换成热流
public fun <T> Flow<T>.stateIn(
    scope: CoroutineScope,
    started: SharingStarted,
    initialValue: T
): StateFlow<T> {
    val config = configureSharing(1)
    val state = MutableStateFlow(initialValue)
    val job = scope.launchSharing(config.context, config.upstream, state, started, initialValue)
    return ReadonlyStateFlow(state, job)
}

/**
 * Starts the upstream flow in a given [scope], suspends until the first value is emitted, and returns a _hot_
 * [StateFlow] of future emissions, sharing the most recently emitted value from this running instance of the upstream flow
 * with multiple downstream subscribers. See the [StateFlow] documentation for the general concepts of state flows.
 *
 * @param scope the coroutine scope in which sharing is started.
 */
public suspend fun <T> Flow<T>.stateIn(scope: CoroutineScope): StateFlow<T> {
    val config = configureSharing(1)
    val result = CompletableDeferred<StateFlow<T>>()
    scope.launchSharingDeferred(config.context, config.upstream, result)
    return result.await()
}
把上面的例子稍微修改一下
private fun flowCreate(): Flow<Int> = flow {
    for (i in 1..3) {
        println("flow emit $i")
        delay(100)
        emit(i)
    }
}

fun main() = runBlocking<Unit> {

    val _flow = flowCreate().stateIn(this)

    println("start delay")
    delay(2000)
    println("在收集之前,就已经发出值了")

    launch {
        println("start collect1")
        _flow.onCompletion {
            println("onCompletion")
        }.collect{
            println("flow collect1 $it")
        }
    }

    launch {
        println("\nstart collect2\n")
        _flow.collect{
            println("flow collect2 $it")
        }
    }
}

输出结果
flow emit 1
flow emit 2
start delay
flow emit 3
在收集之前,就已经发出值了
start collect1
flow collect1 3

start collect2

flow collect2 3
组合多个Flow的操作符
zip
val nums2 = (1..3).asFlow().onEach { delay(300) }
val strs2 = flowOf("one","two","three").onEach { delay(400) }

val startTime = System.currentTimeMillis();
nums2.zip(strs2){ a,b ->
    "$a -> $b"
}.collect{
    println("$it at ${System.currentTimeMillis()-startTime} ms from start")
}

输出结果
1 -> one at 403 ms from start
2 -> two at 804 ms from start
3 -> three at 1204 ms from start
combine
val nums4 = (1..3).asFlow().onEach { delay(300) } // numbers 1..3 every 300 ms
val strs4 = flowOf("one", "two", "three").onEach { delay(400) } // strings every 400 ms
val startTime4 = System.currentTimeMillis() // remember the start time
nums4.combine(strs4) { a, b -> "$a -> $b" } // compose a single string with "combine"
    .collect { value -> // collect and print
        println("$value at ${System.currentTimeMillis() - startTime4} ms from start")
    }

输出结果
1 -> one at 416 ms from start
2 -> one at 619 ms from start
2 -> two at 818 ms from start
3 -> two at 921 ms from start
3 -> three at 1220 ms from start
单向数据流 (UDF)
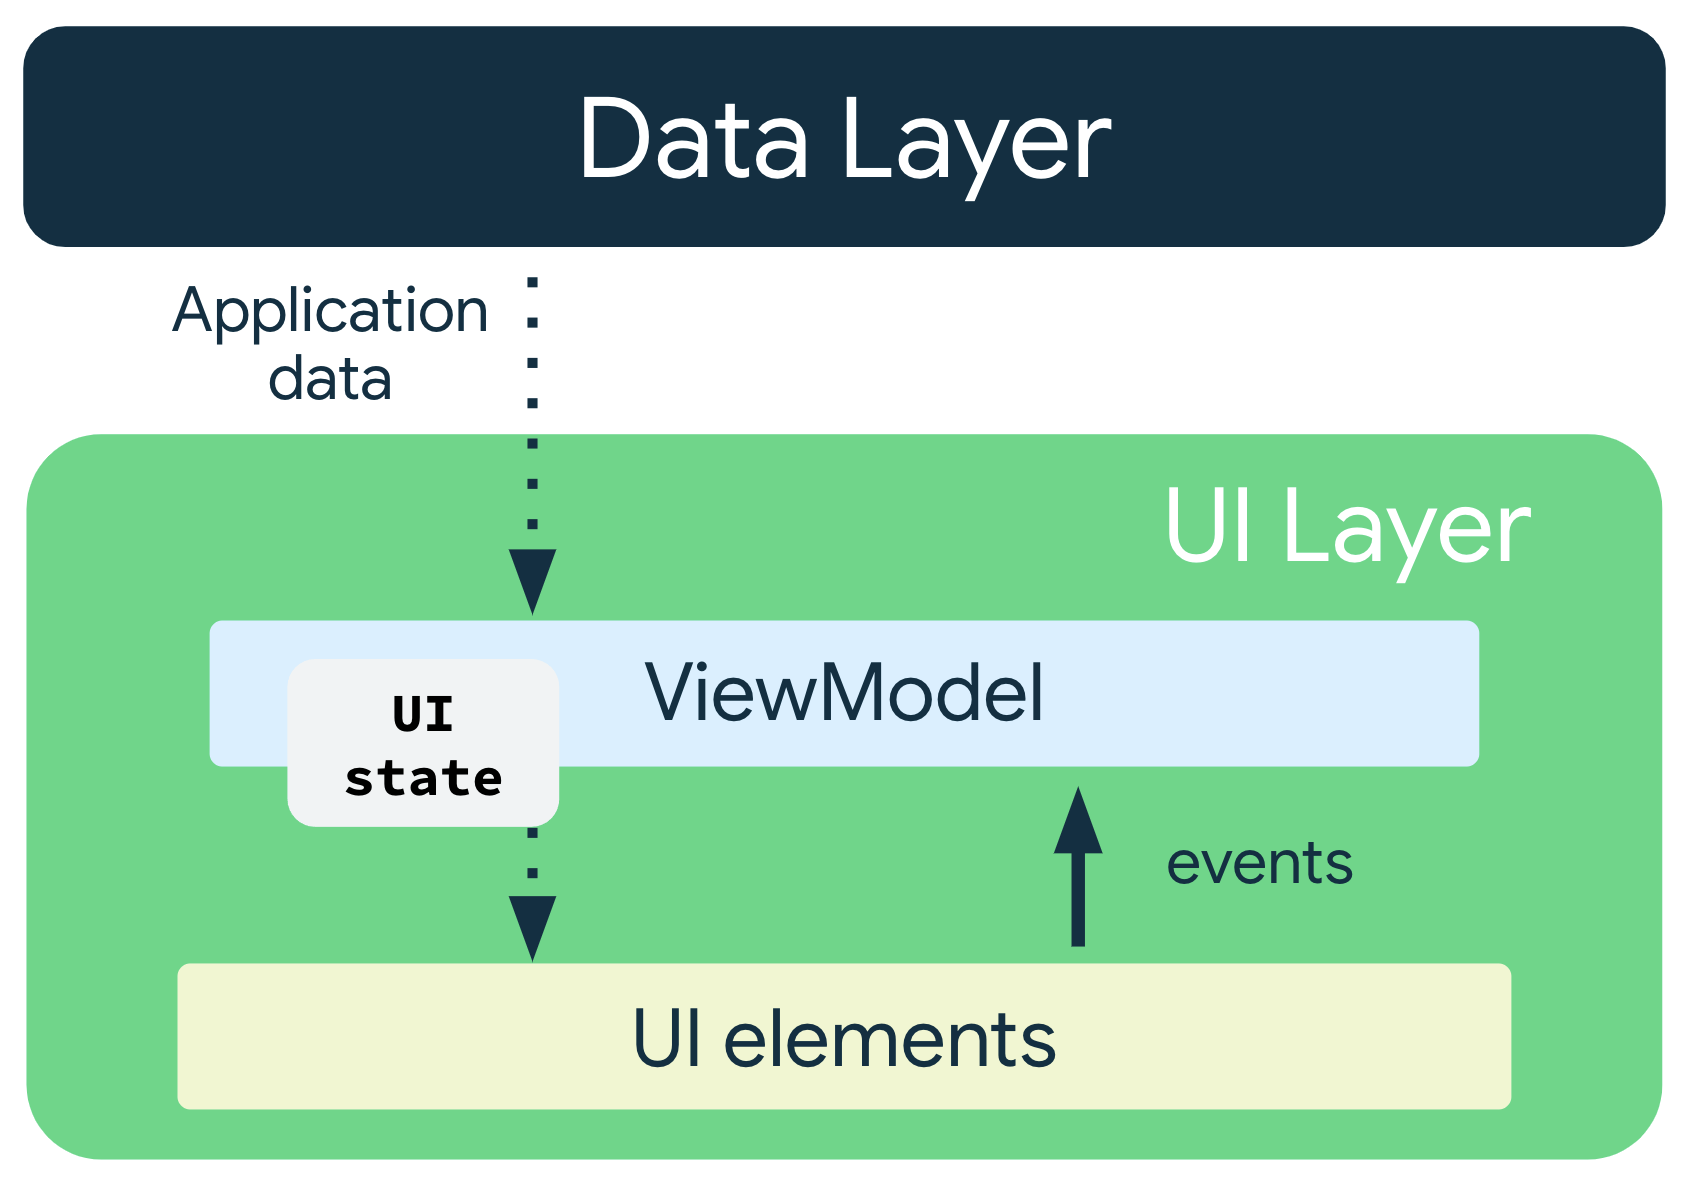
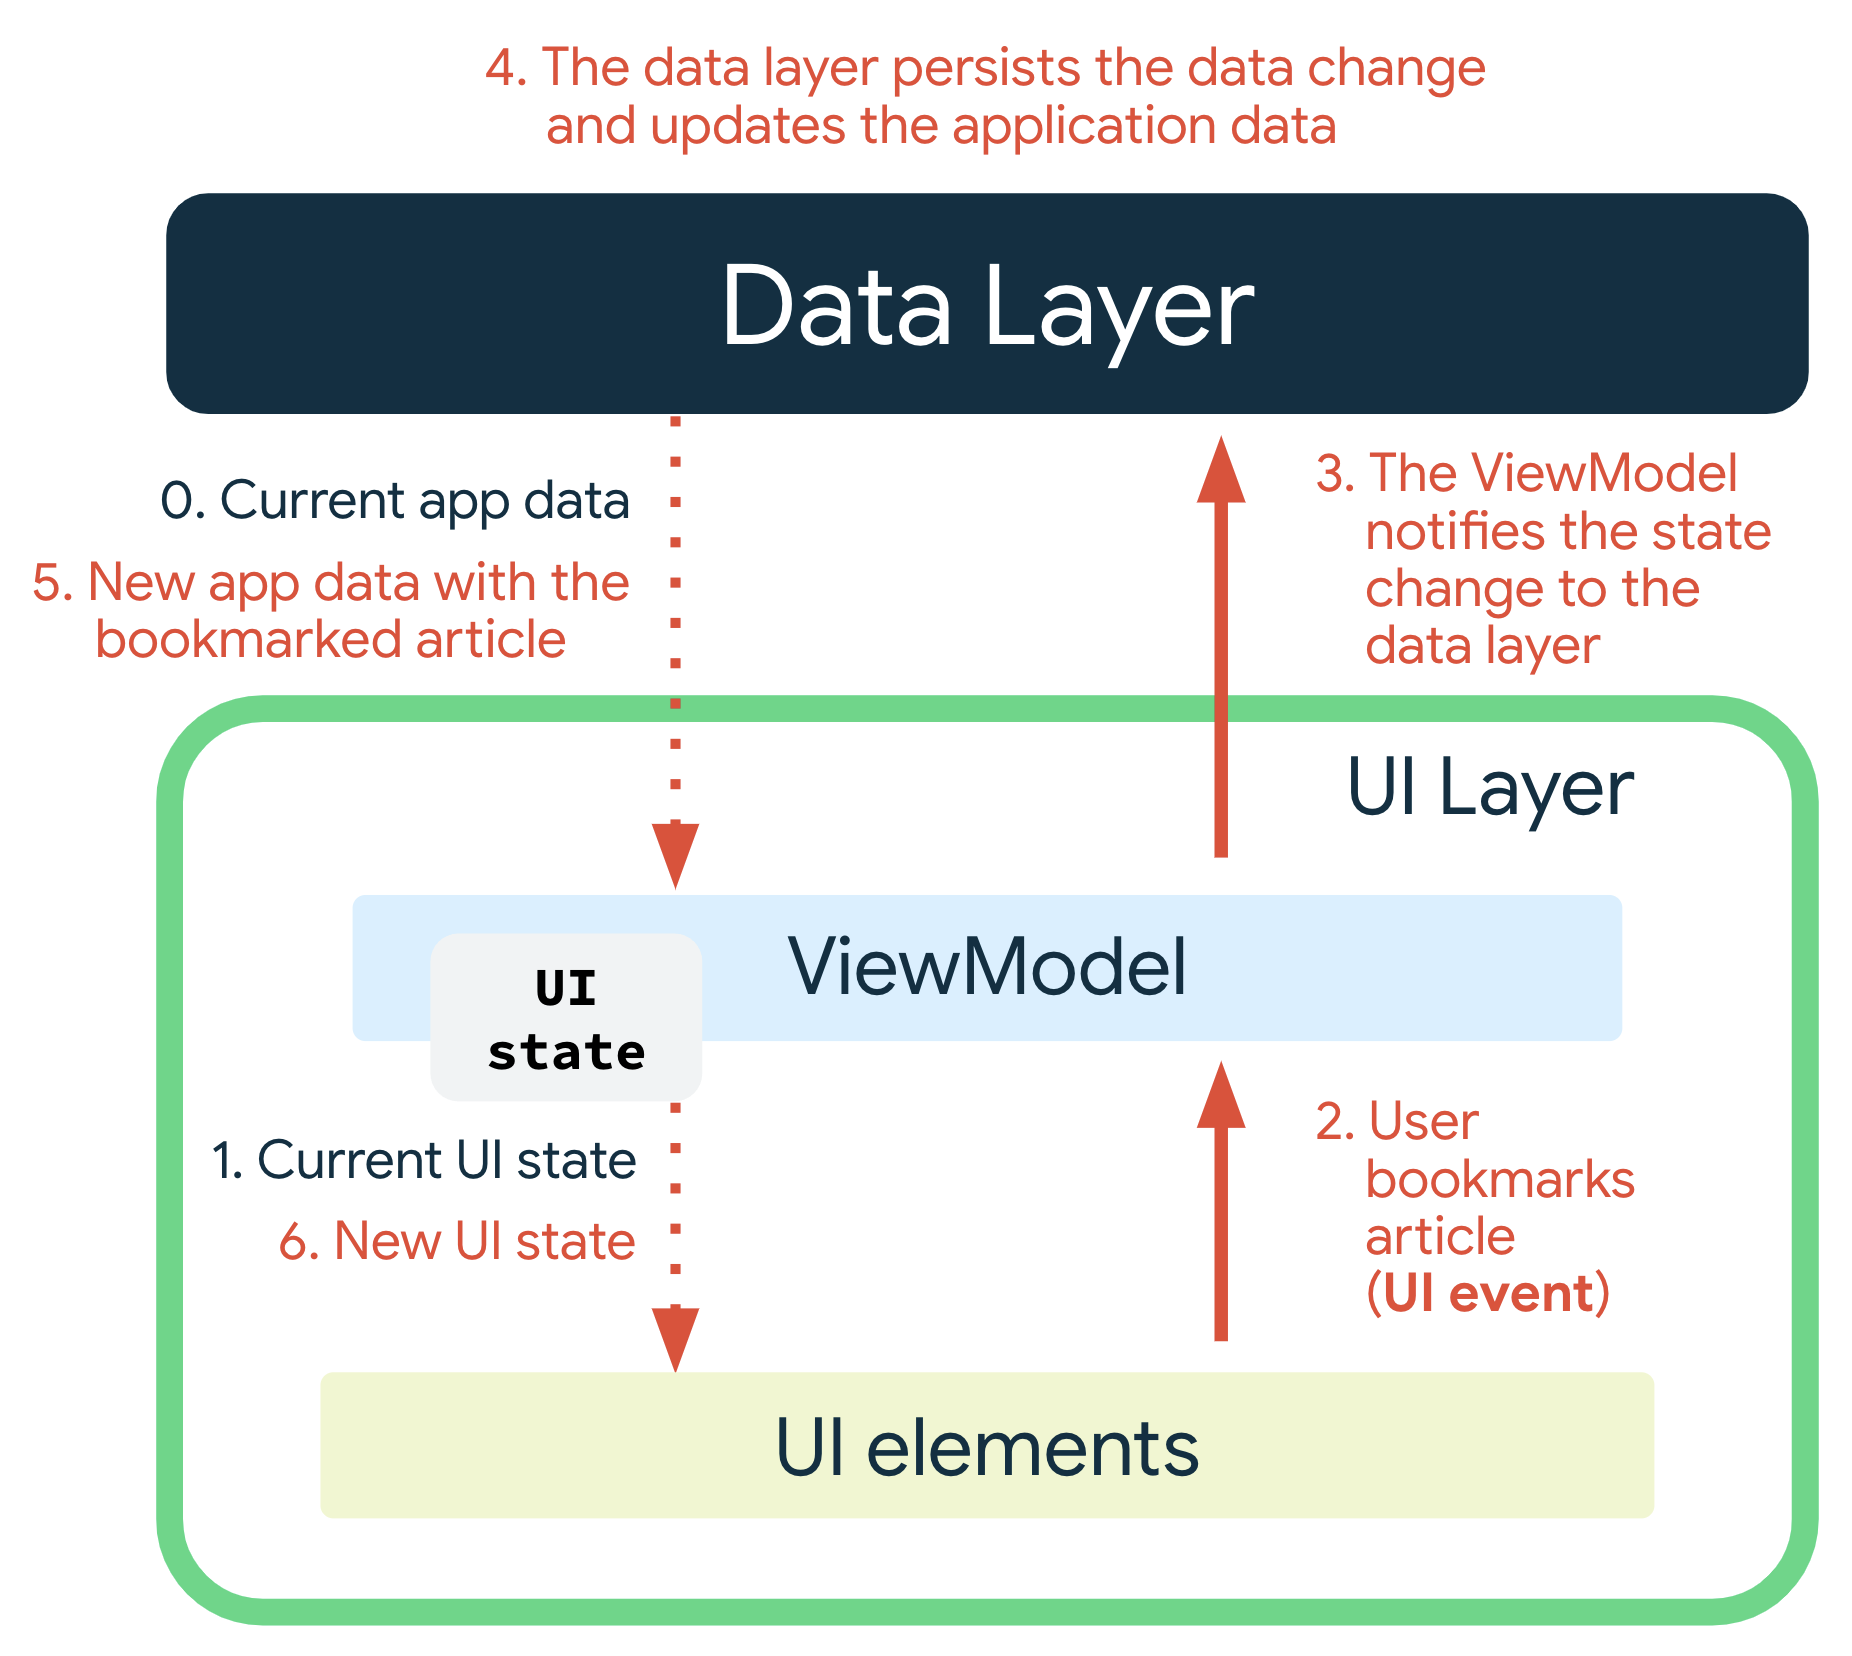
UDF 在应用架构中的运作方式图示
ViewModel+NavHostFragment+StateFlow 单向数据流示例
实现一个简单示例
1.启动app时,先显示一个LoadingFragment,三秒后跳转到登录界面LoginFragment
2.登录界面有一个登录按钮,点击后弹出正在登录提示框,登录成功后跳转到主页
3.登录界面和主页MainFragment显示时间,10秒更新一次
4.主页有一个按钮,点击一次,就累加一次并把点击次数持久化到本地,下次直接读取显示
5.LoadingFragment,LoginFragment,MainFragment共享一个ViewModel实例
ClickCounterSource
存储并读取点击数
class ClickCounterSource(val context: Context) {

    private val EXAMPLE_COUNTER = longPreferencesKey("example_counter")
    fun getCounterFlow(): Flow<Long> = context.dataStore.data
        .map { preferences ->
            preferences[EXAMPLE_COUNTER] ?: 0
        }

    suspend fun incrCount() = context.dataStore.edit { settings ->
        val currentCounterValue = settings[EXAMPLE_COUNTER] ?: 0
        settings[EXAMPLE_COUNTER] = currentCounterValue + 1
    }
}
UserSource
模拟用户登录,并在内存中保存userInfo信息
class UserSource {

    private val _userInfo = MutableLiveData<String>("")
    val userInfo: Flow<String> = _userInfo.asFlow().onEach {
        Log.d("UserSource","UserSource value:$it")
    }

    suspend fun getUserById() {
        delay(3000)
        Log.d("UserSource","getUserById")
        _userInfo.value = "kotlin"
    }
}
定义ViewModel和ViewModelProvider.Factory
class MainViewModel(
    context: Application,
    val clickCounterSource: ClickCounterSource,
    val userSource: UserSource,
) : AndroidViewModel(context) {

    private val timeFlow = flow<Long> {
        while (true) {
            emit(System.currentTimeMillis())
            delay(10 * 1000)
        }
    }

    private val loadingFow = MutableLiveData(true).apply {
        viewModelScope.launch {
            delay(3000)
            value = false
        }
    }.asFlow()

    val mainUiState: StateFlow<MainUiState> = combine(
        loadingFow,
        timeFlow,
        clickCounterSource.getCounterFlow(),
        userSource.userInfo
    ) { loadingFow, time, counter, userInfo ->
        if (loadingFow) {
            MainUiState.Loading
        } else {
            MainUiState.MainState(userName = userInfo, date = Date(time), count = counter)
        }
    }.stateIn(
        scope = viewModelScope,
        started = SharingStarted.WhileSubscribed(),
        initialValue = MainUiState.Loading
    )

    fun login() {
        viewModelScope.launch {
            userSource.getUserById()
        }
    }

    fun incrCount() {
        viewModelScope.launch {
            clickCounterSource.incrCount()
        }
    }

    override fun onCleared() {
        super.onCleared()
        Log.d("MainViewModel", "onCleared")
    }

    companion object {
        class MainViewModelFactory(val context: Context) : ViewModelProvider.Factory {

            override fun <T : ViewModel> create(modelClass: Class<T>, extras: CreationExtras): T {
                return MainViewModel(
                    context = context.applicationContext as Application,
                    clickCounterSource = ClickCounterSource(context),
                    userSource = UserSource(),
                ) as T
            }
        }
    }
}
MainActivity,主要负责切换Fragment
class MainActivity : AppCompatActivity() {

    val viewModel: MainViewModel by viewModels {
        MainViewModel.Companion.MainViewModelFactory(this@MainActivity)
    }
    private lateinit var navController: NavController
    override fun onCreate(savedInstanceState: Bundle?) {
        super.onCreate(savedInstanceState)
        setContentView(R.layout.activity_main)
        val navHostFragment = supportFragmentManager.findFragmentById(R.id.nav_host_container) as NavHostFragment
        navController = navHostFragment.navController
        navController.addOnDestinationChangedListener { controller, destination, arguments ->
            Log.d("MainActivity", "addOnDestinationChangedListener:${destination.label}")
        }
        lifecycleScope.launch {
            repeatOnLifecycle(Lifecycle.State.STARTED) {
                viewModel.mainUiState.collect {
                    updateView(it)
                }
            }
        }
    }

    private fun updateView(mainUiState: MainUiState) {
        if (mainUiState is MainUiState.Loading) {
            if (getString(R.string.loadingScreenLabel) != navController.currentDestination?.label)
                navController.navigate(R.id.loadingScreen)
        } else if (mainUiState is MainUiState.MainState) {
            updateTime(mainUiState.date)
            if (mainUiState.isLogined) {
                if (getString(R.string.mainScreenLabel) != navController.currentDestination?.label) {
                    navController.navigate(R.id.mainScreen)
                }
            } else {
                if (getString(R.string.loginScreenLabel) != navController.currentDestination?.label) {
                    navController.navigate(R.id.loginScreen)
                }
            }
        }
        return
    }

    private fun updateTime(time: Date) {
        findViewById<TextView>(R.id.tvTime).setText(time.toString())
    }
}
LoadingFragment
简单的显示一个等待框
class LoadingFragment : Fragment() {
    private var param1: String? = null
    private var param2: String? = null

    override fun onCreate(savedInstanceState: Bundle?) {
        super.onCreate(savedInstanceState)
        arguments?.let {
            param1 = it.getString(ARG_PARAM1)
            param2 = it.getString(ARG_PARAM2)
        }
    }

    override fun onCreateView(
        inflater: LayoutInflater, container: ViewGroup?,
        savedInstanceState: Bundle?
    ): View? {
        return inflater.inflate(R.layout.fragment_loading, container, false)
    }

    companion object {
        @JvmStatic
        fun newInstance(param1: String, param2: String) =
            LoadingFragment().apply {
                arguments = Bundle().apply {
                    putString(ARG_PARAM1, param1)
                    putString(ARG_PARAM2, param2)
                }
            }
    }
}
LoginFragment
使用activityViewModels,和Activity使用同一个ViewMode实例
调用mainViewModel.login()方法,并且监听是否登录成功
class LoginFragment : Fragment() {
    private var param1: String? = null
    private var param2: String? = null

    private val mainViewModel: MainViewModel by activityViewModels() {
        MainViewModel.Companion.MainViewModelFactory(requireContext())
    }

    override fun onCreate(savedInstanceState: Bundle?) {
        super.onCreate(savedInstanceState)
        arguments?.let {
            param1 = it.getString(ARG_PARAM1)
            param2 = it.getString(ARG_PARAM2)
        }
    }

    override fun onCreateView(
        inflater: LayoutInflater, container: ViewGroup?,
        savedInstanceState: Bundle?
    ): View? {
        return inflater.inflate(R.layout.fragment_login, container, false)
    }

    private var alertDialog: AlertDialog? = null

    override fun onViewCreated(view: View, savedInstanceState: Bundle?) {
        super.onViewCreated(view, savedInstanceState)
        view.findViewById<Button>(R.id.btnLogin).setOnClickListener {
            alertDialog = AlertDialog.Builder(requireContext())
                .setMessage("正在登录,请稍候...")
                .create()
                .apply {
                    show()
                }
            mainViewModel.login()
        }

        lifecycleScope.launch {
            viewLifecycleOwner.repeatOnLifecycle(Lifecycle.State.STARTED) {
                mainViewModel.mainUiState.collect {
                    if (it is MainUiState.MainState && it.isLogined) {
                        alertDialog?.run {
                            dismiss()
                        }
                    }
                }
            }
        }
    }

    companion object {
        @JvmStatic
        fun newInstance(param1: String, param2: String) =
            LoginFragment().apply {
                arguments = Bundle().apply {
                    putString(ARG_PARAM1, param1)
                    putString(ARG_PARAM2, param2)
                }
            }
    }
}
MainFragment
调用 viewModel.incrCount()方法,累加点击数并监听变化
class MainFragment : Fragment() {
    private var param1: String? = null
    private var param2: String? = null

    private val viewModel: MainViewModel by activityViewModels {
        MainViewModel.Companion.MainViewModelFactory(requireContext())
    }

    override fun onCreate(savedInstanceState: Bundle?) {
        super.onCreate(savedInstanceState)
        arguments?.let {
            param1 = it.getString(ARG_PARAM1)
            param2 = it.getString(ARG_PARAM2)
        }
    }

    private fun updateView(state: MainUiState) {
        if (state is MainUiState.MainState) {
            view?.apply {
                findViewById<TextView>(R.id.tvUserName).text = "登录成功:${state.userName}"
                findViewById<TextView>(R.id.tvCount).text = state.count.toString()
            }
        }
    }

    override fun onCreateView(
        inflater: LayoutInflater, container: ViewGroup?,
        savedInstanceState: Bundle?
    ): View? {
        return inflater.inflate(R.layout.fragment_blank, container, false)
    }

    override fun onViewCreated(view: View, savedInstanceState: Bundle?) {
        super.onViewCreated(view, savedInstanceState)
        lifecycleScope.launch {
            viewLifecycleOwner.repeatOnLifecycle(Lifecycle.State.STARTED) {
                viewModel.mainUiState.collect {
                    updateView(state = it)
                }
            }
        }
        view.findViewById<Button>(R.id.btnCounter).setOnClickListener {
            viewModel.incrCount()
        }
    }

    companion object {
        @JvmStatic
        fun newInstance(param1: String, param2: String) =
            MainFragment().apply {
                arguments = Bundle().apply {
                    putString(ARG_PARAM1, param1)
                    putString(ARG_PARAM2, param2)
                }
            }
    }
}
