“持续创作,加速成长!这是我参与「掘金日新计划 · 6 月更文挑战」的第4天,点击查看活动详情”
前言
监控消息队列及告警
一、kafka 监控
kafka_exporter 1.3.1 版本。
kafka版本为2.6.0
1、下载
从 github.com/danielqsj/k… 下载并传 kafka_exporter-1.3.1.linux-amd64.tar.gz 安装包。
 [root@localhost package]# wget https://github.com/danielqsj/kafka_exporter/releases/download/v1.3.1/kafka_exporter-1.3.1.linux-amd64.tar.gz
 [root@localhost package]# tar -xvf kafka_exporter-1.3.1.linux-amd64.tar.gz -C /opt/software/
2、启动
[root@localhost kafka_exporter]# nohup ./kafka_exporter --kafka.server=127.0.0.1:9092 &
启动成功后访问目录:http://192.168.81.104:9308/metrics
3、配置 prometheus
 # 添加 kafka 的配置
   - job_name: 'kafka-exporter'
     static_configs:
     - targets: ['192.168.81.104:9308']
 # 重启 prometheus
 curl -X POST http://192.168.81.104:9090/-/reload
4、导入模板 id 为 7589.
二、rabbitmq 监控
rabbitmq 的版本为 3.7.18(2019年9月份发布)
Erlang 版本为 22.0.7
rabbitmq_exporter 中下载
wget https://github.com/kbudde/rabbitmq_exporter/releases/download/v1.0.0-RC7/rabbitmq_exporter-1.0.0-RC7.linux-amd64.tar.gz
rabbitmq_exporter_1.0.0-RC12_linux_amd64.tar.gz
解压:
[root@node102 package]# tar -zxvf rabbitmq_exporter-1.0.0-RC7.linux-amd64.tar.gz -C /opt/software/
进入解压后目录启动:
[root@node102 rabbitmq]# RABBIT_USER=admin RABBIT_PASSWORD=111111 OUTPUT_FORMAT=JSON PUBLISH_PORT=9099 RABBIT_URL=http://localhost:5672 nohup ./rabbitmq_exporter &
配置 prometheus
 - job_name: 'rabbitMq'
     static_configs:
       - targets: ['ip:9099']
导入模板 2181
重新下载3.8版本以上的
 wget http://erlang.org/download/otp_src_24.0.tar.gz
 [root@node103 package]# wget https://github.com/rabbitmq/rabbitmq-server/releases/download/v3.8.27/rabbitmq-server-generic-unix-3.8.27.tar.xz
三、告警配置
我们已经能够对收集的数据,通过Grafana 展示出来,除了能查看数据外,作为监控系统还需要具备告警功能。
3.1 邮箱配置
修改grafana/conf/defaults.ini 文件
grafana的配置文件默认是在/etc/grafana/grafana.ini,修改配置文件如下:
#################################### Alerting ############################
[alerting]
# Disable alerting engine & UI features
enabled = true
# Makes it possible to turn off alert rule execution but alerting UI is visible
execute_alerts = true
# Default setting for new alert rules. Defaults to categorize error and timeouts as alerting. (alerting, keep_state)
error_or_timeout = alerting
# Default setting for how Grafana handles nodata or null values in alerting. (alerting, no_data, keep_state, ok)
nodata_or_nullvalues = no_data
# Alert notifications can include images, but rendering many images at the same time can overload the server
# This limit will protect the server from render overloading and make sure notifications are sent out quickly
concurrent_render_limit = 5
 # 邮件服务器配置,自行修改配置
 [smtp]
 enabled = true
 host = smtp.163.com:465
 user = xl_2020@163.com
 # If the password contains # or ; you have to wrap it with triple quotes. Ex """#password;"""
 password = MORISJNNLZSGJRTO # 这个密码是你开启smtp服务生成的密码
 ;cert_file =
 ;key_file =
 skip_verify = true
 from_address = xl_2020@163.com
 from_name = Grafana
这个密码不是邮箱的登录密码,而是授权码
重启 Grafana 服务
systemctl start grafana-server
点击测试按钮发送。
在为单独设置告警时,不能用于变量类型的模板,需要把具体的变量引用改为具体的ip,这样就很麻烦
关键字: Template variables are not supported in alert queries.
由于 Prometheus 告警不支持变量,而模板面板使用了大量变量,导致不可使用告警。
因此,放弃使用 Grafana 的告警功能,采用 AlertManager 来实现告警。
3.2 AlertManager 告警配置
cd /prometheus,
vim rule.yml
groups:
- name: 192.168.1.221主机监控
rules:
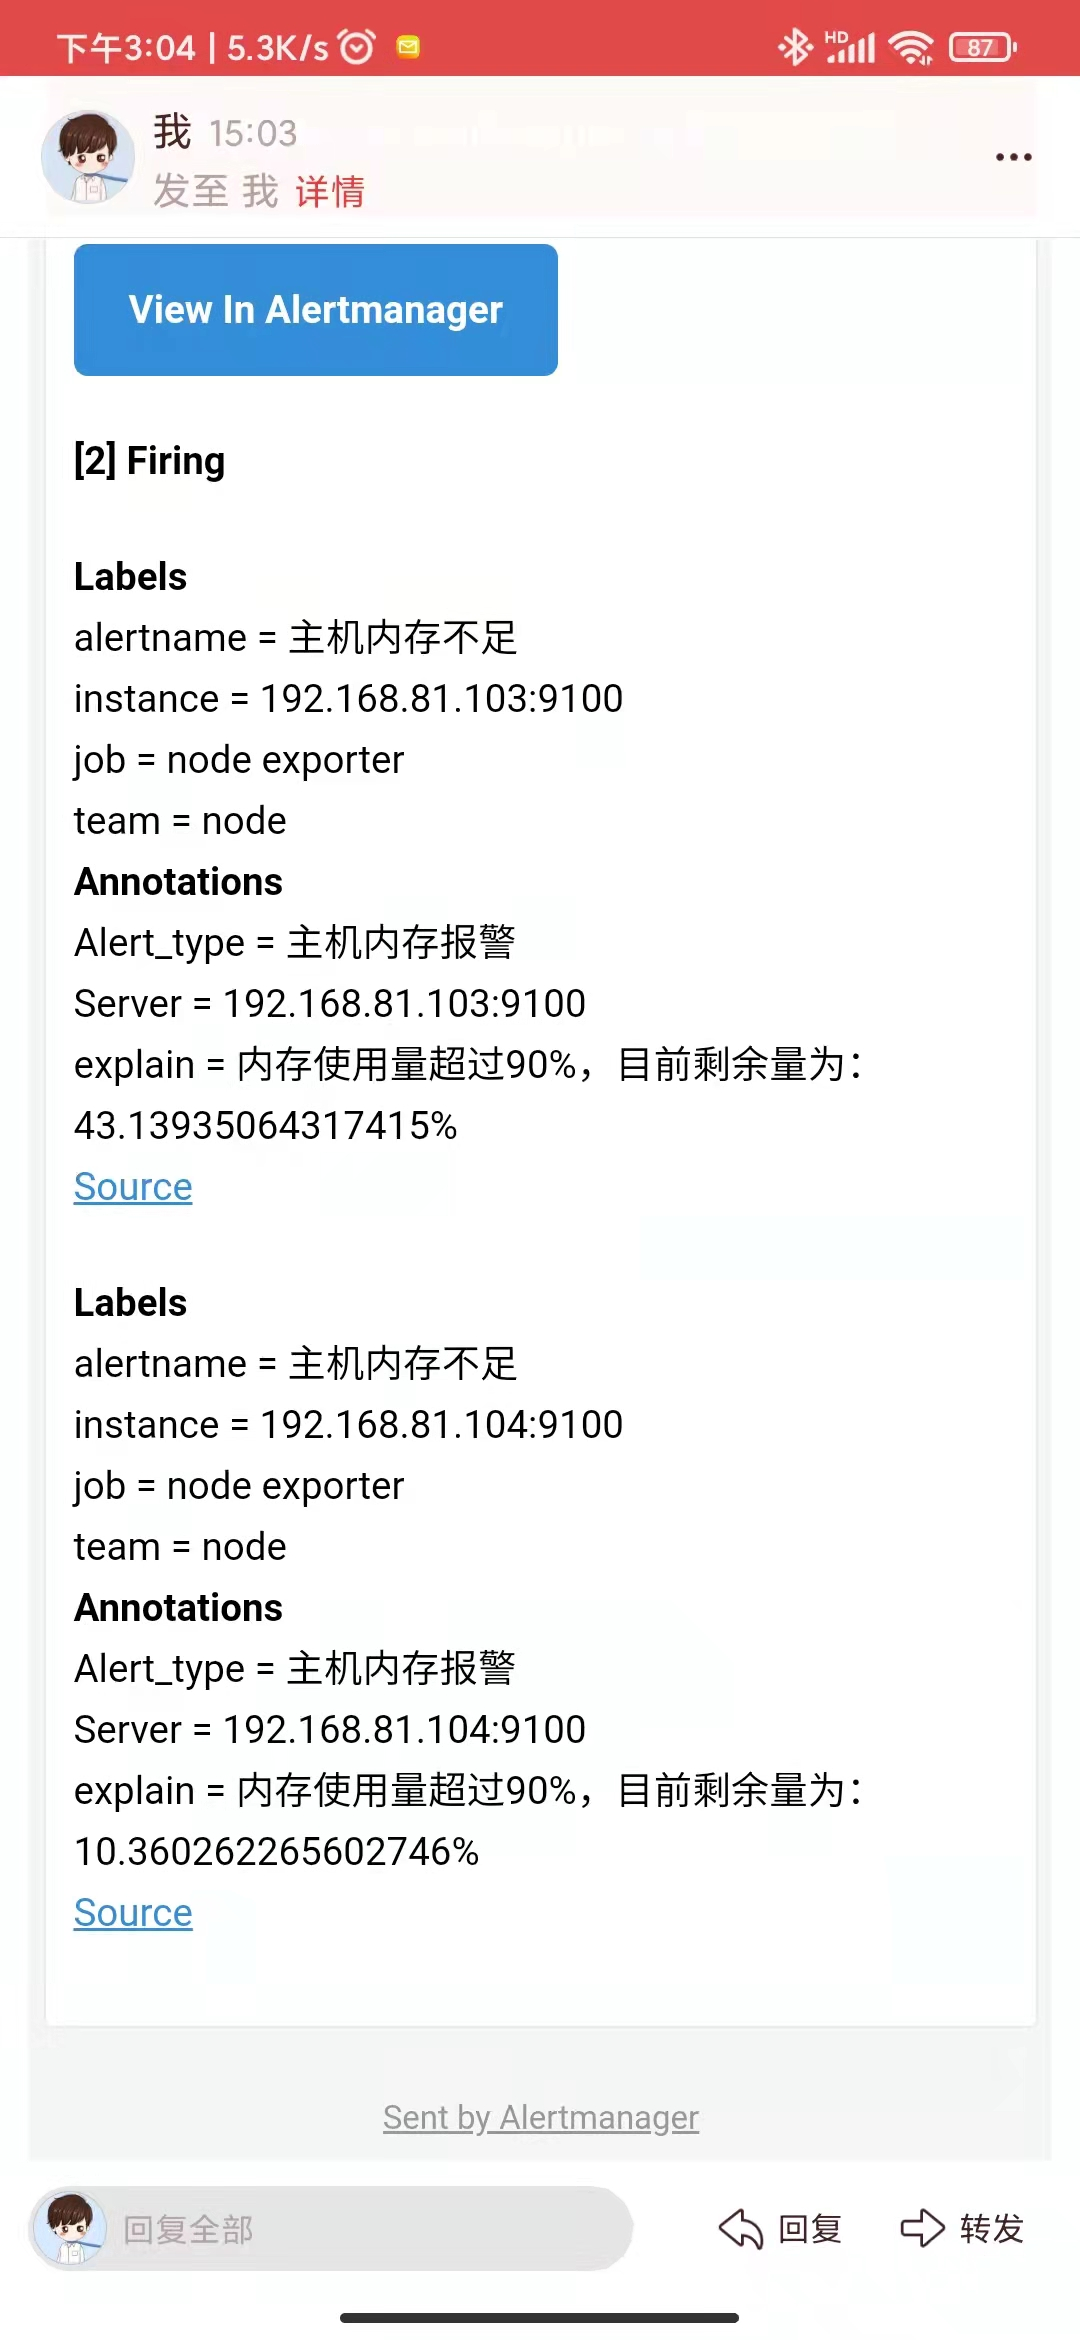
- alert: 主机内存不足
expr: node_memory_MemAvailable_bytes / node_memory_MemTotal_bytes * 100 < 10
for: 2m
labels:
team: node
annotations:
Alert_type: 主机内存报警
Server: '{{$labels.instance}}'
explain: "内存使用量超过90%,目前剩余量为:{{ $value }}%"
#主机磁盘空间不足
- alert: 主机磁盘空间不足
expr: (node_filesystem_avail_bytes * 100) / node_filesystem_size_bytes < 10 and ON (instance, device, mountpoint) node_filesystem_readonly == 0
for: 2m
labels:
team: node
annotations:
Alert_type: 主机磁盘空间不足报警
Server: '{{$labels.instance}}'
explain: "磁盘使用量超过90%,目前剩余量为:{{ $value }}%"
#主机inode
- alert: 主机inode
expr: node_filesystem_files_free{mountpoint ="/rootfs"} / node_filesystem_files{mountpoint="/rootfs"} * 100 < 10 and ON (instance, device, mountpoint) node_filesystem_readonly{mountpoint="/rootfs"} == 0
for: 2m
labels:
team: node
annotations:
Alert_type: 主机inode
Server: '{{$labels.instance}}'
explain: "主机inode使用量超过90%,目前剩余量为:{{ $value }}%"
#主机高CPU负载
- alert: HostHighCpuLoad
expr: 100 - (avg by(instance) (rate(node_cpu_seconds_total{mode="idle"}[2m])) * 100) > 90
for: 0m
labels:
team: node
annotations:
Alert_type: 内存报警
Server: '{{$labels.instance}}'
explain: "内存使用量超过90%,目前使用量为:{{ $value }}%"
修改 prometheus 的配置,然后热重载 prometheus
 rule_files:
    - "rules.yml"
curl -X POST http://192.168.81.104:9090/-/reload
访问查看当前配置的内容:
配置 AlertManager 告警:
1、下载并解压
 [root@localhost package]# wget https://github.com/prometheus/alertmanager/releases/download/v0.22.2/alertmanager-0.22.2.linux-amd64.tar.gz
 [root@localhost package]# tar -zxvf alertmanager-0.22.2.linux-amd64.tar.gz -C /opt/software/
2、 vim alertmanager.yml
global:
resolve_timeout: 5m
smtp_smarthost: 'smtp.163.com:465'
smtp_from: 'xl_2020@163.com'
smtp_auth_username: 'xl_2020@163.com'
smtp_auth_password: 'MORISJNNLZSGJRTO'
smtp_require_tls: false
templates:
- 'template/*.tmpl'
iroute:
group_by: ['alertname']
group_wait: 5s
group_interval: 5s
repeat_interval: 1m
receiver: 'email'
receivers:
- name: 'email'
email_configs:
- to: 'xl_2020@163.com'
send_resolved: true
inhibit_rules:
- source_match:
severity: 'critical'
target_match:
severity: 'warning'
equal: ['alertname', 'dev', 'instance']
3、编辑模板
 [root@lzy alertmanager]# mkdir template
 [root@lzy alertmanager]# cd template/
 [root@lzy template]# vim test.tmpl
{{ define "test.html" }}
<table border="1">
<tr>
<td>报警项</td>
<td>实例</td>
<td>报警阀值</td>
<td>开始时间</td>
</tr>
{{ range $i, $alert := .Alerts }}
<tr>
<td>{{ index $alert.Labels "alertname" }}</td>
<td>{{ index $alert.Labels "instance" }}</td>
<td>{{ index $alert.Annotations "value" }}</td>
<td>{{ $alert.StartsAt }}</td>
</tr>
{{ end }}
</table>
{{ end }}
4、编辑 prometheus.yml
 # Alertmanager configuration
 alerting:
   alertmanagers:
     - static_configs:
         - targets: ['192.168.81.104:9093']
5、启动 alertmanager
nohup ./alertmanager &
6、重启 prometheus
curl -X POST http://192.168.81.104:9090/-/reload
最后等待邮件传送