

服务器概念和初始ajex
服务器相关概念
服务器
服务器的本质:也是一台电脑
服务器的作用:
- 存储一个网站的文件(html,css,js,图片,音乐)
- 提供网站的文件给用户
资源
-
服务器上的 网页(html文件)、图片、音乐、视频、字体文件、CSS文件、JS文件等等都称之为资源。所以资源代指服务器上存储的内容。
-
通俗的讲,我们浏览网页时,从网络当中看到的内容都叫做资源
数据也是资源
网页中的数据,也是服务器对外提供的一种资源。例如股票数据、各行业排行榜等
服务器多数情况都使用数据表的方式来存储数据,和我们平时见到的表格差不多,形式如下
客户端
概念:在前端开发中,客户端特指“Web 浏览器”。
作用:将互联网世界中的 Web 资源加载、并呈现到浏览器窗口中供用户使用。
常见的浏览器:
URL地址(统一资源定位符)
URL 地址,表示服务器上每个资源的确切位置
服务器上的每个资源,都对应着独一无二的URL地址
数据也是服务器上的资源
对数据的操作(增删改查),也对应着不同的URL地址
总结:
-
可以通过URL来访问到服务器上的资源
-
需要对应的URL来对于服务器的数据进行远程操作
(重点)客户端和服务器通信的过程
客户端与服务器之间的通信过程,分为请求 - 响应两个步骤。其中:
-
请求的概念:客户端通过网络去找服务器要资源的过程,叫做“请求”
-
响应的概念:服务器把资源通过网络发送给客户端的过程,叫做“响应”
总结
1.服务器本质就是一台电脑
2.前端开发中,客户端指浏览器
3.网页中资源存储在服务器中
4.URL对服务器数据操作需要找到对应的URL地址
5.请求是由客户端发送的,响应是由服务器做出的
6.有数据的地方就有Ajax,数据是网页的灵魂
Ajax
思考:数据对于网页来说非常重要,那在网页中如何使用服务器的数据
答:需要用到Ajax 技术
定义:Ajax 是浏览器中的技术,用来实现客户端网页请求服务器的数据。
它的英文全称是 Asynchronous Javascript And XML,简称 Ajax。
异步
自带定时器和延时器
-
代码是执行,但是结果不会马上得到
比如下班回家吃饭,下班了但不会马上回到家
-
不一定按照正常上下顺序来执行代码,可以同时做多件事
比如:和两个人吵架
-
异步代码:定时器和延时器
同步
-
代码是执行了,但是结果会马上得到
比如:关电闸,马上就停电;或者被人揍马上就感觉到疼
-
按顺序一件一件做事情
比如:做核酸
XML
-
类似html
-
XML 数据格式而已,类似html数据格式
-
早些年代,客户端和服务器 传递数据,格式就是XML
-
现在主流数据格式,JSON数据格式
-
总结:向服务器请求数据的代码,异步;数据格式是JSON的数据格式
AJax应用场景
请求方式
Ajax中,客户端浏览器在请求服务器上的数据时,根据操作性质(增删改查)的不同,可以分为以下 5 种常见的操作:
操作服务器上的数据除了要使用 URL地址,还需要指定请求方式
Ajax 的基础用法
(重点)axios
axios 是前端圈最火的、专注于数据请求的库
中文官网地址:www.axios-http.cn/
英文官网地址:www.npmjs.com/package/axi…
axios操作步骤:
- 下载 引入到项目中
- 根据url的地址 来编写代码 1 获取数据 -get ( 请求类型 1 get 2 post 3 delete 4 put 5 patch ) 2 编写代码
axios 的基本语法如下:
then固定,是axios封装的一个代码,意思是服务器把数据返回了,then里面的代码就会被触发
基于axios发起get请求
代码案例
<!DOCTYPE html>
<html lang="en">
  <head>
    <meta charset="UTF-8" />
    <meta http-equiv="X-UA-Compatible" content="IE=edge" />
    <meta name="viewport" content="width=device-width, initial-scale=1.0" />
    <title>第一次获取服务器上的数据</title>
    <style>
      table {
       border-collapse: collapse;
       margin: 100px auto;
       border: 1px solid #000;
      }
      thead {
        background-color: rgb(177, 32, 32);
        color: white;
      }
      th{
       width: 100px;
       height: 30px;
      }
      td {
        height: 50px;
        text-align: center;
      }
    </style>
  </head>
  <body>
    <table border="1">
      <thead>
        <tr>
          <th>id</th>
          <th>书名</th>
          <th>作者</th>
          <th>出版社</th>
        </tr>
      </thead>
      <tbody></tbody>
    </table>
    <!-- 第一步先下载引入axios -->
    <script src="./axios.js"></script>
    <script>
      axios({
        method: "get",
        url: "http://www.itcbc.com:3006/api/getbooks",
      }).then((result) => {
        // console.log(result)  //服务器给我们返回的数据!!
        // 数组数据
        const arr = result.data.data;  // 利用了js第三方库的帮助得到数组,
        console.log(arr);
        render(arr)
      });
      const tbody = document.querySelector("tbody");
	// 有了数组数据就可以进行页面渲染了
      function render(arr) {
        let html = ``;
        for (let index = 0; index < arr.length; index++) {
          html += ` <tr>
          <td>${arr[index].id}</td>
          <td>${arr[index].bookname}</td>
          <td>${arr[index].author}</td>
          <td>${arr[index].publisher}</td>
        </tr>`;
        }
        tbody.innerHTML = html;
      }
    </script>
  </body>
</html>
get请求的查询参数
想指定查询条件,可以通过params选项来指定查询参数
get请求携带多个查询参数
想要携带多个参数,只需要在params对象中指定多个查询参数项即可
get请求 直接拼接参数
url + ? 属性名=属性值&属性名=属性值
& 表示和,并且的意思
 axios({
        method: "get",
        // 写法1
         url: "http://www.itcbc.com:3006/api/getbooks",
         params:{
        id:5913
        bookname:'js高级程序设计'
        }
        // 写法2
       // url:'http://www.itcbc.com:3006/api/getbooks?id=5913' //?属性名=属性值&属性名=属性值 固定搭配

      //  多个参数
        url:'http://www.itcbc.com:3006/api/getbooks?id=5913&bookname=js高级程序设计' //&表示并且
      }).then((result) => {
        // console.log(result)  //服务器给我们返回的数据!!
        // 数组数据
        const arr = result.data.data;
        console.log(arr);
        render(arr)
      });
总结
-
在实际开发过程中,前端可以 指定参数来查询对应的数据
-
指定参数的 参数的代码写法 必须要写在 params 对象中,以 键值对的形式存在
-
params 对象中,写什么样的键值对 规定要由后端来决定 前端不懂的时候问他
接口相关的基础概念
接口
使用ajax请求数据时,被请求的URL地址,就叫做数据接口,简称接口或者API接口,每个接口必须有对应的请求方式。一般在API 接口文档中的基本信息可以看到。注意:需要使用请求接口的时候,接口URL需要和接口根路径拼接在一起
接口文档
概念:就是接口的使用说明书,它是我们调用接口的依据。接口文档主要是后端编写的
接口文档的格式
返回示例就是arr
注意:后面如果Ajax程序出错,主要从接口URL,请求方式,请求参数这三方面查错
浏览器地址栏-get请求
如果直接在浏览器的地址栏输入接口地址,来访问数据,这种方式也是属于get请求
get传递参数有两种方式
1,URL上拼接 (用的是这种)
2,params指定
浏览器地址栏不可以测试post请求和delete请求
图书管理-增删改查
需求:根据输入框查询对应的书籍
分析如下
关键代码
关键思路是要判断有没有查询指定参数,如果有就传递指定参数,相反如果没有的话就只是发起请求渲染页面
    getData();

      function addEvent() {
        const input = document.querySelector("input");
        input.addEventListener("keydown", (event) => {
          // 判断按下的是不是回车键
          if (event.key === "Enter") {
            const value = input.value.trim();
            if (value) {
              const queryStr = `?bookname=${value}`;
              getData(queryStr); //传递参数
            } else {
              getData();
            }
          }
        });
      }
完整代码
<!DOCTYPE html>
<html lang="en">
  <head>
    <meta charset="UTF-8" />
    <meta http-equiv="X-UA-Compatible" content="IE=edge" />
    <meta name="viewport" content="width=device-width, initial-scale=1.0" />
    <title>显示完整数据综合案例</title>
    <style>
      table {
        width: 800px;
        margin: 0 auto;
        border-collapse: collapse;
      }
      thead {
        background-color: rgb(211, 61, 61);
        height: 50px;
        color: white;
      }
      td {
        height: 50px;
        padding: 10px;
        background-color: rgb(237, 229, 229);
        text-align: center;
      }
      input {
        margin-bottom: 30px;
        margin-left: 130px;
        height: 30px;
        width: 200px;
        text-indent: 20px;
      }
    </style>
  </head>
  <body>
    <input type="text" placeholder="请输入书名" />
    <table border="1">
      <thead>
        <tr>
          <th>id</th>
          <th>书名</th>
          <th>作者</th>
          <th>出版社</th>
        </tr>
      </thead>
      <tbody></tbody>
    </table>
    <script src="./axios.js"></script>
    <script>
      // <!-- 主要考的是查询指定参数,和函数参数默认值 -->
      window.addEvent();
      getData();

      function addEvent() {
        const input = document.querySelector("input");
        // const self = input;
        // console.log(input);
        input.addEventListener("keydown", (event) => {
          // 判断按下的是不是回车键
          if (event.key === "Enter") {
            // console.log("按下的是回车键");
            // 获取输入框的值
            // debugger;
            // 注意箭头函数和this一起搭配使用,this指向的是Window
            const value = input.value.trim(); // trim() 去除 输入框的值 的两侧的 空字符串
            // console.log(value);
            // 判断是不是空字符串
            if (value) {
              // 不是空字符串
              // console.log("不是空字符串");
              // 假设bookname:红楼梦 ,利用url 传参 ?属性名=属性值
              const queryStr = `?bookname=${value}`;
              // console.log(queryStr)
              getData(queryStr); //传递参数
            } else {
              // console.log("空字符串");
              getData();
            }
          }
        });
      }

      //💥 封装一个发送ajax 请求获取数据的函数
      /* 函数参数默认值
    如果没有给我传递参数,那我就输出默认值
    如果你给我传递了参数,那我就输出你的参数*/
      // query = '' 函数参数默认值,默认空字符串
      function getData(query = "") {
        axios({
          method: "get",
          url: "http://www.itcbc.com:3006/api/getbooks" + query,
          params:{
            appkey:'dongyan123'
          }
        }).then((result) => {
          console.log(result);
          const arr = result.data.data;
          //  console.log(arr)
          render(arr);
        });
      }

      function render(arr) {
        // 遍历渲染页面
        let newArr = arr.map(
          (value) => `
         <tr>
         <td>${value.id}</td>
         <td>${value.bookname}</td>
         <td>${value.author}</td>
         <td>${value.publisher}</td>
       </tr>`
        );
        // 数组转字符串
        const html = newArr.join("");
        document.querySelector("tbody").innerHTML = html;
      }
    </script>
  </body>
</html>
需求:用户点击添加可以实现添加书籍的功能
分析如下
关键代码
关键思路:拿到表单中的值,然后发起增加请求
      // 获取表单 dom 元素
      const booknameDom = document.querySelector(".bookname");
      const authorDom = document.querySelector(".author");
      const publisherDom = document.querySelector(".publisher");
      postData();
      // 新增内容
      function postData() {
        const button = document.querySelector("button");
        button.addEventListener("click", function () {
          // 设置 表单值
          const bookname = booknameDom.value;
          const author = authorDom.value;
          const publisher = publisherDom.value;
          const data = {
            bookname,
            author,
            publisher,
          };
          axios({
            method: "post",
            url: "http://www.itcbc.com:3006/api/addbook",
            data: {
              bookname: data.bookname,
              author: data.author,
              publisher: data.publisher,
              appkey: "dongyan123",
            },
          }).then((result) => {
            // console.log(result);
            getData(); //调用发送请求的函数
            // 清空表单值
            booknameDom.value = "";
            authorDom.value = "";
            publisherDom.value = "";
          });
        });
      }
完整代码
<!DOCTYPE html>
<html lang="en">
  <head>
    <meta charset="UTF-8" />
    <meta http-equiv="X-UA-Compatible" content="IE=edge" />
    <meta name="viewport" content="width=device-width, initial-scale=1.0" />
    <title>新增数据综合案例</title>
    <style>
      body {
        display: flex;
      }
      .left {
        width: 1000px;
        margin: 30px auto;
        /* background-color: pink; */
      }
      .right {
        flex: 1;
        padding: 20px;
        /* background-color: yellow; */
      }
      table {
        width: 850px;
        margin: 0 auto;
        border-collapse: collapse;
      }
      thead {
        background-color: rgb(211, 61, 61);
        height: 50px;
        color: white;
      }
      td {
        height: 30px;
        padding: 10px;
        text-align: center;
        background-color: rgb(245, 241, 241);
        text-align: center;
      }
      input {
        margin-bottom: 30px;
        height: 30px;
        width: 750px;
        text-indent: 20px;
      }
      h3 {
        text-align: center;
        font-size: 20px;
      }
    </style>
  </head>
  <body>
    <div class="left">
      <table border="1">
        <thead>
          <tr>
            <th>id</th>
            <th>书名</th>
            <th>作者</th>
            <th>出版社</th>
          </tr>
        </thead>
        <tbody></tbody>
      </table>
    </div>
    <div class="right">
      <form>
        <h3>添加</h3>
        <input type="text" placeholder="请输入书名" class="bookname" />
        <input type="text" placeholder="请输入作者" class="author" />
        <input type="text" placeholder="请输入出版社" class="publisher" />
        <button type="button">添加数据</button>
      </form>
    </div>
    <script src="./axios.js"></script>
    <script>
      // 获取表单 dom 元素
      const booknameDom = document.querySelector(".bookname");
      const authorDom = document.querySelector(".author");
      const publisherDom = document.querySelector(".publisher");

      postData();

      // 新增内容
      function postData() {
        const button = document.querySelector("button");
        button.addEventListener("click", function () {
          // 设置 表单值
          const bookname = booknameDom.value;
          const author = authorDom.value;
          const publisher = publisherDom.value;

          const data = {
            bookname,
            author,
            publisher,
          };

          axios({
            method: "post",
            url: "http://www.itcbc.com:3006/api/addbook",
            data: {
              bookname: data.bookname,
              author: data.author,
              publisher: data.publisher,
              // 加上了appkey 要传参,
              appkey: "dongyan123",
            },
          }).then((result) => {
            // console.log(result);
            getData(); //调用发送请求的函数
            // 清空表单值
            booknameDom.value = "";
            authorDom.value = "";
            publisherDom.value = "";
          });
        });
      }

      // 发送请求的函数
      function getData(query = "") {
        axios({
          method: "get",
          url: "http://www.itcbc.com:3006/api/getbooks" + query,
          params: {
            appkey: "dongyan123",
          },
        }).then((result) => {
          // console.log(result);
          const arr = result.data.data;

          render(arr);
        });
      }

      function render(arr) {
        // 遍历渲染页面
        let newArr = arr.map(
          (value) => `
               <tr>
               <td>${value.id}</td>
               <td>${value.bookname}</td>
               <td>${value.author}</td>
               <td>${value.publisher}</td>
             </tr>`
        );
        // 数组转字符串
        const html = newArr.join("");
        document.querySelector("tbody").innerHTML = html;
      }
    </script>
  </body>
</html>
需求:用户点击删除标签可以实现删除对应的书籍
分析如下
关键代码
关键思路:获取到删除的id(利用自定义属性,和事件委托),再发起删除请求。优化地方:增加了内置确认框,体验感更加好
  	const tbody = document.querySelector("tbody");
      tbody.addEventListener("click", function (event) {
        if (event.target.nodeName === "A") {
          if (!confirm('确认是否删除')) {
            return  //如果不删除就不需要发出删除的请求,返回不再执行
          }
          const { id } = event.target.dataset;
          axios({
            method: "delete",
            url: "http://www.itcbc.com:3006/api/delbook",
            params: {
              id,
              appkey:'dongyan123'
            },
          }).then(result=>{
            console.log(result)
            getData() //删除成功了,发出请求,重新显示页面数据
          });
        }
      });
完整代码
<!DOCTYPE html>
<html lang="en">
  <head>
    <meta charset="UTF-8" />
    <meta http-equiv="X-UA-Compatible" content="IE=edge" />
    <meta name="viewport" content="width=device-width, initial-scale=1.0" />
    <title>图书管理删除优化</title>
    <style>
         table {
        width: 800px;
        margin: 0 auto;
        border-collapse: collapse;
      }
      thead {
        background-color: rgb(211, 61, 61);
        height: 50px;
        color: white;
      }
      td {
        height: 50px;
        padding: 10px;
        background-color: rgb(237, 229, 229);
        text-align: center;
      }
      input {
        margin-bottom: 30px;
        margin-left: 130px;
        height: 30px;
        width: 200px;
        text-indent: 20px;
      }
    </style>
  </head>
  <body>

    <table border="1">
      <thead>
        <tr>
          <th>id</th>
          <th>书名</th>
          <th>作者</th>
          <th>出版社</th>
          <th>操作</th>
        </tr>
      </thead>
      <tbody></tbody>
    </table>
    <script src="./axios.js"></script>
    <script>
      const tbody = document.querySelector("tbody");

      // 删除
      tbody.addEventListener("click", function (event) {
        // 判断是否点击删除
        // debugger
        if (event.target.nodeName === "A") {
          // console.log('删除此id书名')
          if (!confirm('确认是否删除')) {
            // 不删除
            return //不删除不再执行下面代码
          }
          // 获取删除标签对应的id 自定义属性
          // {id} 解构成对象
          const { id } = event.target.dataset;
          axios({
            method: "delete",
            url: "http://www.itcbc.com:3006/api/delbook",
            params: {
              id,
              appkey:'dongyan123'
            },
          }).then(result=>{
            console.log(result)
            getData() //删除成功了,发出请求,重新显示页面数据
          });
        }
      });
      getData();
      // 封装一个发送ajax 请求获取数据的函数
      function getData() {
        axios({
          method: "get",
          url: "http://www.itcbc.com:3006/api/getbooks",
          params:{
            appkey:'dongyan123'
          }
        }).then((result) => {
          // console.log(result);
          const arr = result.data.data;
          //  console.log(arr)
          render(arr);
        });
      }

      function render(arr) {
        // 遍历渲染页面
        let newArr = arr.map(
          (value) => `
         <tr>
         <td>${value.id}</td>
         <td>${value.bookname}</td>
         <td>${value.author}</td>
         <td>${value.publisher}</td>
         <td><a data-id=${value.id}   href="JavaScript:;">删除</a></td>
       </tr>`
        );
        // 数组转字符串
        const html = newArr.join("");
        document.querySelector("tbody").innerHTML = html;
      }
    </script>
  </body>
</html>
拓展知识-弹出框
confirm js中自带 确认框,如果用户点击 确定 返回true ;相反点击 取消 - false
<body>
    <button>删除</button>
    <script>
      // confirm  js中自带 确认框
      // 如果用户点击 确定 返回true  点击 取消 - false
      // confirm("您舍得删除吗😶")
      document.querySelector('button').addEventListener('click', function () {
        if (confirm('您舍得删除吗😶')) {
          //
          console.log('可以执行删除');
        } else {
          console.log('取消删除');
        }
      });
    </script>
  </body>
需求:用户点击修改标签可以实现修改对应书籍
分析如下
关键代码
 // 需求:点击编辑按钮,获取到表单中的数据,根据接口要求把数据返回
      // 全局变量
      let arr;
      let id;
      const tbody = document.querySelector("tbody");
      const booknameDom = document.querySelector(".bookname");
      const authorDom = document.querySelector(".author");
      const publisherDom = document.querySelector(".publisher");
      const button = document.querySelector("button");

      tbody.addEventListener("click", function (event) {
        if (event.target.className === "edit") {
          const { index } = event.target.dataset;
          booknameDom.value = arr[index].bookname;
          authorDom.value = arr[index].author;
          publisherDom.value = arr[index].publisher;

          // 获取到被编辑的数据id
          id = arr[index].id;
        }
      });

      button.addEventListener("click", function () {
        // 获取表单的值
        const data = {
          // 定义一个全局变量id 就可以拿到了
          id: id,
          bookname: booknameDom.value,
          author: authorDom.value,
          publisher: publisherDom.value,
          appkey: "dongyan123",
        };
        // console.log(data)
        // 发起编辑请求
        axios({
          url: "http://www.itcbc.com:3006/api/updatebook",
          method: "put",
          data,
        }).then((result) => {
          console.log(result);
          getData();
          // 清空表单值
          booknameDom.value = "";
            authorDom.value = "";
            publisherDom.value = "";;
        });
      });
完整代码
<!DOCTYPE html>
<html lang="en">
  <head>
    <meta charset="UTF-8" />
    <meta http-equiv="X-UA-Compatible" content="IE=edge" />
    <meta name="viewport" content="width=device-width, initial-scale=1.0" />
    <title>编辑数据综合案例</title>
    <style>
      body {
        display: flex;
      }
      .left {
        width: 1000px;
        margin: 30px auto;
        /* background-color: pink; */
      }
      .right {
        flex: 1;
        padding: 20px;
        /* background-color: yellow; */
      }
      table {
        width: 850px;
        margin: 0 auto;
        border-collapse: collapse;
      }
      thead {
        background-color: rgb(211, 61, 61);
        height: 50px;
        color: white;
      }
      td {
        height: 30px;
        padding: 10px;
        text-align: center;
        background-color: rgb(245, 241, 241);
        text-align: center;
      }
      h3 {
        text-align: center;
        font-size: 20px;
      }
      input {
        margin-bottom: 30px;
        height: 30px;
        width: 750px;
        text-indent: 20px;
      }
    </style>
  </head>
  <body>
    <div class="left">
      <table border="1">
        <thead>
          <tr>
            <th>id</th>
            <th>书名</th>
            <th>作者</th>
            <th>出版社</th>
            <th>操作</th>
          </tr>
        </thead>
        <tbody></tbody>
      </table>
    </div>
    <div class="right">
      <form>
        <h3>编辑</h3>
        <input type="text" placeholder="请输入书名" class="bookname" />
        <input type="text" placeholder="请输入作者" class="author" />
        <input type="text" placeholder="请输入出版社" class="publisher" />
        <button type="button">编辑数据</button>
      </form>
    </div>
    <script src="../day1/axios.js"></script>
    <script>
      // 需求:点击编辑按钮,获取到表单中的数据,根据接口要求把数据返回
      // 全局变量
      let arr;
      let id;
      const tbody = document.querySelector("tbody");
      const booknameDom = document.querySelector(".bookname");
      const authorDom = document.querySelector(".author");
      const publisherDom = document.querySelector(".publisher");
      const button = document.querySelector("button");

      tbody.addEventListener("click", function (event) {
        if (event.target.className === "edit") {
          const { index } = event.target.dataset;
          booknameDom.value = arr[index].bookname;
          authorDom.value = arr[index].author;
          publisherDom.value = arr[index].publisher;

          // 获取到被编辑的数据id
          id = arr[index].id;
        }
      });

      button.addEventListener("click", function () {
        // 获取表单的值
        const data = {
          // 定义一个全局变量id 就可以拿到了
          id: id,
          bookname: booknameDom.value,
          author: authorDom.value,
          publisher: publisherDom.value,
          appkey: "dongyan123",
        };
        // console.log(data)
        // 发起编辑请求
        axios({
          url: "http://www.itcbc.com:3006/api/updatebook",
          method: "put",
          data,
        }).then((result) => {
          console.log(result);
          getData();
          // 清空表单值
          booknameDom.value = "";
            authorDom.value = "";
            publisherDom.value = "";;
        });
      });

      getData();
      // 发送请求的函数
      function getData(query = "") {
        axios({
          method: "get",
          url: "http://www.itcbc.com:3006/api/getbooks" + query,
          params: {
            appkey: "dongyan123",
          },
        }).then((result) => {
          // console.log(result);
          arr = result.data.data;
          render(arr);
        });
      }

      function render(arr) {
        // 遍历渲染页面
        let newArr = arr.map(
          (value, index) => `
                     <tr>
                     <td>${value.id}</td>
                     <td>${value.bookname}</td>
                     <td>${value.author}</td>
                     <td>${value.publisher}</td>
                     <td><a class='edit' data-index=${index}  href="JavaScript:;">编辑</a></td>
                   </tr>`
        );
        // 数组转字符串
        const html = newArr.join("");
        tbody.innerHTML = html;
      }
    </script>
  </body>
</html>
(重点)network面板(网络)
作用:用来排查ajax方面的错误
使用该工具,可以查看当前Ajax请求的详细信息
-
查看请求方式
-
查看请求的URL地址
-
查看请求参数(载荷那边看)
-
查看响应结果(预览和响应)
-
-
隐藏时间轴。初学阶段,用不到时间轴,可以将其隐藏,从而节省面板的空间
- 禁止浏览器缓存
-
模拟网速
-
(重点)查看请求状态
200 表示成功
pending 表示等待(可能网络不好或者断网了)
4xx 和 5xx 都表示不同程度的错误
Failed 表示失败
-
(重点)查看请求方式和完整URL
-
(重点)查看传输到服务器的数据
-
(重点)查看服务器响应结果
from表单&文件上传
from表单
1、表单作用
在网页中,表单主要负责数据采集功能。例如:
2、表单组成部分
网页中采集数据的表单由三个部分组成,分别是表单标签、表单域(一般有input,textarea、select)、表单按钮。
当表单数据填写完毕后,用户点击表单按钮,会触发表单的提交操作,从而把采集到的数据提交到服务器中
把表单采集到的数据提交到服务器时,需要指定的请求方式和请求的URL地址
思考:form表单如何指定请求的URL地址和请求方式?
使用form标签中的3个专有属性
3、form标签的属性一览表
4、提交数据
利用form表单input带name属性可以实现提交表单数据
<body>
    // 需要指定请求方式和 URL地址
    <form action="http://www.itcbc.com:3006/api/getbooks" method="get">
        <div>
            <label for="">用户</label>
            <input type="text" name="username">
        </div>
        <button>提交</button>
    </form>
</body>
通过Ajax提交表单数据
作用:可以防止表单默认提交行为导致的页面跳转问题,提高用户体验
特点:
1.监听表单提交事件
2.阻止默认提交行为
3.基于axios发起请求
4.指定请求方式,请求地址
5.指定请求体数据
总结:
1.旧方式提交数据 直接在form标签操作方式提交
2.旧方式 会刷新页面 调整页面情况,用户体验差
3.如果input不加name属性,数据就不会提交到后端
4.Ajax方法是异步 网络请求,这样用户体验好(一边使用功能,同时提交数据)
5.Ajax技术 是完全可以不给标签加name的,只是习惯下来的行业规范
5、快速获取到form表单所有的数据
系列化
系列化:把对象或者数组转成 字符串格式的过程 JSON.stringify()
反序列化:把字符串格式转成对象或者数组的过程 JSON.parse()
URLSearchparame对象的作用是将表单或者普通对象转换成a=1&b=2 的格式
方法一、使用jq的方法serialize()函数, 获取表单的数据
作用:是jQuery的一种函数,能够一次性获取表当中采集的数据
语法:$(“表单元素的选择器”).seroalize()
<!-- 引入JQ的js文件 -->
    <script src="./lib/jquery.js"></script>
    <script>
        const btn = document.querySelector(`button`)
        btn.addEventListener(`click`,function(){
            const data = $(`form`).serialize()
            console.log(data);
        })
    </script>
复制代码
总结:
1.使用此函数,必须为每一个表单域添加name属性
2.是JQ封装的,使用要引入
3.结果是一个查询字符串结构
4.能获取隐藏域的值,不能得到禁用状态的值,不能得到文件域的信息
方式二、自己封装函数快速获取表单数据-利用了formData(js内置的对象)
<script>
function getForm(query) {
            // JS内置对象处理表单数据把所有表单标签-name属性 要new
            //💥补充说明  form 对象,包含所有表单数据(input name属性)
 			//操作步骤 1 快速 把 form表单中的带有name属性的数据 设置到 formdata 中
            const form = new FormData(document.querySelector(query))
            //💥补充说明 URL Search Params 用来处理 url上的参数 对象 也是可以被new
           // 操作步骤2 创建把数据 转成 get 参数格式 对象
            const usp = new URLSearchParams()
            //💥补充说明 forEach((值,键)) 固定写法 要对form遍历 出处理好的数据
            // 操作步骤3 对form遍历
            form.forEach((value,key)=>{
                // 这是url的一种方法 添加 追加
                usp.append(key,value)
            })

            // 💥补充说明 usp 有一个方法 toString()  把添加到它身上的 数据 转成 url 的参数的格式
     		// 操作步骤4 usp 获取到了所有它等待转化的数据  开始进行转化
            const data = usp.toString()
            return data
        }
</script>
总结:
1.new FormData获取表单 name属性所有标签
2.new URLsearchparams 处理数据 转成get的字符串格式
3.usp.append(键,值) 添加数据
4.usp.toString()转换添加的数据
方式三、es6 新的对象 用这些新的对象 构造自己的序列化 方法
axios请求方法的别名
axios执行post请求传参格式
axios 执行post请求传递参数 data传参
data可以接受参数的类型
-
对象类型
data:{
bookname:'西游记'
autuor:'吴承恩'
}
-
字符串格式类型
普通对象快速转字符串

写法二:axios.get(Url,{params:{参数}}) ;
post请求
写法一:axios.post(url,参数(对象));
  axios.post('http://www.itcbc.com:3006/api/addbook', {
          bookname: 'post请求1',
          author: 'post请求222',
          publisher: 'post请求33',
          appkey: 'wanshao1234',
        })
        .then((result) => {
          console.log(result);
        });
写法二: axios.post(url,参数(字符串格式));
 const url = 'http://www.itcbc.com:3006/api/addbook';
      const query =
        'bookname=111222&author=222222&publisher=33333&appkey=wanshao1234';
      axios.post(url, query).then((result) => {
        console.log(result);
      });
axios全局配置和拦截器
全局配置
全局配置请求根路径
全局配置请求根路径 - 语法格式
基于 axios 提供的固定配置,即可轻松配置请求的根路径。语法格式如下: axios.defaults.baseURL = '请求根路径'
拦截器
概念
拦截器(interceptors)用来全局拦截 axios 的每一次请求与响应。给用户一个友好提示现在加载中,防止用户一直点击
好处
可以把每个请求中,某些重复性的业务代码封装到拦截器中,提高代码的复用性。
换个简单例子说:我们出省,出省要做核酸检查;我们回来,验核酸再让你回来
使用场景
很多功能 都需要和服务器 交互 发送网络请求
当上传头像 网络很慢、上传的文件很大,整个页面 没有相应的 状态
这个时候,发送请求的时候 都显示一个 加载中的友好提示,这样用户体验感就比较好
实现方式
1、html+CSS来实现加载中
-
1 .很多的ul框架 全部都会提供 加载中的 小小效果
-
2 自己来简单写一个加载中 即可
2 自己根据发送的请求来 显示加载中! axios内置的拦截器代码功能 在任意的请求(推荐这种,因为后期项目复杂, 几百个接口 - 几百个网络请求,这样就可以统一设置)
-
- 在发送请求前 拦截 处理一下 - 显示加载中
-
2.在数据响应来 拦截 处理一下 - 关闭加载中
<script>
       // 添加请求拦截器
      axios.interceptors.request.use(
        function (config) {
          // 在发送请求之前做些什么
          // console.log('发送前 拦截器 ');
          document.querySelector('img').style.display = 'block';
          return config;
        },
        function (error) {
          // 对请求错误做些什么
          return Promise.reject(error);
        }
      );

      // 添加响应拦截器
      axios.interceptors.response.use(
        function (response) {
          document.querySelector('img').style.display = 'none';
          return response;
        },
        function (error) {
          // 超出 2xx 范围的状态码都会触发该函数。
          // 对响应错误做点什么
          return Promise.reject(error);
        }
      );

      const button = document.querySelector('button');
      button.addEventListener('click', function () {
        // 发送网络请求
        axios
          .get('http://www.itcbc.com:3006/api/getbooks?appkey=wanshao1234')
          .then((result) => {
            console.log(result);
          });
      });
    </script>
FormData 和文件上传
FormData
介绍
- FormData 是一个浏览器对象。用于管理表单数据。
- IE10+支持。
- 可以这样理解,FormData的作用和 jQuery中的 serialize() 作用一样,用于快速收集表单数据
- 并且可以将创建的FormData对象直接提交给接口。
- 典型应用场景:FormData + Ajax 技术实现文件上传的功能。
FormData基本用法-快速收集表单数据
💥要求,每个表单元素都具有 name 属性
	<body>
    <form>
      <input type="text" name="username" />
      <input type="text" name="password" />
      <input type="text" name="gender" />
      <button type="button">获取表单数据</button>
    </form>
    <script>
      // JS内置对象处理表单数据把所有表单标签-name属性 要new
       //  form 对象,包含所有表单数据(input name属性)
        // 1 快速 把 form表单中的带有name属性的数据 设置到 formdata 中
        const form = new FormData(document.querySelector('form'));
        // 2 创建把数据 转成 get 参数格式 对象
        const usp = new URLSearchParams();
        // 3 对form遍历
        form.forEach((value, key) => {
          // value =  username表单的值
          // key = username
          usp.append(key, value);
        });
        // 4 usp 获取到了所有它等待转化的数据  开始进行转化
        const data = usp.toString();
        console.log(data);
      });
    </script>
  </body>
FormData的API方法
FormData和serialize的区别
文件上传-图片
操作步骤
第一步、先允许用户选择本地的图片
- 1.1 、指定文件上传的类型,只能是图片不能是其他 input标签一个属性 指定上传的文件的类型 accept
用法
accept= 文件类型/*
accept = "image/*"
          accept = "image/*,video/*"
          https://developer.mozilla.org/zh-CN/docs/Web/HTML/Element/Input/file#唯一文件类型说明符
指定多个文件类型用法,用逗号分隔
-
1.2、给input标签绑定 change事件,图片上传浏览器内存中,就会触发
-
1.3、this.files 来获取文件数组
-
1.4、可选:先在网页显示一下用户选择的图片 再次确定是不是这个图片
  <body>
    <img src="" alt="" />
    <input type="file" accept="image/*" />
    <script>
      const input = document.querySelector("input");
      const img = document.querySelector("img");
      input.addEventListener("change", function () {
    	 // console.log("浏览器拿到图片文件了");
        // console.log(this.files);
        // 获取某个文件对象,比如第一个文件的文件对象
        const file = this.files[0]; // 要上传的文件对象
        // 新的js对象 把浏览器内存中图片文件的地址 获取出来
		// 创建本地文件的预览url
        const src = URL.createObjectURL(file);
        // 设置图片的src为url, 让图片显示出来
        img.src = src;
      });
    </script>
  </body>
总结:
1.明确文件上传类型:image/* 指定图片
2.明确事件类型,change事件,上传图片触发函数
3.URL.createObjectURL()获取浏览器中图片文件地址
第二步、把图片上传到指定服务器
-
根据接口文档的要求来操作代码
URL,请求类型,请求参数(重点)
请求参数-上传文件给后端的参数 肯定是formdata 类型
<body>
     <img src="" alt="" />
   <input type="file" accept="image/*" />
     <script src="./lib/axios.js"></script>
     <script>
       const input = document.querySelector('input');
       const img = document.querySelector('img');
       input.addEventListener('change', function () {
         // 获取某个文件对象,比如第一个文件的文件对象
         const file = this.files[0];
         const src = URL.createObjectURL(file);
         img.src = src;

         // 参数名称 avatar  参数值 file

         const formdata = new FormData(); // 创建一个空formdata对象
         formdata.append('avatar', file); // 接口要求 把文件追加到 formdata对象

         // 把数据上传到服务器中 即可
         axios({
           method: 'post',
           url: 'http://www.itcbc.com:3006/api/formdata',
           data: formdata,
         }).then((result) => {
           console.log(result);
         });

         // 简写
         // axios
         //   .post('http://www.itcbc.com:3006/api/formdata', formdata)
         //   .then((result) => {
         //     console.log(result);
         //   });
       });
     </script>
   </body>
总结
1.把图片上传服务器,根据接口文档、URL、请求类型、请求参数
2.运用FormData上传文件
3.使用FormData的appen方法
文件上传完整写法
 <body>
    <input type="file" accept="image/*" />
    <script src="./lib/axios.js"></script>
    <script>

      const input = document.querySelector('input');
      input.addEventListener('change', function () {
        const file = this.files[0];
        const formdata = new FormData();
        // 接口要求 键值对的
        formdata.append('avatar', file);

        axios
          .post('http://www.itcbc.com:3006/api/formdata', formdata)
          .then((result) => {
            console.log(result);
          });
      });
文件域补充
input标签的属性
-
文件域:
-
accept 属性:控制能够选择的文件类型,比如 accept="image/png,image/jpeg"
-
multiple 属性:控制是否可以多选文件
文件对象
- 面向对象中,讲过,JS中表示一个人,需要用到对象。
- JS中表示一个文件,也需要用对象,也就是文件对象
- 文件对象,是本地文件的一个表示。
- 通俗的说,在 JavaScript 中,使用 文件对象 表示一个本地文件。
- 文件对象不需要自己创建,可以通过文件域获取得到
- 💥选择一个或多个文件
- 💥根据文件域,找到它的 files 属性。files属性是一个伪数组,里面包含了一个或多个文件对象。
取得文件对象
文件对象的作用一:本地预览
文件对象的作用之二:追加到FormData,实现文件上传
请求-响应报文
本质:客户端与服务器通信的过程是基于请求和响应的。
1.请求报文:规定了客户端以什么格式把数据发送给服务器
2.响应报文:规定了服务器以什么格式把数据响应给客户端
作用:方便我们做代码的调试
请求&响应报文-格式
1.请求报文:请求行,请求头,空行和请求体4个部分组成
2.响应报文:状态栏,响应头部,空行和响应体4个部分组成
URL参数
本质:常用的5种请求方式,都可以在URL后面携带请求参数
缺点:敏感信息会直接暴露在地址栏
写法:常用的请求参数有两种写法(第二种先了解)
<script>
	//写法1 get(URL)
      axios.get("http://www.itcbc.com:3006/api/getbooks?appkey=HZD123")
      	.then((result)=>{
            console.log(result);
        })

    //写法2 get(URL,{params:参数})
      axios.get("http://www.itcbc.com:3006/api/getbooks",{params:{appkey:`HZD123`}})
        .then((result)=>{
            console.log(result);
        })
</script>
复制代码
请求体
本质:除了GET请求以外,其他4种常用的请求方式,都可以设置请求体
作用:请求体大小没有限制,所以可以提交大量的数据
写法:
<script>
  // 写法1 axios.post(url,参数{对象}) --JSON格式
  axios.post("http://www.itcbc.com:3006/api/addbook?appkey=HZD123",{bookname:`陈某`,appkey:`XXX`})
            .then((result)=>{
            console.log(result);
        })

 // 写法2 axios.post(url,参数(字符串)) --查询字符串格式
 axios.post("http://www.itcbc.com:3006/api/addbook?appkey=HZD123",`bookname=陈某&appkey=XXX`)
            .then((result)=>{
            console.log(result);
        })

 // 写法3:newFormData() --- FormData 对象格式
 axios.post(`http://www.itcbc.com:3006/api/formdata`
            ,formdata)
     		.then((result)=>{
            console.log(result);
        })
</script>
注意:请求的时候,设置了不同格式的请求体,需要一个对应的请求头
http响应状态码
本质:http响应状态码由三位数字组成,用来标识响应成功与否的状态
作用:客户端浏览器根据响应状态码,即可判断这次http请求是否成功
常见的http响应状态码
与业务状态码区分
本质:所处的位置,表示的结果,通用性不同
1.所处的位置不同
在响应头的状态行中所包含的状态码,或者请求列表中的Status
业务状态码在响应体的数据中所包含的状态码,如案例中的code
2.表示的结果不同
响应状态码只能表示这次请求是否成功
业务状态码·表示这次业务处理是否成功
3.通用性不同
响应状态码是由http协议规定的,具有通用性。每个不同的状态码都有标准含义
业务状态码是后端程序员自己定义的,不具有通用性(如聚合,天行,百度等API的接口)
XMLHttpRequest&跨域
XMLHttpRequest
本质:是浏览器内置的一个构造函数
作用:
1.基于new出来的XHR实例对象,可以发起Ajax的请求。
2.axios中的axios.get() .post()等方法都是基于XHR来的,XHR是原生(底层)代码
XHR发起GET请求
实现步骤
<script>
     // 1 创建 xhr对象
 	const xhr = new XMLHttpRequest
   // 2 调用 open方法 指定 请求类型,url
	 xhr.open(`get`,`http://www.itcbc.com:3006/api/getbooks`)
      // 3 发送出去 send
 	xhr.send()
   // 4 监听onload  数据响应事件
 	xhr.addEventListener(`load`,function(){
     console.log(this.response); //默认 是字符串的格式
	// 字符串转对象
     const obj = JSON.parse(this.response)// 反序列化
     console.log(obj.data);
 })
</script>
请求时携带URL参数
get方法携带参数
<script>
        const xhr = new XMLHttpRequest
        xhr.open(`get`,`http://www.itcbc.com:3006/api/getbooks?appkey=HZD123`)
        xhr.send()
        xhr.addEventListener(`load`,function(){
            console.log(this.response);
            const obj = JSON.parse(this.response)
            const arr = obj.data
            console.log(arr);
            const html = arr.map((value)=>`<li>${value.bookname}</li>`).join(``)
            document.querySelector(`ul`).innerHTML=html
        })
    </script>
post提交请求体数据时
1.调用xhr.setRequestHeader()函数,指定请求体编码格式
2.当请求体格式不同时,需要指定Content-Type的请求头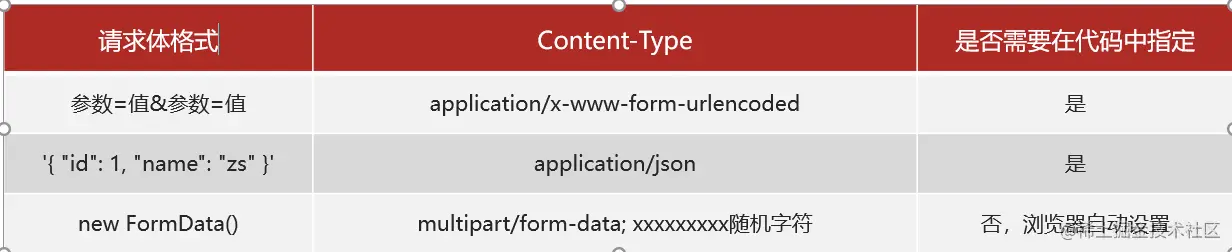
对象格式
<script>
        const xhr = new XMLHttpRequest()
        xhr.open(`post`, `http://www.itcbc.com:3006/api/addbook`)

        const data = {
            bookname: '2从入门到精通2',
            author: '我自己',
            publisher: '黑马出版社',
            appkey:`HZD123`
        }

        // 对象格式的参数 也要设置对应的 conten-type

        xhr.setRequestHeader(`Content-type`,`application/json`)
        const str = JSON.stringify(data)
        xhr.send(str) // 传递 a=b&c=d

        xhr.addEventListener(`load`,function(){
            console.log(this.response);
        })
</script>
字符串格式
  <script>
      const xhr = new XMLHttpRequest();
      // open 来指定 请求方式
      xhr.open('post', 'http://www.itcbc.com:3006/api/addbook');
      const data = {
        bookname: '111从入门到精通111',
        author: '我自己',
        publisher: 'hm出版社',
        appkey: 'wanshao1234',
      };
      // 把data 转成 a=b&c=d ....  URLSearchParams
      const usp=new URLSearchParams(data);
      const query = usp.toString();

      // 设置对应的 content-type
      xhr.setRequestHeader("Content-type","application/x-www-form-urlencoded");
      xhr.send(query); // 传递 a=b&c=d


      xhr.addEventListener('load', function () {
        console.log(this.response);
      });
    </script>
FormData形式
<script>
    const inp = document.querySelector(`input`)
    const img = document.querySelector(`img`)
    inp.addEventListener(`change`, function () {
        const file = this.files[0]
        const src = URL.createObjectURL(file)
        img.src = src

        const formdata = new FormData()
        formdata.append(`avatar`,file)

        const xhr = new XMLHttpRequest()
        xhr.open(`post`,`http://www.itcbc.com:3006/api/formdata`)
    // 不用设置 content-type
        xhr.send(formdata)
        xhr.addEventListener(`load`,function(){
            console.log(this.response);
        })

    })
</script>
自封装Ajax
1.根据JQ的Ajax出发,封装属于自己的Ajxa
<script>
    // JQ的代码也是通过封装的 我们跟着这个代码思路自封装
    $.ajax({
            url: `http://www.itcbc.com:3006/api/getbooks`,
            type: `get`,
            data: `appkey=123`,
            success(result) {
                console.log(result);
            }
        })
</script>
总结
1 type 可能是get 也可能是post
2 data 3种(查询字符串 json formdata )
2.实现ajax封装 GET 方式 携带参数
<script>
   const option = {
        url: 'http://www.itcbc.com:3006/api/getbooks',
        type: 'get',
        data: 'appkey=wanshao1234',
        success(result) {
          // result 等于 要等于响应的数据 =  对象格式
          console.log(result);
        },
      };

      // 我们自己封装一个Ajax函数 来实现ajax上传功能
       ajax(option) // 这是一个函数 调用option里面的属性 实现上传

      function ajax(config) {
        const xhr = new XMLHttpRequest();
        xhr.open(config.type, config.url + '?' + config.data);
        xhr.send();
        xhr.addEventListener('load', function () {
          //  响应的数据 this.response
          // console.log(this.response);
          const obj =JSON.parse(this.response)
          config.success(obj)
        });
      }
</script>
3.实现ajax封装 GET方式 不携带参数
   <script>
      // 形参默认值
      // 解构
      // function func(msg="hello") {
      //   console.log(msg);
      // }

      // func();// undefined
      // func();// 输出默认值
      // func('你好'); /// 你好

      const option = {
        url: 'http://www.itcbc.com:3006/api/getbooks',
        type: 'get',
        // data: 'appkey=wanshao1234',
        success(result) {
          console.log(result);
        },
      };

      ajax(option);

      ajax({
        url: 'http://www.itcbc.com:3006/api/getbooks',
        type: 'get',
        data: 'appkey=wanshao1234',
        success(result) {
          console.log(result);
        },
      });

      function ajax({ url, type, data = '', success }) {
        // 封装的时候考虑到用户 (可能带参数 , 可能不带参数),利用了解构同时设置了默认值
        const xhr = new XMLHttpRequest();
        xhr.open(type, url + '?' + data);
        // 如果 data没有值  url =  http://www.itcbc.com?
        // 如果 data有值  url =  http://www.itcbc.com?appkey=wanshao1234
        xhr.send();
        xhr.addEventListener('load', function () {
          const obj = JSON.parse(this.response);
          success(obj);
        });
      }
    </script>
4.当GET方式中 data是不同类型时
 <body>
    <script>
      // 1.没有参数
      ajax({
        url: 'http://www.itcbc.com:3006/api/getbooks',
        type: 'get',
        // data: 'appkey=wanshao1234',
        success(result) {
          console.log(result);
        },
      });
      // 2.带参数
      ajax({
        url: 'http://www.itcbc.com:3006/api/getbooks',
        type: 'get',
        data: 'appkey=wanshao1234',
        success(result) {
          console.log(result);
        },
      });

      // 3.data是对象格式
      ajax({
        url: 'http://www.itcbc.com:3006/api/getbooks',
        type: 'get',
        data: {
          appkey: 'wanshao1234',
          bookname: '今晚吃啥',
        },
        success(result) {
          console.log(result);
        },
      });

      function ajax({ url, type, data = '', success }) {
        const xhr = new XMLHttpRequest();

        if (typeof data === 'object') {
          // data是一个对象
          data = new URLSearchParams(data).toString();
        }
        // (typeof data === 'object')&&(data = new URLSearchParams(data).toString())
        xhr.open(type, url + '?' + data); // a=1&b=2 URLSearchParams
        xhr.send();
        xhr.addEventListener('load', function () {
          const obj = JSON.parse(this.response);
          success(obj);
        });
      }

      // typeof

      // console.log(typeof "" === 'object');  // 数据是不是对象格式
    </script>
  </body>
5.封装POST 方式
判断当前data数据类型:字符串、对象、FormData(之前内容)
<script>
      ajax({
        url: 'http://www.itcbc.com:3006/api/getbooks',
        type: 'get',
        success(result) {
          console.log(result);
        },
      });
      ajax({
        url: 'http://www.itcbc.com:3006/api/getbooks',
        type: 'post',
        success(result) {
          console.log(result);
        },
      });
    	function ajax({ url, type, data = ``, success }) {
            const xhr = new XMLHttpRequest()
            // 判断请求类型---这里是get请求类型
            if (type === `get`) {
        	// get请求的相关的代码
                if (typeof data === `object`) {
                    data = (new URLSearchParams(data)).toString()
                }
                xhr.open(type, url + `?` + data)
                xhr.send()
                // post请求类型
            } else if (type === `post`) {
                xhr.open(type, url)
                // 判断是不是字符串
                if (typeof data === `string`) {
				xhr.setRequestHeader(`Content-type`, `application/x-www-form-urlencoded`)
                    xhr.send(data)
                    // 判断是不是对象(普通对象和FormData)
                } else if (typeof data === `object`) {
          // 判断 实例和构造函数的关系 实例 instanceof 构造函数
                    if (data instanceof FormData) {
       			 // 是 FormData 实例
                        xhr.send(data)
                    } else {
                		// 普通的对象
                        xhr.setRequestHeader(`Content-type`, `application/json`)
                        const str = JSON.stringify(data)
                        xhr.send(str)
                    }
                }
            }
</script>
   /*
      判断当前data的数据类型
      1 字符串类型
              xhr.setRequestHeader("Content-type","application/x-www-form-urlencoded");
              xhr.send(data); // 传递 a=b&c=d
      2 对象类型
              xhr.setRequestHeader("Content-type","application/json");
              const str =JSON.stringify(data);
              xhr.send(str); // 传递 a=b&c=d
      3 formdata
              xhr.send(formdata);

       */
 //  判断当前数据 字符串类型 typeof
     // console.log( typeof data === "string" ); // 字符串类型

      // console.log( typeof data === "object" ); // 对象类型
总结
1.通过今天所学的底层原生Ajax 代码 来封装一个 自己的Ajax上传函数 用JQ的Ajax做参考
2.参照JQ的ajxa代码格式 运用底层的原生Ajax 进行封装使用
3.有传参和不传参两种情况 用默认值+解构思路 进一步优化代码
4.最后把形参.属性名 优化 解构{属性名,data=``(默认值)}
5.data可以是没有参数 可以是字符串 还可以是对象
6.type of 判断是否为对象 运用URLsearcParams/ .toString()转换数据
7.post请求方式 与get不同 所以用if区分 get一部分 post 一部分
8.判断当前data数据类型:字符串、对象、FormData 分别放入相应判断函数内
9.判断字符串类型: typeof 判断实例对应构造函数: 实例 instanceof 构造函数
数据交换格式
概念
数据交换格式,就是服务器端与客户端之间数据传输的格式。
JSON概念
JSON(全称:JavaScript Object Notation)是一种数据交换格式,它本质上是用字符串的方式来表示对象或数组类型的数据。例如:
JSON数据
用字符串的方式来表示的对象或数组类型的数据,叫做 JSON 数据
JSON 数据的格式有两种: 1、对象格式 2、数组格式
JSON 的语法要求
对象格式的 JSON 数据
数组格式的 JSON 数据
把 JSON 数据转换为 JS 数据
调用浏览器内置的 JSON.parse() 函数,可以把 JSON 格式的字符串转换为 JS 数据,例如:
把 JS 数据转换为 JSON 数据
调用浏览器内置的 JSON.stringify() 函数,可以把 JS 数据转换为 JSON 格式的字符串,例如:
序列化和反序列化
- 把真实数据转换为字符串的过程,叫做序列化 使用JSON.stringify() 函数进行转换
- 把字符串转换为真实数据的过程,叫做反序列化 使用 JSON.parse() 函数进行转换
把 XMLHttpRequest 请求到的 JSON 数据反序列化为 JS 对象
在 xhr 对象的 load 事件中,通过 xhr.response 访问到的是 JSON 格式的字符串数据。可以调用 JSON.parse() 函数将 xhr.response 转化为 JS 对象。示例代码如下:
防抖-节流
节流
本质:指的是单位时间内,频繁触发同一个操作,只会触发1次( 上一次的业务没有结束的话 不允许开启下一次业务)
<script>
  // 开关
      let isLoadding = false; // 有没有请求在发送当中

      // 点击按钮的时候先判断 isLoadding true还是false
      //  true 请求在发送中  return
      //  false 没有请求
      //   先设置 isLoadding true
      //   发送请求出去
      //  请求回来了  设置 isLoadding = false

      document.querySelector('button').addEventListener('click', function () {
        if (isLoadding) {
          return;
        }

        isLoadding = true;

        // 发送请求的时候  禁用按钮
        // this.disabled=true;
        getData();
      });
      function getData(query = '') {
        console.log('请求发送出去');
        axios({
          method: 'get',
          url: 'http://www.itcbc.com:3006/api/getbooks' + query,
          // params:{},
        }).then((result) => {
          console.log('数据回来了');
          // document.querySelector('button').disabled=false
          isLoadding = false;
        });
      }
</script>
应用场景
使用场景 移动端分页 - 倒计时按钮 等等
防抖
本质:指的是频繁触发某一个操作,只能执行最后一次
<script>
    // 1,定义timeId
	let timeId
        keyword.addEventListener(`input`, function (e) {
          // 3. 清除之前的延时器
            clearTimeout(timeId)
          // 2. 创建延时器,并记录延时器的ID
            timeId = setTimeout(function () {
                let value = keyword.value.trim()
                let valuePush = `?bookname=${value}`
                getData(valuePush)
            }, 1000)
        })
</script>
应用场景
技术原理
1 用新的一次输入来清除上一次的延时器
2 同时开启一个新的延时器
同源策略&跨域(重点-面试常问)
同源
同源指的是两个URL地址具有相同的协议,主机名(域名),端口号一致
例如:下表给出了相对于 www.test.com/index.html 页面的 5 个同源检测结果
同源策略
同源策略(英文全称 Same origin policy)是浏览器提供的一个安全功能。
浏览器的同源策略规定:不允许非同源的 URL 之间进行资源的交互。
后台调用后台的资源是可以的,后端会有自己的方式来解决的
浏览器对跨域请求的拦截过程
浏览器允许发起跨域请求,但跨域请求回来的数据,会被浏览器拦截,无法在页面获取到数据
跨域
跨域:不同源就是跨域
出现跨域的根本原因:浏览器的同源策略不允许非同源的 URL进行资源交互
浏览器对跨域的拦截过程
本质:浏览器允许发起跨域请求,当时请求回来会被浏览器拦截,页面无法显示
突破跨域限制方案
JSONP和CORS是两种解决方案
注意:JSONP在实际开发很少用,CORS是主流解决方案
CORS
本质:是解决跨域数据请求的终极解决方案
注意:
1.需要浏览器和服务器同时支持下
2.浏览器支持CORS功能(主流浏览器全部支持)
3.服务器开启CORS功能(需要后端为借口开启CORS功能)
CORS 的两个主要优势
1、CORS 是真正的 Ajax 请求,支持 GET、POST、DELETE、PUT、PATCH 等这些常见的 Ajax 请求方式 2、只需要后端开启 CORS 功能即可,前端的代码无须做任何改动
JSONP
JSONP 是实现跨域数据请求的一种技术解决方案。它只支持 GET 请求,不支持 POST、DELETE 等其它请求。
跨域目的 :拿到后端的数据(前后端跨域 不同源 直接发送Ajax请求失败)
<script>
        function show(option){
            let str = option.message
            console.log(str);
        }
    </script>
<script src="http://www.itcbc.com:3006/api/getscript2"></script>
总结:
JSONP的底层实现原理: 在底层,用到了 属性!
1.script标签的src属性不受同源策略的影响 跨域
2.浏览器对script的支持:
允许它下载指定路径的JS代码(JS代码 由后端程序员来设定它的内容)
show({data:["a","b"]})=>show是后端命名的 show中传递了真正的数据
而且还会执行JS代码
前端需要自己来定义 show方法的内容 指我前端的业务逻辑
