

前言
在前面Android-UI绘制流程及原理中我们了解到View的绘制流程三大步骤:测量,布局,绘制,我们接着去看他们每一步又干了什么事情
UI绘制详细步骤
-
测量performMeasure
view.measure ---> view.onMeasure ---> view.setMeasuredDimension
--->setMeasuredDimensionRaw
-
布局performLayout
view.layout ---> view.onLayout
-
绘制performDraw
ViewRootImpl.draw(fullRedrawNeeded) ---> ViewRootImpl.drawSoftware
--->view.draw(Canvas)
performMeasure
首先我们打开ViewRootImpl的performMeasure方法
private void performMeasure(int childWidthMeasureSpec, int childHeightMeasureSpec) {
    //这里的view就是顶级的布局容器DecorView
    if (mView == null) {
        return;
    }
    Trace.traceBegin(Trace.TRACE_TAG_VIEW, "measure");
    try {
        mView.measure(childWidthMeasureSpec, childHeightMeasureSpec);
    } finally {
        Trace.traceEnd(Trace.TRACE_TAG_VIEW);
    }
}
然后打开mView.measure看看做了什么事情,发现他来到了View的measure方法。这是一个final类型的方法,表示不能对它进行一个重写。
public final void measure(int widthMeasureSpec, int heightMeasureSpec) {
        if (cacheIndex < 0 || sIgnoreMeasureCache) {
            onMeasure(widthMeasureSpec, heightMeasureSpec);
            mPrivateFlags3 &= ~PFLAG3_MEASURE_NEEDED_BEFORE_LAYOUT;
        } else {
            long value = mMeasureCache.valueAt(cacheIndex);
            setMeasuredDimensionRaw((int) (value >> 32), (int) value);
            mPrivateFlags3 |= PFLAG3_MEASURE_NEEDED_BEFORE_LAYOUT;
        }
}
看到了调用onMeasure方法
protected void onMeasure(int widthMeasureSpec, int heightMeasureSpec) {
    setMeasuredDimension(getDefaultSize(getSuggestedMinimumWidth(), widthMeasureSpec),
            getDefaultSize(getSuggestedMinimumHeight(), heightMeasureSpec));
}
看到它调用了一个setMeasuredDimension方法,我们继续点进去,发现它又调用了一个setMeasuredDimensionRaw方法
protected final void setMeasuredDimension(int measuredWidth, int measuredHeight) {
    ...
    setMeasuredDimensionRaw(measuredWidth, measuredHeight);
}
private void setMeasuredDimensionRaw(int measuredWidth, int measuredHeight) {
    mMeasuredWidth = measuredWidth;
    mMeasuredHeight = measuredHeight;

    mPrivateFlags |= PFLAG_MEASURED_DIMENSION_SET;
}
我们发现已经到头了,我们发现对成员变量mMeasuredWidth和mMeasuredHeight进行赋值,然后进行一个标志位的设置,然后进行保存。实际上就是确定控件的宽度和高度。那控件的宽高是怎么确定的。是通过MeasureSpec来进行设置的。
MeasureSpec
他是一个32位int的值。前两位表示测量模式(specMode),后30位表示测量的尺寸大小(specSize)
测量模式定义了三个这样的静态常量
//表示父容器不对view做任何限制,系统内部使用
public static final int UNSPECIFIED = 0 << MODE_SHIFT;
//父容器检测出view的大小,view的大小就是specSize 对应LayoutParams.MATCH_PARENT 或者是固定大小
public static final int EXACTLY     = 1 << MODE_SHIFT;
//父容器指定一个可用大小,view的大小不能超过这个值,对应LayoutParams.WRAP_CONTENT
public static final int AT_MOST     = 2 << MODE_SHIFT;
在这个类中,我们要关心以下几个方法:
/**
* 表示可以通过一个specMode和一个specSize打包生成一个MeasureSpec
*/
public static int makeMeasureSpec(@IntRange(from = 0, to = (1 << MeasureSpec.MODE_SHIFT) - 1) int size,
                                  @MeasureSpecMode int mode) {
  //false,看下面的实现
  if (sUseBrokenMakeMeasureSpec) {
        return size + mode;
    } else {
        return (size & ~MODE_MASK) | (mode & MODE_MASK);
    }
}
//通过传入一个MeasureSpec可以解包操作获取到specMode public static int getMode(int measureSpec) { //noinspection ResourceType return (measureSpec & MODE_MASK); }//通过传入一个MeasureSpec可以解包操作获取到specSize public static int getSize(int measureSpec) { return (measureSpec & ~MODE_MASK); }
那我们这个MeasureSpec是怎么确定的,我们继续看回一下ViewRootImpl中performMeasure对于childWidthMeasureSpec, childHeightMeasureSpec是怎么确定的:
int childWidthMeasureSpec = getRootMeasureSpec(mWidth, lp.width);
int childHeightMeasureSpec = getRootMeasureSpec(mHeight, lp.height);
performMeasure(childWidthMeasureSpec, childHeightMeasureSpec);
我们这两个参数是有getRootMeasureSpec计算出:
//第一个参数表示窗口的宽/高
//第二个参数表示本身view(在这里指的是顶层布局容器DecorView)的布局属性LayoutParams的宽/高
private static int getRootMeasureSpec(int windowSize, int rootDimension) {
    int measureSpec;
    switch (rootDimension) {

    //充满父容器
    case ViewGroup.LayoutParams.MATCH_PARENT:
        // Window can't resize. Force root view to be windowSize.
        measureSpec = MeasureSpec.makeMeasureSpec(windowSize, MeasureSpec.EXACTLY);
        break;
    //包裹类型
    case ViewGroup.LayoutParams.WRAP_CONTENT:
        // 可以缩小放大,但是最大的值不能超过windowSize
        measureSpec = MeasureSpec.makeMeasureSpec(windowSize, MeasureSpec.AT_MOST);
        break;
    default:
        // Window wants to be an exact size. Force root view to be that size.
        measureSpec = MeasureSpec.makeMeasureSpec(rootDimension, MeasureSpec.EXACTLY);
        break;
    }
    return measureSpec;
}
在此,我们可以做一个小的总结:
View的测量-确定DecorView的MeasureSpec
DecorView的MeasureSpec由窗口大小和自身的LayoutParams决定,遵守如下规则:
- LayoutParams.MATCH_PARENT:精准模式,窗口大小
- LayoutParams.WRAP_CONTENT:最大模式,最大为窗口大小
- 固定大小:精准模式,大小为LayoutParams的大小
我们现在知道了DecorView的MeasureSpec是怎么确定的了,我们接下来继续看回ViewRootImpl的performMeasure方法,里面执行view.measure ---> view.onMeasure。因为DecorView是继承FrameLayout。那我们看一下FrameLayout中的onMeasure方法:
protected void onMeasure(int widthMeasureSpec, int heightMeasureSpec) {
    int count = getChildCount();

    final boolean measureMatchParentChildren =
            MeasureSpec.getMode(widthMeasureSpec) != MeasureSpec.EXACTLY ||
            MeasureSpec.getMode(heightMeasureSpec) != MeasureSpec.EXACTLY;
    mMatchParentChildren.clear();

    int maxHeight = 0;
    int maxWidth = 0;
    int childState = 0;

  //for循环,遍历每一个子view
    for (int i = 0; i < count; i++) {
        final View child = getChildAt(i);
        if (mMeasureAllChildren || child.getVisibility() != GONE) {
            measureChildWithMargins(child, widthMeasureSpec, 0, heightMeasureSpec, 0);
            final LayoutParams lp = (LayoutParams) child.getLayoutParams();
            maxWidth = Math.max(maxWidth,
                    child.getMeasuredWidth() + lp.leftMargin + lp.rightMargin);
            maxHeight = Math.max(maxHeight,
                    child.getMeasuredHeight() + lp.topMargin + lp.bottomMargin);
            childState = combineMeasuredStates(childState, child.getMeasuredState());
            if (measureMatchParentChildren) {
                if (lp.width == LayoutParams.MATCH_PARENT ||
                        lp.height == LayoutParams.MATCH_PARENT) {
                    mMatchParentChildren.add(child);
                }
            }
        }
    }

    // Account for padding too
    maxWidth += getPaddingLeftWithForeground() + getPaddingRightWithForeground();
    maxHeight += getPaddingTopWithForeground() + getPaddingBottomWithForeground();

    // Check against our minimum height and width
    maxHeight = Math.max(maxHeight, getSuggestedMinimumHeight());
    maxWidth = Math.max(maxWidth, getSuggestedMinimumWidth());

    // Check against our foreground's minimum height and width
    final Drawable drawable = getForeground();
    if (drawable != null) {
        maxHeight = Math.max(maxHeight, drawable.getMinimumHeight());
        maxWidth = Math.max(maxWidth, drawable.getMinimumWidth());
    }

    setMeasuredDimension(resolveSizeAndState(maxWidth, widthMeasureSpec, childState),
            resolveSizeAndState(maxHeight, heightMeasureSpec,
                    childState << MEASURED_HEIGHT_STATE_SHIFT));

    count = mMatchParentChildren.size();
    if (count > 1) {
        for (int i = 0; i < count; i++) {
            final View child = mMatchParentChildren.get(i);
            final MarginLayoutParams lp = (MarginLayoutParams) child.getLayoutParams();

            final int childWidthMeasureSpec;
            if (lp.width == LayoutParams.MATCH_PARENT) {
                final int width = Math.max(0, getMeasuredWidth()
                        - getPaddingLeftWithForeground() - getPaddingRightWithForeground()
                        - lp.leftMargin - lp.rightMargin);
                childWidthMeasureSpec = MeasureSpec.makeMeasureSpec(
                        width, MeasureSpec.EXACTLY);
            } else {
                childWidthMeasureSpec = getChildMeasureSpec(widthMeasureSpec,
                        getPaddingLeftWithForeground() + getPaddingRightWithForeground() +
                        lp.leftMargin + lp.rightMargin,
                        lp.width);
            }

            final int childHeightMeasureSpec;
            if (lp.height == LayoutParams.MATCH_PARENT) {
                final int height = Math.max(0, getMeasuredHeight()
                        - getPaddingTopWithForeground() - getPaddingBottomWithForeground()
                        - lp.topMargin - lp.bottomMargin);
                childHeightMeasureSpec = MeasureSpec.makeMeasureSpec(
                        height, MeasureSpec.EXACTLY);
            } else {
                childHeightMeasureSpec = getChildMeasureSpec(heightMeasureSpec,
                        getPaddingTopWithForeground() + getPaddingBottomWithForeground() +
                        lp.topMargin + lp.bottomMargin,
                        lp.height);
            }

            child.measure(childWidthMeasureSpec, childHeightMeasureSpec);
        }
    }
}
上面有一个for循环,遍历每一个子view,然后调用measureChildWithMargins方法,点进去
protected void measureChildWithMargins(View child,
        int parentWidthMeasureSpec, int widthUsed,
        int parentHeightMeasureSpec, int heightUsed) {
    final MarginLayoutParams lp = (MarginLayoutParams) child.getLayoutParams();

    final int childWidthMeasureSpec = getChildMeasureSpec(parentWidthMeasureSpec,
            mPaddingLeft + mPaddingRight + lp.leftMargin + lp.rightMargin
                    + widthUsed, lp.width);
    final int childHeightMeasureSpec = getChildMeasureSpec(parentHeightMeasureSpec,
            mPaddingTop + mPaddingBottom + lp.topMargin + lp.bottomMargin
                    + heightUsed, lp.height);

    child.measure(childWidthMeasureSpec, childHeightMeasureSpec);
}
发现这个方法会获取child的MeasureSpec,然后最后调用child.measure方法,测量子控件的宽高。这里我们关注一下上面getChildMeasureSpec获取子控件的测量规格。这是如何实现的,我们点进去:
//第一个参数表示父容器的MeasureSpec
//第二个参数表示父容器当前已经使用的空间
//第三个参数表示子控件的布局参数LayoutParams的宽高
public static int getChildMeasureSpec(int spec, int padding, int childDimension) {
    //获取父容器的Mode
    int specMode = MeasureSpec.getMode(spec);
    //获取父容器的size
    int specSize = MeasureSpec.getSize(spec);

    int size = Math.max(0, specSize - padding);

    int resultSize = 0;
    int resultMode = 0;

    switch (specMode) {
    //如果父容器是精确模式
    case MeasureSpec.EXACTLY:
        //如果子控件布局参数LayoutParams是固定大小
        if (childDimension >= 0) {
            resultSize = childDimension;//子控件Size大小就是那个固定大小
            resultMode = MeasureSpec.EXACTLY;//子控件的模式就是精确模式
        }
        //如果子控件布局参数LayoutParams是MATCH_PARENT
        else if (childDimension == LayoutParams.MATCH_PARENT) {
            resultSize = size;//子控件Size大小就是父容器的size
            resultMode = MeasureSpec.EXACTLY;//子控件的模式就是精确模式
        }
         //如果子控件布局参数LayoutParams是WRAP_CONTENT
        else if (childDimension == LayoutParams.WRAP_CONTENT) {
          //子控件Size大小不能超过父容器的size,由于我们不能确定最终的宽高,所以暂时赋值一个最大size(父容器的size)
            resultSize = size;
            resultMode = MeasureSpec.AT_MOST;//子控件的模式就是最大模式
        }
        break;

    //如果父容器是最大模式,说明父容器目前仍然不知道他自己现在的宽高
    case MeasureSpec.AT_MOST:
        //如果子控件布局参数LayoutParams是固定大小
        if (childDimension >= 0) {
            resultSize = childDimension;//子控件Size大小就是那个固定大小
            resultMode = MeasureSpec.EXACTLY;//子控件的模式就是精确模式
        }
        //如果子控件布局参数LayoutParams是MATCH_PARENT
        else if (childDimension == LayoutParams.MATCH_PARENT) {
            resultSize = size;//子控件Size大小就是父容器的size
            resultMode = MeasureSpec.AT_MOST;//子控件的模式就是最大模式
        }
        //如果子控件布局参数LayoutParams是WRAP_CONTENT
        else if (childDimension == LayoutParams.WRAP_CONTENT) {
         //子控件Size大小不能超过父容器的size,由于我们不能确定最终的宽高,所以暂时赋值一个最大size(父容器的size)
            resultSize = size;
            resultMode = MeasureSpec.AT_MOST;//子控件的模式就是最大模式
        }
        break;

    // Parent asked to see how big we want to be
    case MeasureSpec.UNSPECIFIED:
        if (childDimension >= 0) {
            // Child wants a specific size... let him have it
            resultSize = childDimension;
            resultMode = MeasureSpec.EXACTLY;
        } else if (childDimension == LayoutParams.MATCH_PARENT) {
            // Child wants to be our size... find out how big it should
            // be
            resultSize = View.sUseZeroUnspecifiedMeasureSpec ? 0 : size;
            resultMode = MeasureSpec.UNSPECIFIED;
        } else if (childDimension == LayoutParams.WRAP_CONTENT) {
            // Child wants to determine its own size.... find out how
            // big it should be
            resultSize = View.sUseZeroUnspecifiedMeasureSpec ? 0 : size;
            resultMode = MeasureSpec.UNSPECIFIED;
        }
        break;
    }
  //子控件的size和mode确定之后调用MeasureSpec.makeMeasureSpec获取子控件的测量规格,返回上层方法
    return MeasureSpec.makeMeasureSpec(resultSize, resultMode);
}
-
在此我们可以总结一波View的测量-确定View的MeasureSpec
View的MeasureSpec由父容器的MeasureSpec和自身的LayoutParams决定(和DecorView不同)
ChildLayoutParams\parentMeasureSpec EXACTLY AT_MOST UNSPECIFIED dp/px EXACTLY/childSize EXACTLY/childSize EXACTLY/childSize MATCH_PARENT EXACTLY/parentSize AT_MOST/parentSize UNSPECIFIED/0 WRAP_CONTENT AT_MOST/parentSize AT_MOST/parentSize UNSPECIFIED/0 用文字表达为:
- 子View写死宽高:测量模式不受父View影响,全都为EXACTLY,宽高为写死的宽高
- 子View没有写死宽高:如果父View都为AT_MOST,子View想都别想还是为AT_MOST,如果父View为EXACTLY且子View的LayoutParams为match_parent,才为EXACTLY。宽高都为父View剩下的区域。这就很好的明白了为什么我们自定义View时,如果没对View的宽高进行处理,View即使是wrap_content也会撑满整个屏幕了。
当FrameLayout中的onMeasure测量完子控件的测量规格后,需要获取子控件最右边和最底部,进而知道自身的宽高

  // Account for padding too
    maxWidth += getPaddingLeftWithForeground() + getPaddingRightWithForeground();
    maxHeight += getPaddingTopWithForeground() + getPaddingBottomWithForeground();

    // 获取是否设置最小高度
    maxHeight = Math.max(maxHeight, getSuggestedMinimumHeight());
   //获取是否设置最小宽度度
    maxWidth = Math.max(maxWidth, getSuggestedMinimumWidth());

    // Check against our foreground's minimum height and width
    final Drawable drawable = getForeground();
    if (drawable != null) {
        maxHeight = Math.max(maxHeight, drawable.getMinimumHeight());
        maxWidth = Math.max(maxWidth, drawable.getMinimumWidth());
    }

    setMeasuredDimension(resolveSizeAndState(maxWidth, widthMeasureSpec, childState),
            resolveSizeAndState(maxHeight, heightMeasureSpec,
                    childState << MEASURED_HEIGHT_STATE_SHIFT));
这里我们来总结一下measure的流程
ViewGroup measure ---> onMeasure(测量子控件的宽高) --->setMeasuredDimension
---> setMeasuredDimensionRaw(保存自己的宽高)
View measure ---> onMeasure ---> setMeasuredDimension
---> setMeasuredDimensionRaw(保存自己的宽高)
在此,当View的OnMeasure方法,我们要注意
protected void onMeasure(int widthMeasureSpec, int heightMeasureSpec) {
    setMeasuredDimension(getDefaultSize(getSuggestedMinimumWidth(), widthMeasureSpec),
            getDefaultSize(getSuggestedMinimumHeight(), heightMeasureSpec));
}
里面有一个getDefaultSize方法
public static int getDefaultSize(int size, int measureSpec) {
    int result = size;
    int specMode = MeasureSpec.getMode(measureSpec);
    int specSize = MeasureSpec.getSize(measureSpec);

    switch (specMode) {
    case MeasureSpec.UNSPECIFIED:
        result = size;
        break;
    case MeasureSpec.AT_MOST:
    case MeasureSpec.EXACTLY:
        result = specSize;
        break;
    }
    return result;
}
我们看到specMode无论是AT_MOST还是EXACTLY,View的测量过程中,他的测量的尺寸都赋值为了我们测量规格的size,我们根据之前说的,这个规格的size都赋值成了父容器剩余的空间。我们就能明白,在自定义view的时候如果不重写onMeasure方法,在xml布局中写MATCH_PARENT,WRAP_CONTENT效果是一样的。因为MATCH_PARENT对应EXACTLY,WRAP_CONTENT对应AT_MOST,在上面代码中我们发现都是返回父容器剩余的空间大小。
performLayout
View的布局
- 调用View.layout确定自身的位置,即确定mLeft,mTop,mRight,mBottom的值
- 如果是ViewGroup类型,需要调用onLayout确定子View的位置
接下来我们还是源码分析,我们来到ViewRootImpl的performLayout方法
//第一个参数:顶层布局容器的布局属性
//第二个参数,顶层布局的宽度
//第三个参数,顶层布局的高度
performLayout(lp, mWidth, mHeight);
现在点进去performLayout这个方法
private void performLayout(WindowManager.LayoutParams lp, int desiredWindowWidth,
        int desiredWindowHeight) {

    final View host = mView;
    if (host == null) {
        return;
    }
    //host就是DecorView
    //host.getMeasuredWidth()测量宽度
    //host.getMeasuredHeight()测量高度
    host.layout(0, 0, host.getMeasuredWidth(), host.getMeasuredHeight());
}
我们点进去host.layout方法,我们发现来到了view的layout方法
public void layout(int l, int t, int r, int b) {
   ...
    int oldL = mLeft;
    int oldT = mTop;
    int oldB = mBottom;
    int oldR = mRight;
    setFrame()
  ...
onLayout(changed, l, t, r, b);
  ...
}
发现这个方法就是确定上下左右的值,通过setFrame()方法,那我们就自己布局成功。然后还有子类的onLayout方法需要实现。如果你是一个view,那么这个方法可以不实现。如果是viewgroup。则需要实现。
performDraw
老规矩,找到performDraw。里面有一个draw方法
boolean canUseAsync = draw(fullRedrawNeeded);
打开这个方法,里面还有一个drawSoftware方法。
里面对应一个mView.draw(canvas)方法。
里面就是执行绘制的具体步骤
①、绘制视图的背景;
②、保存画布的图层(Layer)
③、绘制View的内容
④、绘制View子视图(dispatchDraw),如果没有就不用
⑤、还原图层(Layer)
⑥、绘制滚动条
我们接下来看一下ViewGroup的dispatchDraw()方法
for (int i = 0; i < childrenCount; i++) {
    while (transientIndex >= 0 && mTransientIndices.get(transientIndex) == i) {
        final View transientChild = mTransientViews.get(transientIndex);
        if ((transientChild.mViewFlags & VISIBILITY_MASK) == VISIBLE ||
                transientChild.getAnimation() != null) {
            more |= drawChild(canvas, transientChild, drawingTime);
        }
        transientIndex++;
        if (transientIndex >= transientCount) {
            transientIndex = -1;
        }
    }

    final int childIndex = getAndVerifyPreorderedIndex(childrenCount, i, customOrder);
    final View child = getAndVerifyPreorderedView(preorderedList, children, childIndex);
    if ((child.mViewFlags & VISIBILITY_MASK) == VISIBLE || child.getAnimation() != null) {
        more |= drawChild(canvas, child, drawingTime);
    }
}
可以看到他会遍历子view执行drawChild方法
protected boolean drawChild(Canvas canvas, View child, long drawingTime) {
    return child.draw(canvas, this, drawingTime);
}
由此可见,view的绘制也是从上到下进行递归调用。
常见问题
1. 首次 View 的绘制流程是在什么时候触发的?
ActivityThread.handleResumeActivity ---> wm.addView ---> WindowManagerImpl.addView -> WindowManagerGlobal.addView -> ViewRootImpl.setView -> ViewRootImpl.requestLayout 就触发了第一次 View 的绘制。
2. ViewRootImpl 创建的时机?
ViewRootImpl 也是在 WindowManagerGlobal.addView 里创建的。
3.ViewRootImpl 和 DecorView 的关系是什么?
// ViewRootImpl.setView
    public void setView(View view, WindowManager.LayoutParams attrs, View panelParentView) {
      requestLayout();
      // ...
      // 这里的 view 是 DecorView
      view.assignParent(this);
    }
接着上面的代码看,在 ViewRootImpl.setView 里,通过 DecorView.assignParent 把 ViewRootImpl 设置为 DecorView 的 parent。
所以 ViewRootImpl 和 DecorView 的关系就是 ViewRootImpl 是 DecorView 的 parent。
因为 DecorView 是我们布局的顶层,现在我们就知道层层调用 requestLayout 等方法是怎么调用到 ViewRootImpl 里的了。
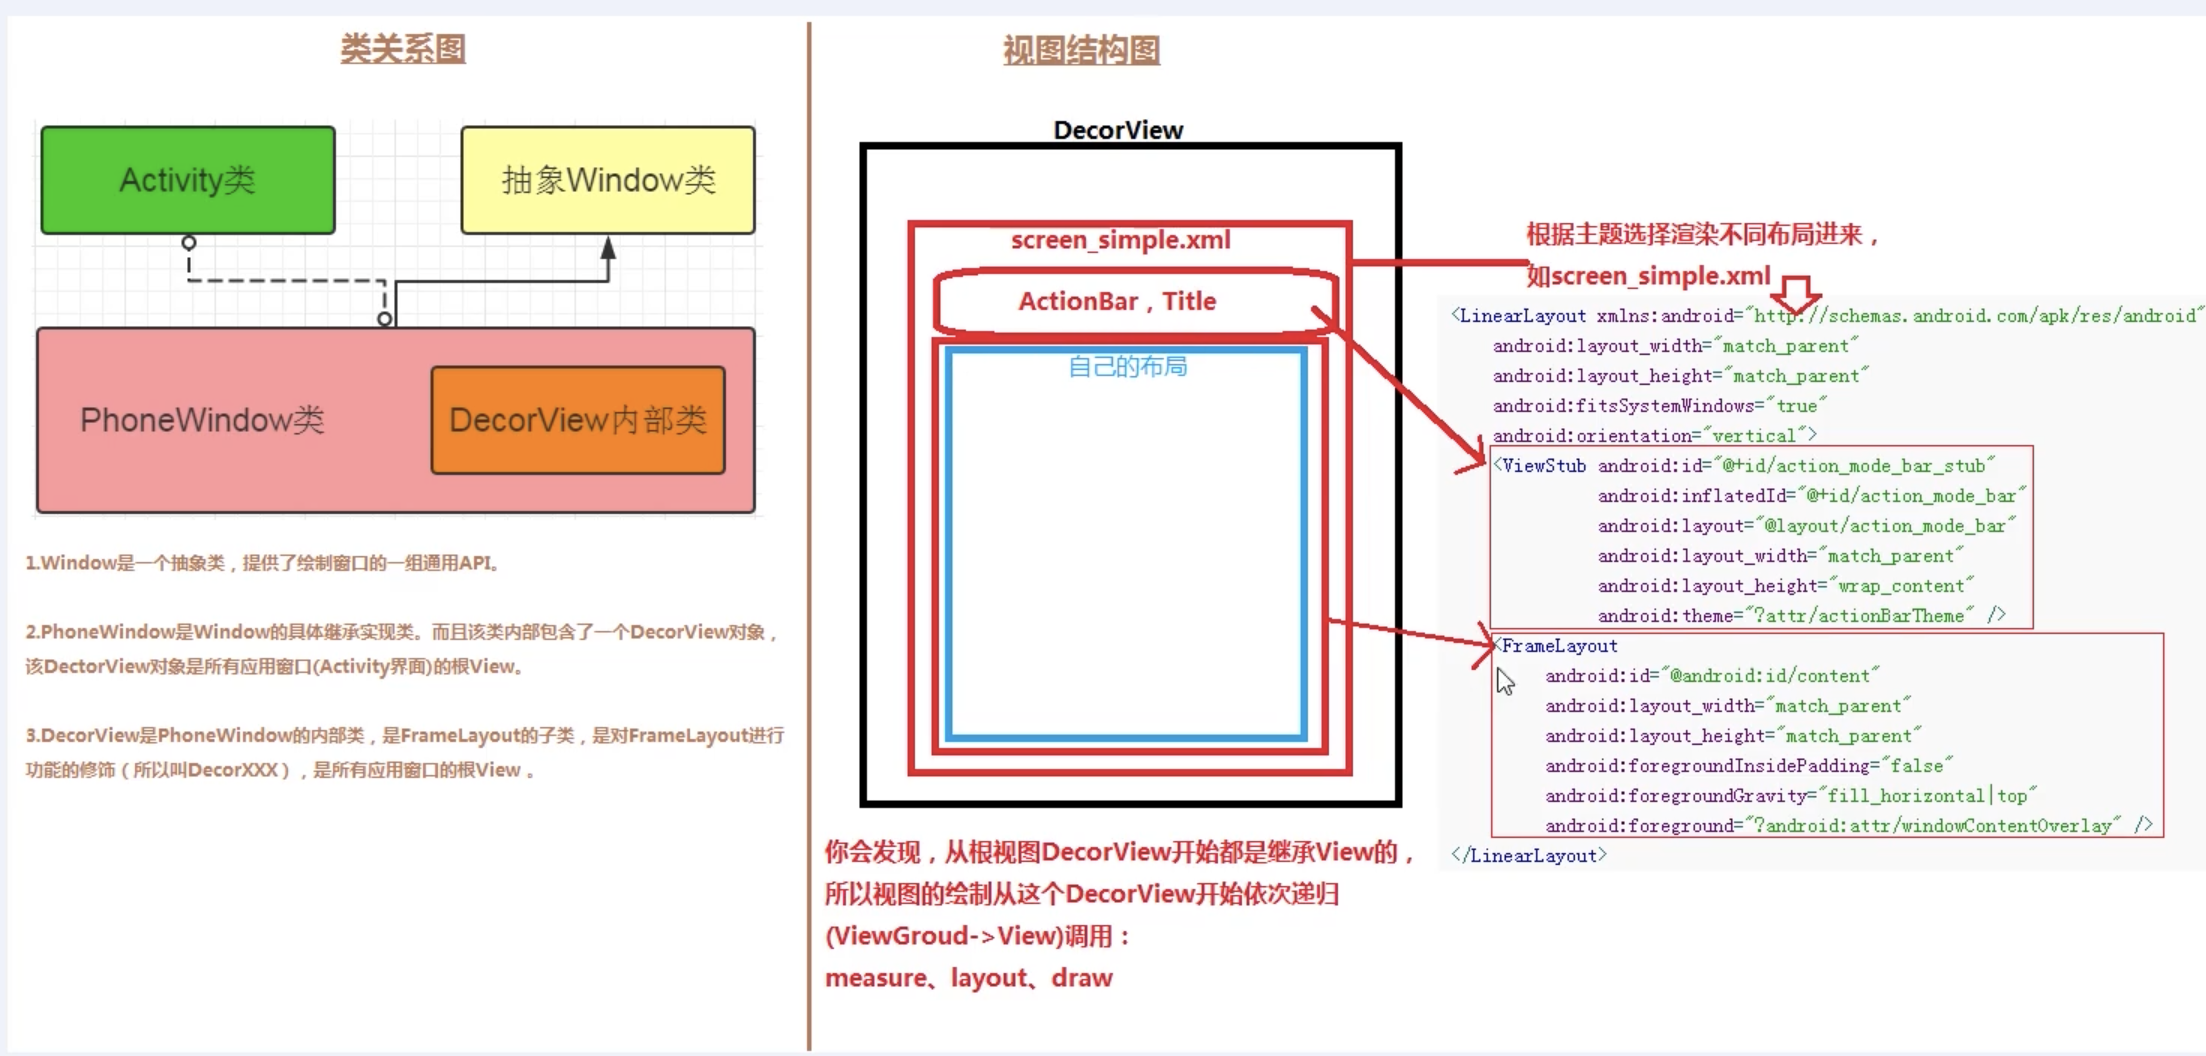
4.DecorView 的布局是什么样的?
5.DecorView 的创建时机?
Activity.setContentView -> PhoneWindow.setContentView -> installDecor
6.setContentView 的流程
setContentView 流程比较简单,会调用 PhoneWindow.setContentView。
其中做的事情是两个:
- 创建 DecorView
- 根据 layoutResId 创建 View 并添加到 DecorView 中
7.LayoutInflate 的流程
LayoutInflate.inflate 最终是调用 createViewFromTag 从 xml 生成 View
8. Activity、PhoneWindow、DecorView、ViewRootImpl 的关系?
其实上面的问题中,我们经常会说到 PhoneWindow 这个角色,PhoneWindow 其实是 Window 的唯一子类,是 Activity 和 View 交互系统的中间层,而 DecorView 是整个 View 层级的最顶层,ViewRootImpl 是 DecorView 的 parent,但是他并不是一个真正的 View,只是继承了 ViewParent 接口,用来掌管 View 的各种事件,包括 requestLayout、invalidate、dispatchInputEvent 等等。
9. PhoneWindow 的创建时机?
Activity.attach 里创建的,而 Activity.attach 又是在 ActivityThread.performLaunchActivity 里创建的。
10.如何触发重新绘制?
requestLayout 和 invalidate。
11. requestLayout 和 invalidate 的区别
-
requestLayout
requestLayout会直接递归调用父窗口的requestLayout,直到ViewRootImpl,然后触发peformTraversals,由于mLayoutRequested为true,会导致onMeasure和onLayout被调用。不一定会触发OnDraw。只有 flag 被设置为 PFLAG_DIRTY_OPAQUE 才会进行绘制。这也就是大家经常说的 requestLayout 不会引发 draw。
-
invalidate
view的invalidate不会导致ViewRootImpl的invalidate被调用,而是递归调用父view的invalidateChildInParent,直到ViewRootImpl的invalidateChildInParent,然后触发peformTraversals,会导致当前view被重绘,由于mLayoutRequested为false,不会导致onMeasure和onLayout被调用,而OnDraw会被调用
-
postInvalidate
postInvalidate是在非UI线程中调用,invalidate则是在UI线程中调用。
requestLayout 是用来设置 FORCE_LAYOUT 标志,invalidate 用来设置 dirty 标志。所以 requestLayout 只会触发 measure 和 layout,invalidate 只会触发 draw。
12.为什么onCreate获取不到View的宽高
Activity在执行完oncreate,onResume之后才创建ViewRootImpl,ViewRootImpl进行View的绘制工作调用链
startActivity->ActivityThread.handleLaunchActivity->onCreate ->完成DecorView和Activity的创建->handleResumeActivity->onResume()->DecorView添加到WindowManager->ViewRootImpl.performTraversals()方法,测量(measure),布局(layout),绘制(draw), 从DecorView自上而下遍历整个view树
13.在Activity中获取某个View的宽高有几种方法
-
Activity/View#onWindowFocusChanged:此时View已经初始化完毕,当Activity的窗口得到焦点和失去焦点时均会被调用一次,如果频繁地进行onResume和onPause,那么onWindowFocusChanged也会被频繁地调用。
-
view.post(runnable): 通过post将runnable放入ViewRootImpl的RunQueue中,RunQueue中runnable最后的执行时机,是在下一个performTraversals到来的时候,也就是view完成layout之后的第一时间获取宽高。
-
ViewTreeObserver#addOnGlobalLayoutListener:当View树的状态发生改变或者View树内部的View的可见性发生改变时,onGlobalLayout方法将被回调。
-
View.measure(int widthMeasureSpec, int heightMeasureSpec): match_parent 直接放弃,无法measure出具体的宽/高。原因很简单,根据view的measure过程,构造此种MeasureSpec需要知道parentSize,即父容器的剩余空间,而这个时候我们无法知道parentSize的大小,所以理论上不可能测量处view的大小。
14. View#post与Handler#post的区别
public boolean post(Runnable action) {
    final AttachInfo attachInfo = mAttachInfo;
    if (attachInfo != null) {
        return attachInfo.mHandler.post(action);
    }

    // Postpone the runnable until we know on which thread it needs to run.
    // Assume that the runnable will be successfully placed after attach.
    getRunQueue().post(action);
    return true;
}
对于View#post当View已经attach到window,直接调用UI线程的Handler发送runnable。如果View还未attach到window,将runnable放入ViewRootImpl的RunQueue中,而不是通过MessageQueue。RunQueue的作用类似于MessageQueue,只不过这里面的所有runnable最后的执行时机,是在下一个performTraversals到来的时候,也就是view完成layout之后的第一时间获取宽高,MessageQueue里的消息处理的则是下一次loop到来的时候。
15. Android中非UI主线程能不能操作UI?
从出错的堆栈信息中可以异常看到是 ViewRootImpl#checkThread() 方法中抛出的。
void checkThread() {
    if (mThread != Thread.currentThread()) {
        throw new CalledFromWrongThreadException(
                "Only the original thread that created a view hierarchy can touch its views.");
    }
}
在 ViewRootImpl 还没创建出来之前
- UI 修改的操作没有线程限制。
在 ViewRootImpl 创建完成之后
- 保证「创建 ViewRootImpl 的操作」和「执行修改 UI 的操作」在同一个线程即可。也就是说,要在同一个线程调用 ViewManager#addView 和 ViewManager#updateViewLayout 的方法。
- 注:ViewManager 是一个接口,WindowManger 接口继承了这个接口,我们通常都是通过 WindowManger(具体实现为 WindowMangerImpl) 进行 view 的 add remove update 操作的。
- 对应的线程需要创建 Looper 并且调用 Looper#loop 方法,开启消息循环。
