

本文已参与「新人创作礼」活动,一起开启掘金创作之路。
一、步骤
项目展示
1、脚手架VueCli2
vue-cli脚手架配置项目
首先 vue init webpack note-blog
然后 cd note-blog
最后 npm run dev,启动项目。目录结构在下面
2、测试组件
2.1
在note-blog\src\components下面创建新组件,注意组件名怎么命名的。
2.2
填写代码。更改template里面div的class名,和组件名相辅相成;script里面name也是一样
<template>
<div class="add-blog">
<h1>add-blog</h1>
</div>
</template>
<script>
export default {
name: "add-blog",
data() {
return {};
},
};
</script>
<style scoped>
</style>
2.3
在父组件App.vue里面引入若干子组件
添加下面代码。template里面div的id名,和组件名相辅相成,添加路由组件;script里面name也是一样,另外引入需要的子组件
<template>
<div id="app">
<add-blog-vue></add-blog-vue>
</div>
</template>
<script>
import AddBlogVue from "./components/AddBlog.vue";
export default {
name: "App",
components: {
AddBlogVue,
},
};
</script>
运行命令 npm run dev,得到下面的图
3、添加博客,post数据
3.1页面
第一个组件
创建组件,美化组件页面内容
3.1.1
先简单实现页面主要组成
<template>
<div class="add-blog">
<h1>添加博客</h1>
<form>
<label for="title">博客标题</label>
<input type="text" v-model="blog.title" required />
<label for="content">博客内容</label>
<textarea v-model="blog.content" cols="30" rows="10"></textarea>
</form>
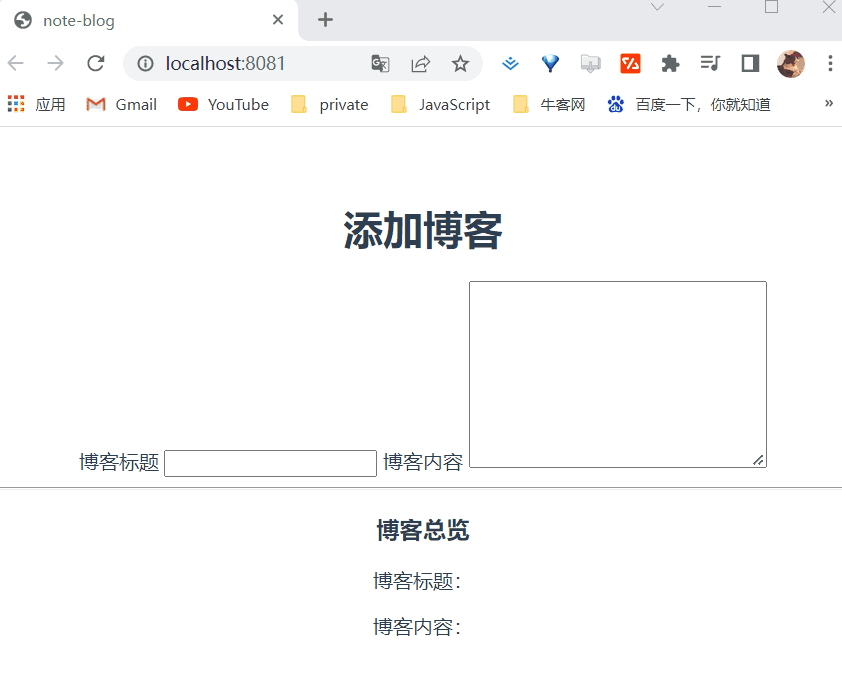
<hr />
<div id="preview">
<h3>博客总览</h3>
<p>博客标题:{{ blog.title }}</p>
<p>博客内容:</p>
<p>{{ blog.content }}</p>
</div>
</div>
</template>
<script>
export default {
name: "add-blog",
data() {
return {
blog: {
title: "",
content: "",
},
};
},
};
</script>
tips:input标签总和v-model搭配,双向数据绑定
3.1.2
完善。
1、ul>li,select>option标签总和v-for搭配,循环
2、button标签总和v-on:click.prevent="post"事件搭配。prevent防止刷新
3、post请求,需要模块下载 npm install vue-resource --save ,在index.js里面模块,像引入App.vue模块一样
<template>
<div id="checkboxes">
<label>Vue.js</label>
<input type="checkbox" value="Vue.js" v-model="blog.categories" />
<label>Node.js</label>
<input type="checkbox" value="Node.js" v-model="blog.categories" />
<label>React.js</label>
<input type="checkbox" value="React.js" v-model="blog.categories" />
<label>Angular.js</label>
<input type="checkbox" value="Angular.js" v-model="blog.categories" />
<label for="author">作者:</label>
<select v-model="blog.author">
<option v-for="(author, index) in authors" :key="index">
{{ author }}
</option>
</select>
</div>
<button v-on:click.prevent="post">添加博客</button>
<hr />
<div id="preview">
<h3>博客总览</h3>
<p>博客标题:{{ blog.title }}</p>
<p>博客内容:</p>
<p>{{ blog.content }}</p>
<p>博客分类:</p>
<ul>
<li v-for="(category, index) in blog.categories" :key="index">
{{ category }}
</li>
</ul>
<p>作者:{{ blog.author }}</p>
</div>
</template>
<script>
methods:{
post:function(){
this.$http
.post("http://jsonplaceholder.typicode.com/posts", {
title: this.blog.title,
body: this.blog.content,
userId: 1,
})
.then(function (data) {
console.log(data);
});
}
}
</script>
4、最后v-if设置什么情况下显示,什么情况下不显示
3.1.3
正式美化
4、展示博客组件
4.1
第二个组件
步骤和添加博客组件一致
4.2
实现请求 this.$http.get("网址",{}).then((data)=>{console.log(data)})
<template>
<div id="show-blogs">
<h1>show-blogs</h1>
<!-- v-for="(blog, index) in blogs"遍历请求得到的数据 -->
<div class="single-blog" v-for="(blog, index) in blogs" :key="index">
<h2>{{ blog.title }}</h2>
<article>
{{ blog.body }}
</article>
</div>
</div>
</template>
<script>
export default {
name: "show-blogs",
data() {
return {
blogs: [],
};
},
created() {
this.$http.get("http://jsonplaceholder.typicode.com/posts").then((data) => {
console.log(data);
this.blogs = data.body.slice(0, 20);
console.log(this.blogs);
});
},
};
</script>
<style scoped>
#show-blogs {
max-width: 800px;
margin: 0 auto;
}
.single-blog {
padding: 20px;
margin: 20px 0;
box-sizing: border-box;
background: #eee;
}
</style>
4.3
【tip】请求的本地数据文件,只能放在static文件夹底下
5、钩子函数
5.1
自定义指令
5.2
5.2.1属性
Vue.directive('rainbow', {
  bind(el, binding, vnode) {
    el.style.color = "#" + Math.random().toString(16).slice(2, 8)
  }
})
5.2.2方法
Vue.directive('theme', {
  bind(el, binding, vnode) {
    if (binding.value == 'wide') {
      el.style.maxWidth = "1260px"
    } else if (binding.value == 'narrow') {
      el.style.maxWidth = "560px"
    } else if (binding.value == 'middle') {
      el.style.maxWidth = "800px"
    }
  }
})
5.2.3方法的属性
Vue.directive('theme', {
  bind(el, binding, vnode) {
    if (binding.value == 'wide') {
      el.style.maxWidth = "1260px"
    } else if (binding.value == 'narrow') {
      el.style.maxWidth = "560px"
    }
    // ShowBlogs的自定义属性v-theme 的参数column
    if (binding.arg == 'column') {
      el.style.background = "#667cc"
      el.style.padding = '20px'
    }
  }
})
6、过滤器方法
6.1
自定义过滤器
<h2 v-rainbow>{{ blog.title | to-uppercase}}</h2>
<article v-rainbow>
    {{ blog.body | snippet }}
</article>
6.2
实现过滤器
// value接收"to-uppercase"的值,并返回toUpperCase()
Vue.filter("to-uppercase", function (value) {
  return value.toUpperCase();
})
Vue.filter("snippet", function (value) {
  return value.slice(0, 100) + "...";
})
6.3
什么时候需要使用过滤器方法?
6.4
实现搜索方法
computed: {
    filteredBlogs: function () {
        return this.blogs.filter((blog) => {
            //   this.blogs.filter过滤的方法返回布尔值,ES6函数match(this.search)
            return blog.title.match(this.search);
        });
    },
},
7、路由
7.1
2022年2月7日以后,vue-router的默认安装版本为版本4,即vue-router4只能用在vue3中,vue-router3才能用在vue2中
1、下载路由模块 npm i vue-router@3.2.0
2、引入路由模块
3、创建路由 router.js
import ShowBlogs from './components/ShowBlogs'
import AddBlog from './components/AddBlog'

export default [
    { path: "/", component: ShowBlogs },
    { path: "/add", component: AddBlog }
]
4、修改路由view
8、头部组件
8.1 制作头部
第三个组件
步骤和添加博客组件一致
创建头部组件,App.vue引入头部组件,美化样式
<template>
  <nav>
    <ul>
      <li>
        <router-link to="/" exact>博客</router-link>
        <router-link to="/add" exact>写博客</router-link>
      </li>
    </ul>
  </nav>
</template>

<script>
export default {
  name: "blog-header",
};
</script>

<style scoped>
ul {
  list-style-type: none;
  margin: 0;
  text-align: center;
}
li {
  display: inline-block;
  margin: 0 10px;
}
a {
  text-decoration: none;
  color: #fff;
  padding: 12px;
  border-radius: 5px;
}
nav {
  background: crimson;
  padding: 30px 0;
  margin-bottom: 40px;
}
.router-link-active {
  background: rgba(255, 255, 255, 0.8);
  color: #444;
}
</style>
8.2 路由参数
8.2.1 单条博客组件
第四个组件
<template>
  <div id="single-blog">
    <h1 v-rainbow>{{ blog.title }}</h1>
    <article v-rainbow>{{ blog.body }}</article>
  </div>
</template>

<script>
export default {
  name: "single-blog",
  data() {
    return {
      id: this.$route.params.id,
      // 点击进入成为单条博客
      blog: {},
    };
  },
  created() {
    this.$http
      .get("http://jsonplaceholder.typicode.com/posts/" + this.id)
      .then((data) => {
        // console.log(data);
        this.blog = data.body;
      });
  },
  directives: {
    rainbow: {
      bind(el, binding, vnode) {
        el.style.color = "#" + Math.random().toString(16).slice(2, 8);
      },
    },
  },
};
</script>

<style scoped>
#single-blog {
  max-width: 800px;
  margin: 0 auto;
  padding: 20px;
  background: #eee;
  border: 1px dotted #aaa;
}
</style>
