

👏🏻欢迎来到 CoderStan 的手写 Mini-Vue3 专栏,和我一起✍🏻实现自己的 Mini-Vue3。这是专栏中的第五篇文章,通过这篇文章,你将能够理解 Vue3 更新逻辑的实现原理,包括面试必考的 diff 算法的完整实现。(🙏🏻感谢 阿崔cxr 的 mini-vue)
有不足的地方欢迎大家评论留下意见或建议,如果觉得还不错还请👍🏻支持一下,想看其他部分的文章可以关注我或者关注我的手写 Mini-Vue3专栏,想看逐行注释的源码欢迎访问 GitHub 仓库,也请⭐支持一下。
5. 实现 runtime-core 的更新
5.1 实现 Element 更新流程
① happy path
在视图中进行操作触发setup返回对象中的响应式数据修改时,会进行更新,根据修改后的数据生成新的 VNode 并与原来的 VNode 进行对比确定需要更新的部分,再将原来的相应部分替换为新的部分。
在实现 Element 更新流程之前,首先对src/reactivity/src目录下的index.ts文件做如下修改,将ref导出:
/* src/reactivity/src/index.ts */

export { ref, proxyRefs } from './ref'
然后在example目录下创建ready-to-update-Element文件夹,在其中放置 Element 更新流程的测试相关文件,包括三个文件:index.html、main.js和App.js,其中index.html和main.js文件中的内容与之前的测试相同,App.js文件中的内容如下:
export const App = {
  name: 'App',
  setup() {
    // 响应式数据
    const count = ref(0)

    const onClick = () => {
      // 修改响应式数据
      count.value++
    }

    return {
      count,
      onClick
    }
  },
  render() {
    return h(
      'div',
      {
        id: 'root'
      },
      [
        h('p', {}, `count: ${this.count}`),
        h(
          'button',
          {
            onClick: this.onClick
          },
          'plus 1'
        )
      ]
    )
  }
}
② 实现
在render函数中使用响应式数据,当在视图中进行操作触发响应式数据修改时则再次调用render函数获取新 VNode 树并调用patch方法递归地处理。
首先完善src/runtime-core目录下的component.ts文件中的createComponentInstance函数,在组件实例对象中加入 subTree property 和 isMounted property,分别用于保存 VNode 树和表明对 VNode 树的操作是初始化或更新:
/* component.ts */

export function createComponentInstance(vnode, parent) {
  const component = {
    vnode,
    type: vnode.type,
    setupState: {},
    props: {},
    slots: {},
    provides: parent ? parent.provides : {},
    parent,
    subTree: {},
    proxy: null,
    isMounted: false,
    emit: () => {}
  }

  /* 其他代码 */
}
接下来完善src/runtime-core目录下的renderer.ts文件中的patch方法,接受旧 VNode 树作为第一个参数,再将第二个参数vnode改写为n2:
/* renderer.ts */

function patch(n1, n2, container, parentComponent) {
  // 根据新 VNode 类型的不同调用不同的函数
  const { type, shapeFlag } = n2

  // 通过新 VNode 的 type property 判断 VNode 类型
  switch (type) {
    case Fragment:
      processFragment(n1, n2, container, parentComponent)
      break
    case Text:
      processText(n1, n2, container)
      break
    default:
      // 通过新 VNode 的 shapeFlag property 与枚举变量 ShapeFlags 进行与运算来判断类型是 Element 或 Component
      if (shapeFlag & ShapeFlags.ELEMENT) {
        processElement(n1, n2, container, parentComponent)
      } else if (shapeFlag & ShapeFlags.STATEFUL_COMPONENT) {
        processComponent(n1, n2, container, parentComponent)
      }
      break
  }
}
然后完善src/runtime-core目录下的renderer.ts文件中的setupRenderEffect函数,利用effect将调用render函数和patch方法获取并处理 VNode 树的操作收集,而之前的操作是初始化 VNode 树:
/* renderer.ts */

function setupRenderEffect(instance, vnode, container) {
  // 利用 effect 将调用 render 函数和 patch 方法的操作收集
  effect(() => {
    // 根据组件实例对象的 isMounted property 判断是初始化或更新 VNode 树
    // 若为 false 则是初始化
    if (!instance.isMounted) {
      const { proxy } = instance

      const subTree = (instance.subTree = instance.render.call(proxy))

      patch(subTree, container, instance)

      vnode.el = subTree.el

      // 将组件实例对象的 isMounted property 赋值为 true
      instance.isMounted = true
    }
    // 否则是更新
    else {
      // TODO: 更新 VNode 树
    }
  })
}
完善src/runtime-core目录下的renderer.ts文件中所有相关的函数,解决报错,其中在render函数中调用patch方法对根组件对应 VNode 进行处理时、在mountChildren函数中调用patch方法处理 children 中的每个 VNode 时和在setupRenderEffect函数中调用patch方法初始化 VNode 树时,传入的第一个参数均为 null:
/* renderer.ts */

function render(vnode, container) {
  patch(null, vnode, container, null)
}

function processFragment(n1, n2, container, parentComponent) {
  mountChildren(n2.children, container, parentComponent)
}

function processText(n1, n2, container) {
  const { children } = n2

  /* 其他代码 */
}

function processElement(n1, n2, container, parentComponent) {
  // 若旧 VNode 不存在则初始化 Element
  if (!n1) {
    mountElement(n2, container, parentComponent)
  }
  // 否则更新 Element
  else {
    // TODO: 更新 Element
  }
}

function processComponent(n1, n2, container, parentComponent) {
  mountComponent(n2, container, parentComponent)
}

function setupRenderEffect(instance, vnode, container) {
  effect(() => {
    if (!instance.isMounted) {
      /* 其他代码 */

      patch(null, subTree, container, instance)

      vnode.el = subTree.el

      instance.isMounted = true
    } else {
      // TODO: 更新 VNode 树
    }
  })
}
再来完善src/runtime-core目录下的renderer.ts文件中的setupRenderEffect函数,完成之前留下的更新 VNode 树的 TODO,与初始化的区别在于通过解构赋值获取组件实例对象的 VNode 树,在调用patch方法处理时作为第一个参数传入:
/* renderer.ts */

function setupRenderEffect(instance, vnode, container) {
  effect(() => {
    if (!instance.isMounted) {
      /* 其他代码 */
    }
    // 否则是更新
    else {
      // 通过解构赋值获取组件实例对象的 proxy property 和旧 VNode 树
      const { proxy, subTree: preSubTree } = instance

      // 调用组件实例对象中 render 函数获取新 VNode 树,同时将 this 指向指定为 proxy property,并将其挂载到组件实例对象上
      const subTree = (instance.subTree = instance.render.call(proxy))

      // 调用 patch 方法处理新旧 VNode 树
      patch(preSubTree, subTree, container, instance)
    }
  })
}
最后在src/runtime-core目录下的renderer.ts文件中声明patchElement函数,并完善processElement函数。patchElement函数用于更新 Element,暂时只实现 Element 更新的流程因此还没有实现该函数:
/* renderer.ts */

function processElement(n1, n2, container, parentComponent) {
  if (!n1) {
    mountElement(n2, container, parentComponent)
  } else {
    patchElement(n1, n2, container)
  }
}

// 用于更新 Element
function patchElement(n1, n2, container) {
  // TODO: 实现 patchElement 函数
  console.log('update')
}
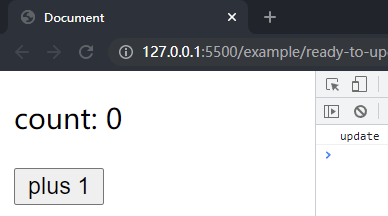
在项目文件夹下执行yarn build命令进行打包,打包完成后通过 live server 插件打开example/ready-to-update目录下的index.html文件,可以看到根组件选项对象中的内容被渲染到了页面上,点击按钮在控制台中输出了对应内容,这样就成功实现了 Element 的更新流程。
5.2 更新 Element 的 props
① happy path
更新 Element 的 props 共有三种情况:
- 修改 props 对象中的 property
- 将 props 对象中的 property 赋值为 undefined 或 null
- 删除 props 对象中的 property
首先在example目录下创建update-props文件夹,在其中放置更新 Element 的 props 测试相关文件,包括三个文件:index.html、main.js和App.js,其中index.html和main.js文件中的内容与之前的测试相同,App.js文件中的内容如下:
export const App = {
  name: 'App',
  setup() {
    const props = ref({
      foo: 'foo',
      bar: 'bar',
      baz: 'baz'
    })

    const onChangePropsDemo1 = () => {
      // 修改 props 对象中的 property
      props.value.foo = 'newFoo'
    }

    const onChangePropsDemo2 = () => {
      // 将 props 对象中的 property 赋值为 undefined 或 null
      props.value.bar = undefined
    }

    const onChangePropsDemo3 = () => {
      // 删除 props 对象中的 property
      const { baz, ...newProps } = props.value
      props.value = newProps
    }

    return {
      props,
      onChangePropsDemo1,
      onChangePropsDemo2,
      onChangePropsDemo3
    }
  },
  render() {
    return h(
      'div',
      {
        id: 'demo',
        ...this.props
      },
      [
        h(
          'button',
          {
            onClick: this.onChangePropsDemo1
          },
          'Demo1'
        ),
        h(
          'button',
          {
            onClick: this.onChangePropsDemo2
          },
          'Demo2'
        ),
        h(
          'button',
          {
            onClick: this.onChangePropsDemo3
          },
          'Demo3'
        )
      ]
    )
  }
}
② 实现
首先完善src/runtime-dom目录下的index.ts文件中的patchProps函数,若 props 对象中的 property 为 undefined 或 null,则利用Element.removeAttribute()将该 property 从元素上移除,再将第二个参数val改写为nextVal:
/* src/runtime-dom/index.ts */

function patchProp(el, key, nextVal) {
  /* 其他代码 */

  if (isOn(key)) {
    /* 其他代码 */
  } else {
    // 若 props 对象中的 property 为 undefined 或 null
    if (nextVal == null) {
      // 利用 Element.removeAttribute() 将该 property 从元素上移除
      el.removeAttribute(key)
    }
    // 否则
    else {
      // 利用 Element.setAttribute() 将该 property 添加到元素上
      // 其中 key 作为元素的 attribute 或 property 名,value 作为 attribute 或 property 的值
      el.setAttribute(key, nextVal)
    }
  }
}
再在src/runtime-core目录下的renderer.ts文件中实现patchProps函数,该函数用于更新 Element 的 props。在patchProps函数中,先遍历新 VNode 的 props 对象,若新旧 VNode 的 props 对象中的 property 或方法不相等则将新 VNode 的 property 或方法挂载到元素上,再遍历旧 VNode 的 props 对象,若新 VNode 的 props 对象中不包含该 property 或方法则将元素上的相应 property 或方法赋值为 null:
/* src/runtime-core/renderer.ts */

// 用于更新 Element 的 props
function patchProps(el, oldProps, newProps) {
  if (oldProps !== newProps) {
    // 遍历新 VNode 的 props 对象
    for (const key in newProps) {
      const prev = oldProps[key]
      const next = newProps[key]

      // 若新旧 VNode 的 props 对象中的 property 或方法不相等
      if (prev !== next) {
        // 将新 VNode 的 property 或方法挂载到元素上
        hostPatchProp(el, key, next)
      }
    }

    if (oldProps !== {}) {
      // 遍历旧 VNode 的 props 对象
      for (const key in oldProps) {
        // 若新 VNode 的 props 对象中不包含该 property 或方法
        if (!(key in newProps)) {
          // 将元素上该 property 或方法赋值为 null
          hostPatchProp(el, key, null)
        }
      }
    }
  }
}
最后来实现src/runtime-core目录下的renderer.ts文件中的patchElement函数,在其中获取新旧 VNode 的 props 对象,获取旧 VNode 的 el property 并将其挂载到新 VNode 上,并调用patchProps函数进行更新:
/* src/runtime-core/renderer.ts */

function patchElement(n1, n2, container) {
  const oldProps = n1.props || {}
  const newProps = n2.props || {}

  // 获取旧 VNode 的 el property 并将其挂载到新 VNode 上
  const el = (n2.el = n1.el)

  patchProps(el, oldProps, newProps)
}
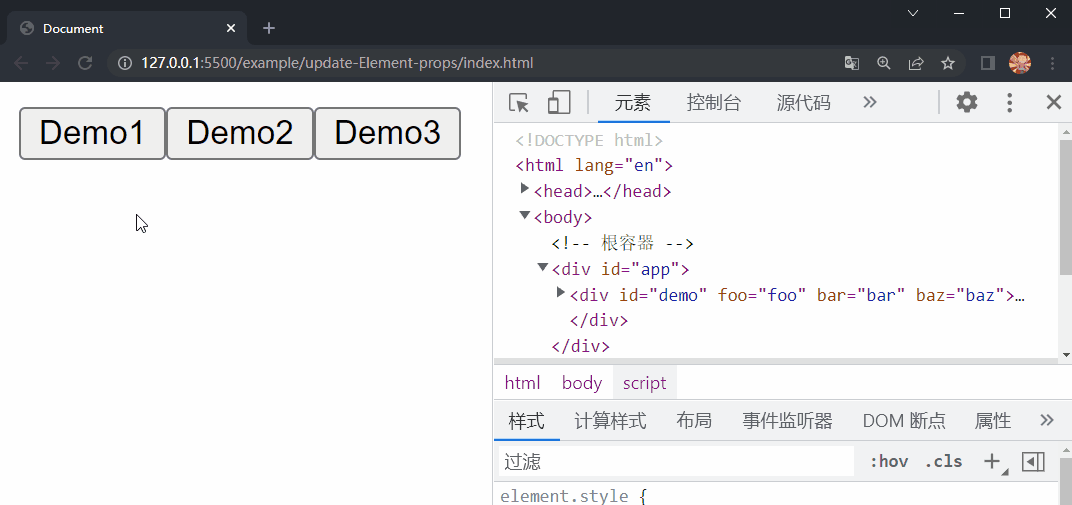
在项目文件夹下执行yarn build命令进行打包,打包完成后通过 live server 插件打开example/update-props目录下的index.html文件,可以看到根组件选项对象中的内容被渲染到了页面上,依次点击三个按钮,分别更新了 div#demo 的 foo property 、删除了 bar property 以及删除了 baz property,这样就成功实现了 Element 的 props 的更新。
5.3 更新 Element 的 children (1)
Element 的 children 可以为 string 或 Array,因此更新 Element 的 children 共有四种情况:
- 新 VNode 的 children 是 string,旧 VNode 的 children 是 Array
- 新旧 VNode 的 children 都是 string
- 新 VNode 的 children 是 Array,旧 VNode 的 children 是 string
- 新旧 VNode 的 children 都是 Array
其中前三种情况相对简单,更新的逻辑可以简单概括为先移除旧 VNode 的 children,再将新 VNode 的 children 添加到根容器/父元素中,而第四种情况比较复杂,需要用到 diff 算法。因此先完成针对前三种情况的更新。
① happy path
首先在example目录下创建update-Element-children_T-A文件夹,在其中放置更新 Element 的 children 前三种情况的测试相关文件,包括六个文件:index.html、main.js、App.js、Array2Text.js、Text2Text.js和Text2Array.js,其中main.js文件中的内容与之前的测试相同,index.html文件新增了样式,App.js文件中的内容如下:
/* App.js */

export const App = {
  name: 'App',
  setup() {
    const onUpdateA2T = () => {
      // 触发 Array2Text 组件中 Element 的更新
      window.isUpdateA2T.value = true
    }

    const onUpdateT2T = () => {
      // 触发 Text2Text 组件中 Element 的更新
      window.isUpdateT2T.value = true
    }

    const onUpdateT2A = () => {
      // 触发 Text2Array 组件中 Element 的更新
      window.isUpdateT2A.value = true
    }

    return { onUpdateA2T, onUpdateT2T, onUpdateT2A }
  },
  render() {
    return h('div', {}, [
      // Array2Text 的测试
      h('div', { class: 'demo-array2text' }, [
        // Array2Text 组件
        h(Array2Text),
        h(
          'button',
          {
            onCLick: this.onUpdateA2T
          },
          'Array2Text'
        )
      ]),
      // Text2Text 的测试
      h('div', { class: 'demo-text2text' }, [
        // Text2Text 组件
        h(Text2Text),
        h(
          'button',
          {
            onCLick: this.onUpdateT2T
          },
          'Text2Text'
        )
      ]),
      // Text2Array 的测试
      h('div', { class: 'demo-text2array' }, [
        // Text2Array 组件
        h(Text2Array),
        h(
          'button',
          {
            onCLick: this.onUpdateT2A
          },
          'Text2Array'
        )
      ])
    ])
  }
}
Array2Text.js、Text2Text.js和Text2Array.js文件中的内容分别如下:
/* Array2Text.js */

const prev = [h('div', {}, 'prevChild1'), h('div', {}, 'prevChild2')]
const next = 'nextChild'

export default {
  name: 'Array2Text',
  setup() {
    const isUpdateA2T = ref(false)
    window.isUpdateA2T = isUpdateA2T

    return { isUpdateA2T }
  },
  render() {
    const self = this

    return h('div', {}, self.isUpdateA2T ? next : prev)
  }
}
/* Text2Text.js */

const prev = 'prevChild'
const next = 'nextChild'

export default {
  name: 'Text2Text',
  setup() {
    const isUpdateT2T = ref(false)
    window.isUpdateT2T = isUpdateT2T

    return {
      isUpdateT2T
    }
  },
  render() {
    const self = this

    return h('div', {}, self.isUpdateT2T ? next : prev)
  }
}
/* Text2Array.js */

const prev = 'prevChild'
const next = [h('div', {}, 'nextChild1'), h('div', {}, 'nextChild2')]

export default {
  name: 'Text2Array',
  setup() {
    const isUpdateT2A = ref(false)
    window.isUpdateT2A = isUpdateT2A

    return {
      isUpdateT2A
    }
  },
  render() {
    const self = this

    return h('div', {}, self.isUpdateT2A ? next : prev)
  }
}
② 实现
要移除旧 VNode 的 children 并将新 VNode 的 children 添加到根容器/父元素中,首先在src/runtime-dom目录下的index.ts文件中实现remove函数和setElementText函数,并在调用createRenderer函数传入的对象中加入以上两个函数:
/* src/runtime-dom/index.ts */

// 用于移除元素
function remove(child) {
  // 获取当前元素的父元素
  const parent = child.parentNode

  if (parent) {
    // 利用 Element.removeChild() 将元素从其父元素中移除
    parent.removeChild(child)
  }
}

// 用于修改元素的文本内容
function setElementText(el, text) {
  el.textContent = text
}

/**
 * 调用 createRenderer 函数,并传入包含 createText 函数、createElement 函数、
 * patchProp 函数、insert 函数、remove 函数和 setElementText 函数的对象
 */
const renderer: any = createRenderer({
  createText,
  createElement,
  patchProp,
  insert,
  remove,
  setElementText
})
接下来在src/runtime-core目录下的renderer.ts文件中的createRenderer函数中,通过解构赋值获取createText函数时同时获取insert函数和setElementText函数,而在patchElement函数中,除了调用patchProps函数外,还需要调用patchChildren函数更新 Element 的 children:
/* renderer.ts */

export function createRenderer(options) {
  /**
   * 通过解构赋值获取 createText 函数、createElement 函数、patchProp 函数、
   * insert 函数、remove 函数和 setElementText 函数
   */
  const {
    createText: hostCreateText,
    createElement: hostCreateElement,
    patchProp: hostPatchProp,
    insert: hostInsert,
    remove: hostRemove,
    setElementText: hostSetElementText
  } = options

  /* 其他代码 */

  function patchElement(n1, n2, container) {
    /* 其他代码 */

    patchChildren(n1, n2, el)
    patchProps(el, oldProps, newProps)
  }

    // 用于更新 Element 的 children
  function patchChildren(n1, n2, container) {
    // TODO: 实现 patchChildren 函数
  }
}
最后在src/runtime-core目录下的renderer.ts文件中实现patchChildren函数,在其中首先通过解构赋值分别获得新旧 VNode 的 children 和 shapeFlag property,接下来根据新旧 VNode 的 children 类型进行相应的处理。
针对第一种情况,需要先移除旧 VNode 的 children 并将根容器/父元素的文本内容设置为新 VNode 的 children;而针对第二种情况,则只需要在新旧 VNode 的 children 不同时将根容器/父元素的文本内容设置为新 VNode 的 children:
/* renderer.ts */

function patchChildren(n1, n2, container) {
  // 通过结构赋值分别获得新旧 VNode 的 children 和 shapeFlag property
  const { children: c1, shapeFlag: prevShapeFlag } = n1
  const { children: c2, shapeFlag: nextShapeFlag } = n2

  // 若新 VNode 的 children 类型是 string
  if (nextShapeFlag & ShapeFlags.TEXT_CHILDREN) {
    // 同时旧 VNode 的 children 类型是 Array
    if (prevShapeFlag & ShapeFlags.ARRAY_CHILDREN) {
      // 移除旧 VNode 的 children
      for (const child of c1) {
        // 移除 VNode
        hostRemove(child)
      }

      // 将根容器/父元素的文本内容设置为新 VNode 的 children
      hostSetElementText(container, c2)
    }
    // 同时旧 VNode 的 children 类型为 string
    else {
      // 若新旧 VNode 的 children 不同
      if (c1 !== c2) {
        // 将根容器/父元素的文本内容设置为新 VNode 的 children
        hostSetElementText(container, c2)
      }
    }
  }
}
对以上实现做简单优化,将移除旧 VNode 的 children 的逻辑抽离成一个unmountChildren函数,并将调用hostSetElementText函数提升为公共部分:
/* renderer.ts */

function patchChildren(n1, n2, container, parentComponent) {
  /* 其他代码 */

  if (nextShapeFlag & ShapeFlags.TEXT_CHILDREN) {
    if (prevShapeFlag & ShapeFlags.ARRAY_CHILDREN) {
      // 移除旧 VNode 的 children
      unmountChildren(c1)
    }

    if (c1 !== c2) {
      hostSetElementText(container, c2)
    }
  }
}

// 用于遍历 children,移除其中的所有 VNode
function unmountChildren(children) {
  for (const child of children) {
    // 移除 VNode
    hostRemove(child)
  }
}
针对第三种情况,需要先将根容器/父元素的文本内容设置为空字符串,并调用mountChildren函数将新 VNode 的 children 添加到根容器/父元素中,同时完善src/runtime-core目录下的renderer.ts文件中所有相关的函数,解决报错:
/* renderer.ts */

function patchChildren(n1, n2, container, parentComponent) {
  /* 其他代码 */

  if (nextShapeFlag & ShapeFlags.TEXT_CHILDREN) {
    /* 其他代码 */
  }
  // 若新 VNode 的 children 类型为 Array
  else if (nextShapeFlag & ShapeFlags.ARRAY_CHILDREN) {
    // 同时旧 VNode 的 children 类型为 string
    if (prevShapeFlag & ShapeFlags.TEXT_CHILDREN) {
      // 将根容器/父元素的文本内容设置为空字符串
      hostSetElementText(container, '')

      // 将新 VNode 的 children 添加到根容器/父元素中
      mountChildren(c2, container, parentComponent)
    }
    // 同时旧 VNode 的 children 类型为 Array
    else {
      // TODO: diff 算法
    }
  }
}
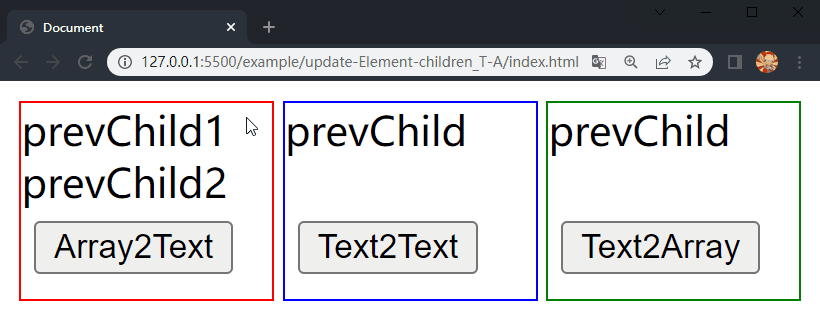
在项目文件夹下执行yarn build命令进行打包,打包完成后通过 live server 插件打开example/update-Element-children_T-A目录下的index.html文件,可以看到根组件和各子组件选项对象中的内容被渲染到了页面上,依次点击 div.demo-array2text、div.demo-text2text 和 div.demo-text2array 中的按钮,三个 div 中的 内容分别进行了更新,这样就成功实现了 Element 的 children 更新的前三种情况。
5.4 更新 Element 的 children (2)
接下来完成针对第四种情况的实现,也就是新旧 VNode 的 children 都是数组的情况,而用来确定新旧数组差异部分的方法就是 diff 算法。由于在前端开发中,对数组中元素进行操作的场景通常只有以下几种:
- 插入元素
- 移除元素
- 移动元素位置
而不会对数组进行大规模的变动,因此确定新旧数组差异,也即 diff 算法的核心就是确定以上三个操作发生的位置,也就是要插入的元素要插入的位置、要移除的元素所在的位置和要移动的元素所在的位置与将要移动到的位置。而确定操作位置时采用的策略是双端对比,概括为先从头开始遍历对比新旧数组直至出现差异,再从尾开始,中间部分就是操作发生的位置。
① happy path
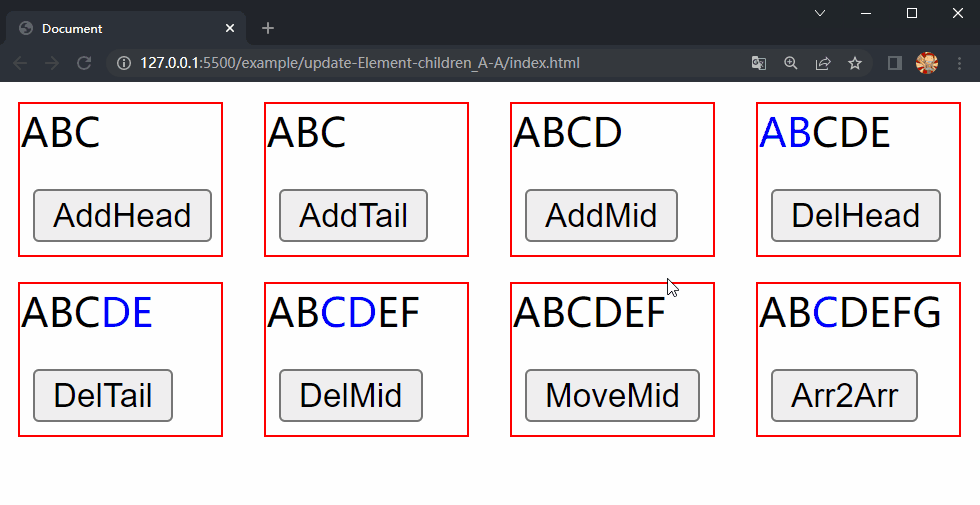
首先在example目录下创建update-Element-children_A-A文件夹,在其中放置更新 Element 的 children 第四种情况的测试相关文件,包括十一个文件:index.html、main.js、App.js、AddHead.js、AddTail.js、DelHead.js、DelTail.js、DelMid.js、AddMid.js、MoveMid.js和Array2Array.js,其中main.js文件中的内容与之前的测试相同,index.html文件新增了样式,App.js文件中的内容如下:
/* App.js */

export const App = {
  name: 'App',
  setup() {
    const onAddHead = () => {
      // 触发 AddHead 组件中 Element 的更新
      window.isAddHead.value = true
    }

    const onAddTail = () => {
      // 触发 AddTail 组件中 Element 的更新
      window.isAddTail.value = true
    }

    const onAddMid = () => {
      // 触发 AddMid 组件中 Element 的更新
      window.isAddMid.value = true
    }

    const onDelHead = () => {
      // 触发 DelHead 组件中 Element 的更新
      window.isDelHead.value = true
    }

    const onDelTail = () => {
      // 触发 DelTail 组件中 Element 的更新
      window.isDelTail.value = true
    }

    const onDelMid = () => {
      // 触发 DelMid 组件中 Element 的更新
      window.isDelMid.value = true
    }

    const onMoveMid = () => {
      // 触发 MoveMid 组件中 Element 的更新
      window.isMoveMid.value = true
    }

    const onUpdateA2A = () => {
      // 触发 Array2Array 组件中 Element 的更新
      window.isUpdateA2A.value = true
    }

    return {
      onAddHead,
      onAddTail,
      onAddMid,
      onDelHead,
      onDelTail,
      onDelMid,
      onMoveMid,
      onUpdateA2A
    }
  },
  render() {
    return h('div', { class: 'container' }, [
      // AddHead 的测试
      h('div', { class: 'demo AddHead' }, [
        // AddHead 组件
        h(AddHead),
        h(
          'button',
          {
            onCLick: this.onAddHead
          },
          'AddHead'
        )
      ]),
      // AddTail 的测试
      h('div', { class: 'demo AddTail' }, [
        // AddTail 组件
        h(AddTail),
        h(
          'button',
          {
            onCLick: this.onAddTail
          },
          'AddTail'
        )
      ]),
      // AddMid 的测试
      h('div', { class: 'demo AddMid' }, [
        // AddMid 组件
        h(AddMid),
        h(
          'button',
          {
            onCLick: this.onAddMid
          },
          'AddMid'
        )
      ]),
      // DelHead 的测试
      h('div', { class: 'demo DelHead' }, [
        // DelHead 组件
        h(DelHead),
        h(
          'button',
          {
            onCLick: this.onDelHead
          },
          'DelHead'
        )
      ]),
      // DelTail 的测试
      h('div', { class: 'demo DelTail' }, [
        // DelTail 组件
        h(DelTail),
        h(
          'button',
          {
            onCLick: this.onDelTail
          },
          'DelTail'
        )
      ]),
      // DelMid 的测试
      h('div', { class: 'demo DelMid' }, [
        // DelMid 组件
        h(DelMid),
        h(
          'button',
          {
            onCLick: this.onDelMid
          },
          'DelMid'
        )
      ]),
      // MoveMid 的测试
      h('div', { class: 'demo MoveMid' }, [
        // MoveMid 组件
        h(MoveMid),
        h(
          'button',
          {
            onCLick: this.onMoveMid
          },
          'MoveMid'
        )
      ]),
      // Array2Array 的测试
      h('div', { class: 'demo Array2Array' }, [
        // Array2Array 组件
        h(Array2Array),
        h(
          'button',
          {
            onCLick: this.onUpdateA2A
          },
          'Arr2Arr'
        )
      ])
    ])
  }
}
后几个文件中除了新旧数组分别对应相应的操作外几乎相同,以Array2Array.js文件为例,其中的内容如下:
/* Array2Array.js */

const prev = [
  h('span', { key: 'A' }, 'A'),
  h('span', { key: 'B' }, 'B'),
  h('span', { key: 'C', class: 'deleted' }, 'C'),
  h('span', { key: 'D' }, 'D'),
  h('span', { key: 'E' }, 'E'),
  h('span', { key: 'F' }, 'F'),
  h('span', { key: 'G' }, 'G')
]

const next = [
  h('span', { key: 'A' }, 'A'),
  h('span', { key: 'B' }, 'B'),
  h('span', { key: 'E', class: 'moved' }, 'E'),
  h('span', { key: 'D' }, 'D'),
  h('span', { key: 'X', class: 'added' }, 'X'),
  h('span', { key: 'F' }, 'F'),
  h('span', { key: 'G' }, 'G')
]

export default {
  name: 'Array2Array',
  setup() {
    const isUpdateA2A = ref(false)
    window.isUpdateA2A = isUpdateA2A

    return {
      isUpdateA2A
    }
  },
  render() {
    const self = this

    return h('div', {}, self.isUpdateA2A ? next : prev)
  }
}
② 实现
在实现前先来看一下对于 diff 算法非常重要的 key attribute。查看 Vue3 官方文档中的特殊 attribute 部分,找到 key attribute 的介绍。
key attribute 主要用做 Vue 的虚拟 DOM 算法的提示,以在比对新旧节点组时辨识 VNodes。如果不使用 key,Vue 会使用一种算法来最小化元素的移动并且尽可能尝试就地修改/复用相同类型元素。而使用 key 时,它会基于 key 的顺序变化重新排列元素,并且那些使用了已经不存在的 key 的元素将会被移除/销毁。
有相同父元素的子元素必须有唯一的 key。重复的 key 会造成渲染错误。
最常见的用例是和
v-for一起使用:<ul> <li v-for="item in items" :key="item.id">...</li> </ul>
在实现针对第四种情况的更新时,首先给 VNode 增加 key property,用于保存对应组件的 key attribute,在src/runtime-core目录下的vnode.ts文件中完善createVNode函数:
/* render.ts */

export function createVNode(type, props?, children?) {
  const vnode = {
    type,
    props,
    children,
    shapeFlag: getShapeFlag(type),
    // 对应组件的 key attribute
    key: props?.key,
    el: null
  }

  /* 其他代码 */
 }
接下来,为了保证插入元素和移动元素位置时能够将元素插入或移动至正确的位置,利用Element.insertBefore()函数重构src/runtime-dom目录下的index.ts文件中的insert函数,额外接受一个 Element 或 null 作为第三个参数,称为锚点。而Element.insertBefore()函数接受要插入或者移动的元素和锚点作为参数,用于将某个元素插入到指定元素即锚点之前或者数组尾部。
/* src/runtime-dom/index.ts */

function insert(child, parent, anchor) {
  // 利用 Element.insertBefore() 将元素添加到根容器/父元素中
  parent.insertBefore(child, anchor || null)
}
完善src/runtime-core目录下的renderer.ts文件中所有相关的函数,解决报错,其中在render函数中调用patch方法对根组件对应 VNode 进行处理时,传入的最后一个参数为 null。
/* renderer.ts */

function render(vnode, container) {
  patch(null, vnode, container, null, null)
}
然后实现patchKeyedChildren函数,用于针对第四种情况的更新:
/* renderer.ts */

function patchChildren(n1, n2, container, parentComponent, anchor) {
  /* 其他代码 */

  if (nextShapeFlag & ShapeFlags.TEXT_CHILDREN) {
    /* 其他代码 */
  }
  else if (nextShapeFlag & ShapeFlags.ARRAY_CHILDREN) {
    if (prevShapeFlag & ShapeFlags.TEXT_CHILDREN) {
      /* 其他代码 */
    }
    else {
      patchKeyedChildren(c1, c2, container, parentComponent, anchor)
    }
  }
}

// 用于针对数组情况更新 Element 的 children
function patchKeyedChildren(c1, c2, container, parentComponent, parentAnchor) {
  // TODO: 实现 patchKeyedChildren 函数
}
在patchKeyedChildren函数中,先实现用于判断两个元素是否是同一 VNode 的isSameVNodeType函数,若 type property 和 key property 均相同则返回 true:
// 用于判断两个元素是否是同一 VNode
function isSameVNodeType(n1, n2) {
  // 若 type property 和 key property 均相同则返回 true
  return n1.type === n2.type && n1.key === n2.key
}
接下来声明三个用于双端对比的指针i、e1和e2,其中i的初始值为 ,e1和e2的初始值分别为新旧数组的最大索引,先后从头、从尾开始遍历对比新旧数组,若两个元素是同一 VNode 则对其调用patch方法进行更新,斗则结束遍历,此时旧的数组的 [i,e1] 子数组和新的数组的 [i,e2] 子数组就是新旧数组的差异部分:
const l2 = c2.length
// 用于双端对比的指针(索引)
let i = 0
let e1 = c1.length - 1
let e2 = l2 - 1

// 从头遍历
while (i <= e1 && i <= e2) {
  const n1 = c1[i]
  const n2 = c2[i]

  // 若两个元素是同一 VNode 则对其调用 patch 方法进行更新
  if (isSameVNodeType(n1, n2)) {
    patch(n1, n2, container, parentComponent, parentAnchor)
  }
  // 否则结束遍历,此时 i 为从头遍历时差异位置在两个数组中的索引
  else {
    break
  }

  i++
}

// 从尾遍历
while (i <= e1 && i <= e2) {
  const n1 = c1[e1]
  const n2 = c2[e2]

  // 若两个元素是同一 VNode 则对其调用 patch 方法进行更新
  if (isSameVNodeType(n1, n2)) {
    patch(n1, n2, container, parentComponent, parentAnchor)
  }
  // 否则结束遍历,此时 e1 和 e2 分别为从尾遍历时差异位置在两个数组中的索引
  else {
    break
  }

  e1--
  e2--
}
确定了差异部分,接下来就可以针对三种操作进行更新。
首先,若 i 大于 e1,则说明新的数组比旧的长,将多出的元素依次向旧的中插入。而若 e2+1 小于新的数组长度则说明差异出现在头部,锚点为新的数组中索引为 e2+1 的 VNode 的 el property,否则在尾部,锚点为 null。共有三种情况分别对应以下三幅图:
具体的实现:
// 若 i > e1 则说明新的数组比旧的长,将多出的元素依次向旧的中插入
if (i > e1) {
  if (i <= e2) {
    // 要插入位置的下一个元素的索引是 e2+1
    const nextPos = e2 + 1
    // 若 e2+1 小于新的数组长度,则锚点为新的数组中索引为 e2+1 的 VNode 的 el property,否则为 null
    const anchor = nextPos < l2 ? c2[nextPos].el : null

    // 依次对子数组[i,e2]中的 VNode 调用 patch 方法进行插入
    while (i <= e2) {
      patch(null, c2[i], container, parentComponent, anchor)

      i++
    }
  }
}
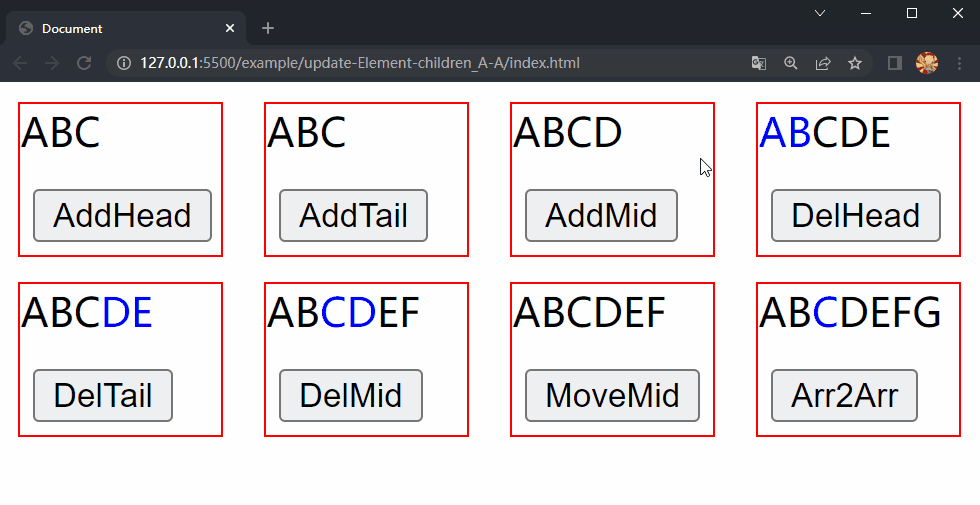
在项目文件夹下执行yarn build命令进行打包,打包完成后通过 live server 插件打开example/update-Element-children_A-A目录下的index.html文件,可以看到根组件和各子组件选项对象中的内容被渲染到了页面上,依次点击 div.demo.add-head、div.demo.add-tail 和 div.demo.add-mid 中的按钮,三个 div 中的 内容分别进行了更新,这样就成功实现了 Element 的 children 更新的第四种情况中的插入元素。

接下来,若 i 不大于 e1 但大于 e2,则说明旧的数组比新的长,将多出的元素依次从旧的中移除。同样有三种情况分别对应以下三幅图:
具体的实现:
if (i > e1) {
  /* 其他代码 */
}
// 若 i > e2 则说明旧的数组比新的长,将多出的元素依次从旧的中移除
else if (i > e2) {
  // 依次移除子数组[i,e1]中的 VNode
  while (i <= e1) {
    hostRemove(c1[i].el)

    i++
  }
}
在项目文件夹下执行yarn build命令进行打包,打包完成后通过 live server 插件打开example/update-Element-children_A-A目录下的index.html文件,可以看到根组件和各子组件选项对象中的内容被渲染到了页面上,依次点击 div.demo.del-head、div.demo.del-tail 和 div.demo.del-mid 中的按钮,三个 div 中的 内容分别进行了更新,这样就成功实现了 Element 的 children 更新的第四种情况中的移除元素。
最后,也是最复杂的情况,若 i 不大于 e1 且 i 不大于 e2,则说明子数组 [i,e1] 和子数组 [i,e2] 存在差异,可能同时包括插入元素、移除元素和移动元素位置。为了确定两个子数组间的差异,分别遍历两个子数组。在遍历子数组 [i,e1] 时,若某个元素同样在子数组 [i,e2] 中,则对其调用patch方法进行更新,否则直接移除该元素;而在遍历子数组 [i,e2] 时,若某个元素不在子数组 [i,e1] 中,则对其调用patch方法进行插入,否则,若该元素在两个子数组中的索引不同,则说明该元素是要移动的元素,将该元素插入到其要移动到的位置。
在实现中,为了提升性能,做了几处优化:
-
为了快速确定子数组 [i,e1] 中的某个元素是否在子数组 [i,e2] 中,避免每次都对后者进行遍历,用 Map 实例
keyToNewIndexMap保存子数组 [i,e2] 中元素的索引,其中 key 为 VNode 的 key property,value 为索引。在遍历子数组 [i,e1] 的过程中,若 VNode 包含 key property 则从keyToNewIndexMap中获取元素在新的数组中的索引,否则遍历子数组 [i,e2] 获取其在新的数组中的索引。之后,若索引不存在则说明该元素不在新的数组中,可直接移除,否则对其调用patch方法进行更新。let s = i // 用于保存子数组[i,e2]中元素的索引,key 为 VNode 的 key property,value 为索引 const keyToNewIndexMap = new Map() // 遍历子数组[i,e2],保存其中元素的索引 for (let i = s; i <= e2; i++) { const nextChild = c2[i] keyToNewIndexMap.set(nextChild.key, i) } // 遍历子数组[i,e1],依次进行处理 for (let i = s; i <= e1; i++) { const prevChild = c1[i] let newIndex // 若当前元素包含 key property,则从 keyToNewIndexMap 中获取其在新的数组中的索引 if (prevChild.key != null) { newIndex = keyToNewIndexMap.get(prevChild.key) } // 否则 else { // 遍历子数组[i,e2]获取其索引 for (let j = s; j <= e2; j++) { if (isSameVNodeType(prevChild, c2[j])) { newIndex = j break } } } // 若当前元素在新的数组中的索引不存在则其不在新的数组中,可直接移除 if (newIndex === undefined) { hostRemove(prevChild.el) } // 否则对当前元素调用 patch 方法进行更新 else { // 对当前元素调用 patch 方法进行更新 patch(prevChild, c2[newIndex], container, parentComponent, null) } } -
为了避免对子数组 [i,e1] 中确定要移除的元素进行判断,用变量
toBePatched保存需要调用patch方法的次数,其值为子数组 [i,e2] 的长度,用变量patched记录调用patch方法的次数。在遍历子数组 [i,e1] 的过程中,若patched大于等于toBePatched,则说明当前元素是要移除的元素,可直接移除。// 用于保存需要调用 patch 方法的次数 const toBePatched = e2 - s + 1 // 用于记录调用 patch 方法的次数 let patched = 0 /* 其他代码 */ for (let i = s; i <= e1; i++) { const prevChild = c1[i] // 若 patched 大于等于 toBePatched,则说明当前元素是要移除的元素,可直接移除 if (patched >= toBePatched) { hostRemove(prevChild.el) continue } /* 其他代码 */ if (newIndex === undefined) { /* 其他代码 */ } else { patch(prevChild, c2[newIndex], container, parentComponent, null) patched++ } } -
为了快速确定子数组 [i,e2] 中的某个元素是否在子数组 [i,e1] 中,避免每次都对后者进行遍历,用数组
newIndexToOldIndexMap保存子数组 [i,e2] 中元素在旧的数组中的索引,数组中每一项默认为 0,在保存时加 1。在倒叙遍历子数组 [i,e2] 时,若在newIndexToOldIndexMap中某个元素在子数组 [i,e2] 索引对应的值为 0,则说明该元素不在旧的数组中,对其调用 patch 方法进行插入。该元素在新的数组中的索引为 nextIndex,若 nextIndex+1 小于新的数组长度则说明差异出现在头部,锚点为新的数组中索引为 nextIndex+1 的 VNode 的 el property,否则在尾部,锚点为 null。// 用于保存子数组[i,e2]中元素在旧的数组中的索引,默认为 0,在保存时加 1 const newIndexToOldIndexMap = new Array(toBePatched) for (let i = 0; i < toBePatched; i++) { newIndexToOldIndexMap[i] = 0 } /* 其他代码 */ for (let i = s; i <= e1; i++) { /* 其他代码 */ if (newIndex === undefined) { /* 其他代码 */ } else { // 保存当前元素在旧的数组中的索引 newIndexToOldIndexMap[newIndex - s] = i + 1 /* 其他代码 */ } } // 倒序遍历子数组[i,e2],依次进行处理 for (let i = toBePatched - 1; i >= 0; i--) { // 用于保存当前元素在新的数组中的索引 const nextIndex = i + s const nextChild = c2[nextIndex] /** * 若 nextIndex+1 小于新的数组长度 * 则锚点为新的数组中索引为 nextIndex+1 的 VNode 的 el property * 否则为 null */ const anchor = nextIndex + 1 < l2 ? c2[nextIndex + 1].el : null /** * 若在 newIndexToOldIndexMap 中当前元素在子数组[i,e2]索引对应的值为 0 * 则说明该元素不在旧的数组中,对其调用 patch 方法进行插入 */ if (newIndexToOldIndexMap[i] === 0) { patch(null, nextChild, container, parentComponent, anchor) } } -
为了避免对不需要移动位置的元素进行插入,实现用于求数组中的最长递增子序列的
getSequence函数,对于数组newIndexToOldIndexMap,其最长递增子序列就是旧的数组中不需要移动位置的元素。关于getSequence函数,可以参考 力扣-300. 最长递增子序列,具体的实现:function getSequence(arr: number[]): number[] { const p = arr.slice() const result = [0] let i, j, u, v, c const len = arr.length for (i = 0; i < len; i++) { const arrI = arr[i] if (arrI !== 0) { j = result[result.length - 1] if (arr[j] < arrI) { p[i] = j result.push(i) continue } u = 0 v = result.length - 1 while (u < v) { c = (u + v) >> 1 if (arr[result[c]] < arrI) { u = c + 1 } else { v = c } } if (arrI < arr[result[u]]) { if (u > 0) { p[i] = result[u - 1] } result[u] = i } } } u = result.length v = result[u - 1] while (u-- > 0) { result[u] = v v = p[v] } return result } -
为了避免在不存在元素移动时调用
getSequence函数,用变量moved标志是否存在元素移动,用变量maxNewIndexSoFar保存遍历子数组 [i,e1] 时其中元素在新的数组中的最大索引。在遍历子数组 [i,e1] 时,若某个元素在新的数组中且索引大于等于maxNewIndexSoFar,则更新后者,否则说明存在元素移动,将moved的值变为 true。而在遍历子数组 [i,e2] 时,同时遍历其最长递增子序列,若某个元素在旧的数组中且存在元素移动,同时该元素在子数组 [i,e2] 索引与遍历最长递增子序列的值不相等,则说明该元素是要移动的元素,将该元素插入到其要移动到的位置。// 用于标志是否存在元素移动 let moved = false // 用于保存遍历子数组[i,e1]时其中元素在新的数组中的最大索引 let maxNewIndexSoFar = 0 /* 其他代码 */ for (let i = s; i <= e1; i++) { if (newIndex === undefined) { /* 其他代码 */ } else { // 若当前元素在新的数组中的索引大于等于 maxNewIndexSoFar,则更新后者 if (newIndex >= maxNewIndexSoFar) { maxNewIndexSoFar = newIndex } // 否则说明存在元素移动,将 moved 的值变为 true else { moved = true } /* 其他代码 */ } } /** * 用于保存最长递增子序列 * 若 moved 为 true 则存在元素移动 * 通过 getSequence() 函数获取 newIndexToOldIndexMap 的最长递增子序列 */ const increasingNewIndexSequence = moved ? getSequence(newIndexToOldIndexMap) : [] // 用于倒序遍历最长递增子序列 let j = increasingNewIndexSequence.length - 1 for (let i = toBePatched - 1; i >= 0; i--) { /* 其他代码 */ if (newIndexToOldIndexMap[i] === 0) { /* 其他代码 */ } // 若存在元素移动 else if (moved) { /** * 若 j 小于 0,即最长递增子序列已遍历完 * 或者当前元素在子数组[i,e2]索引与最长递增子序列中索引为 j 的值不相等 * 则说明当前元素是要移动的元素 */ if (j < 0 || i !== increasingNewIndexSequence[j]) { // 将当前元素插入到其要移动到的位置 hostInsert(nextChild.el, container, anchor) } else { j-- } } }
最后是完整的实现:
if (i > e1) {
  /* 其他代码 */
} else if (i > e2) {
  /* 其他代码 */
}
// 若 i <= e1 且 i <= e2 则说明子数组[i,e1]和子数组[i,e2]有差异
else {
  let s = i

  const toBePatched = e2 - s + 1
  let patched = 0

  const keyToNewIndexMap = new Map()
  const newIndexToOldIndexMap = new Array(toBePatched)
  let moved = false
  let maxNewIndexSoFar = 0

  for (let i = 0; i < toBePatched; i++) {
    newIndexToOldIndexMap[i] = 0
  }

  for (let i = s; i <= e2; i++) {
    const nextChild = c2[i]

    keyToNewIndexMap.set(nextChild.key, i)
  }

  for (let i = s; i <= e1; i++) {
    const prevChild = c1[i]

    if (patched >= toBePatched) {
      hostRemove(prevChild.el)

      continue
    }

    let newIndex
    if (prevChild.key != null) {
      newIndex = keyToNewIndexMap.get(prevChild.key)
    } else {
      for (let j = s; j <= e2; j++) {
        if (isSameVNodeType(prevChild, c2[j])) {
          newIndex = j

          break
        }
      }
    }

    if (newIndex === undefined) {
      hostRemove(prevChild.el)
    } else {
      if (newIndex >= maxNewIndexSoFar) {
        maxNewIndexSoFar = newIndex
      }
      else {
        moved = true
      }

      newIndexToOldIndexMap[newIndex - s] = i + 1
      patch(prevChild, c2[newIndex], container, parentComponent, null)

      patched++
    }
  }

  const increasingNewIndexSequence = moved
    ? getSequence(newIndexToOldIndexMap)
    : []
  let j = increasingNewIndexSequence.length - 1

  for (let i = toBePatched - 1; i >= 0; i--) {
    const nextIndex = i + s
    const nextChild = c2[nextIndex]
    const anchor = nextIndex + 1 < l2 ? c2[nextIndex + 1].el : null

    if (newIndexToOldIndexMap[i] === 0) {
      patch(null, nextChild, container, parentComponent, anchor)
    } else if (moved) {
      if (j < 0 || i !== increasingNewIndexSequence[j]) {
        hostInsert(nextChild.el, container, anchor)
      } else {
        j--
      }
    }
  }
}
在项目文件夹下执行yarn build命令进行打包,打包完成后通过 live server 插件打开example/update-Element-children_A-A目录下的index.html文件,可以看到根组件和各子组件选项对象中的内容被渲染到了页面上,依次点击 div.demo.move-mid 和 div.demo.array2array 中的按钮,两个 div 中的 内容分别进行了更新,这样就成功实现了 Element 的 children 更新的第四种情况中的移动元素位置和同时包含三种操作。
5.5 更新 Component
① happy path
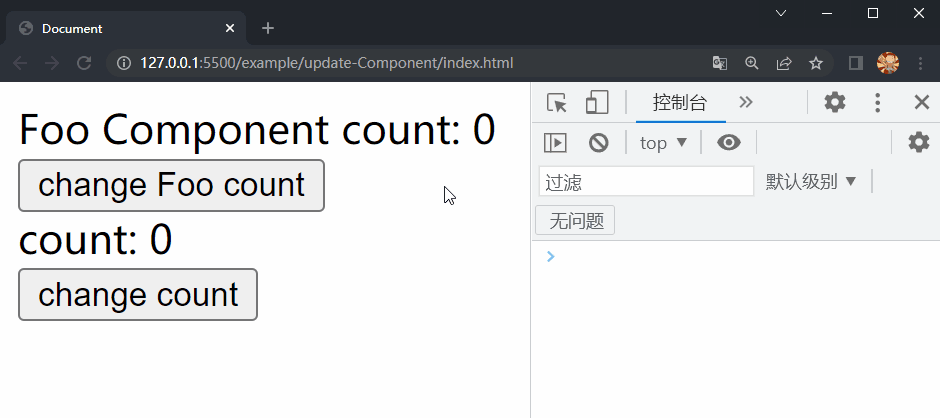
在视图中进行操作触发setup返回对象中的响应式数据修改,同时该数据传递给其他组件时,会对该组件进行更新,根据修改后的数据生成新的 VNode 并与原来的 VNode 进行对比确定需要更新的部分,再将原来的相应部分替换为新的部分。
首先在example目录下创建update-Component文件夹,在其中放置更新 Component 的测试相关文件,包括四个文件:index.html、main.js、App.js和Foo.js,其中index.html和main.js文件中的内容与之前的测试相同,App.js和Foo.js文件中的内容如下:
/* App.js */

export const App = {
  name: 'App',
  setup() {
    // 响应式数据
    const fooCount = ref(0)
    // 响应式数据
    const count = ref(0)

    const onChangeFooProps = () => {
      // 修改响应式数据
      fooCount.value++
    }

    const onChangeCount = () => {
      // 修改响应式数据
      count.value++
    }

    return { fooCount, count, onChangeFooProps, onChangeCount }
  },
  render() {
    return h('div', {}, [
      h(Foo, {
        // 创建 Foo 组件,向其中传入 count prop
        count: this.fooCount
      }),
      h(
        'button',
        {
          onClick: this.onChangeFooProps
        },
        'change Foo count'
      ),
      h('div', {}, 'count: ' + this.count),
      h(
        'button',
        {
          onClick: this.onChangeCount
        },
        'change count'
      )
    ])
  }
}
/* Foo.js */

// Foo 组件选项对象
export const Foo = {
  name: 'Foo',
  setup() {
    return {}
  },
  render() {
    // 通过 this.$props 获取 props 对象
    return h('div', {}, `Foo Component count: ${this.$props.count}`)
  }
}
② 实现
首先,为了通过this.$props获取 props 对象,在src/runtime-core目录下的componentPublicInstance.ts文件中增加对应的的 getter:
/* componentPublicInstance.ts */

const publicPropertiesMap = {
  $el: i => i.vnode.el,
  $slots: i => i.slots,
  $props: i => i.props
}
接下来,在src/runtime-core目录下的renderer.ts文件中声明updateComponent函数,用于更新 Component,并完善processElement函数。
/* renderer.ts */

function processComponent(n1, n2, container, parentComponent, anchor) {
  // 若旧 VNode 不存在则初始化 Component
  if (!n1) {
    mountComponent(n2, container, parentComponent, anchor)
  }
  // 否则更新 Component
  else {
    updateComponent(n1, n2)
  }
}

  // 用于更新 Component
function updateComponent(n1, n2) {
  // TODO: 实现 updateComponent 函数
}
接下来,完善src/runtime-core目录下的component.ts文件中的createComponentInstance函数,在组件实例对象中加入 next property 和 update 方法,分别用于保存新 VNode 和保存effect执行返回的函数。
/* component.ts */

export function createComponentInstance(vnode, parent) {
  const component = {
    vnode,
    type: vnode.type,
    setupState: {},
    props: {},
    slots: {},
    provides: parent ? parent.provides : {},
    parent,
    subTree: {},
    update: () => {},
    next: null,
    isMounted: false,
    emit: () => {}
  }

  /* 其他代码 */
}
然后在src/runtime-core目录下的renderer.ts文件中声明updateComponentPreRender函数,用于更新组件实例对象的 property:
/* renderer.ts */

// 用于更新组件实例对象的 property
function updateComponentPreRender(instance, nextVNode) {
  instance.vnode = nextVNode
  instance.next = null
  instance.props = nextVNode.props
}
完善src/runtime-core目录下的renderer.ts文件中的setupRenderEffect函数,在其中将effect返回的函数保存为组件实例对象的 update 方法,同时在调用render函数和patch方法更新 VNode 树时,将旧 VNode 的 el property 挂载到新 VNode 上并调用updateComponentPreRender函数更新组件实例对象的 property:
/* renderer.ts */

function setupRenderEffect(instance, vnode, container, anchor) {
  // 利用 effect 将调用 render 函数和 patch 方法的操作收集,并将 effect 返回的函数保存为组件实例对象的 update 方法
  instance.update = effect(() => {
    if (!instance.isMounted) {
      //
    } else {
      // 通过解构赋值获取组件对应新旧 VNode 以及组件实例对象的 proxy property 和旧 VNode 树
      const { next, vnode, proxy, subTree: preSubTree } = instance
      console.log('update', vnode.type.name)

      if (next) {
        // 将旧 VNode 的 el property 挂载到新 VNode 上
        next.el = vnode.el

        updateComponentPreRender(instance, next)
      }

      //
    }
  })
}
再给 VNode 增加 component property,用于保存对应组件实例对象,默认值设置为 null,在src/runtime-core目录下的vnode.ts文件中完善createVNode函数:
/* vnode.ts */

export function createVNode(type, props?, children?) {
  const vnode = {
    type,
    props,
    children,
    // 对应组件实例对象
    component: null,
    shapeFlag: getShapeFlag(type),
    key: props?.key,
    el: null
  }

  /* 其他代码 */
}
为了提升性能,避免即使子组件不需要更新在更新父组件时也会更新子组件的情况出现,在src/runtime-core目录下创建componentUpdateUtils.ts文件,在其中实现并导出shouldUpdateComponent函数,用于判断组件是否需要更新,在其中对比新旧 VNode 的 props 对象,若不相等则返回 true,否则返回 false:
/* componentUpdateUtils.ts */

// 用于判断组件是否需要更新
export function shouldUpdateComponent(prevVNode, nextVNode): boolean {
  const { props: prevProps } = prevVNode
  const { props: nextProps } = nextVNode

  // 对比新旧 VNode 的 props 对象,若不相等则返回 true,否则返回 false
  for (const key in nextProps) {
    if (nextProps[key] !== prevProps[key]) {
      return true
    }
  }

  return false
}
最后来实现src/runtime-core目录下的renderer.ts文件中的updateComponent函数,在其中首先获取旧 VNode 对应组件实例对象并将其挂载到 VNode 上,若组件需要更新则将新 VNode 挂载到组件实例对象上,并调用组件实例对象的 update 方法,也就是再次执行调用render函数和patch方法获取并处理 VNode 树的操作,否则将旧 VNode 的 el property 挂载到新 VNode 上,并将新 VNode 挂载到组件实例对象上:
/* renderer.ts */

function updateComponent(n1, n2) {
  // 获取旧 VNode 对应组件实例对象并将其挂载到新 VNode 上
  const instance = (n2.component = n1.component)

  // 若需要更新组件
  if (shouldUpdateComponent(n1, n2)) {
    // 将新 VNode 挂载到组件实例对象上
    instance.next = n2
    // 调用组件实例对象的 update 方法
    instance.update()
  }
  // 否则
  else {
    // 将旧 VNode 的 el property 挂载到新 VNode 上
    n2.el = n1.el
    // 将新 VNode 挂载到组件实例对象上
    instance.vnode = n2
  }
}
在项目文件夹下执行yarn build命令进行打包,打包完成后通过 live server 插件打开example/update-Component目录下的index.html文件,可以看到根组件和 Foo 组件选项对象中的内容被渲染到了页面上,依次点击两个按钮,Foo 组件和根组件中的内容分别进行了更新,这样就成功实现了 Component 的更新。
5.6 实现nextTick
查看 Vue3 API 文档中的全局 API 部分,找到nextTick的介绍。
将回调推迟到下一个 DOM 更新周期之后执行。在更改了一些数据以等待 DOM 更新后立即使用它。
import { createApp, nextTick } from 'vue'

const app = createApp({
  setup() {
    const message = ref('Hello!')
    const changeMessage = async newMessage => {
      message.value = newMessage
      await nextTick()
      console.log('Now DOM is updated')
    }
  }
})
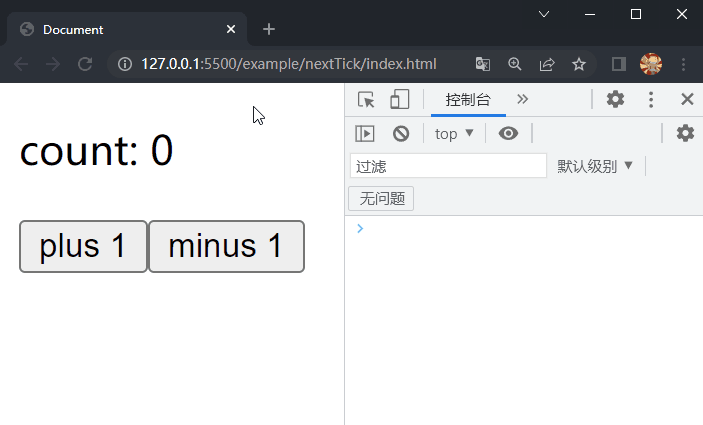
① happy path
在实现nextTick之前,首先在example目录下创建nextTick文件夹,在其中放置插槽的测试相关文件,包括三个文件:index.html、main.js和App.js,其中index.html和main.js文件中的内容与之前的测试相同,App.js文件中的内容如下:
/* App.js */

export default {
  name: 'App',
  setup() {
    // 响应式数据
    const count = ref(0)
    const instance = getCurrentInstance()

    function onPlus() {
      // 修改响应式数据
      count.value++

      // 同步获取视图中显示的内容
      console.log(instance.vnode.el.childNodes[0].innerHTML)

      // 在 nextTick 的回调函数中获取视图中显示的内容
      nextTick(() => {
        console.log(instance.vnode.el.childNodes[0].innerHTML)
      })
    }

    async function onMinus() {
      // 修改响应式数据
      count.value--

      // 同步获取视图中显示的内容
      console.log(instance.vnode.el.childNodes[0].innerHTML)

      // 等待 nextTick 执行后再获取视图中显示的内容
      await nextTick()
      console.log(instance.vnode.el.childNodes[0].innerHTML)
    }

    return {
      count,
      onPlus,
      onMinus
    }
  },
  render() {
    return h('div', {}, [
      h('p', {}, `count: ${this.count}`),
      h('button', { onClick: this.onPlus }, 'plus 1'),
      h('button', { onClick: this.onMinus }, 'minus 1')
    ])
  }
}
② 实现
在 Vue3 中,视图的更新是异步的,也就是说如果在视图中进行操作会触发setup返回对象中的响应式数据的连续多次修改,只会根据最后的数据生成新的 VNode 并将原来的相应部分替换为新的部分。为了实现视图的异步更新,在利用effect将调用render函数和patch方法获取并处理 VNode 树的操作收集时传入包含scheduler方法的对象作为第二个参数,而在scheduler方法将组件实例对象的 update 方法保存到队列中,最后将依次从队列中弹出组件实例对象的 update 方法并执行的操作放到微任务队列中。
首先,为了使用Array.prototype.includes方法,在tsconfig.json文件中的lib项中增加ES2016:
"lib": [
  "DOM",
  "ES6",
  "ES2016"
]
接下来,在src/runtime-core目录下创建scheduler.ts文件,用数组queue保存组件实例对象的 update 方法,用变量isFlushPending标志是否将清空队列的操作放到微任务队列中,然后实现并导出queueJobs函数,用于将组件实例对象的 update 方法保存到队列中:
/* scheduler.ts */

// 用于保存组件实例对象的 update 方法
const queue: any[] = []
// 用于标志是否将清空队列的操作放到微任务队列中
let isFlushPending = false

// 用于将组件实例对象的 update 方法保存到队列中并将清空队列的操作放到微任务队列中
export function queueJobs(job) {
  if (!queue.includes(job)) {
    queue.push(job)
  }

  // 若清空队列的操作已经放到微任务队列中则直接返回
  if (isFlushPending) {
    return
  }

  isFlushPending = true

  // 将依次从队列中弹出组件实例对象的 update 方法并执行的操作放到微任务队列中
  Promise.resolve().then(() => {
    isFlushPending = false

    let nextJob
    while ((nextJob = queue.shift())) {
      nextJob && job()
    }
  })
}
再完善src/runtime-core目录下的renderer.ts文件中的setupRenderEffect函数,在利用effect收集操作时传入包含scheduler方法的对象作为第二个参数,而在scheduler方法中调用queueJobs函数并传入组件实例对象的 update 方法:
/* renderer.ts */

function setupRenderEffect(instance, vnode, container, anchor) {
  instance.update = effect(
    () => {
      /* 其他代码 */
    },
    // 传入包含 scheduler 方法的对象作为第二个参数
    {
      // 在 scheduler 方法中将组件实例对象的 update 方法保存到队列中
      scheduler() {
        queueJobs(instance.update)
      }
    }
  )
}
在src/runtime-core目录下的scheduler.ts文件中实现并导出nextTick,用于将回调函数推迟到下一个 DOM 更新周期之后执行,在其中若传入了回调函数则将其放到微任务队列中并返回一个 Promise,否则直接返回一个 Promise:
/* scheduler.ts */

// 用于将回调函数推迟到下一个 DOM 更新周期之后执行
export function nextTick(fn) {
  // 若传入了回调函数则将其放到微任务队列中并返回一个 Promise,否则直接返回一个 Promise
  return fn ? Promise.resolve().then(fn) : Promise.resolve()
}
最后在src/runtime-core目录下的index.ts文件中将nextTick导出:
/* index.ts */

export { nextTick } from './scheduler'
在项目文件夹下执行yarn build命令进行打包,打包完成后通过 live server 插件打开example/nextTick目录下的index.html文件,可以看到根组件选项对象中的内容被渲染到了页面上,依次点击两个按钮,在控制台均先后输出视图更新前后显示的内容,这样就成功实现了nextTick。
对以上实现做简单优化,在src/runtime-core目录下的scheduler.ts文件中,将清空队列的操作和依次从队列中弹出组件实例对象的 update 方法并执行的操作分别抽离成queueFlush函数和flushJobs函数,并利用nextTick将flushJobs函数放到微任务队列中:
/* scheduler.ts */

const p = Promise.resolve()

export function nextTick(fn) {
  return fn ? p.then(fn) : p
}

export function queueJobs(job) {
  if (!queue.includes(job)) {
    queue.push(job)
  }

  queueFlush()
}

// 用于清空队列
function queueFlush() {
  if (isFlushPending) {
    return
  }

  isFlushPending = true

  // 利用 nextTick 将 flushJobs 函数放到微任务队列中
  nextTick(flushJobs)
}

// 用于依次从队列中弹出组件实例对象的 update 方法并执行
function flushJobs() {
  isFlushPending = false

  let job
  while ((job = queue.shift())) {
    job && job()
  }
}
总结
至此,就完成了 Mini-Vue3 的 runtime-core 的更新,希望这篇文章能够让你有所收获,如果觉得写的不错还请👍🏻支持一下。
