1.事件捕获
事件捕获 : 当触发子元素的事件时候,先从最顶级父元素,一级一级往里触发
执行规则: window->document->html->body->父元素->子元素
document.querySelector('.son').addEventListener('click',function(){
alert('我是蓝色子元素')
},true)
document.querySelector('.father').addEventListener('click',function(){
alert('我是红色父元素')
},true)
document.body.addEventListener('click',function(){
alert('我是body')
},true)
document.documentElement.addEventListener('click',function(){
alert('我是html')
},true)
document.addEventListener('click',function(){
alert('我是document')
},true)
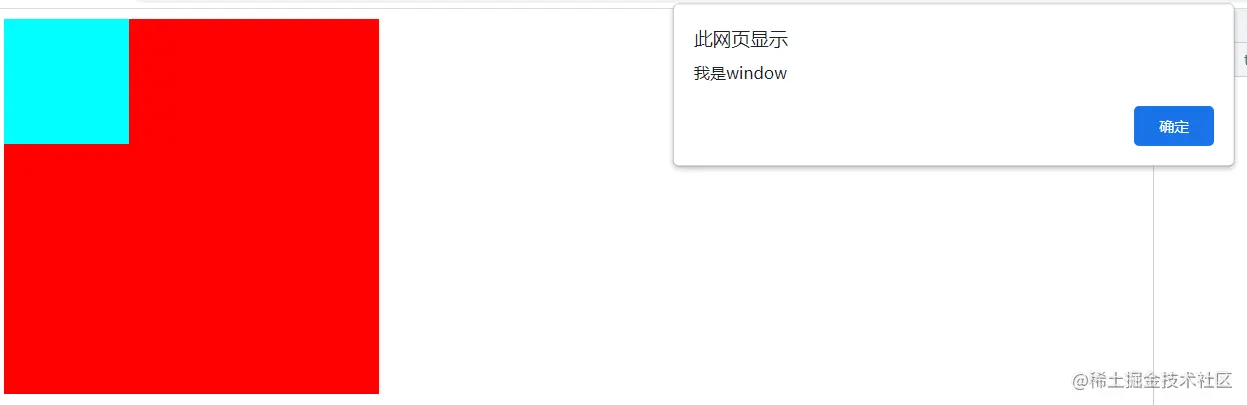
window.addEventListener('click',function(){
alert('我是window')
},true)
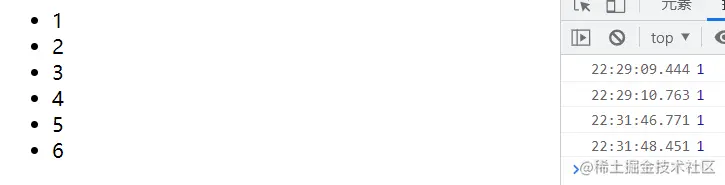
2.事件冒泡
当一个元素的事件被触发时,同样的事件将会在该元素的所有祖先元素中依次被触发。这一过程被称为事件冒泡
事件冒泡 : 当触发子元素的事件时候,所有的父级元素‘同名事件’会被依次触发
子元素->父元素->body->html->document->window
<div class="father">
<div class="son"></div>
</div>
<script>
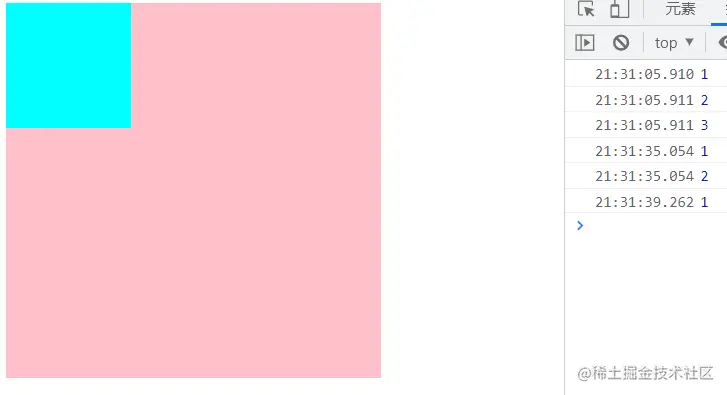
document.addEventListener('click', function () {
console.log(1);
}, true)
document.querySelector('.father').addEventListener('click', function () {
console.log(2)
}, true)
document.querySelector('.son').addEventListener('click', function () {
console.log(3)
}, true)
注:当鼠标点击子盒子时控制台依次会出现1,2,3 当点击父盒子时控制台会出现1,2 当点击空白页面时会出现1
3.鼠标经过事件
 mouseover 和 mouseout 会有冒泡效果
 mouseenter 和 mouseleave 没有冒泡效果 (推荐)
     .father {
  width: 300px;
  height: 300px;
  background-color: pink;
}

.son {
  width: 100px;
  height: 100px;
  background-color: aqua;
}
  </style>
</head>

<body>
   <div class="father">
   <div class="son"></div>
  </div>
 <script>
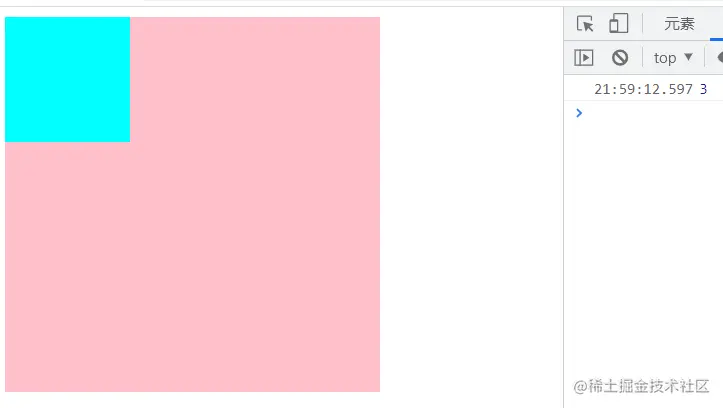
不会出现冒泡效果,鼠标经过子盒子时控制台依次会出现1,2,3
// document.addEventListener('mouseenter', function () {
//   console.log(1);
// })
// document.querySelector('.father').addEventListener('mouseenter', function () {
//   console.log(2)
// })
// document.querySelector('.son').addEventListener('mouseenter', function () {
//   console.log(3)
// })
会出现冒泡效果,鼠标经过子盒子时控制台依次会出现3,2,1
document.addEventListener('mouseover', function () {
  console.log(1);
})
document.querySelector('.father').addEventListener('mouseover', function () {
  console.log(2)
})
document.querySelector('.son').addEventListener('mouseover', function () {
  console.log(3)
})
4.阻止冒泡
阻止事件流动 : e.stopPropagation()
.father {
width: 300px;
height: 300px;
background-color: pink;
}
.son {
width: 100px;
height: 100px;
background-color: aqua;
}
</style>
</head>
<body>
<div class="father">
<div class="son"></div>
</div>
<script>
document.addEventListener('click', function () {
console.log(1);
})
document.querySelector('.father').addEventListener('click', function () {
console.log(2)
})
document.querySelector('.son').addEventListener('click', function (e) {
e.stopPropagation()
console.log(3)
})
</script>
当鼠标点击子盒子时控制台只会出现数字 3 不会出现1和2
5.阻止表单黙认行为
<form action="index" id="form">
用户名:<input type="text"><button>按钮</button>
</form>
<a href="http://www.baidu.com">百度</a>
<a href="javascript:;">百度</a>
<script>
const form = document.querySelector('#form')
form.addEventListener('submit', function (e) {
alert('1')
e.preventDefault()
})
document.querySelector('a').addEventListener('click', function (e) {
alert('阻止跳转')
e.preventDefault()
})
点击百度后不会跳转到网页

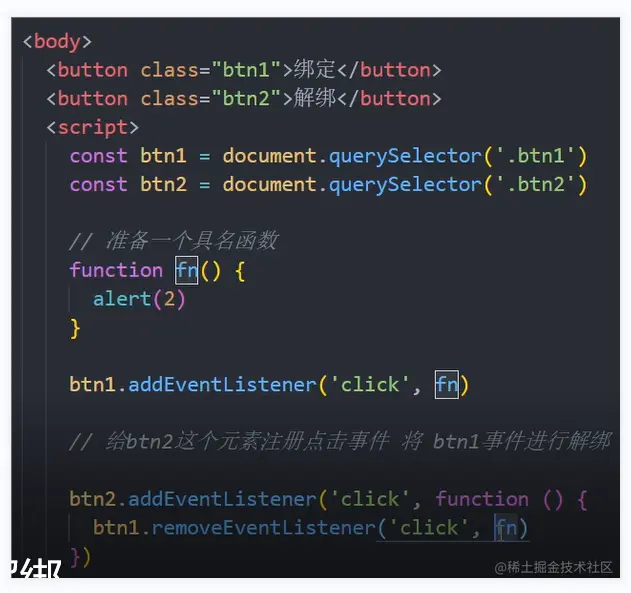
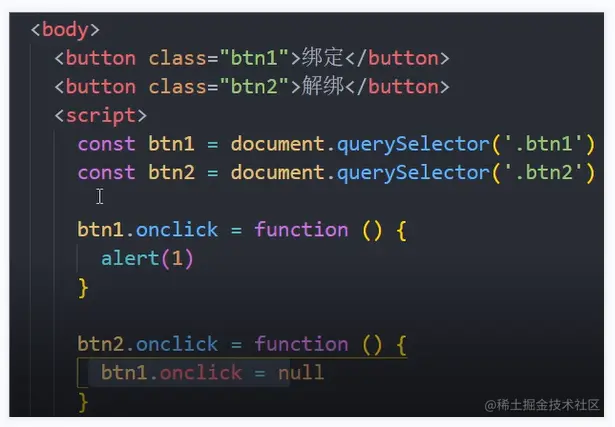
6.解绑事件
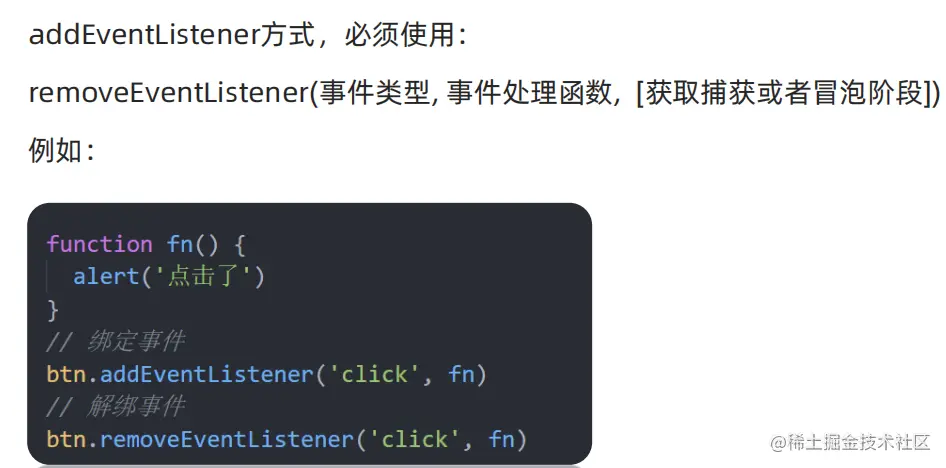
let box = document.querySelector('#box')
box.onclick = function(){
alert(11111)
}
box.onclick = null
box.addEventListener('click',function(){
alert('1-假如生活欺骗了你,请不要悲伤')
})
let fn = function(){
alert('2-因为它明天还会继续欺骗你')
}
box.addEventListener('click', fn )
box.removeEventListener('click', fn )
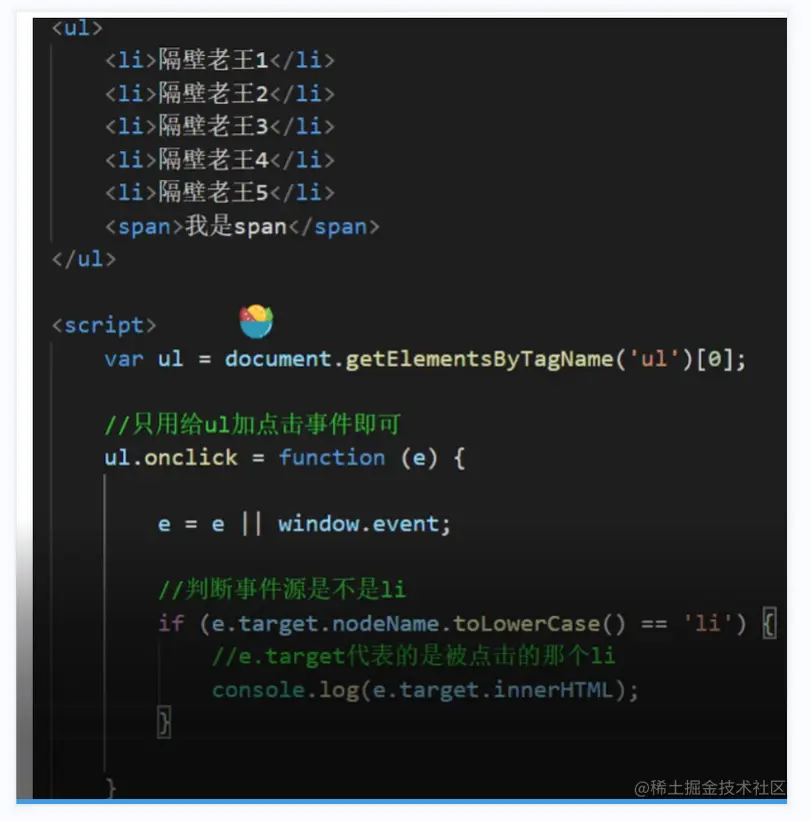
7.事件委托
事件委托 : 给父元素注册事件, 委托给子元素处理
1. 事件委托原理 : 事件冒泡
2. 事件委托注意点 :
不能使用 this : this指向父元素
需要使用 e.target : 真正点击的子元素(事件触发源)
3. 事件委托的应用 : 给动态新增元素注册事件 -->
<body>
<ul>
<li>1</li>
<li>2</li>
<li>3</li>
<li>4</li>
<li>5</li>
<li>6</li>
</ul>
<script>
const ul = document.querySelector('ul')
ul.addEventListener('click', function (e) {
if (e.target.tagName === 'LI') {
console.log(1);
}
})
注:只有点击li标签上的元素才会处发控制台的元素
8.页面加载事件
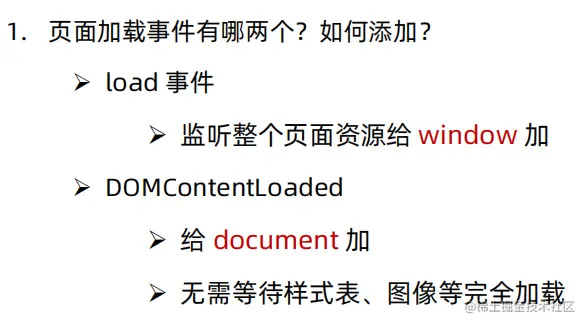
<script>
document.addEventListener('DOMContentLoaded', function () {
const btn = document.querySelector('#btn')
console.log(btn)
})
</script>
</head>
<body>
<button id="btn">按钮</button>
</body>
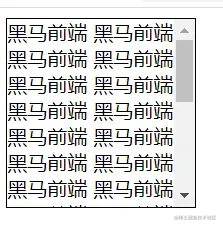
9.页面滚动事件
body {
height: 3000px;
}
.box {
overflow-y: scroll;
width: 150px;
height: 150px;
border: 1px solid black;
}
</style>
</head>
<body>
<div class="box">
黑马前端
黑马前端
黑马前端
黑马前端
黑马前端
黑马前端
黑马前端
黑马前端
黑马前端
黑马前端
黑马前端
黑马前端
黑马前端
黑马前端
黑马前端
黑马前端
黑马前端
黑马前端
黑马前端
黑马前端
黑马前端
黑马前端
黑马前端
黑马前端
黑马前端
黑马前端
黑马前端
黑马前端
黑马前端
黑马前端
黑马前端
黑马前端
黑马前端
</div>
<script>
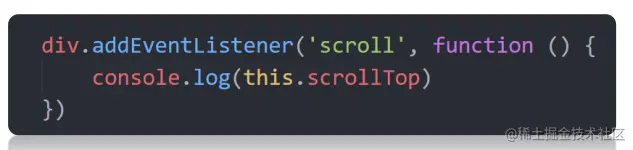
const box = document.querySelector('.box')
box.addEventListener('scroll', function () {
console.log('我滚动了')
})
10.给整个页面添加滚动事件
<style>
body {
height: 3000px;
}
</style>
</head>
<body>
<script>
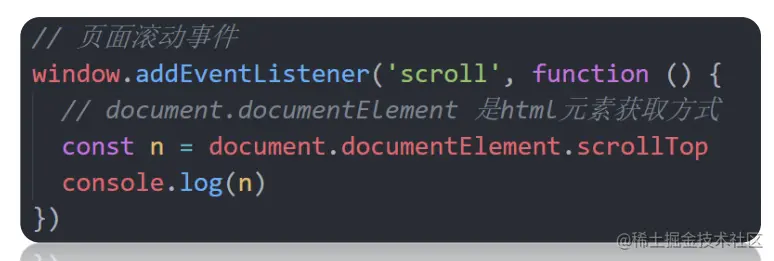
document.addEventListener('scroll', function () {
console.log(document.documentElement.scrollTop)
})
</script>
11.点击盒子滚动条回到顶部
<style>
body {
height: 3000px;
}
* {
margin: 0;
padding: 0;
}
.box {
position: fixed;
width: 60px;
height: 60px;
background-color: pink;
font-size: 20px;
line-height: 30px;
bottom: 20px;
right: 20px;
text-align: center;
cursor: pointer;
}
</style>
</head>
<body>
<div class="box">回到顶部</div>
<script>
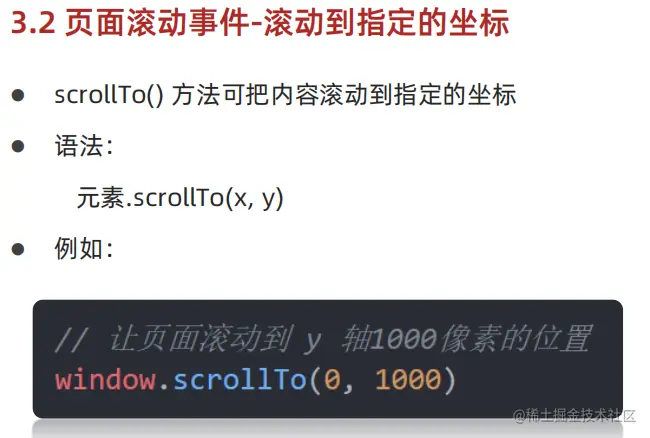
document.querySelector('.box').addEventListener('click', function () {
document.documentElement.scrollTop = 0
})
</script>

12.页面滚动事件-获取位置
scrollLeft和scrollTop (属性)
获取被卷去的大小
获取元素内容往左、往上滚出去看不到的距离
这两个值是可读写的

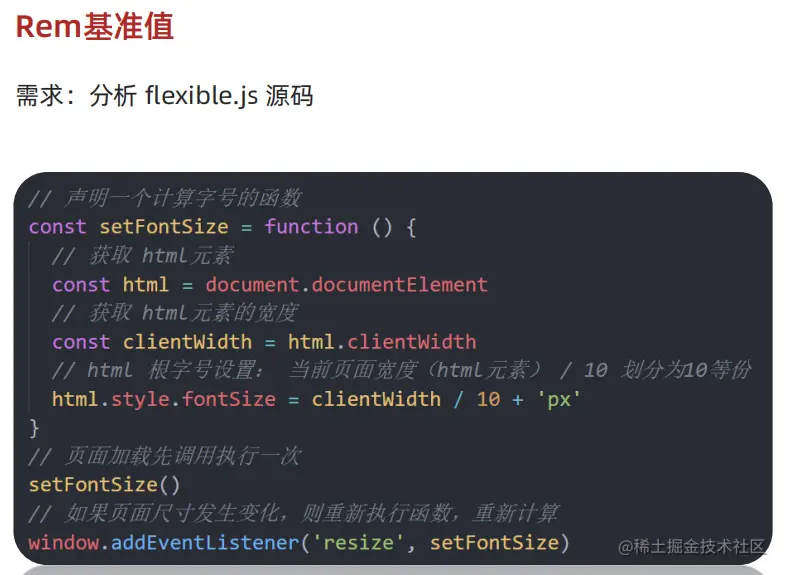
<script>
function setRemUnit() {
  const html = document.documentElement
  const rem = html.clientWidth / 10
  html.style.fontSize = rem + 'px'
}
setRemUnit()
window.addEventListener('resize', setRemUnit)
</script>
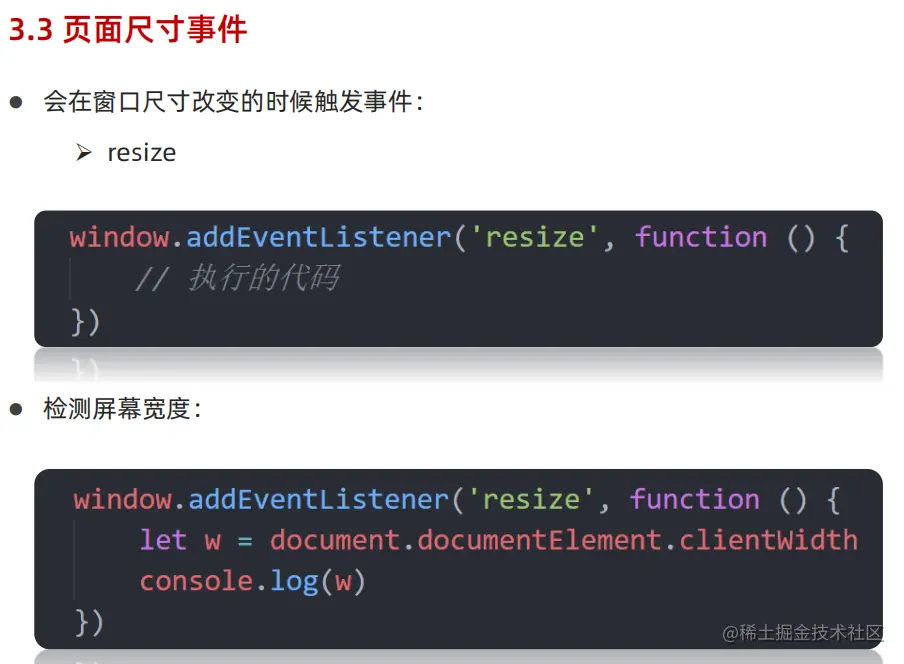
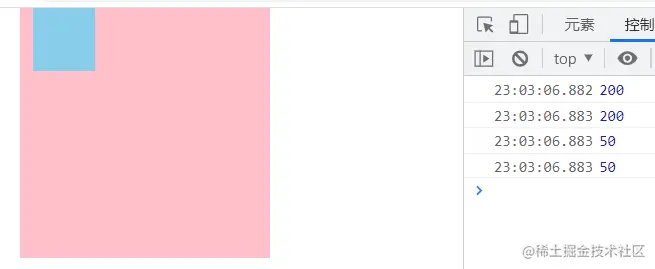
13.页面尺寸事件-获取元素宽高
 获取宽高:
 获取元素的可见部分宽高(不包含边框,margin,滚动条等)
 clientWidth和clientHeight
 <style>
* {
  margin: 0;
  padding: 0;
}

.box {
  width: 200px;
  height: 200px;
  background-color: pink;
  margin-left: 100px;
}

.son {
  width: 50px;
  height: 50px;
  background-color: skyblue;
  margin-left: 10px;
}
 </style>
</head>

<body>
     <div class="box">
     <div class="son"></div>
   </div>
 <script>
       onst box = document.querySelector('.box')
       console.log(box.clientWidth)
       console.log(box.clientHeight)

       const son = document.querySelector('.son')
       console.log(son.clientWidth)
       console.log(son.clientHeight)
 </script>
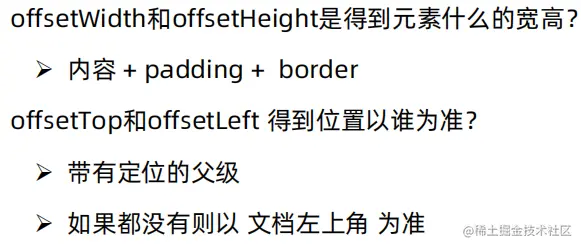
14.元素尺寸于位置-尺寸
获取宽高:
获取元素的自身宽高、包含元素自身设置的宽高、padding、border
offsetWidth和offsetHeight
获取出来的是数值,方便计算
注意: 获取的是可视宽高, 如果盒子是隐藏的,获取的结果是0
获取位置:
获取元素距离自己定位父级元素的左、上距离
offsetLeft和offsetTop 注意是只读属性
<style>
* {
  margin: 0;
  padding: 0;
}

.box {
  width: 200px;
  height: 200px;
  background-color: pink;
  margin-left: 100px;
  margin-top: 100px;
}

.son {
  width: 50px;
  height: 50px;
  background-color: skyblue;
  margin-left: 10px;
  margin-top: 120px;

}
 </style>
</head>

 <body>
   <div class="box">
   <div class="son"></div>
 </div>
 <script>
const box = document.querySelector('.box')
console.log(box.offsetLeft)
console.log(box.offsetTop)

const son = document.querySelector('.son')
console.log(son.offsetLeft)
console.log(son.offsetTop)
</script>
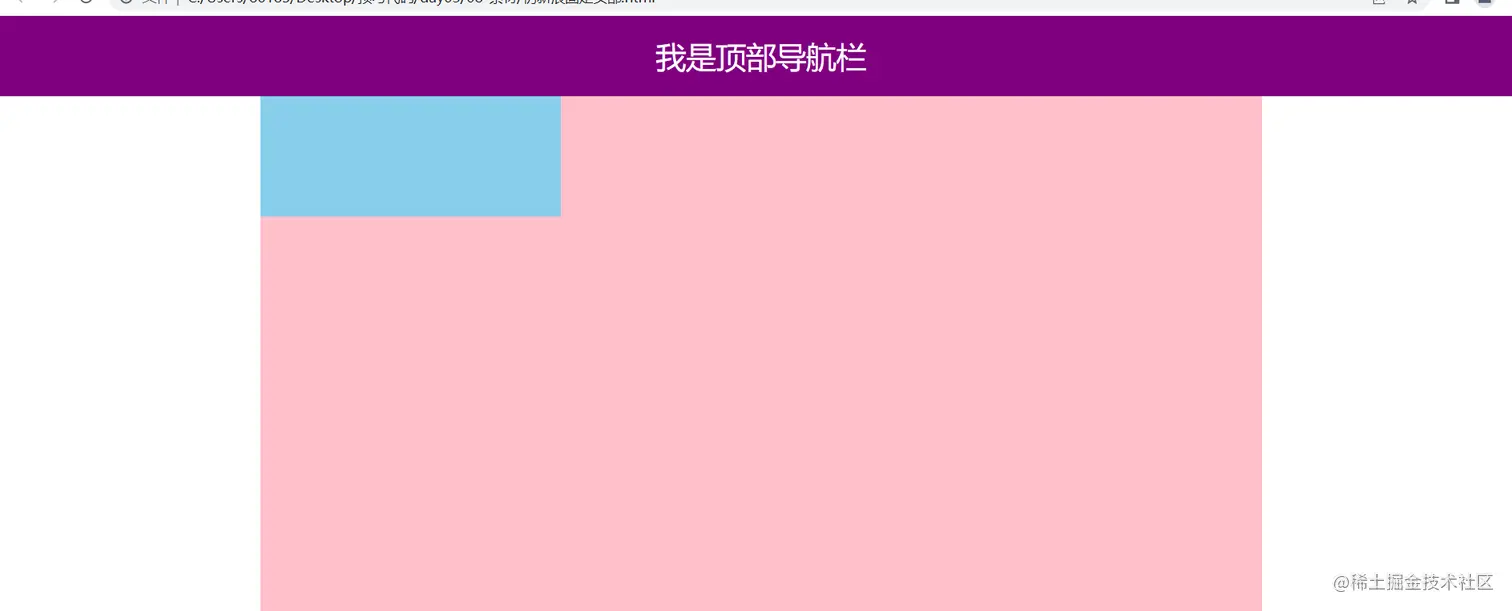
15.案例 仿新浪固定头部
   * {
  margin: 0;
  padding: 0;
  box-sizing: border-box;
}

.content {
  overflow: hidden;
  width: 1000px;
  height: 3000px;
  background-color: pink;
  margin: 0 auto;
}

.backtop {
  display: none;
  width: 50px;
  left: 50%;
  margin: 0 0 0 505px;
  position: fixed;
  bottom: 60px;
  z-index: 100;
}

.backtop a {
  height: 50px;
  width: 50px;
  background: url(./images/bg2.png) 0 -600px no-repeat;
  opacity: 0.35;
  overflow: hidden;
  display: block;
  text-indent: -999em;
  cursor: pointer;
}

.header {
  position: fixed;
  top: -80px;
  left: 0;
  width: 100%;
  height: 80px;
  background-color: purple;
  text-align: center;
  color: #fff;
  line-height: 80px;
  font-size: 30px;
  transition: all .3s;
}

.sk {
  width: 300px;
  height: 300px;
  background-color: skyblue;
  margin-top: 500px;
}
 </style>
</head>

<body>
   <div class="header">我是顶部导航栏</div>
   <div class="content">
 <div class="sk">秒杀模块</div>
</div>
  <div class="backtop">
   <img src="./images/close2.png" alt="">
   <a href="javascript:;"></a>
 </div>
 <script>
//获取秒杀模块到页面顶部距离
const sk = document.querySelector('.sk').offsetTop
const header = document.querySelector('.header')

//获取页面滚动元素
document.addEventListener('scroll', function () {
  //获取页面顶部距离
  const n = document.documentElement.scrollTop
  if (n > sk) {
    header.style.top = 0
  } else {
    header.style.top = '-80px'
  }
})
</script>
当蓝色盒子滚到上面时紫色盒子会显示出来