

Spirng中的自定义标签的解析
1、是什么
在Spring中存在默认标签与自定义标签两种,
默认标签:
<bean id="sqlSessionFactory" class="org.mybatis.spring.SqlSessionFactoryBean"/>
自定义标签:
<context:component-scan base-package="com.mmall" annotation-config="true"/>
<tx:annotation-driven transaction-manager="transactionManager" proxy-target-class="true" />
2、怎么用
Spring提供了可扩展Schema的支持,这是一个不错的折中方案,扩展Spring自定义标签配置大致需要以下几个步骤(前提是要把Spring的Core包加入项目中)。
- 创建一个需要扩展的组件(即我们自定义的java类)。
- 定义一个XSD文件描述组件内容。
- 创建一个文件,实现BeanDefinitionParser接口,用来解析XSD文件中的定义和组件定义。
- 创建一个Handler文件,扩展自NamespaceHandlerSupport,目的是将组件注册到Spring容器。
- 编写Spring.handlers和Spring.schemas文件。 ----《Spring源码深度解析》
什么是Schema?(www.twle.cn/l/yufei/sch… zh.wikipedia.org/wiki/XML_Sc…
2.1 扩展的组件
首先我们创建一个普通的POJO,这个POJO没有任何特别之处,只是用来接收配置文件,接收我们在配置文件中配置在标签内的属性。
public class User {
    private String userName;
    private String email;

    public String getUserName() {
        return userName;
    }

    public void setUserName(String userName) {
        this.userName = userName;
    }

    public String getEmail() {
        return email;
    }

    public void setEmail(String email) {
        this.email = email;
    }
}
2.2自定义XSD
定义一个 XSD 文件描述组件内容(可利用在线生成工具xmlgrid.net/xml2xsd.htm…
<?xml version="1.0" encoding="UTF-8"?>
<xs:schema xmlns:xs="http://www.w3.org/2001/XMLSchema"
           elementFormDefault="qualified"
           targetNamespace="http://www.shihy.vip/schema/user">
    <xs:element name="user">
        <xs:complexType>
            <xs:attribute name="id" type="xs:string"></xs:attribute>
            <xs:attribute name="userName" type="xs:string"></xs:attribute>
            <xs:attribute name="email" type="xs:string"></xs:attribute>
        </xs:complexType>
    </xs:element>
</xs:schema>
- 声明命名空间:
http://www.shihy.vip/schema/user - 定义element: 这里的
user就是元素的名称,使用时<myname:user id="testbean" userName="shihy" email="xxxxxxxx@qq.com"/> - 定义元素属性: 元素属性就是
attribute标签,user有3个属性id、userName和email。
2.3定义解析规则
创建一个文件,实现BeanDefinitionParser接口,用来解析XSD文件中的定义和组件定义
/**
 * BeanDefinitionParser 自定义标签的解析
 */
public class UserBeanDefinitionParser  extends AbstractSingleBeanDefinitionParser {
    //element对应的类,表示该标签<myname:user id="testbean" userName="shihy" email="xxxxxxxx@qq.com"/>
    //所对应的类。该方法的返回值会作为builder.getRawBeanDefinition().setBeanClass(beanClass)方法的入参,即
    //beanClass,放到BeanDefinition中
    protected Class getBeanClass(Element element) {
        return User.class;
    }
    //从element中解析并提取对应的元素的属性,放入到BeanDefinition中
    protected void doParse(Element element, BeanDefinitionBuilder bean) {
        //在 xsd 中定义的userName属性
        String userName = element.getAttribute("userName");
        //在 xsd 中定义的email属性
        String email = element.getAttribute("email");
        //将提取的属性放入到BeanDefinitionBuilder中(其实就是放到BeanDefinition中,只不过是包装了一层),
        //待到完成所有bean的解析后统一注册到beanFactory中
        if (StringUtils.hasText(userName)) {
            bean.addPropertyValue("userName", userName);
        }
        if (StringUtils.hasText(email)) {
            bean.addPropertyValue("email", email);
        }
    }
}
2.4 创建Handler类
创建一个Handler类,扩展自NamespaceHandlerSupport
Handler类:
/**
 * 自定义标签解码入口
 *
 */
public class MyNamespaceHandler extends NamespaceHandlerSupport  {
    public void init() {
        //入参user要注意和xsd中的一致,在xsd中定义的是<xs:element name="user">
        registerBeanDefinitionParser("user", new UserBeanDefinitionParser());
    }

}
Handler类的方法很简单,registerBeanDefinitionParser目的是将组件注册到父类的属性parsers中,
/**
  * Stores the {@link BeanDefinitionParser} implementations keyed by the
  * local name of the {@link Element Elements} they handle.
  * 用于保存BeanDefinitionParser的实现类,以能被这些BeanDefinitionParser的实现类处理的Element的local name为key
  */
	private final Map<String, BeanDefinitionParser> parsers =
			new HashMap<String, BeanDefinitionParser>();
何为local name?
//com.sun.org.apache.xerces.internal.dom.DeferredElementNSImpl#synchronizeData
// extract local part from QName
        int index = name.indexOf(':');
        if (index < 0) {
            localName = name;
        }
        else {
            localName = name.substring(index + 1);
        }
2.5编写Spring.handlers和Spring.schemas文件
编写Spring.handlers和Spring.schemas文件,默认位置是在工程的/META-INF/文件夹下,当然,你可以通过Spring的扩展或者修改源码的方式改变路径。
- Spring.handlers。
//xsd的命名空间(后期作为key来取这个等号后面的值参见3.2.2。) = 自定义的Handler类的全限定名
http\://www.shihy.vip/schema/user = com.shihy.common.handler.MyNamespaceHandler
- Spring.schemas。
//xsi:schemaLocation属性中配置的xsd位置字符串(这里可以不是真正的xsd的名字或者位置,只是作为一个标识,后期会拿它作为key,来取这个等号后面的值参考3.1的5.2.1,如) = 自定义的xsd的相对路径
http\://www.shihy.vip/schema/user.xsd = com/shihy/common/config/Spring-test.xsd
他们默认的加载路径
//org.springframework.beans.factory.xml.DefaultNamespaceHandlerResolver#DEFAULT_HANDLER_MAPPINGS_LOCATION
/**
  * The location to look for the mapping files. Can be present in multiple JAR files.
  */
	public static final String DEFAULT_HANDLER_MAPPINGS_LOCATION = "META-INF/spring.handlers";

//org.springframework.beans.factory.xml.PluggableSchemaResolver#DEFAULT_SCHEMA_MAPPINGS_LOCATION
 /**
   * The location of the file that defines schema mappings.
   * Can be present in multiple JAR files.
   */
   public static final String DEFAULT_SCHEMA_MAPPINGS_LOCATION = "META-INF/spring.schemas";
到这里,自定义的配置就结束了,而Spring加载自定义的大致流程是遇到自定义标签然后就去Spring.handlers和Spring.schemas中去找对应的handler和XSD,默认位置是/META-INF/下,进而有找到对应的handler以及解析元素的Parser,从而完成了整个自定义元素的解析,也就是说自定义与Spring中默认的标准配置不同在于Spring将自定义标签解析的工作委托给了用户去实现。
- 最终的项目目录
2.6创建测试配置文件
在配置文件中引入对应的命名空间以及XSD后,便可以直接使用自定义标签了。
<?xml version="1.0" encoding="UTF-8"?>
<--xmlns:myname="http://www.shihy.vip/schema/user",这个值就是对应的xsd文件的targetNamespace的值-->
<beans xmlns="http://www.springframework.org/schema/beans"
       xmlns:xsi="http://www.w3.org/2001/XMLSchema-instance"
       xmlns:myname="http://www.shihy.vip/schema/user"
       xsi:schemaLocation="
       http://www.springframework.org/schema/beans http://www.springframework.org/schema/beans/spring-beans.xsd
	   http://www.shihy.vip/schema/user http://www.shihy.vip/schema/user.xsd">
    <myname:user id="testbean" userName="shihy" email="xxxxxxxx@qq.com"/>
</beans>
2.7 测试
public class CustomElementTest
{
    private static DefaultListableBeanFactory factory;

    public static void main(String[] args)
    {
        ApplicationContext bf = new ClassPathXmlApplicationContext("application-context.xml");
        User user=(User) bf.getBean("test");
        System.out.println(user.getUserName()+","+user.getEmail());
    }
}
输出结果:shihy,xxxxxxxx@qq.com
3、为什么---源码解析
//org.springframework.beans.factory.xml.XmlBeanDefinitionReader#doLoadBeanDefinitions
protected int doLoadBeanDefinitions(InputSource inputSource, Resource resource)
			throws BeanDefinitionStoreException {
		try {
		    //3.1的入口
			Document doc = doLoadDocument(inputSource, resource);
			//3.2的入口
			return registerBeanDefinitions(doc, resource);
		}
		......省略部分代码
	}
3.1在哪里解析了XSD文档和spring.schemas文件的呢?
-
**1.**在容器初启动的时候,会初始化
XmlBeanDefinitionReader,在初始化的过程中,会创建它的成员变量private EntityResolver entityResolver
//org.springframework.context.support.AbstractXmlApplicationContext#loadBeanDefinitions(org.springframework.beans.factory.support.DefaultListableBeanFactory)
protected void loadBeanDefinitions(DefaultListableBeanFactory beanFactory) throws BeansException, IOException {
		// Create a new XmlBeanDefinitionReader for the given BeanFactory.
		XmlBeanDefinitionReader beanDefinitionReader = new XmlBeanDefinitionReader(beanFactory);
        ........省略部分代码
		beanDefinitionReader.setEntityResolver(new ResourceEntityResolver(this));
        ........省略部分代码
	}
//org.springframework.beans.factory.xml.ResourceEntityResolver#ResourceEntityResolver
public ResourceEntityResolver(ResourceLoader resourceLoader) {
        //调用父类的构造器
		super(resourceLoader.getClassLoader());
		this.resourceLoader = resourceLoader;
	}
//org.springframework.beans.factory.xml.DelegatingEntityResolver#DelegatingEntityResolver(java.lang.ClassLoader)
//父类的构造器
public DelegatingEntityResolver(ClassLoader classLoader) {
        //关于dtd解析的,不用考虑
		this.dtdResolver = new BeansDtdResolver();
        //重头戏,这个东西就是用来解析我们的XSD
		this.schemaResolver = new PluggableSchemaResolver(classLoader);
	}
//org.springframework.beans.factory.xml.PluggableSchemaResolver#PluggableSchemaResolver(java.lang.ClassLoader)
/**
  * Loads the schema URL -> schema file location mappings using the default
  * mapping file pattern "META-INF/spring.schemas".
  * the ClassLoader to use for loading
  * (can be {@code null}) to use the default ClassLoader
  */
public PluggableSchemaResolver(ClassLoader classLoader) {
        //利用这个classLoader来加载schema文件,一般是AppClassLoader,即在classpath下加载
		this.classLoader = classLoader;
        //默认的schema文件存放位置
		this.schemaMappingsLocation = DEFAULT_SCHEMA_MAPPINGS_LOCATION;
	}
//org.springframework.beans.factory.xml.PluggableSchemaResolver#DEFAULT_SCHEMA_MAPPINGS_LOCATION
public static final String DEFAULT_SCHEMA_MAPPINGS_LOCATION = "META-INF/spring.schemas";
- **2.**接着根据spring 的配置文件加bean定义,此时会用到
ResourceEntityResolver
//org.springframework.beans.factory.xml.XmlBeanDefinitionReader#doLoadDocument
protected Document doLoadDocument(InputSource inputSource, Resource resource) throws Exception {
		return this.documentLoader.loadDocument(inputSource, getEntityResolver(), this.errorHandler,
				getValidationModeForResource(resource), isNamespaceAware());
	}
这里的getEntityResolver()方法,就是获取我们前面初始化的时候new 的那个ResourceEntityResolver。
- **3.**在loadDocument方法中会用到JDK的jar包,用于xml解析。将spring的
ResourceEntityResolver作为入参。
//org.springframework.beans.factory.xml.DefaultDocumentLoader#loadDocument
public Document loadDocument(InputSource inputSource, EntityResolver entityResolver,
			ErrorHandler errorHandler, int validationMode, boolean namespaceAware) throws Exception {
		......省略部分代码
		DocumentBuilder builder = createDocumentBuilder(factory, entityResolver, errorHandler);
		return builder.parse(inputSource);
	}
- **4.**对于xml的解析大概分为,第一步,校验;第二步,生成Document对象。
//com.sun.org.apache.xerces.internal.jaxp.DocumentBuilderImpl#parse
public Document parse(InputSource is) throws SAXException, IOException {
        ......省略部分代码
        //第一步,这里进行对is中的xml文档,进行xsd格式校验。is就是spring配置文件的对象表示
        domParser.parse(is);
        //第二步,获取xml文档对应的Document对象,里面包含了spring配置文件中配置的所有的节点
        Document doc = domParser.getDocument();
        domParser.dropDocumentReferences();
        return doc;
    }
- **5.**进入
domParser.parse(is)方法后,最终会调用到如下代码:
//com.sun.org.apache.xerces.internal.impl.xs.XMLSchemaValidator#handleStartElement
Augmentations handleStartElement(QName element, XMLAttributes attributes, Augmentations augs) {
......省略部分代码
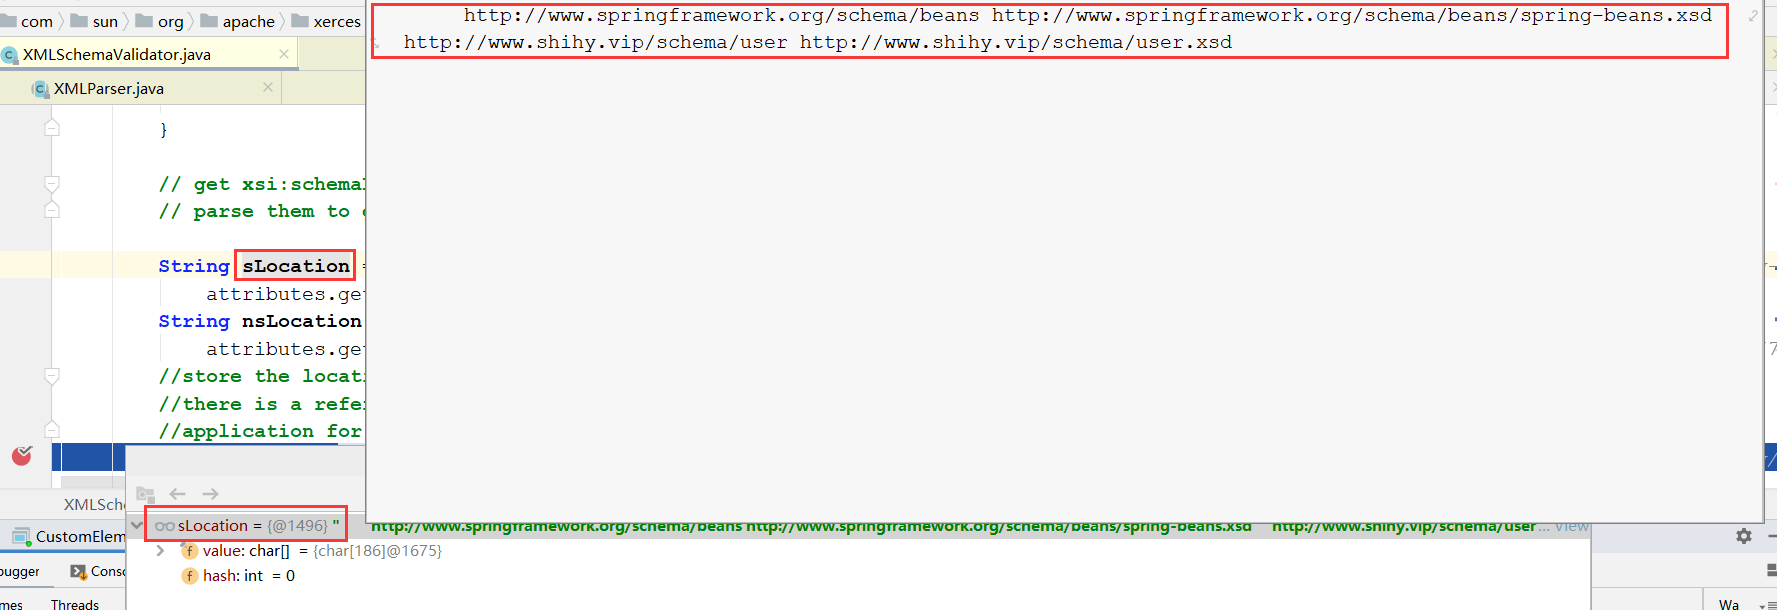
// get xsi:schemaLocation and xsi:noNamespaceSchemaLocation attributes,
// parse them to get the grammars
//在这里解析我们在spring配置文件中在xsi:schemaLocation中配置的值
//public static final String XSI_SCHEMALOCATION = "schemaLocation".intern();
//public static final String URI_XSI = "http://www.w3.org/2001/XMLSchema-instance".intern();
//就是获取我们在spring配置文件中配置的xsi:schemaLocation中的值
String sLocation =
attributes.getValue(SchemaSymbols.URI_XSI, SchemaSymbols.XSI_SCHEMALOCATION);
//public static final String XSI_NONAMESPACESCHEMALOCATION = "noNamespaceSchemaLocation".intern();
String nsLocation =
attributes.getValue(SchemaSymbols.URI_XSI, SchemaSymbols.XSI_NONAMESPACESCHEMALOCATION);
//store the location hints.. we need to do it so that we can defer the loading of grammar until
//there is a reference to a component from that namespace. To provide location hints to the
//application for a namespace
//5.1将xsi:schemaLocation中的值解析出来,放入fLocationPairs这个Map中
storeLocations(sLocation, nsLocation);
......省略部分代码
//try to find schema grammar by different means..
//5.2 尝试用不同的方法寻找模式语法,返回一个表示xsd 的对象,见下面5.2解析
SchemaGrammar sGrammar =
findSchemaGrammar(
XSDDescription.CONTEXT_ELEMENT,
element.uri,
null,
element,
attributes);
......省略部分代码
//5.3 利用5.2返回的xsd对象进行格式校验
processAttributes(element, attributes, attrGrp);
......省略部分代码
}
- 5.1
storeLocations(sLocation, nsLocation)方法解析
//com.sun.org.apache.xerces.internal.impl.xs.XMLSchemaValidator#storeLocations
//这个方法将xml中的命名空间和xsd位置,拆分开,命名空间做key,xsd文件位置做value,放入fLocationPairs这个Map中
//fLocationPairs是个成员变量
void storeLocations(String sLocation, String nsLocation) {
        if (sLocation != null) {
            //看这里
            if (!XMLSchemaLoader.tokenizeSchemaLocationStr(sLocation, fLocationPairs)) {
                       ......省略部分代码
        }
        ......省略部分代码
    }
//com.sun.org.apache.xerces.internal.impl.xs.XMLSchemaLoader#tokenizeSchemaLocationStr
public static boolean tokenizeSchemaLocationStr(String schemaStr,
            Map<String, XMLSchemaLoader.LocationArray> locations) {
        if (schemaStr!= null) {
            //" \n\t\r"这个字符串中的每个字符,会作为分隔符,用来截取schemaStr
            //schemaStr就是上一步的sLocation
            StringTokenizer t = new StringTokenizer(schemaStr, " \n\t\r");
            String namespace, location;
           //用来判断是否还有命名空间和xsd
            while (t.hasMoreTokens()) {
                //用来获取命名空间---截取出一个单独的命名空间字符串,见5.1.1
                namespace = t.nextToken ();
                if (!t.hasMoreTokens()) {
                    return false; // error!
                }
                //获取xsd的位置---截取出一个单独的表示xsd位置的字符串见5.1.2
                location = t.nextToken();
                //构造LocationArray对象
                LocationArray la = locations.get(namespace);
                if(la == null) {
                    la = new LocationArray();
                    //放入locations中,即上一步的fLocationPairs
                    locations.put(namespace, la);
                }
                la.addLocation(location);
            }
        }
        return true;
    }
//java.util.StringTokenizer#hasMoreTokens
public boolean hasMoreTokens() {
        //newPosition初始化时候为-1
        //currentPosition初始化为0
        newPosition = skipDelimiters(currentPosition);
        return (newPosition < maxPosition);
    }
//java.util.StringTokenizer#skipDelimiters
private int skipDelimiters(int startPos) {
        if (delimiters == null)
            throw new NullPointerException();

        int position = startPos;
        //retDelims默认false,maxPosition表示最大位置
        while (!retDelims && position < maxPosition) {
            //hasSurrogates默认false
            if (!hasSurrogates) {
                //str即上面的sLocation,在这里,获取str的每一个字符
                char c = str.charAt(position);
                //maxDelimCodePoint的作用待研究。
                //用每一个字符和字符串" \n\t\r"对比,若该字符存在与字符串" \n\t\r"中,position加1,进行下一次循环。
                //若不存在,说明下一个字符是有效的信息,不是换行,空格,制表符,跳出循环。返回有效信息位置。
                if ((c > maxDelimCodePoint) || (delimiters.indexOf(c) < 0))
                    break;
                position++;
            } else {
                int c = str.codePointAt(position);
                if ((c > maxDelimCodePoint) || !isDelimiter(c)) {
                    break;
                }
                position += Character.charCount(c);
            }
        }
        return position;
    }
//java.util.StringTokenizer#nextToken()
public String nextToken() {
        currentPosition = (newPosition >= 0 && !delimsChanged) ?
            newPosition : skipDelimiters(currentPosition);
        delimsChanged = false;
        newPosition = -1;

        if (currentPosition >= maxPosition)
            throw new NoSuchElementException();
        int start = currentPosition;
        //在这里获取要截取的字符串的长度,scanToken方法和skipDelimiters方法类似
        currentPosition = scanToken(currentPosition);
        //截取出一个单独的命名空间字符串或者xsd位置的字符串并返回
        return str.substring(start, currentPosition);
    }
5.1.1 一个单独的命名空间字符串
5.1.2一个单独的表示xsd位置的字符串
5.1.3最后的locations变量的样子,locations其实就是前面的fLocationPairsf
- 5.2
findSchemaGrammar(XSDDescription.CONTEXT_ELEMENT,element.uri,null,element,attributes)方法解析
//com.sun.org.apache.xerces.internal.impl.xs.XMLSchemaValidator#findSchemaGrammar
//用于返回表示xsd文档的对象,里面包含了xsd的内容
SchemaGrammar findSchemaGrammar(
        short contextType,
        String namespace,
        QName enclosingElement,
        QName triggeringComponet,
        XMLAttributes attributes) {
        SchemaGrammar grammar = null;
        //get the grammar from local pool...
        //默认为null
        grammar = fGrammarBucket.getGrammar(namespace);

        if ((grammar == null && !fUseGrammarPoolOnly) || fNamespaceGrowth) {
            ......省略部分代码
            //fLocationPairs的值就是5.1.3的处理结果
            Map<String, XMLSchemaLoader.LocationArray> locationPairs = fLocationPairs;
            ......省略部分代码
            if (grammar == null || fXSDDescription.fLocationHints != null) {
                boolean toParseSchema = true;
                ......省略部分代码
                }

                // try to parse the grammar using location hints from that namespace..
                //尝试使用来自该名称空间的位置提示来解析语法…
                try {
                    //5.2.1获取xsd文件对应的资源表示
                    //fEntityResolver就是前面第3步传入的ResourceEntityResolver
                    XMLInputSource xis =
                        XMLSchemaLoader.resolveDocument(
                            fXSDDescription,
                            locationPairs,
                            fEntityResolver);
                        ......省略部分代码
                    if (toParseSchema) {
                        //5.2.2获取grammar对象
                        grammar = fSchemaLoader.loadSchema(fXSDDescription, xis, fLocationPairs);
                    }
                } catch (IOException ex) {
                   ......省略部分代码
                }
            }
        }
        return grammar;
    }
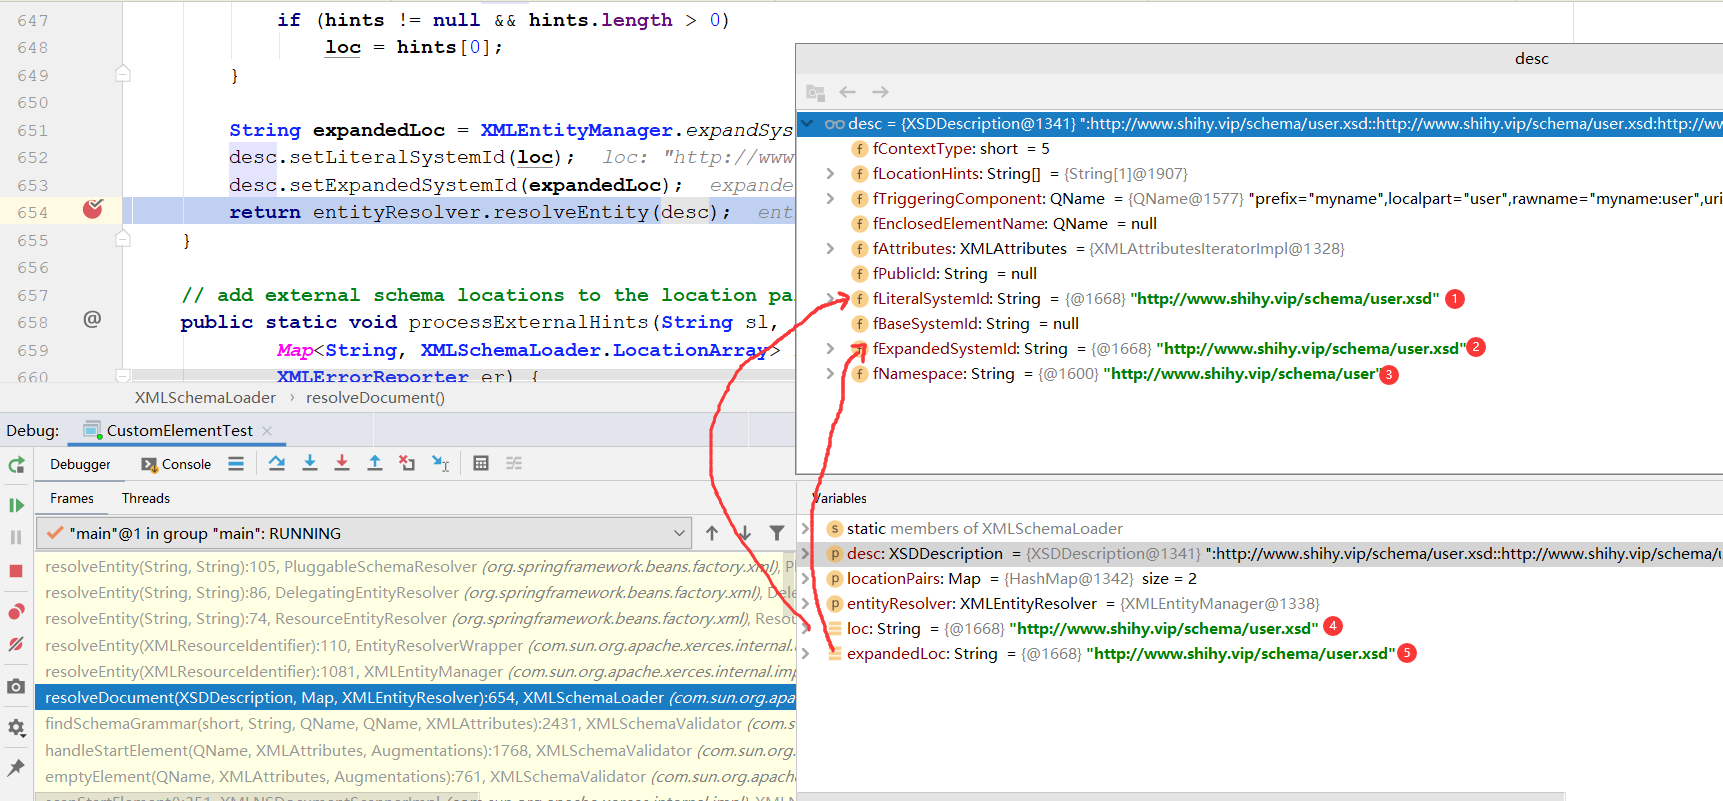
5.2.1 如何找到xsd文档?
//com.sun.org.apache.xerces.internal.impl.xs.XMLSchemaLoader#resolveDocument
public static XMLInputSource resolveDocument(XSDDescription desc,
            Map<String, LocationArray> locationPairs,
            XMLEntityResolver entityResolver) throws IOException {
        String loc = null;
        // we consider the schema location properties for import
        if (desc.getContextType() == XSDDescription.CONTEXT_IMPORT ||
                desc.fromInstance()) {
            // use empty string as the key for absent namespace
            //获取element节点的命名空间
            String namespace = desc.getTargetNamespace();
            String ns = namespace == null ? XMLSymbols.EMPTY_STRING : namespace;
            // get the location hint for that namespace
            //获取命名空间对应的xsd位置对象
            LocationArray tempLA = locationPairs.get(ns);
            if(tempLA != null)
                //获取数组中的第一个元素,即xsd位置字符串---http://www.shihy.vip/schema/user.xsd
                loc = tempLA.getFirstLocation();
        }

        // if it's not import, or if the target namespace is not set
        // in the schema location properties, use location hint
        if (loc == null) {
            String[] hints = desc.getLocationHints();
            if (hints != null && hints.length > 0)
                loc = hints[0];
        }
        //在这里expandedLoc就是等于loc的
        String expandedLoc = XMLEntityManager.expandSystemId(loc, desc.getBaseSystemId(), false);
        desc.setLiteralSystemId(loc);
        desc.setExpandedSystemId(expandedLoc);
        return entityResolver.resolveEntity(desc);
    }
//com.sun.org.apache.xerces.internal.util.EntityResolverWrapper#resolveEntity
public XMLInputSource resolveEntity(XMLResourceIdentifier resourceIdentifier)
        throws XNIException, IOException {

        String pubId = resourceIdentifier.getPublicId();
        //获取上一步的expandedLoc,也就是xsd的位置字符串---http://www.shihy.vip/schema/user.xsd
        String sysId = resourceIdentifier.getExpandedSystemId();
                //fEntityResolver就是容器初始化时候的那个ResourceEntityResolver--前面第1步
                InputSource inputSource = fEntityResolver.resolveEntity(pubId, sysId);
                if (inputSource != null) {
                    String publicId = inputSource.getPublicId();
                    String systemId = inputSource.getSystemId();
                    String baseSystemId = resourceIdentifier.getBaseSystemId();
                    InputStream byteStream = inputSource.getByteStream();
                    Reader charStream = inputSource.getCharacterStream();
                    String encoding = inputSource.getEncoding();
                    XMLInputSource xmlInputSource =
                        new XMLInputSource(publicId, systemId, baseSystemId);
                    xmlInputSource.setByteStream(byteStream);
                    xmlInputSource.setCharacterStream(charStream);
                    xmlInputSource.setEncoding(encoding);
                    return xmlInputSource;
                }
            }

    }
//org.springframework.beans.factory.xml.ResourceEntityResolver#resolveEntity
//这里就用到了容器初始化时候的那个ResourceEntityResolver了--前面第1步
public InputSource resolveEntity(String publicId, String systemId) throws SAXException, IOException {
        //这里真正去解析xsd
		InputSource source = super.resolveEntity(publicId, systemId);
		if (source == null && systemId != null) {
			String resourcePath = null;
			try {
				String decodedSystemId = URLDecoder.decode(systemId, "UTF-8");
				String givenUrl = new URL(decodedSystemId).toString();
				String systemRootUrl = new File("").toURI().toURL().toString();
				// Try relative to resource base if currently in system root.
				if (givenUrl.startsWith(systemRootUrl)) {
					resourcePath = givenUrl.substring(systemRootUrl.length());
				}
			}
			catch (Exception ex) {
				// Typically a MalformedURLException or AccessControlException.
				if (logger.isDebugEnabled()) {
					logger.debug("Could not resolve XML entity [" + systemId + "] against system root URL", ex);
				}
				// No URL (or no resolvable URL) -> try relative to resource base.
				resourcePath = systemId;
			}
			if (resourcePath != null) {
				if (logger.isTraceEnabled()) {
					logger.trace("Trying to locate XML entity [" + systemId + "] as resource [" + resourcePath + "]");
				}
				Resource resource = this.resourceLoader.getResource(resourcePath);
				source = new InputSource(resource.getInputStream());
				source.setPublicId(publicId);
				source.setSystemId(systemId);
				if (logger.isDebugEnabled()) {
					logger.debug("Found XML entity [" + systemId + "]: " + resource);
				}
			}
		}
		return source;
	}
//org.springframework.beans.factory.xml.DelegatingEntityResolver#resolveEntity
//ResourceEntityResolver的父类,回想前面1中调用的父类构造器
public InputSource resolveEntity(String publicId, String systemId) throws SAXException, IOException {
	//根据文件扩展名,来解析xsd还是dtd
    if (systemId != null) {
			if (systemId.endsWith(DTD_SUFFIX)) {
				return this.dtdResolver.resolveEntity(publicId, systemId);
			}
            //解析xsd
			else if (systemId.endsWith(XSD_SUFFIX)) {
				return this.schemaResolver.resolveEntity(publicId, systemId);
			}
		}
		return null;
	}
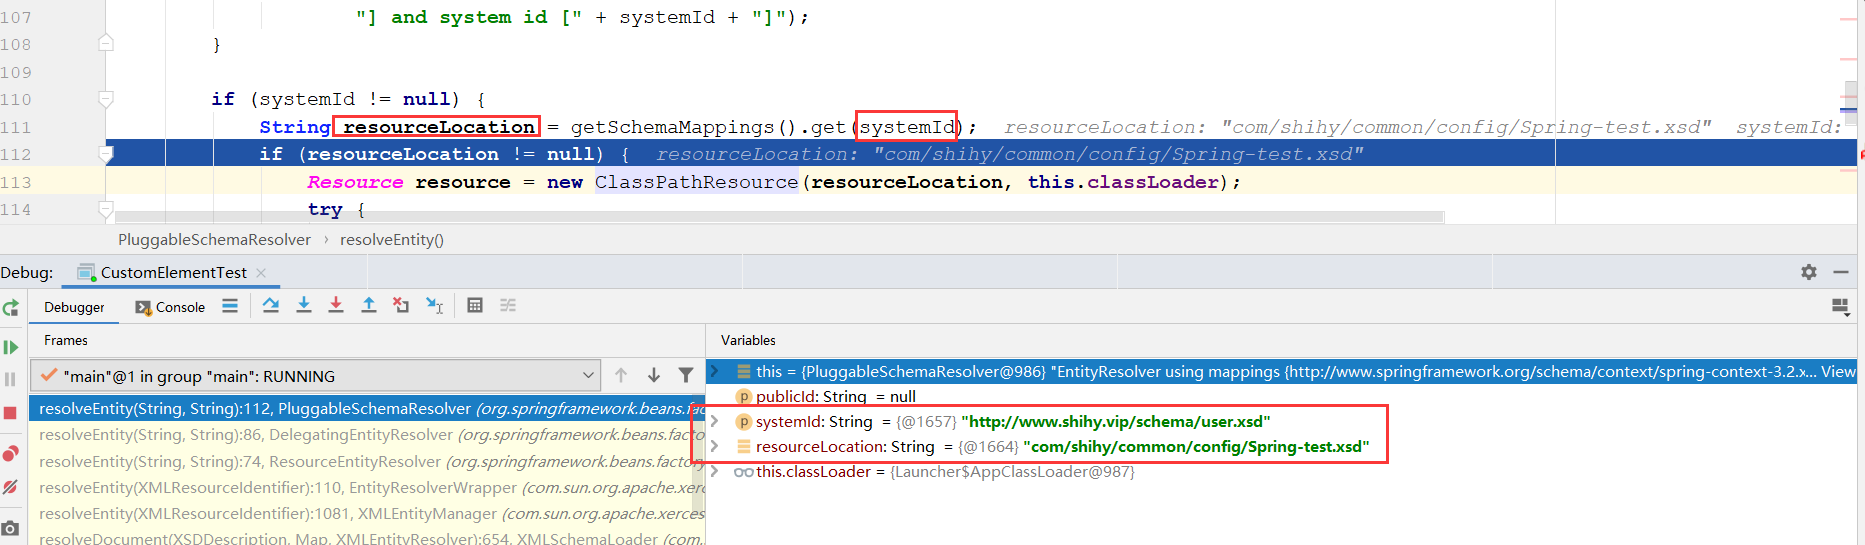
//org.springframework.beans.factory.xml.PluggableSchemaResolver#resolveEntity
//这里就回到了spring中,利用的就是前面1中加载的PluggableSchemaResolver
public InputSource resolveEntity(String publicId, String systemId) throws IOException {
		if (logger.isTraceEnabled()) {
			logger.trace("Trying to resolve XML entity with public id [" + publicId +
					"] and system id [" + systemId + "]");
		}

		if (systemId != null) {
            //根据位置字符串,找到xsd在spring.schames文件中配置的真正位置
            //http://www.shihy.vip/schema/user.xsd----->com/shihy/common/config/Spring-test.xsd
			String resourceLocation = getSchemaMappings().get(systemId);
			if (resourceLocation != null) {
                //构造资源对象,里面就放了xsd文件的信息
				Resource resource = new ClassPathResource(resourceLocation, this.classLoader);
				try {
					InputSource source = new InputSource(resource.getInputStream());
					source.setPublicId(publicId);
					source.setSystemId(systemId);
					if (logger.isDebugEnabled()) {
						logger.debug("Found XML schema [" + systemId + "] in classpath: " + resourceLocation);
					}
					return source;
				}
				catch (FileNotFoundException ex) {
					if (logger.isDebugEnabled()) {
						logger.debug("Couldn't find XML schema [" + systemId + "]: " + resource, ex);
					}
				}
			}
		}
		return null;
	}
/**
	 * Load the specified schema mappings lazily.
	 */
	private Map<String, String> getSchemaMappings() {
		if (this.schemaMappings == null) {
			synchronized (this) {
				if (this.schemaMappings == null) {
					if (logger.isDebugEnabled()) {
						logger.debug("Loading schema mappings from [" + this.schemaMappingsLocation + "]");
					}
					try {
                        //根据给定的类加载器,加载资源,schemaMappingsLocation的值为META-INF/spring.schemas
                        //classLoader为AppClassLoader
                        //从类路径中读取META-INF/spring.schemas文件的值,并放入Properties对象中
						Properties mappings =
								PropertiesLoaderUtils.loadAllProperties(this.schemaMappingsLocation, this.classLoader);
						if (logger.isDebugEnabled()) {
							logger.debug("Loaded schema mappings: " + mappings);
						}
						Map<String, String> schemaMappings = new ConcurrentHashMap<String, String>(mappings.size());
						CollectionUtils.mergePropertiesIntoMap(mappings, schemaMappings);
						this.schemaMappings = schemaMappings;
					}
					catch (IOException ex) {
						throw new IllegalStateException(
								"Unable to load schema mappings from location [" + this.schemaMappingsLocation + "]", ex);
					}
				}
			}
		}
		return this.schemaMappings;
	}
/**
	 * Load all properties from the specified class path resource
	 * (in ISO-8859-1 encoding), using the given class loader.
	 * <p>Merges properties if more than one resource of the same name
	 * found in the class path.
	 * @param resourceName the name of the class path resource
	 * @param classLoader the ClassLoader to use for loading
	 * (or {@code null} to use the default class loader)
	 * @return the populated Properties instance
	 * @throws IOException if loading failed
	 */
	public static Properties loadAllProperties(String resourceName, ClassLoader classLoader) throws IOException {
		Assert.notNull(resourceName, "Resource name must not be null");
		ClassLoader clToUse = classLoader;
		if (clToUse == null) {
			clToUse = ClassUtils.getDefaultClassLoader();
		}
		Properties props = new Properties();
		Enumeration<URL> urls = clToUse.getResources(resourceName);
		while (urls.hasMoreElements()) {
			URL url = urls.nextElement();
			URLConnection con = url.openConnection();
			ResourceUtils.useCachesIfNecessary(con);
			InputStream is = con.getInputStream();
			try {
				if (resourceName != null && resourceName.endsWith(XML_FILE_EXTENSION)) {
					props.loadFromXML(is);
				}
				else {
					props.load(is);
				}
			}
			finally {
				is.close();
			}
		}
		return props;
	}
5.3利用xsd进行校验
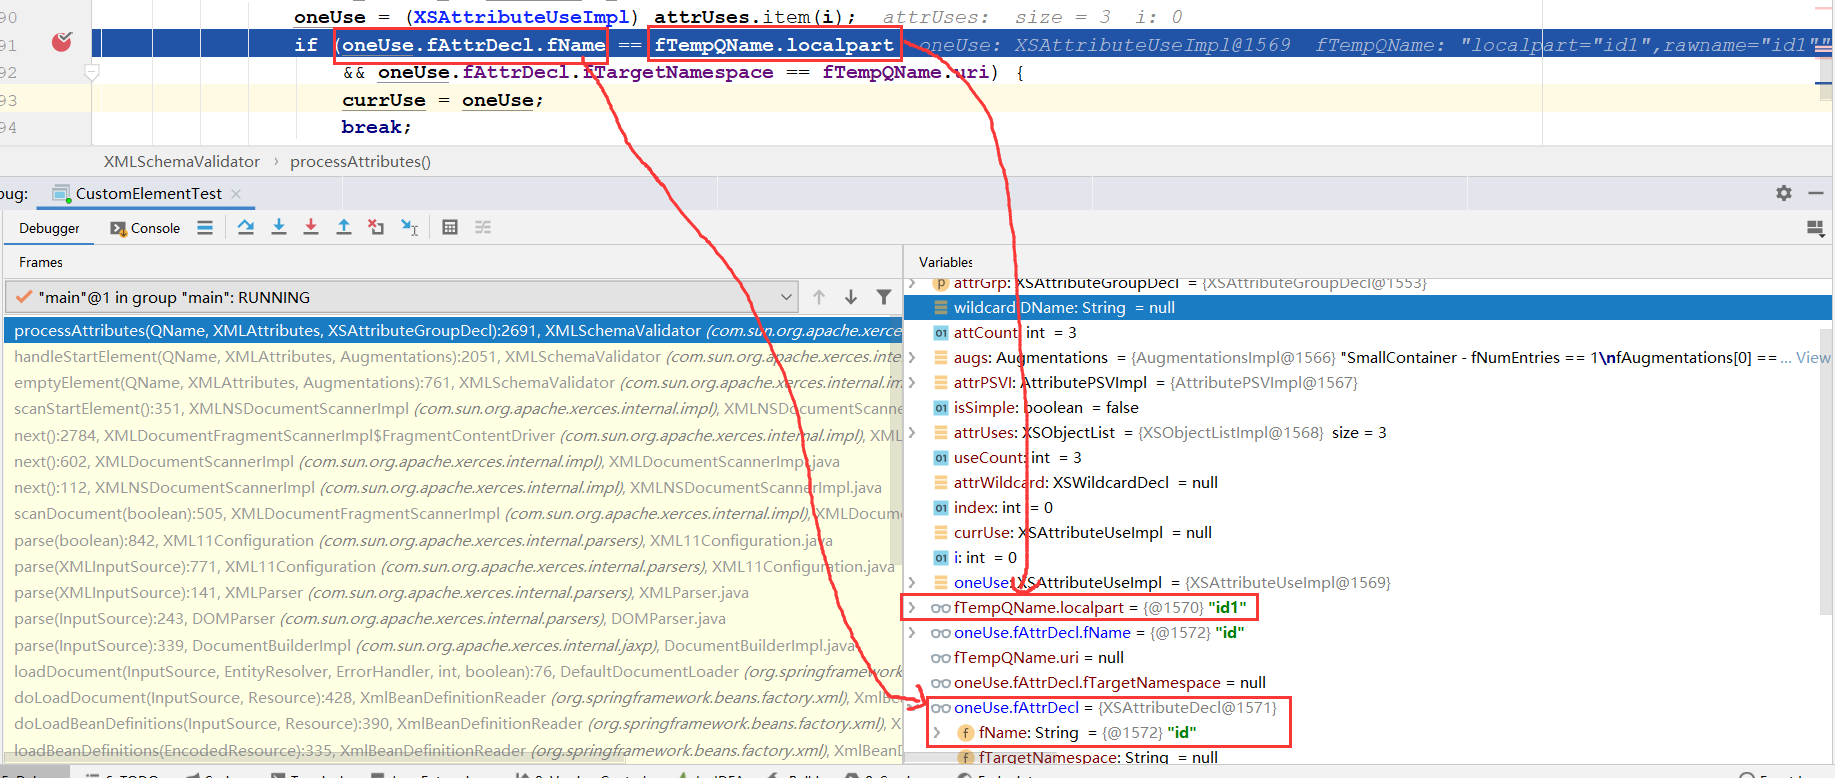
com.sun.org.apache.xerces.internal.impl.xs.XMLSchemaValidator#processAttributes
大概思路就是用xsd中的属性,和我们在spring配置文件里面配置的标签的属性进行相互比较,若有不一致则报错
这里的oneUse来自于5.2获取的SchemaGrammar对象。
大概的依赖关系是:oneUse--->attrUses--->attrGrp.getAttributeUses()--->ctype.getAttrGrp()--->fCurrentType--->fCurrentElemDecl.fType--->sGrammar.getGlobalElementDecl(element.localpart)
oneUse这个对象的值就是从我们在xsd里面定义的。fTempQName这个是我们在spring配置文件里面实际配置的。
比如,将示例中的spring配置文件的属性id修改成id1:
<myname:user id1="test" userName="shihy" email="xxxxxxxx@qq.com"/>
3.2在哪里解析的spring.handlers文件呢?
//org.springframework.beans.factory.xml.DefaultBeanDefinitionDocumentReader#parseBeanDefinitions
protected void parseBeanDefinitions(Element root, BeanDefinitionParserDelegate delegate) {
		if (delegate.isDefaultNamespace(root)) {
			NodeList nl = root.getChildNodes();
			for (int i = 0; i < nl.getLength(); i++) {
				Node node = nl.item(i);
				if (node instanceof Element) {
					Element ele = (Element) node;
					if (delegate.isDefaultNamespace(ele)) {
                        //解析默认标签,import、alias、bean、beans
						parseDefaultElement(ele, delegate);
					}
					else {
                        //解析用户自定义标签
						delegate.parseCustomElement(ele);
					}
				}
			}
		}
		else {
            //解析用户自定义标签
			delegate.parseCustomElement(root);
		}
	}
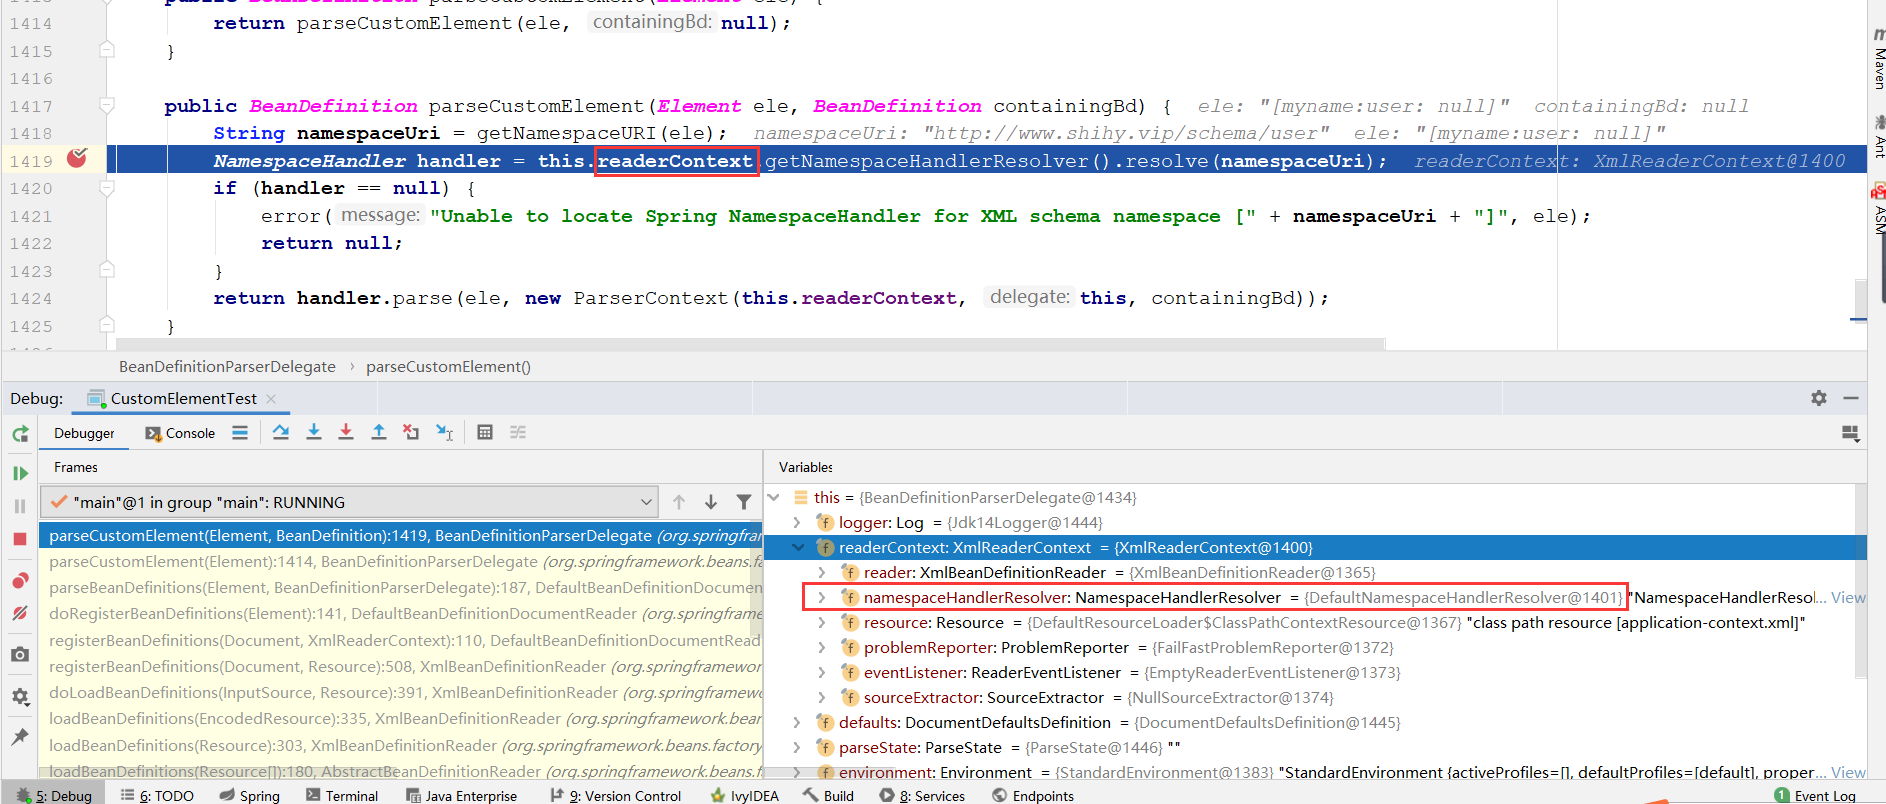
//org.springframework.beans.factory.xml.BeanDefinitionParserDelegate#parseCustomElement(org.w3c.dom.Element, org.springframework.beans.factory.config.BeanDefinition)
//containingBd为父类bean,对顶层元素的解析应设置为null
public BeanDefinition parseCustomElement(Element ele, BeanDefinition containingBd) {
        //获取对应的命名空间
		String namespaceUri = getNamespaceURI(ele);
        //根据命名空间找到对应的NamespaceHandler
		NamespaceHandler handler = this.readerContext.getNamespaceHandlerResolver().resolve(namespaceUri);
		if (handler == null) {
			error("Unable to locate Spring NamespaceHandler for XML schema namespace [" + namespaceUri + "]", ele);
			return null;
		}
        //调用自定义的NamespaceHandler进行解析
		return handler.parse(ele, new ParserContext(this.readerContext, this, containingBd));
	}
其实思路非常的简单,无非是根据对应的bean获取对应的命名空间,根据命名空间解析对应的处理器,然后根据用户自定义的处理器进行解析。
- 3.2.1获取标签的命名空间
标签的解析是从命名空间的提起开始的,无论是区分Spring中默认标签和自定义标签还是区分自定义标签中不同标签的处理器都是以标签所提供的命名空间为基础的,而至于如何提取对应元素的命名空间其实并不需要我们亲自去实现,在org.w3c.dom.Node中已经提供了方法供我们直接调用:
//org.springframework.beans.factory.xml.BeanDefinitionParserDelegate#getNamespaceURI
public String getNamespaceURI(Node node) {
		return node.getNamespaceURI();
	}
- 3.2.2提取自定义标签处理器
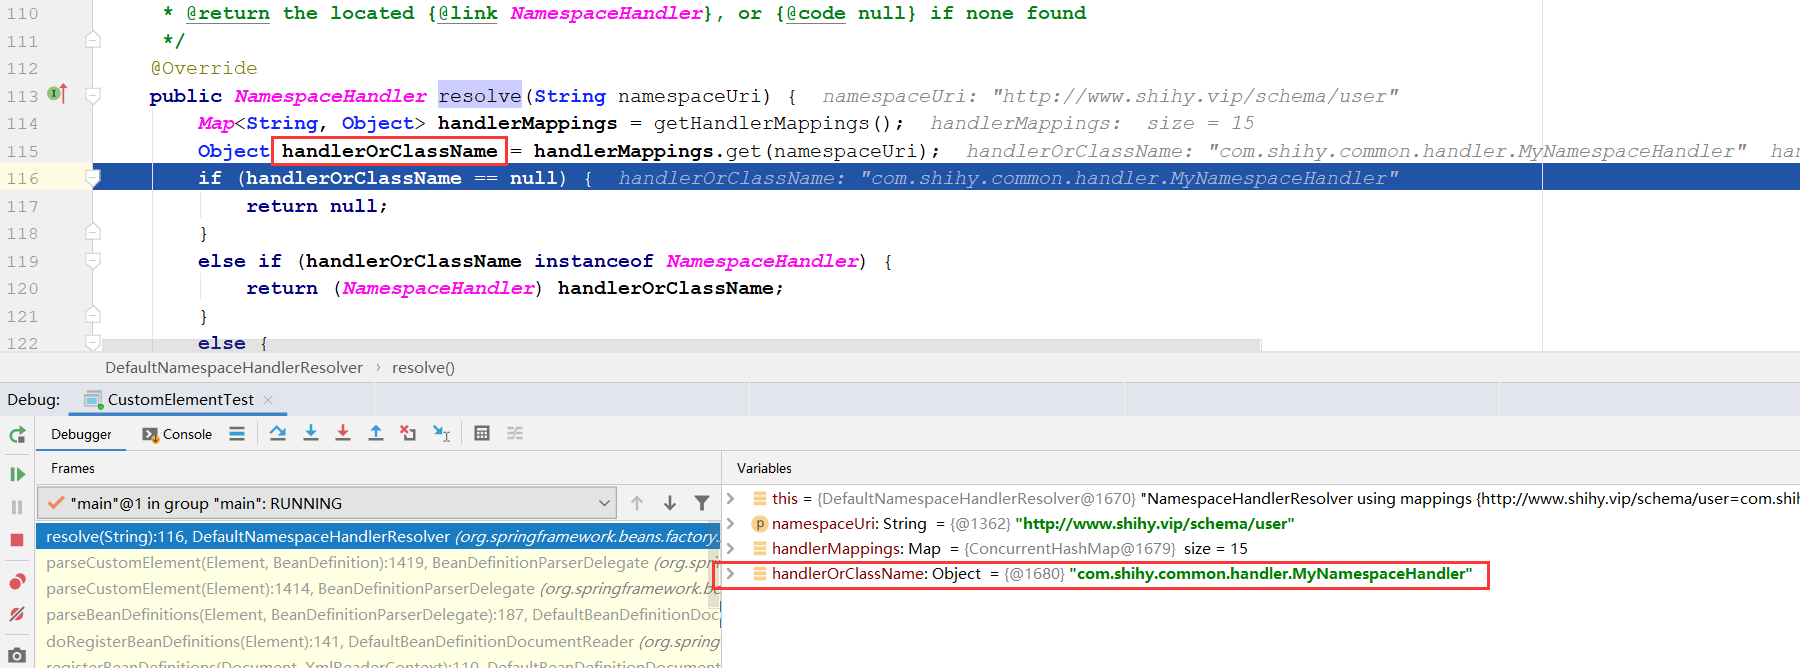
有了命名空间,就可以进行NamespaceHandler的提取了,继续之前的parseCustomElement函数的跟踪,分析NamespaceHandler handler = this.readerContext.getNamespaceHandlerResolver(). resolve(namespaceUri),在readerContext初始化的时候其属性namespaceHandlerResolver已经被初始化为了DefaultNamespaceHandlerResolver的实例,所以,这里调用的resolve方法其实调用的是DefaultNamespaceHandlerResolver类中的方法。我们进入DefaultNamespaceHandlerResolver的resolve方法进行查看。
//org.springframework.beans.factory.xml.DefaultNamespaceHandlerResolver#resolve
//Locate the {@link NamespaceHandler} for the supplied namespace URI  from the configured mappings.
public NamespaceHandler resolve(String namespaceUri) {
        //获取所有已经配置的handler映射,读取Spring.handlers配置文件并将配置文件缓存在map中。
        //这么handlerMappings里面包含了,当前java程序的类路径中所有的Spring.handler中的所有数据。
		Map<String, Object> handlerMappings = getHandlerMappings();
        //根据命名空间找到对应的信息,也就是获取自定义的Handler类的全限定名
		Object handlerOrClassName = handlerMappings.get(namespaceUri);
		if (handlerOrClassName == null) {
			return null;
		}
		else if (handlerOrClassName instanceof NamespaceHandler) {
            //已经做过解析的情况,直接从缓存读取
			return (NamespaceHandler) handlerOrClassName;
		}
		else {
            //没有做过解析,则返回的是类路径
			String className = (String) handlerOrClassName;
			try {
                //使用反射将类路径转化为类,自定义的Handler类
				Class<?> handlerClass = ClassUtils.forName(className, this.classLoader);
				if (!NamespaceHandler.class.isAssignableFrom(handlerClass)) {
					throw new FatalBeanException("Class [" + className + "] for namespace [" + namespaceUri +
							"] does not implement the [" + NamespaceHandler.class.getName() + "] interface");
				}
                //获取自定义的Handler类的对象
				NamespaceHandler namespaceHandler = (NamespaceHandler) BeanUtils.instantiateClass(handlerClass);
				//调用自定义的NamespaceHandler的初始化方法。回顾上面的例子
                namespaceHandler.init();
                //记录在缓存
				handlerMappings.put(namespaceUri, namespaceHandler);
				return namespaceHandler;
			}
			.....省略部分代码
		}
	}
getHandlerMappings这个方法和前面获取spring.schames中的值,步骤类似了:
//org.springframework.beans.factory.xml.DefaultNamespaceHandlerResolver#getHandlerMappings
/**
	 * Load the specified NamespaceHandler mappings lazily.
	 */
	private Map<String, Object> getHandlerMappings() {
        //如果没有被缓存则开始进行缓存
		if (this.handlerMappings == null) {
			synchronized (this) {
				if (this.handlerMappings == null) {
					try {
                        //this.handlerMappingsLocation在构造函数中已经被初始化为:META- INF/ Spring.handlers
                        //classLoader为AppClassLoader
                        //从类路径中读取META-INF/spring.handlers文件的值,并放入Properties对象中
						Properties mappings =
								PropertiesLoaderUtils.loadAllProperties(this.handlerMappingsLocation, this.classLoader);
						if (logger.isDebugEnabled()) {
							logger.debug("Loaded NamespaceHandler mappings: " + mappings);
						}
						Map<String, Object> handlerMappings = new ConcurrentHashMap<String, Object>(mappings.size());
						//将Properties格式文件合并到Map格式的handlerMappings中
                        CollectionUtils.mergePropertiesIntoMap(mappings, handlerMappings);
						this.handlerMappings = handlerMappings;
					}
					catch (IOException ex) {
						throw new IllegalStateException(
								"Unable to load NamespaceHandler mappings from location [" + this.handlerMappingsLocation + "]", ex);
					}
				}
			}
		}
		return this.handlerMappings;
	}
借助了工具类PropertiesLoaderUtils对属性handlerMappingsLocation进行了配置文件的读取,handlerMappingsLocation被默认初始化为“META-INF/Spring.handlers”。
上面的函数清晰地阐述了解析自定义NamespaceHandler的过程,通过之前的示例程序我们了解到如果要使用自定义标签,那么其中一项必不可少的操作就是在Spring.handlers文件中配置命名空间与命名空间处理器的映射关系。只有这样,Spring才能根据映射关系找到匹配的处理器,而寻找匹配的处理器就是在上面函数中实现的,当获取到自定义的NamespaceHandler之后就可以进行处理器初始化并解析了。我们不妨再次回忆一下示例中对于命名空间处理器的内容:
//com.shihy.common.handler.MyNamespaceHandler#init
public class MyNamespaceHandler extends NamespaceHandlerSupport  {
       public void init() {
             //调用父类的方法,将自定义标签的解析类UserBeanDefinitionParser的对象注册到自己的parsers属性中
             registerBeanDefinitionParser("user", new UserBeanDefinitionParser());
         }
}
//org.springframework.beans.factory.xml.NamespaceHandlerSupport#registerBeanDefinitionParser
protected final void registerBeanDefinitionParser(String elementName, BeanDefinitionParser parser) {
        //Stores the {@link BeanDefinitionParser} implementations keyed by the
	    //local name of the {@link Element Elements} they handle.
        //放入到成员变量中,也就是一个map
		this.parsers.put(elementName, parser);
	}
3.3标签解析
有部分内容参考《Spring源码深度解析》
//org.springframework.beans.factory.xml.BeanDefinitionParserDelegate#parseCustomElement(org.w3c.dom.Element, org.springframework.beans.factory.config.BeanDefinition)
return handler.parse(ele, new ParserContext(this.readerContext, this, containingBd));
以之前提到的示例进行分析,此时的handler已经被实例化成我们自定义的MyNamespace- Handler了,而MyNamespaceHandler也已经完成了初始化的工作,但是在我们实现的自定义命名空间处理器中并没有实现parse方法,所以推断,这个方法是父类中的实现,查看父类NamespaceHandlerSupport中的parse方法。
//org.springframework.beans.factory.xml.NamespaceHandlerSupport#parse
public BeanDefinition parse(Element element, ParserContext parserContext) {
		return findParserForElement(element, parserContext).parse(element, parserContext);
	}
解析过程中首先是寻找元素对应的解析器,进而调用解析器中的parse方法,那么结合示例来讲,其实就是首先获取在MyNameSpaceHandler类中的init方法中注册的对应的UserBean- DefinitionParser实例,并调用其parse方法进行进一步解析。
//org.springframework.beans.factory.xml.NamespaceHandlerSupport#findParserForElement
private BeanDefinitionParser findParserForElement(Element element, ParserContext parserContext) {
        //获取元素名称,也就是<myname:user中的user,若在示例中,此时localName为user。
        //也就是在xsd中定义的<xs:element name="user">
        //所以,在registerBeanDefinitionParser方法中注册解析器的时候,入参user要注意和xsd中的一致
        String localName = parserContext.getDelegate().getLocalName(element);
            //根据user找到对应的解析器,也就是在
            //registerBeanDefinitionParser("user", new UserBeanDefinitionParser());注册的解析器
     		BeanDefinitionParser parser = this.parsers.get(localName);
		if (parser == null) {
			parserContext.getReaderContext().fatal(
					"Cannot locate BeanDefinitionParser for element [" + localName + "]", element);
		}
		return parser;
	}
而对于parse方法的处理:
//org.springframework.beans.factory.xml.AbstractBeanDefinitionParser#parse
public final BeanDefinition parse(Element element, ParserContext parserContext) {
         AbstractBeanDefinition definition = parseInternal(element, parserContext);
         if (definition != null && !parserContext.isNested()) {
             try {
                 String id = resolveId(element, definition, parserContext);
                 if (!StringUtils.hasText(id)) {
                     parserContext.getReaderContext().error(
                             "Id is required for element '" + parserContext. getDelegate(). getLocalName(element)
                                     + "' when used as a top-level tag", element);
                 }
                 String[] aliases = new String[0];
                 String name = element.getAttribute(NAME_ATTRIBUTE);
                 if (StringUtils.hasLength(name)) {
                     aliases = StringUtils.trimArrayElements(StringUtils.commaDelimitedList  ToStringArray(name));
                 }
                 //将AbstractBeanDefinition转换为BeanDefinitionHolder并注册
                 BeanDefinitionHolder holder = new BeanDefinitionHolder(definition, id,
 aliases);
                 registerBeanDefinition(holder, parserContext.getRegistry());
                 if (shouldFireEvents()) {
                     //需要通知监听器则进行处理
                     BeanComponentDefinition componentDefinition = new BeanComponentDefinition
(holder);
                     postProcessComponentDefinition(componentDefinition);
                     parserContext.registerComponent(componentDefinition);
                 }
             }
             catch (BeanDefinitionStoreException ex) {
                 parserContext.getReaderContext().error(ex.getMessage(), element);
                 return null;
             }
         }
         return definition;
}
虽说是对自定义配置文件的解析,但是,我们可以看到,在这个函数中大部分的代码是用来处理将解析后的AbstractBeanDefinition转化为BeanDefinitionHolder并注册的功能,而真正去做解析的事情委托给了函数parseInternal,正是这句代码调用了我们自定义的解析函数。
在parseInternal中并不是直接调用自定义的doParse函数,而是进行了一系列的数据准备,包括对beanClass、scope、lazyInit等属性的准备。
//org.springframework.beans.factory.xml.AbstractSingleBeanDefinitionParser#parseInternal
protected final AbstractBeanDefinition parseInternal(Element element, ParserContext
parserContext) {
         BeanDefinitionBuilder builder = BeanDefinitionBuilder.genericBeanDefinition();
         String parentName = getParentName(element);
         if (parentName != null) {
             builder.getRawBeanDefinition().setParentName(parentName);
         }
   //获取自定义标签中的class,此时会调用自定义解析器如UserBeanDefinitionParser中的getBeanClass方法
         Class<?> beanClass = getBeanClass(element);
         if (beanClass != null) {
             builder.getRawBeanDefinition().setBeanClass(beanClass);
         }
         else {
        //若子类没有重写getBeanClass方法则尝试检查子类是否重写getBeanClassName方法
             String beanClassName = getBeanClassName(element);
             if (beanClassName != null) {
                 builder.getRawBeanDefinition().setBeanClassName(beanClassName);
             }
         }
         builder.getRawBeanDefinition().setSource(parserContext.extractSource(element));
         if (parserContext.isNested()) {
    //若存在父类则使用父类的scope属性
             builder.setScope(parserContext.getContainingBeanDefinition().getScope());
         }
         if (parserContext.isDefaultLazyInit()) {
             // Default-lazy-init applies to custom bean definitions as well.
    //配置延迟加载
             builder.setLazyInit(true);
         }
    //调用子类重写的doParse方法进行解析
         doParse(element, parserContext, builder);
         return builder.getBeanDefinition();
     }

//org.springframework.beans.factory.xml.AbstractSingleBeanDefinitionParser#doParse(org.w3c.dom.Element, org.springframework.beans.factory.xml.ParserContext, org.springframework.beans.factory.support.BeanDefinitionBuilder)
protected void doParse(Element element, ParserContext parserContext, BeanDefinition
Builder builder) {
         doParse(element, builder);
}
接着就调用我们自定义的UserBeanDefinitionParser中的doParse方法。将我们咋自定义标签
<myname:user id="testbean" userName="shihy" email="xxxxxxxx@qq.com"/>中的各个属性取出来放入到BeanDefinitionBuilder中,后续会建造出一个bean定义对象AbstractBeanDefinition。后续容器就根据这个bean定义对象进行bean的实例化操作。
