1.WebAPI概念
浏览器提供的一套操作浏览器功能和页面元素的API(BOM和DOM)

2.JavaScript组成三个部分
   1.ECMAScript - JavaScript的核心
   2.DOM - 文档对象模型
   3.BOM - 浏览器对象模型
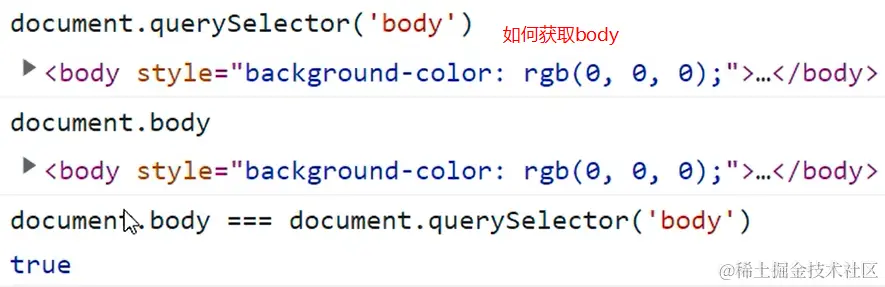
3.## DOM
    通过可编程的对象模型,JavaScript 获得了足够的能力来创建动态的 HTML。
        -   JavaScript 能够改变页面中的所有 HTML 元素
        -   JavaScript 能够改变页面中的所有 HTML 属性
        -   JavaScript 能够改变页面中的所有 CSS 样式
        -   JavaScript 能够对页面中的所有事件做出反应
4.DOM工作原理介绍
硬盘代码读取到内存 -> 浏览器渲染引擎生成DOM树(document) -> 开始渲染页面
<a href="#">链接</a>
<p id="p1" class="one">文本</p>
console.log(document);
5.## BOM
# 获取页面元素
1. 获取单个元素 : document.querySelector('选择器')
1.1 如果选择器不存在则获取null
1.2 如果选择器存在,只会获取满足条件的第一个 "dom对象"
2. 获取多个元素: document.querySelectorAll('选择器')
2.1 如果选择器不存在则获取空数组 []
2.2 如果选择器存在,会获取满足所有条件的 “dom对象伪数组”
3.querySelector与querySelectorAll区别
3.1 querySelector获取的是dom对象,可以直接操作修改
3.2 querySelector获取的是伪数组,不可以直接操作修改。必须要通过下标取出里面的dom
* @description: 1.根据选择器获取页面元素
* @param {string} 选择器字符串
* @return: null | DOM元素对象
特点: 只会获取满足选择器条件的第一个元素
*/
let box = document.querySelector('#box')
console.log(box)
let one = document.querySelector('.one')
console.log(one)
** 案例**
<div class="box">11</div>
<div class="box">22</div>
<script>
const divObj = document.querySelector('.box')
divObj.style.color = 'pink'
</script>

* @description: 2.根据选择器获取页面所有元素
* @param {string} 选择器字符串
* @return: 一定是伪数组 [DOM元素对象,DOM元素对象,DOM元素对象]
特点:(1)会获取满足选择器条件的所有元素,并且一定返回数组类型
(2)如果选择器不存在,则返回空数组
(3)如果选择器只能找到一个元素,也会返回数组
*/
let oneList = document.querySelectorAll('p')
console.log(oneList)
box.style.backgroundColor = 'pink'
oneList[0].style.backgroundColor = 'red'
案例
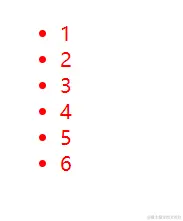
<ul class="nav">
<li>1</li>
<li>2</li>
<li>3</li>
<li>4</li>
<li>5</li>
<li>6</li>
</ul>
<script>
const lisObj = document.querySelectorAll('.nav li')
for (let i = 0; i < lisObj.length; i++) {
lisObj[i].style.color = 'red'
}
</script>
案例
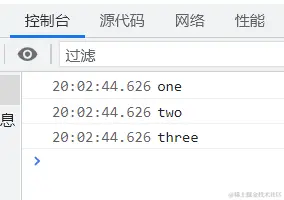
<ul>
<li title="one">1</li>
<li title="two">2</li>
<li title="three">3</li>
</ul>
const lis = document.querySelectorAll('ul li')
for (let i = 0
console.log(lis[i].title)
}
6.# 操作元素属性
        1.1 元素.innerText : 获取元素文本
        1.2 元素.innerHTML : 获取元素文本+标签
        1.3 两者区别 :  innerText不能解析标签, innerHTML可以解析标签
注:innerText和innerHTML两者之间是包含关系,如果修改了innerHTML ,
则innerText会被覆盖
<div class="box">
我是div文本
<a href="#">我是链接</a>
<p>我是pp</p>
</div>
let box = document.querySelector('#box')
1.innerText
console.log(box.innerText)
2.innerHTML
console.log(box.innerHTML)
注:在控制台打印时,innerText会获取元素文本. innerHTML会获取元素文本+标签
下图就是控制台显示的两种情况
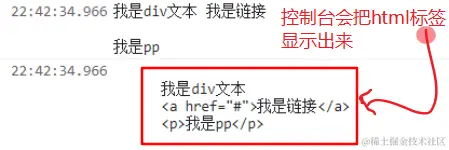
通过分别设置一个元素的innerText与innerHTML了解两者的区别
innerText:会把所有的内容都当成文本,无法解析标签
box.innerText = '<h2>我是标题</h2><button>我是按钮</button>'
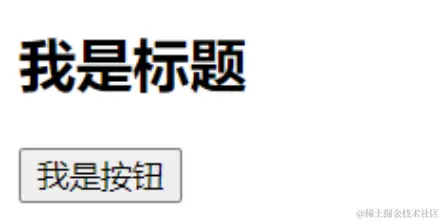
注:在页面显示时,所有的内容都当成文本,无法解析标签,如下图所示:

innerHTML:可以解析字符串中的标签
作用:可以和document.write()一样动态给页面添加元素
box.innerHTML = '<h2>我是标题</h2><button>我是按钮</button>'
注:在页面显示时,可以解析字符串中的标签,如下图所示:
案例
<div class="box">
<strong>五一不放假</strong>
</div>
<script>
const box = document.querySelector('.box')
console.log(box.innerText)
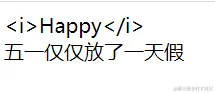
box.innerText = '五一仅仅放了一天假'
document.write(box.innerText)
box.innerText = '<i>Happy</i>'
<div class="box">
<strong>五一不放假</strong>
</div>
<script>
const box = document.querySelector('.box')
console.log(box.innerHTML)
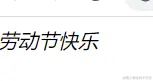
box.innerHTML = '劳动节快乐'
box.innerHTML = `<i>劳动节快乐</i>`
</script>
7.## 元素常用属性
1.语法: 元素.属性 = 值
2.常用属性
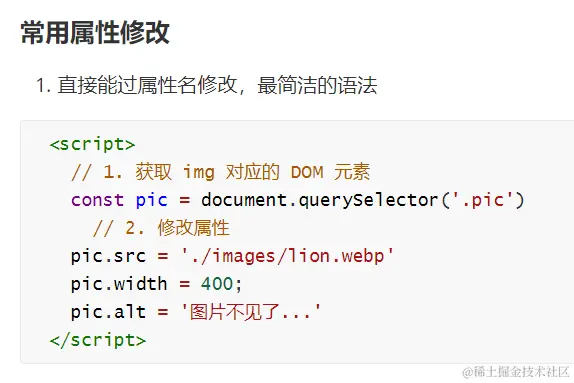
元素.href : a标签的链接
元素.src : img标签的图片路径
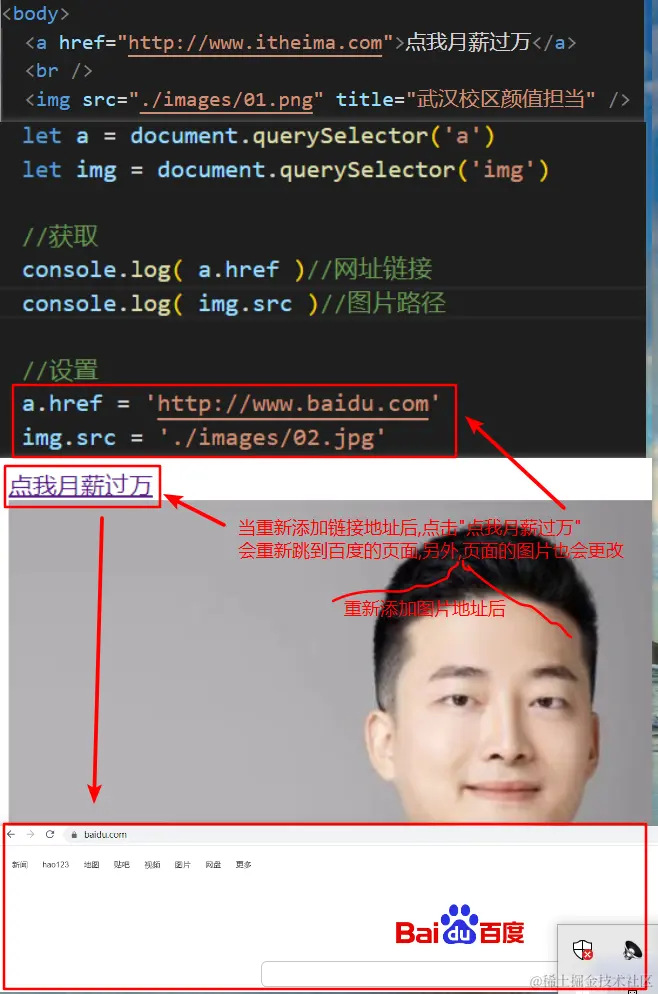
案例
    <a href="http://www.itheima.com">点我月薪过万</a>
     <br />
    <img src="./images/01.png" title="黑马ikun" />
      *注意:要想修改元素属性,一定要先获取元素
       let a = document.querySelector('a')
       let img = document.querySelector('img')
       1.获取属性   元素.属性名
        console.log( a.href )//网址链接
        console.log( img.src )//图片路径
      2.设置属性   元素.属性名 = 值
      a.href = 'http://baidu.com'
      img.src = './images/02.jpg'
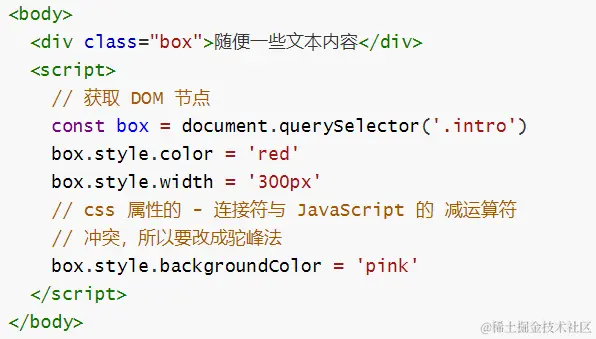
8.## 元素样式属性
通过 style 操作样式
代码示例:
<style>
.box {
border: 20px solid green;
}
</style>
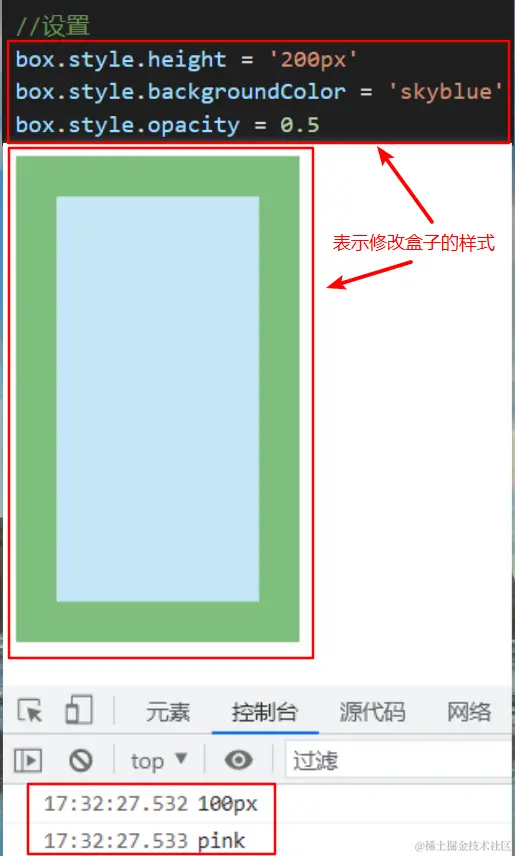
<body>
<div class="box" style="width: 100px;height: 100px;background-color: pink"></div>
<script>
let box = document.querySelector('.box')
console.log( box.style.width )
console.log( box.style.backgroundColor )
box.style.height = '200px'
box.style.backgroundColor = 'skyblue'
box.style.opacity = 0.5
</script>
</body>
通过className操作样式
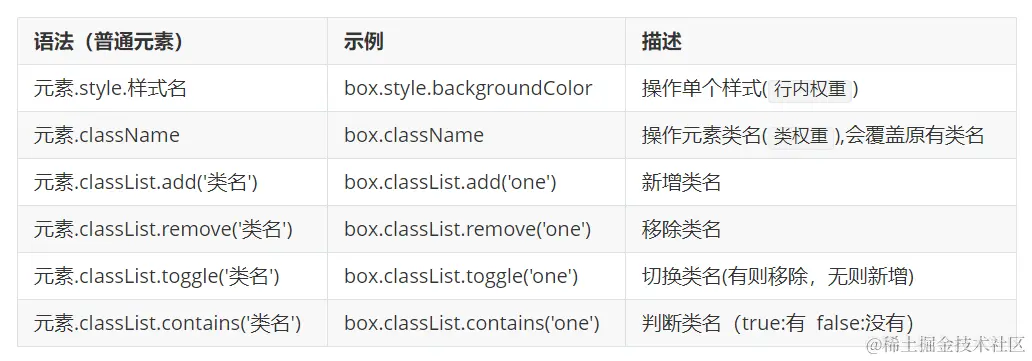
   元素样式操作
    1.style语法:  元素.style.样式属性 = 值
            * 注意点: 有-的样式属性需要转成驼峰命名(去掉-,后面第一个字母大写)
    2.className语法:   元素.className = '类名'
           (1)元素类名是className, 而不是class(因为class是js关键字)
           (2)className修改类名, 会覆盖以前的类名
    3.classList语法:
     通过className设置类名来设置样式注意点
      * 类名需要通过className来访问,而不是class,因为class是js中的关键字
      * 如果元素原本有类名,则会被覆盖
案例
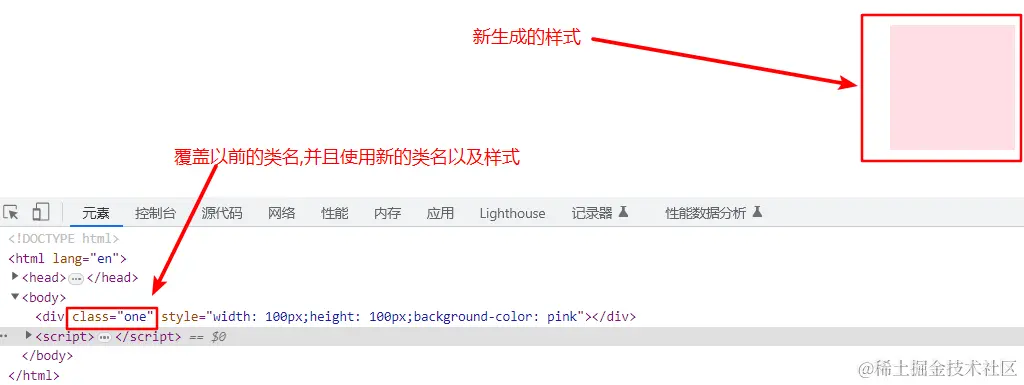
<style>
.one{
margin: 20px auto;
opacity: 0.5;
}
.two{
width: 200px;
height: 200px;
background-color: blue;
border: 10px solid yellow;
}
</style>
</head>
<body>
<div class="box two" style="width: 100px;height: 100px;background-color: pink"></div>
<script>
let box = document.querySelector('.box')
console.log( box.className )
box.className = 'one'
</script>
</body>
通过classList操作样式
1.style语法: 元素.style.样式属性 = 值
* 注意点: 有-的样式属性需要转成驼峰命名(去掉-,后面第一个字母大写)
2.className语法: 元素.className = '类名'
* 注意点: 会覆盖原本的类名
3.classList语法:
(1)新增类名: 元素.classList.add( '类名' )
(2)删除类名: 元素.classList.remove( '类名' )
(3)切换类名: 元素.classList.toggle( '类名' )
切换: 有则移除,无则新增
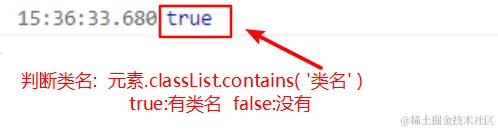
(4)判断类名: 元素.classList.contains( '类名' )
true:有类名 false:没有
<style>
.one{
margin: 20px auto;
opacity: 0.5;
}
.two{
width: 200px;
height: 200px;
background-color: blue;
border: 10px solid yellow;
}
</style>
</head>
<body>
<div class="box two" style="width: 100px;height: 100px;background-color: pink"></div>
<script>
let box = document.querySelector('.box')
box.classList.add('one')
box.classList.remove('two')
切换: 有则移除,无则新增
box.classList.toggle('two')
console.log( box.classList.contains( 'two' ) )
</script>
表单元素常用属性
1.表单内容 : 表单元素.value
2.表单状态 : 布尔类型属性
元素.disabled : 是否禁用
元素.checked : (radio,checkbox)
元素.selected : (option)
<input type="text" value="我是表单内容" >
<br>
<input type="radio" name="sex" >男
<input type="radio" name="sex">女
<br>
<input type="checkbox" name="goods" >商品1
<input type="checkbox" name="goods">商品2
<input type="checkbox" name="goods">商品3
<input type="checkbox" name="goods">商品4
<br>
<select name="" id="">
<option value="">前端</option>
<option value="">java</option>
<option value="">测试</option>
<option value="">UI</option>
</select>
1.表单内容 : 表单元素.value
2.表单布尔类型属性
表单元素.disabled : 是否禁用
表单元素.checked : 是否选中 (单选+多选)
表单元素.selected : 是否选中(下拉菜单)
获取的数组,一定要取下标先取出dom对象。 才可以使用dom语法
let inputList = document.querySelectorAll('input')
let optionList = document.querySelectorAll('option')
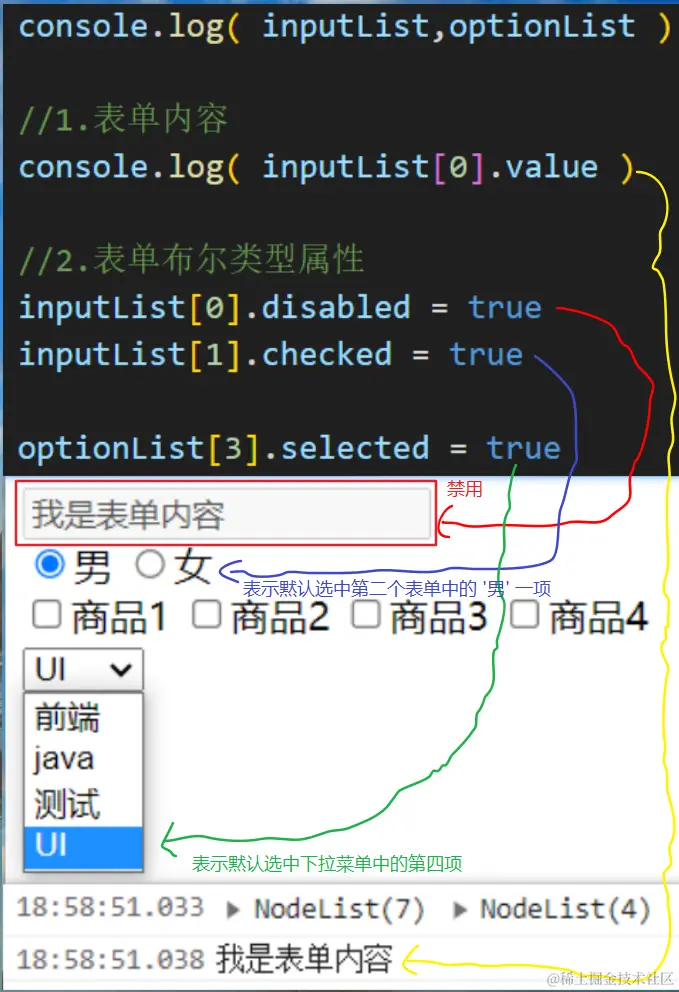
console.log(inputList, optionList)
1.表单内容 : 表单元素.value
错误写法:
console.log(inputList[0].innerText)
正确写法:
console.log(inputList[0].value) //我是表单内容
2.表单布尔类型属性
inputList[0].disabled = true //表示第一个表单禁用
inputList[1].checked = true //表示黙认选中第二个表单中的 '男' 一项
inputList[1].checked = 1 //表示黙认选中第二个表单中的 '男' 一项 ,
'1' 可以隐式转换,相当于true , 但一般情况下最好用true
optionList[3].selected = true // 表示黙认选中下拉菜单中的第四项
<input type="text" value="请输入">
<button disabled>按钮</button>
<input type="checkbox" name="" id="" class="agree">
<script>
let input = document.querySelector('input')
input.value = '小米手机'
input.type = 'password'
let btn = document.querySelector('button')
btn.disabled = false
let checkbox = document.querySelector('.agree')
checkbox.checked = false
</script>
9.# 事件介绍及注册事件
  - 1.事件:js处理用户交互的一种机制
     交互:什么元素在什么时刻做什么事
    2.事件的三要素:组成事件的三要素
-   事件源:什么元素(div p)
-   事件类型:什么时刻(鼠标点击onclick 鼠标移入:onmouseover)
-   事件处理函数:做什么事(一段代码:函数)
    3.注册事件:本质是给元素属性赋值
-   `事件源.事件类型 = 事件处理函数`
    `box.onclick = function(){}`
    4.事件工作原理
-   `a.事件在注册的时候,不会执行(函数在声明的时候不会执行)`
-   `b.一旦元素注册事件之后,当用户触发了这个事件的时候,浏览器会自动捕捉到这个事件,
       然后帮我们调用元素对象的事件处理函数`
    5.页面中 `任何元素` 都`可以`注册 很`多个事件(点击,移入等)`
代码示例
<div class="box" style="width: 100px;height: 100px;background-color: pink"></div>
<script>
//对元素进行任何属性操作前提: 获取元素
let box = document.querySelector('.box')
1.交互(功能) : 什么元素 在 什么时刻 做 什么事
2.事件(技术) : js实现交互功能的一种机制(技术)
3.事件三要素
事件源 : 什么元素(对象)
事件类型 : 什么时刻(属性) (单击 双击 鼠标移入 鼠标移出)
单击: onclick
双击: ondblclick
鼠标移入: onmouseover
鼠标移出: onmouseout
事件处理 : 做什么事(函数)
4.注册事件 : 给元素添加交互功能
语法: 事件源.事件类型 = 事件处理函数
box.onclick = function(){}
5.事件原理
5.1 注册事件本质 是 : 对象的属性(方法)赋值
5.2 注册事件的时候,事件处理函数不会执行 (函数在声明的时候不会执行)
5.3 当用户触发事件(点击)的时候,浏览器会自动去调用事件处理函数
* 点击box的时候,浏览器底层会执行一行代码: box.onclick()
*/
/*
任何元素都可以注册事件(添加交互功能)
任何元素都可以注册很多个事件
*/
//1.鼠标点击事件
box.onclick = function(){
box.style.backgroundColor = 'green'
}
//2.鼠标双击事件
box.ondblclick = function(){
box.style.backgroundColor = 'pink'
}
//3.鼠标移入
box.onmouseenter = function(){
box.style.backgroundColor = 'purple'
}
//4.鼠标离开
box.onmouseleave = function(){
box.style.backgroundColor = 'skyblue'
}
box.onmouseover = function () {
box.style.backgroundColor = 'purple'
}
box.ondblclick = function () {
alert('你双击我了')
}
</script>

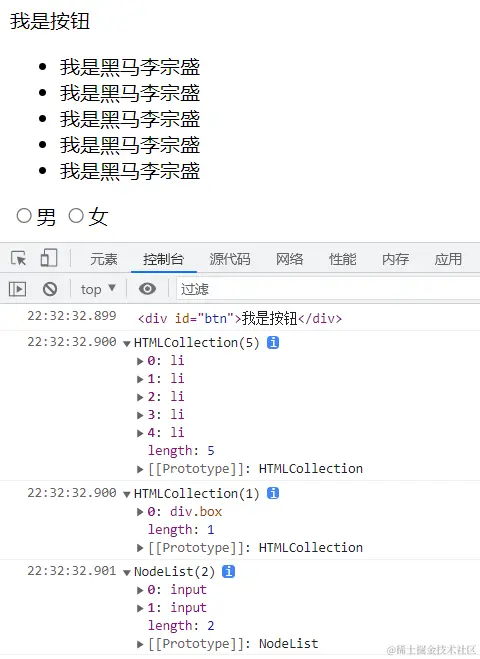
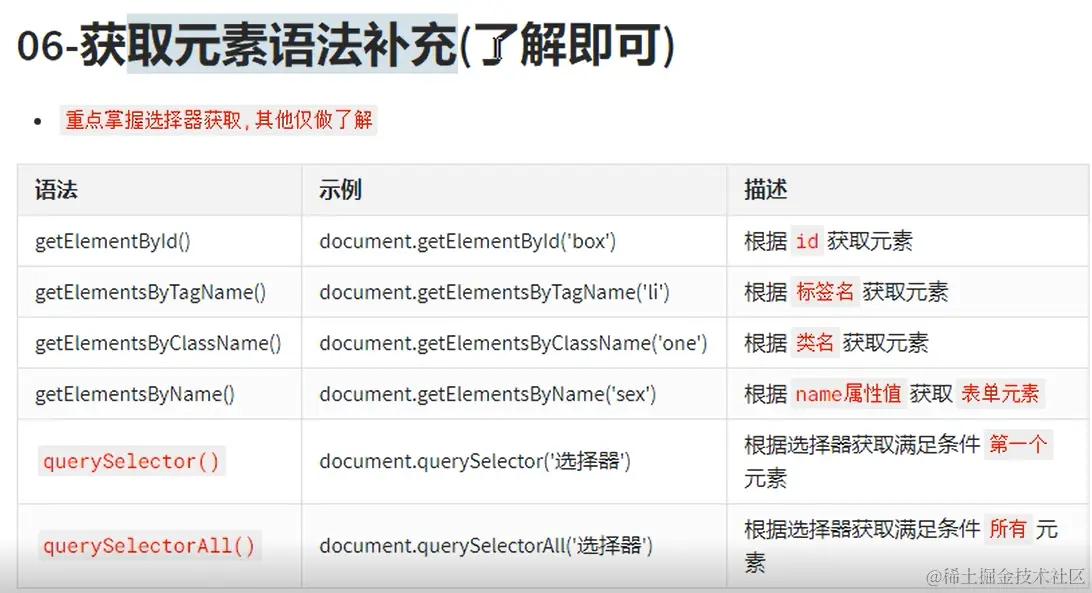
10.# 获取元素语法补充
<div id="btn">我是按钮</div>
<ul>
<li>我是黑马李宗盛</li>
<li>我是黑马李宗盛</li>
<li>我是黑马李宗盛</li>
<li>我是黑马李宗盛</li>
<li>我是黑马李宗盛</li>
</ul>
<div class="box"></div>
<input type="radio" name="gender" />男
<input type="radio" name="gender" />女
<script>
let btn = document.getElementById('btn')
console.log(btn)
let liList = document.getElementsByTagName('li')
console.log(liList)
let boxList = document.getElementsByClassName('box')
console.log(boxList)
let genderList = document.getElementsByName('gender')
console.log(genderList)
</script>
11.dom事件分为两大类
第一类:鼠标事件
1.鼠标点击事件
box.onclick = function () {
  box.style.backgroundColor = 'green'
}
2.鼠标双击事件
box.ondblclick = function () {
  box.style.backgroundColor = 'red'
}
3.鼠标移入
box.onmouseenter = function () {
  box.style.backgroundColor = 'blue'
}
4.鼠标移出
box.onmouseleave = function () {
  box.style.backgroundColor = 'skyblue'
}
第二类:键盘事件
键盘输入: oninput
控制样式属性
自定义属性
<body>
<div data-id="1"> 自定义属性 </div>
<script>
let div = document.querySelector('div')
console.log(div.dataset.id)
</script>
间歇函数
<script>
function repeat() {
console.log('不知疲倦的执行下去....')
}
setInterval(repeat, 1000)
</script>
案例
<script>
let i = 1
let id = setInterval(function () {
console.log(i)
i++
if (i > 10) {
clearInterval(id)
}
}, 1000)
</script>
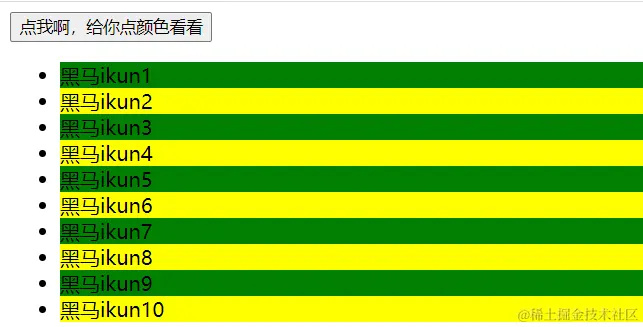
12.案例:隔行变色
<body>
<button class="btn">点我啊,给你点颜色看看</button>
<ul>
<li>黑马ikun1</li>
<li>黑马ikun2</li>
<li>黑马ikun3</li>
<li>黑马ikun4</li>
<li>黑马ikun5</li>
<li>黑马ikun6</li>
<li>黑马ikun7</li>
<li>黑马ikun8</li>
<li>黑马ikun9</li>
<li>黑马ikun10</li>
</ul>
<script>
let btn = document.querySelector(".btn")
let liList = document.querySelectorAll("li")
btn.onclick = function() {
for(let i = 0;i<liList.length;i++){
if( i % 2 == 0){
liList[i].style.backgroundColor = 'green'
}else{
liList[i].style.backgroundColor = 'yellow'
}
}
}
</script>
</body>
13.案例:开关灯
<body>
<button class="btn">关灯</button>
<script>
//1.获取元素
let btn = document.querySelector('.btn')
//2.注册事件
btn.onclick = function(){
  //3.事件处理
  //1.1 如果按钮文本是开灯:  (1)改body颜色白色 , (2)改按钮文字为关灯
  if( btn.innerText == '开灯' ){
    //任何标签都有默认样式, 如果设置为空字符串,标签自动加载默认样式
    document.body.style.backgroundColor = ''
    btn.innerText = '关灯'
  }else{
    document.body.style.backgroundColor = '#000'
    btn.innerText = '开灯'
  }
}
</script>
</body>

14.案例:二维码显示与隐藏
<style>
#small {
width: 50px;
height: 50px;
background: url('images/bgs.png') no-repeat -159px -51px;
position: fixed;
top: 40%;
right: 10px;
}
#big {
width: 210px;
height: 210px;
position: absolute;
left: -210px;
display: none;
}
#big img {
width: 100%;
height: 100%;
}
</style>
</head>
<body>
<div id="small">
<div id="big">
<img src="images/hmewm.jpg" alt="" />
</div>
</div>
<script>
let small = document.querySelector('#small')
let big = document.querySelector('#big')
small.onmouseenter = function(){
big.style.display = 'block'
}
small.onmouseleave = function(){
big.style.display = 'none'
}
</script>
</body>

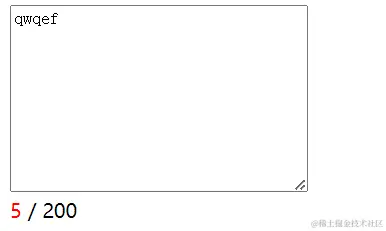
15.微博输入案例:
<style>
.userCount {
color: red;
}
</style>
</head>
<body>
<div class="controls">
<textarea
placeholder="说点什么吧..."
id="area"
cols="30"
rows="10"
maxlength="200"
></textarea>
<div>
<span class="userCount">0</span>
<span>/</span>
<span>200</span>
</div>
</div>
<script>
let area = document.querySelector('#area')
let userCount = document.querySelector('.userCount')
area.oninput = function(){
console.log( area.value )
console.log( area.value.length )
userCount.innerText = area.value.length
}
</script>
</body>
16.获取元素其他方式
<body>
<div id="btn">我是按钮</div>
<ul>
<li>我是黑马李宗盛</li>
<li>我是黑马李宗盛</li>
<li>我是黑马李宗盛</li>
<li>我是黑马李宗盛</li>
<li>我是黑马李宗盛</li>
</ul>
<div class="box"></div>
<input type="radio" name="gender" />男
<input type="radio" name="gender" />女
<script>
let btn = document.getElementById('btn')
console.log(btn)
let liList = document.getElementsByTagName('li')
console.log( liList )
let box = document.getElementsByClassName('box')
console.log( box )
let genderList = document.getElementsByName('gender')
console.log(genderList)
</script>
</body>