

目录
视图解析器
视图解析器:将页面路径部分添加到配置文件中
没有视图解析器
return "/WEB-INF/show01.jsp";
有了视图解析器
return "show01.jsp";
在SpringMVC中配置视图解析器 设置前缀和后缀 把视图解析器放入Spring容器
    public InternalResourceViewResolver viewResolver(){

        InternalResourceViewResolver viewResolver = new InternalResourceViewResolver();

        viewResolver.setPrefix("/WEB-INF/");

        viewResolver.setSuffix(".jsp");

        return viewResolver;
异常处理器
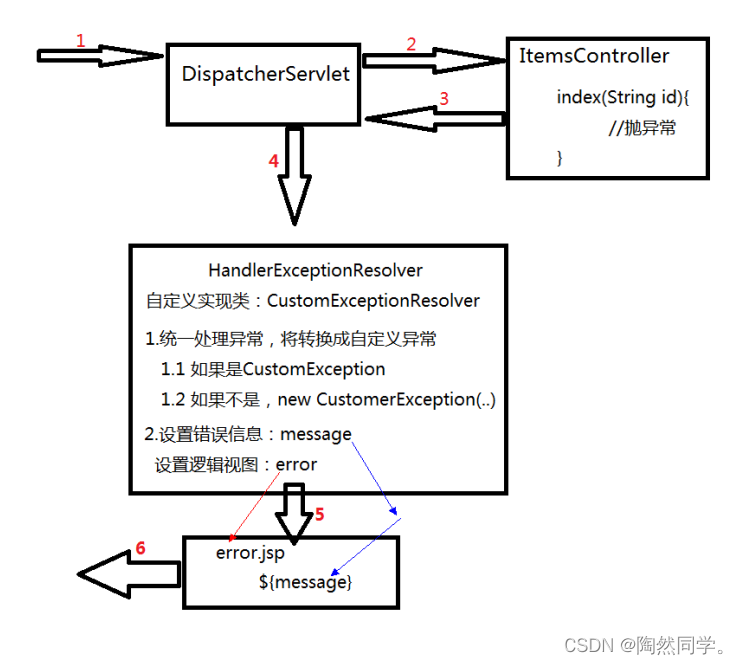
在SpringMVC中 提供了一个全局异常处理器 对于系统中的异常进行统一处理 在一般系统中 Dao Service Controller 出现异常都往上throws Exception 最后由SpringMVC的前端控制器进行统一的全局异常处理
一般都是自定义异常 然后解析该异常 判断该异常属于那种异常 对其进行处理 若非自定义异常 在
报错系统错误 请与管理员联系异常
第一步自定义异常
public class CustomException extends Exception{

    private static final long serialVersionUID = 8222256702797084775L;

    public CustomException() {

    public CustomException(String message) {

    public CustomException(String message, Throwable cause) {

        super(message, cause);

    public CustomException(Throwable cause) {

    public CustomException(String message, Throwable cause, boolean enableSuppression, boolean writableStackTrace) {

        super(message, cause, enableSuppression, writableStackTrace);
第二步定义异常处理器
异常处理器需要实现HandlerExceptionResolver接口 重写方法resolverException
public class CustomExceptionResolver implements HandlerExceptionResolver {

    public ModelAndView resolveException(HttpServletRequest httpServletRequest, HttpServletResponse httpServletResponse, Object o, Exception ex) {

        CustomException customException = null;

        if(ex instanceof CustomException){

            customException = (CustomException)ex;

            customException = new CustomException("系统错误,请与管理员联系");

        ModelAndView modelAndView = new ModelAndView();

        modelAndView.addObject("message",customException.getMessage());

        modelAndView.setViewName("error");

        return modelAndView;
第三步 定义异常显示界面
<%@ page contentType="text/html;charset=UTF-8" language="java" %>
第四步 测试程序
    @RequestMapping("index")

    public String index(String id) throws CustomException {

            throw new CustomException("没有id参数");

        return "itemlist";
异常处理器分析
拦截器
===
概述
SpringMVC中的拦截器就像Servlet中的过滤器一样Filter 用于对处理器的前后顺序进行处理
拦截器需要实现接口:HandlerInterceptor
分析
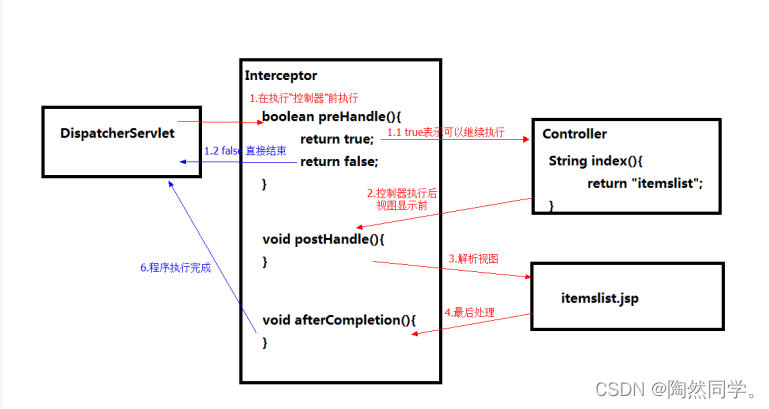
方法
boolean preHandle() :返回一个boolean值 返回true继续执行 返回false直接结束
void postHandle() :在执行完处理器方法后 视图显示之前执行
void afterCompletion() :在视图解析成功后执行
拦截器
第一步定义拦截器 实现HandlerInterceptor接口
public class MyInterceptor1 implements HandlerInterceptor {
public boolean preHandle(HttpServletRequest request, HttpServletResponse response, Object handler) throws Exception {

    System.out.println("MyInterceptor1拦截器的preHandle");

public void postHandle(HttpServletRequest request, HttpServletResponse response, Object handler, ModelAndView modelAndView) throws Exception {

    System.out.println("MyInterceptor1拦截器的postHandle");

public void afterCompletion(HttpServletRequest request, HttpServletResponse response, Object handler, Exception ex) throws Exception {

    System.out.println("MyInterceptor1拦截器的afterCompletion");
第二步 配置类 注册拦截器 设置拦截路径
private MyInterceptor1 myInterceptor1;

public void addInterceptors(InterceptorRegistry registry) {

    InterceptorRegistration interceptorRegistration = registry.addInterceptor(myInterceptor1);

    interceptorRegistration.addPathPatterns("/**");
多拦截器配置
分析
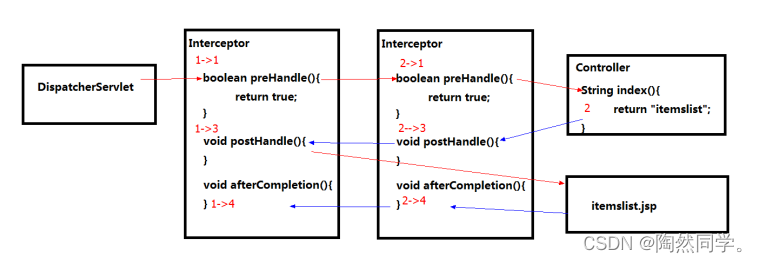
配置类 注册拦截器
private MyInterceptor1 myInterceptor1;

private MyInterceptor2 myInterceptor2;

public void addInterceptors(InterceptorRegistry registry) {

    InterceptorRegistration interceptorRegistration = registry.addInterceptor(myInterceptor1);

    interceptorRegistration.addPathPatterns("/**");

    InterceptorRegistration interceptorRegistration2 = registry.addInterceptor(myInterceptor2);

    interceptorRegistration2.addPathPatterns("/**");
        使用场景

        1.用户名权限校验

        2.解决乱码

        3.日志记录

文件上传
====

        第一步定义上传页面
	姓名:<input type="text" name="name"/> <br/>

	价格:<input type="text" name="price"/> <br/>

	图片:<input type="file" name="picFile"/> <br/>

	<input type="submit" value="提交" />
第二步 Controller
public String upload(String name, Double price, @RequestParam(required = false,value = "picFile") MultipartFile picFile) throws IOException {

    System.out.println("姓名:" + name);

    System.out.println("价格:" + price);

    String originalFilename = picFile.getOriginalFilename();

    System.out.println("上传文件名:" + originalFilename);

    File file = new File("F:\\Temp", originalFilename);

    picFile.transferTo(file);

    return "itemslist";
第三步配置中配置文件上传解析器
public CommonsMultipartResolver multipartResolver(){

    CommonsMultipartResolver multipartResolver = new CommonsMultipartResolver();

    // 设置所有的上传文件的总大小 10M

    multipartResolver.setMaxInMemorySize(10*1024*1024);

    // 设置单个文件上传的大小 4M

    multipartResolver.setMaxUploadSize(4*1024*1024);

    multipartResolver.setDefaultEncoding("utf-8");

    return multipartResolver;
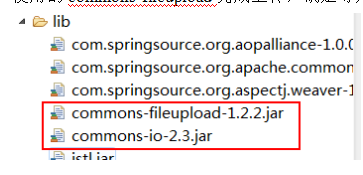
导入jar包或坐标
使用的commons-fileupload完成上传,确定导入fileupload jar包
坐标
commons-fileupload
commons-fileupload
1.2.2
commons-io
commons-io
         MultipartFile对象

        String getOriginalFilename() :获得长传的文件名

        transferTo(File file) :将文件上传到指定的文件

        String getContentType() :获得文件MIME类型

        String getName() :获得表单中文件组件的名字

JSON数据交互
========

        @RequestBody:将json、xml转换为Java对象
@RequestMapping("tj.action")

public void run1(@RequestBody String jsonStr){

    System.out.println(jsonStr);
@ResponseBodey:将Java对象转换成json、xml
@RequestMapping("tj.action")

public @ResponseBody QVo getInfo(String name,Double price){

    System.out.println("接收到前端数据:" + name + " " + price);

    QVo qVo = new QVo("lisiguang", 220.4);
RESTful支持
=========

        概述

        RESTful就是一个资源定位及资源操作的一种风格 不是标准也不是协议 只是一种风格

        资源定位 要求URL没有动词 只有名词 没有参数

        URL 格式 http://blog.csdn.net/beat\_the\_world/article/details/45621673

        资源操作 通过HTTP请求方式 确定不同的请求

        get查询资源 post新建资源(也可以修改资源) put更新资源 delete删除资源

        @RequestMapping(value = "/user/{xxx}",method = RequestMethod.GET)

        {xxx}相当于占位符 用于匹配到URL中的参数 通过@PathVariable("xxx")获得路径匹配的资源
@RequestMapping("/viewItems/{id}")

public String viewItems(@PathVariable("id")String id, Model model){

    model.addAttribute("id",id);

    return "itemslist";
> 本文使用 [文章同步助手](https://juejin.cn/post/6940875049587097631) 同步
