

无论你是在做一个简单的待办事项应用,还是在建立你的梦想应用,认证都能帮助你用用户的特定信息来实现个性化体验。它也是隐私和安全的一个重要组成部分。
Firebase认证是一个预先配置好的后台服务,它使得使用SDK与移动应用的集成变得非常容易。你不需要为认证过程维护任何后端基础设施,而且Firebase支持与流行的身份供应商(如Google、Facebook和GitHub)的整合。
在本教程中,我们将向你展示如何将Firebase认证与你的Flutter应用集成。为了用一个实际的例子来证明,我们将引导你完成建立一个电子邮件-密码注册和登录的过程。
我们将走完以下步骤。
- 创建一个Flutter和Firebase项目
- 为Android、iOS和Web设置Firebase
- 导入Firebase插件
- 初始化Firebase应用程序
- 注册一个新的用户
- 用户签入和签出
- 刷新用户
- 定义验证器
- 建立签到表格
- 建立个人资料页面
- 保持登录状态
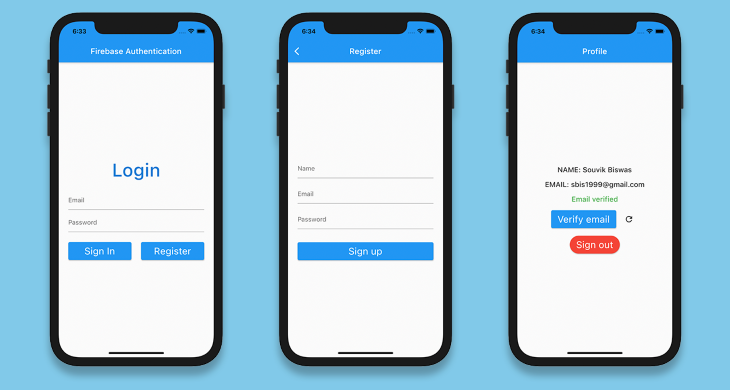
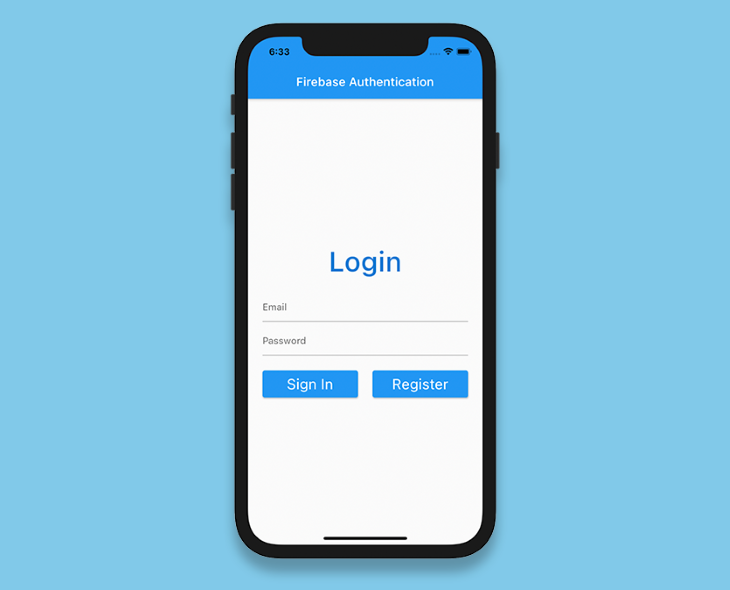
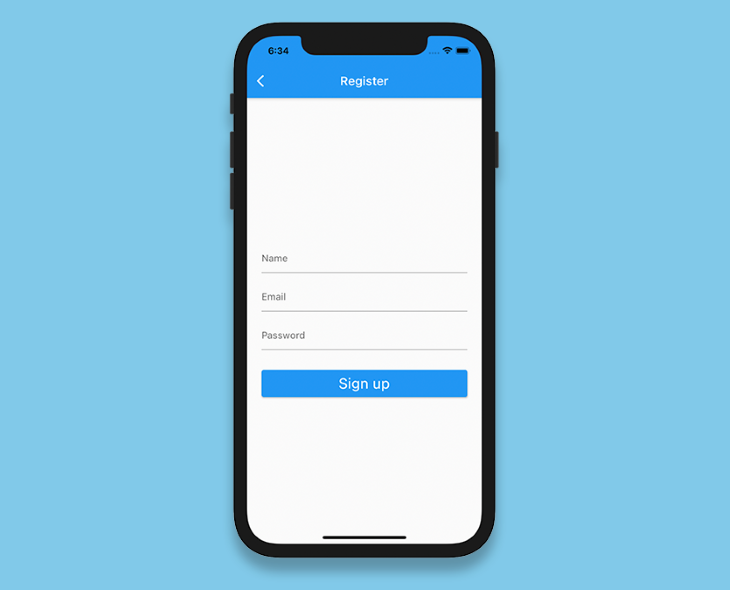
完成后的应用程序看起来会是这样的。
创建一个Flutter和Firebase项目
使用以下命令创建一个新的Flutter项目。
flutter create flutter_authentication
在你喜欢的代码编辑器中打开该项目。下面是如何用VS Code打开它。
code flutter_authentication
为了将Firebase与你的Flutter项目集成,你必须通过进入控制台创建一个新的Firebase项目。
添加一个新的项目并给它一个名字。在这个示例项目中,我们不需要谷歌分析,所以你可以禁用它。一旦你创建了你的项目,你会被引导到你的Firebase项目仪表板。
为Android、iOS和Web设置Firebase
要在Android、iOS或Web上使用Firebase,你必须为每个平台完成一些配置。请看下面的完整配置指南。
现在我们有了使用Firebase的基本设置,让我们深入到我们的Flutter应用中去。
导入Firebase插件
在你开始实现认证逻辑之前,你需要导入以下插件。
[firebase_core](https://pub.dev/packages/firebase_core)在Flutter应用中使用任何Firebase服务,都需要使用Firebase认证。[firebase_auth](https://pub.dev/packages/firebase_auth)以获得Firebase认证服务的访问权
将这些插件添加到你的pubspec.yaml 文件中。
dependencies:
  firebase_core: ^1.0.4
  firebase_auth: ^1.1.1
初始化Firebase应用程序
在Flutter应用中使用任何Firebase服务之前,你需要初始化Firebase App。
将main.dart 文件修改为以下内容。
import 'package:flutter/material.dart';
import 'screens/login_page.dart';
void main() {
  runApp(MyApp());
}
class MyApp extends StatelessWidget {
  @override
  Widget build(BuildContext context) {
    return MaterialApp(
      title: 'Flutter Authentication',
      debugShowCheckedModeBanner: false,
      theme: ThemeData(
        primarySwatch: Colors.cyan,
      ),
      home: LoginPage(),
    );
  }
}
定义LoginPage 。
import 'package:flutter/material.dart';
class LoginPage extends StatelessWidget {
  @override
  Widget build(BuildContext context) {
    return Scaffold(
      appBar: AppBar(
        title: Text('Firebase Authentication'),
      ),
    );
  }
}
添加一个新的方法来初始化Firebase App。
Future<FirebaseApp> _initializeFirebase() async {
    FirebaseApp firebaseApp = await Firebase.initializeApp();
    return firebaseApp;
}
因为这个方法是异步的,你必须在构建方法里面使用FutureBuilder 。
class LoginPage extends StatelessWidget {
  Future<FirebaseApp> _initializeFirebase() async {
    FirebaseApp firebaseApp = await Firebase.initializeApp();
    return firebaseApp;
  }
  @override
  Widget build(BuildContext context) {
    return Scaffold(
      appBar: AppBar(
        title: Text('Firebase Authentication'),
      ),
      body: FutureBuilder(
        future: _initializeFirebase(),
        builder: (context, snapshot) {
          if (snapshot.connectionState == ConnectionState.done) {
            return Column(
              children: [
                Text('Login'),
              ],
            );
          }
          return Center(
            child: CircularProgressIndicator(),
          );
        },
      ),
    );
  }
}
现在,我们只是在异步任务完成时显示一个简单的Text widget,其他的只是一个CircularProgressIndicator 。
注册一个新用户
当一个新用户到来时,在登录之前,他们必须注册到Firebase认证。
创建一个名为fire_auth.dart 的新dart文件,并定义一个名为registerUsingEmailPassword() 的新方法。
class FireAuth {
  static Future<User?> registerUsingEmailPassword({
    required String name,
    required String email,
    required String password,
  }) async {
    FirebaseAuth auth = FirebaseAuth.instance;
    User? user;
    try {
      UserCredential userCredential = await auth.createUserWithEmailAndPassword(
        email: email,
        password: password,
      );
      user = userCredential.user;
      await user!.updateProfile(displayName: name);
      await user.reload();
      user = auth.currentUser;
    } on FirebaseAuthException catch (e) {
      if (e.code == 'weak-password') {
        print('The password provided is too weak.');
      } else if (e.code == 'email-already-in-use') {
        print('The account already exists for that email.');
      }
    } catch (e) {
      print(e);
    }
    return user;
  }
}
在这里,我们使用提供的电子邮件和密码注册一个新用户,并将用户的名字与这个文件联系起来。
可能会出现各种FirebaseAuthException 的错误,我们在上面的代码段中已经处理了这些错误。
用户签入和签出
要签入已经在我们的应用程序中注册的用户,请定义一个新的方法,称为signInUsingEmailPassword() ,传递用户的电子邮件和密码。
static Future<User?> signInUsingEmailPassword({
  required String email,
  required String password,
  required BuildContext context,
}) async {
  FirebaseAuth auth = FirebaseAuth.instance;
  User? user;

  try {
    UserCredential userCredential = await auth.signInWithEmailAndPassword(
      email: email,
      password: password,
    );
    user = userCredential.user;
  } on FirebaseAuthException catch (e) {
    if (e.code == 'user-not-found') {
      print('No user found for that email.');
    } else if (e.code == 'wrong-password') {
      print('Wrong password provided.');
    }
  }

  return user;
}
电子邮件和密码被用来生成Firebase提供的User 对象。这个User ,以后可以用来检索存储在该账户中的任何其他数据(例如,用户名、个人资料图片等)。
你可以使用signOut() 方法来注销一个用户。没有必要为注销创建一个单独的方法,因为它只是一行代码。
FirebaseAuth.instance.signOut();
发送电子邮件验证
假设你想在继续之前验证一个用户是否输入了正确的电子邮件地址。为了发送电子邮件验证,你可以使用User 对象上的sendEmailVerification() 方法。
user.sendEmailVerification();
刷新用户
我们将在FireAuth 类中再定义一个方法来刷新User 。
static Future<User?> refreshUser(User user) async {
  FirebaseAuth auth = FirebaseAuth.instance;

  await user.reload();
  User? refreshedUser = auth.currentUser;

  return refreshedUser;
}
定义验证器
我们的应用程序将有三个表单字段:姓名、电子邮件、密码。我们将为每个字段创建一个验证器。验证器将帮助检查用户是否在特定字段中输入了任何不合适的值,并显示相应的错误。
创建一个名为validator.dart 的新文件,定义一个类Validator ,并在其中指定三个方法(每个方法都将接受一个String 作为参数)。
validateName(),检查姓名字段是否为空validateEmail(),检查电子邮件地址字段是否为空,并使用正则表达式验证其格式是否正确。validatePassword(),检查密码字段是否为空,并验证其长度是否超过六个字符。
class Validator {
  static String? validateName({required String name}) {
    if (name == null) {
      return null;
    }
    if (name.isEmpty) {
      return 'Name can\'t be empty';
    }

    return null;
  }

  static String? validateEmail({required String email}) {
    if (email == null) {
      return null;
    }
    RegExp emailRegExp = RegExp(
        r"^[a-zA-Z0-9.!#$%&'*+/=?^_`{|}~-]+@[a-zA-Z0-9](?:[a-zA-Z0-9-]{0,253}[a-zA-Z0-9])?(?:\.[a-zA-Z0-9](?:[a-zA-Z0-9-]{0,253}[a-zA-Z0-9])?)*$");

    if (email.isEmpty) {
      return 'Email can\'t be empty';
    } else if (!emailRegExp.hasMatch(email)) {
      return 'Enter a correct email';
    }

    return null;
  }

  static String? validatePassword({required String password}) {
    if (password == null) {
      return null;
    }
    if (password.isEmpty) {
      return 'Password can\'t be empty';
    } else if (password.length < 6) {
      return 'Enter a password with length at least 6';
    }

    return null;
  }
}
建立签到表格
让我们在LoginPage 中添加一个表单,用于接受用户的电子邮件地址和密码。
定义一个GlobalKey 。
final _formKey = GlobalKey<FormState>();
添加一个表单并指定密钥。
Form(
  key: _formKey,
  child: Column(
    children: <Widget>[
      // Add widgets
    ],
  ),
)
接下来,添加两个TextFormField,以接受电子邮件和密码。
Form(
  key: _formKey,
  child: Column(
    children: <Widget>[
      TextFormField(
        controller: _emailTextController,
        focusNode: _focusEmail,
        validator: (value) => Validator.validateEmail(email: value),
      ),
      SizedBox(height: 8.0),
      TextFormField(
        controller: _passwordTextController,
        focusNode: _focusPassword,
        obscureText: true,
        validator: (value) => Validator.validatePassword(password: value),
      ),
    ],
  ),
)
在Form 内添加两个按钮:一个用于登录,另一个用于导航到RegisterPage 。
Row(
  mainAxisAlignment: MainAxisAlignment.spaceBetween,
  children: [
    Expanded(
      child: ElevatedButton(
        onPressed: () async {
          if (_formKey.currentState!.validate()) {
            User? user = await FireAuth.signInUsingEmailPassword(
              email: _emailTextController.text,
              password: _passwordTextController.text,
            );
            if (user != null) {
              Navigator.of(context)
                  .pushReplacement(
                MaterialPageRoute(builder: (context) => ProfilePage(user: user)),
              );
            }
          }
        },
        child: Text(
          'Sign In',
          style: TextStyle(color: Colors.white),
        ),
      ),
    ),
    Expanded(
      child: ElevatedButton(
        onPressed: () {
          Navigator.of(context).push(
            MaterialPageRoute(builder: (context) => RegisterPage()),
          );
        },
        child: Text(
          'Register',
          style: TextStyle(color: Colors.white),
        ),
      ),
    ),
  ],
)
在登录按钮里面,我们调用了FireAuth.signInUsingEmailPassword() ,用于使用Firebase认证来执行登录过程。
RegisterPage 也将包含一个与此类似的Form ,只是多了一个字段,用于接受用户首次注册时的名字。
你可以在这里查看RegisterPage 的用户界面代码。
建立个人资料页面
在ProfilePage ,我们将传递User 对象并显示以下细节:姓名、电子邮件和用户是否完成了电子邮件验证。
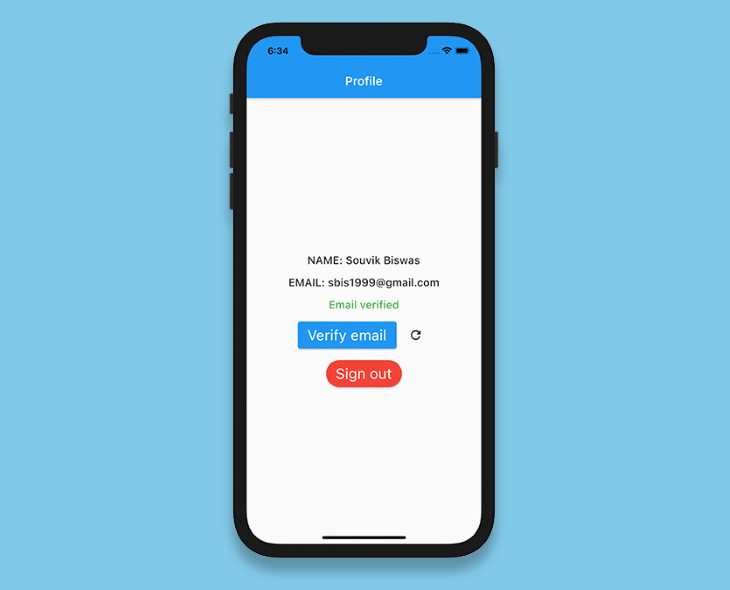
这个页面还将包含两个按钮:一个用于发送电子邮件验证,另一个用于签出用户。
class ProfilePage extends StatefulWidget {
  final User user;
  const ProfilePage({required this.user});
  @override
  _ProfilePageState createState() => _ProfilePageState();
}
class _ProfilePageState extends State<ProfilePage> {
  bool _isSendingVerification = false;
  bool _isSigningOut = false;
  late User _currentUser;

  @override
  void initState() {
    _currentUser = widget.user;
    super.initState();
  }

  @override
  Widget build(BuildContext context) {
    return Scaffold(
      appBar: AppBar(
        title: Text('Profile'),
      ),
      body: Center(
        child: Column(
          mainAxisAlignment: MainAxisAlignment.center,
          children: [
            Text(
              'NAME: ${_currentUser.displayName}',
              style: Theme.of(context).textTheme.bodyText1,
            ),
            SizedBox(height: 16.0),
            Text(
              'EMAIL: ${_currentUser.email}',
              style: Theme.of(context).textTheme.bodyText1,
            ),
            SizedBox(height: 16.0),
            _currentUser.emailVerified
                ? Text(
                    'Email verified',
                    style: Theme.of(context)
                        .textTheme
                        .bodyText1!
                        .copyWith(color: Colors.green),
                  )
                : Text(
                    'Email not verified',
                    style: Theme.of(context)
                        .textTheme
                        .bodyText1!
                        .copyWith(color: Colors.red),
                  ),
              // Add widgets for verifying email
              // and, signing out the user
          ],
        ),
      ),
    );
  }
}
发送电子邮件验证的按钮如下。
ElevatedButton(
  onPressed: () async {
    await _currentUser.sendEmailVerification();
  },
  child: Text('Verify email'),
)
我们还将添加一个IconButton ,当电子邮件被验证时,它可以用来刷新用户。
IconButton(
  icon: Icon(Icons.refresh),
  onPressed: () async {
    User? user = await FireAuth.refreshUser(_currentUser);
    if (user != null) {
      setState(() {
        _currentUser = user;
      });
    }
  },
)
最后是签出用户的按钮。
ElevatedButton(
  onPressed: () async {
    await FirebaseAuth.instance.signOut();

    Navigator.of(context).pushReplacement(
      MaterialPageRoute(
        builder: (context) => LoginPage(),
      ),
    );
  },
  child: Text('Sign out')
)
保持登录状态
还有一件重要的事情要做。在大多数应用程序中,你只需要登录一次,它就会在以后的访问中记住这个状态--也就是说,它会自动将你签入应用程序,这样你就不必每次都提供你的凭证。
在_LoginPageState 类中,修改_initializeFirebase() 方法以检索当前用户。如果User 不是空的,这意味着用户已经登录到应用程序,所以只要用检索到的用户导航到UserInfoScreen 。
Future<FirebaseApp> _initializeFirebase() async {
    FirebaseApp firebaseApp = await Firebase.initializeApp();
    User? user = FirebaseAuth.instance.currentUser;
    if (user != null) {
      Navigator.of(context).pushReplacement(
        MaterialPageRoute(
          builder: (context) => ProfilePage(
            user: user,
          ),
        ),
      );
    }
    return firebaseApp;
}
结语
恭喜你!你已经成功地集成了Firebase认证。你已经成功地将Firebase认证与你的Flutter应用集成在一起。正如你可能已经注意到的,Firebase认证不仅提供了后台基础设施来轻松地认证用户,而且还提供了预定义的自动登录和电子邮件验证方法。而且还有很多值得探索的地方;Firebase认证还提供了对与一些身份提供者的整合的支持,包括谷歌、Facebook、Twitter、苹果等。
你可以在GitHub上找到示例项目中使用的代码。
如果你对这个Flutter和Firebase认证教程有任何建议或疑问,欢迎在Twitter或LinkedIn上与我联系。
The postImplementing Firebase Authentication in a Flutter appappeared first onLogRocket Blog.
