

考虑一种情况,你想检索用户的登录凭证。对于这种用例,拥有一个允许客户在你的应用程序中输入文本数据的组件是合适的。
这就是React Native的 [TextInput](https://reactnative.dev/docs/textinput)组件的作用。除了字符串之外,我们甚至可以定制它来接受密码和数字。
在这篇文章中,你将学习React Native的TextInput 组件的基本知识。稍后,我们还将根据我们的需要,对其属性进行调整。
这将是本指南的成果。
入门
要用Expo实现一个应用程序,请运行以下终端命令。
expo init textinput-tutorial
在你的项目目录中,像这样安装react-native-paper 的依赖关系。
npm install react-native-paper
简单用法
下面的代码片断渲染了一个基本的文本框。
import { StyleSheet, Text, View, TextInput } from "react-native";
export default function App() {
  return (
    <View style={styles.container}>
      <TextInput style={styles.input} />
    </View>
  );
}
const styles = StyleSheet.create({
   input: {
    backgroundColor: "white"
  },
//...
});
你可以让你的元素看起来更漂亮,像这样。
const styles = StyleSheet.create({
  input: {
    borderColor: "gray",
    width: "100%",
    borderWidth: 1,
    borderRadius: 10,
    padding: 10,
  },
});
在上面的代码中,我们为文本框的边框设计了样式,并给它一些填充。此外,我们使用了borderRadius 属性。这告诉React添加圆形边框。
现在它看起来肯定更有吸引力了
定制化
添加一个占位符
当你想提供提示和说明以帮助用户填写数据时,添加一个占位符是很有用的。
要做到这一点,使用placeholder 道具。
<TextInput style={styles.input} placeholder="John" />
多行
TextInput 组件也可以接受多行文本。这对于获取用户反馈等情况很有用。
<TextInput style={styles.input} multiline={true} />
最大长度
想限制用户的输入长度?这可以通过maxLength 这个道具来实现。
<TextInput style={styles.input} maxLength={4} />
不可更改的文本框
你可以用editable 道具阻止对你的元素的输入。
<TextInput
  style={styles.input}
  editable={false}
  value="This cannot be edited"
/>
改变键盘类型
考虑一个情况,你要问客户的电话号码。在这里,显示数字键盘而不是默认键盘是明智的。
要改变键盘类型,可以像这样使用keyboardType 。
<TextInput style={styles.input} keyboardType="phone-pad"/>
要获得用户的电子邮件地址,适当的keyboardType ,就是email-address 。
<TextInput style={styles.input} keyboardType="email-address"/>
获取密码
当涉及到密码时,我们可以定制我们的文本字段,使输入的数据被掩盖。为了实现这一点,我们将像这样使用secureTextEntry 属性。
<TextInput style={styles.input} secureTextEntry={true}/>
记录用户的输入
在每一个文本变化之后
假设你有一个作为搜索栏的文本框。在这种情况下,你会希望在每次输入的值发生变化时捕获数据。
你可以通过onChangeText 这个道具来实现。它是一个回调,每当文本框检测到变化时就会运行。
export default function App() {
  const [name, setName] = useState("");
  return (
    <View style={styles.container}>
      <Text>Write name.</Text>
      <TextInput
        style={styles.input}
        placeholder="John Doe"
        onChangeText={(value) => setName(value)}
      />
      <Text>Welcome: {name}</Text>
    </View>
  );
}
在这段代码中,我们告诉React Native将name Hook更新为TextInput 的值。最后,我们显示了name 这个变量的值。
当用户提交时
考虑这样一种情况:你有一个表单,并且希望只有在用户提交表单时才保存数据。
为了实现这一点,你可以使用onSubmitEditing 回调。
export default function App() {
  const [name, setName] = useState("");
  return (
    <View style={styles.container}>
      <Text>Write name.</Text>
      <TextInput
        style={styles.input}
        onSubmitEditing={(value) => setName(value.nativeEvent.text)}
      />
      <Text>Welcome, {name}!</Text>
    </View>
  );
}
在上面这段代码中,如果用户按下返回键,React Native会将name Hook变量更新为输入值。
使用React Native Paper的文本字段图标
React Native Paper允许我们在文本框的任何一面显示图标。这将使你的界面看起来更现代。
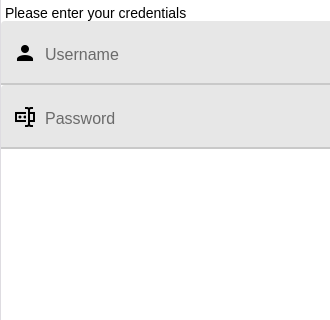
下面的代码片断渲染了一个带有文本字段的图形。
import { TextInput } from "react-native-paper";
//extra code removed...
return (
  <View>
    <Text> Please enter your credentials</Text>
    <TextInput label="Username" left={<TextInput.Icon name="account" />} />
    <TextInput
      label="Password"
      secureTextEntry
      left={<TextInput.Icon name="form-textbox-password" />}
    />
  </View>
);
left 属性告诉React Native在左边显示所需的图标。
这将是输出结果。
结语
在本指南中,你学到了如何在React Native库中使用和记录TextInput 。在我自己的应用程序中,我使用React Native Paper,因为它在所有平台上看起来都很好,开箱即用。
非常感谢你的阅读!
The postA complete guide to TextInput in React Native appearedfirst on LogRocketBlog.
