

简介
什么是React.cloneElement() ?
[React.cloneElement()](https://reactjs.org/docs/react-api.html#cloneelement)是React顶层API的一部分,用于操作元素。它克隆并返回一个新的元素,使用其第一个参数作为起点。这个参数可以是一个React元素或一个渲染React元素的组件。
新的元素将有以下特点。
- 原有元素的道具与新的道具浅浅地合并在一起
- 新的子元素取代现有的子元素
- 原元素中的
key和ref被保留。
当你想添加或修改一个父组件的子元素的道具时,React.cloneElement() ,同时避免不必要的重复代码。
语法和使用React.cloneElement()
在我们看一些例子之前,让我们先看看React.cloneElement() 的语法。语法在下一个代码块中给出,后面是一些术语的定义。
React.cloneElement(element, [props], [...children])
element: 将被克隆的元素[props]:除了原元素的道具外,将被添加到克隆的元素中的道具[...children]: 克隆对象的子女。注意,现有对象的子元素不会被复制。
你可以在父组件的定义中使用React.cloneElement() ,以执行下列过程。
- 修改子元素属性
- 添加到子组件属性
- 扩展子组件的功能
本文通过以下例子深入探讨这三种操作的每一种。
- 修改子女属性
- 重复的字符
- 花式儿童按钮
- 一次性修改单选按钮属性
- 克隆另一个React元素作为一个道具
- 添加到子女属性
- 粗体字
- 将道具传递给通过以下方式接收的元素
React.cloneElement()
- 扩展子组件的功能
- 点击时的提示
修改子元素属性
当你修改子元素的属性时,这意味着你通过传递给父元素来改变子元素的属性。
没有比通过真实的代码例子更好的解释方式了。我们将用下面的例子来说明这个概念。
- 重复的字符
- 花式子按钮
- 一次性修改单选按钮的属性
- 克隆React元素作为一个属性
在我们继续之前,请注意在这些例子中,所修改的属性是浅层合并的--key 和ref 是保持的。还没有创建新的子节点,尽管我们会在本文的最后一个例子中看一下。
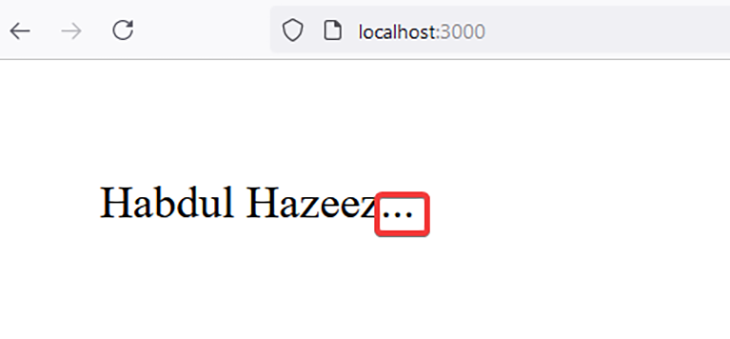
1.重复的字符
在下一个代码块中,RepeatCharacters 是一个父组件,CreateTextWithProps 是一个子组件。
CreateTextWithProps 有一个名为ASCIIChar 的属性,其值是任何有效的 ASCII 字符。RepeatCharacters 将使用React.cloneElement() 在克隆的元素中重复这个字符,其次数在times 属性中指定。
import React from "react";
const CreateTextWithProps = ({ text, ASCIIChar, ...props }) => {
return (
<span {...props}>
{text}{ASCIIChar}
</span>
)
};
const RepeatCharacters = ({ times, children }) => {
return React.cloneElement(children, {
// This will override the original ASCIIChar in the text.
ASCIIChar: children.props.ASCIIChar.repeat(times),
})
};
function App() {
return (
<div>
<RepeatCharacters times={3}>
<CreateTextWithProps
text="Habdul Hazeez"
ASCIIChar='.'
/>
</RepeatCharacters>
</div>
)
}
export default App
下面是在网络浏览器中看到的结果。
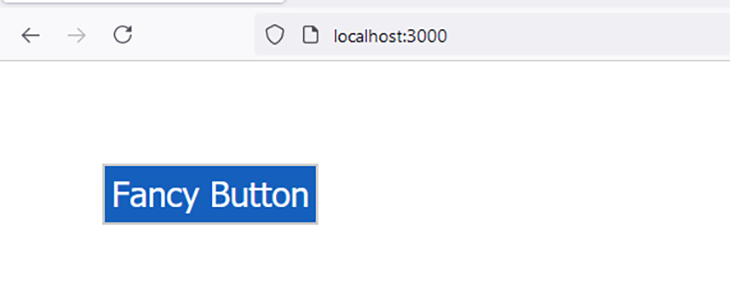
2.花哨的儿童按钮
这里没有什么花哨的东西--这是一些代码,显示一个按钮,上面有 "Fancy button "的文字。这证明你可以定制这些组件以满足你的需要。
ButtonContainer 组件使用React.cloneElement() 来修改由Button 组件渲染的元素的外观。
在这种情况下,你提供null 作为React.cloneElement() 的第三个参数,因为作为提醒,你并没有创建任何新的子元素。
import React from "react";
const ButtonContainer = (props) => {
let newProp = {
backgroundColor: "#1560bd",
textColor: '#ffffff',
border: '1px solid #cccccc',
padding: '0.2em',
}
return (
<div>
{React.Children.map(props.children, child => {
return React.cloneElement(child, {newProp}, null)
})}
</div>
)
};
const Button = (props) => {
return <button
style={{
color: props.newProp.textColor,
border: props.newProp.border,
padding: props.newProp.padding,
backgroundColor: props.newProp.backgroundColor
}}>Fancy Button</button>
}
function App() {
return (
<ButtonContainer>
<Button />
</ButtonContainer>
)
}
export default App
当你在网络浏览器中查看结果时,你会得到与下面的图片类似的东西。
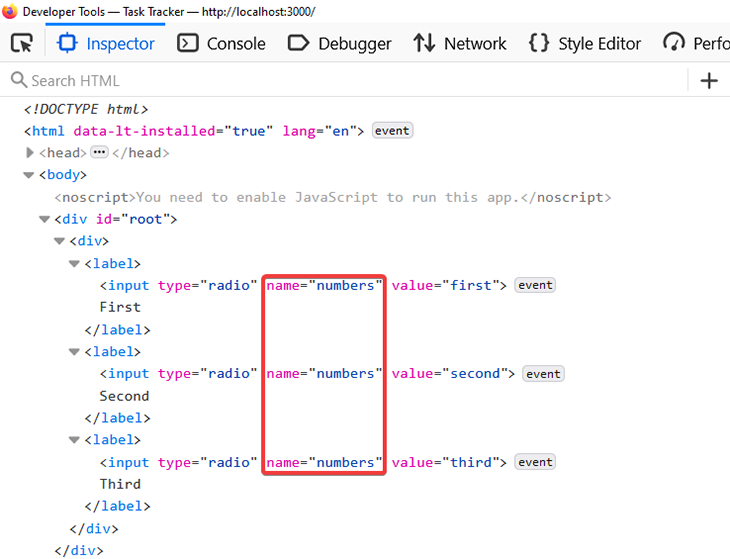
3.修改单选按钮的属性
在HTML中,单选按钮是分组的。你只能从提供的选项中选择一个,而且它们似乎总是有一个name 属性附加在上面。
利用到目前为止你所获得的知识,你可以通过一个父组件动态地将这个name 属性添加到多个子组件中。
在这种情况下,子组件应该是单选按钮或者是渲染单选按钮的组件。
import React from "react";
const RadioGroup = (props) => {
const RenderChildren = () => (
React.Children.map(props.children, child => {
return React.cloneElement(child, {
name: props.name,
})
})
)
return (
<div>
{<RenderChildren />}
</div>
)
}
const RadioButton = (props) => {
return (
<label>
<input type="radio" value={props.value} name={props.name} />
{props.children}
</label>
)
}
function App() {
return (
<RadioGroup name="numbers">
<RadioButton value="first">First</RadioButton>
<RadioButton value="second">Second</RadioButton>
<RadioButton value="third">Third</RadioButton>
</RadioGroup>
)
}
export default App
你可以使用你的浏览器的检查元素功能来确认这一点。
4.克隆另一个React元素作为一个道具
你很可能会发现自己处于这样一种情况:你必须为不同的网页创建一个具有不同文字的网站标题。
在你的React武器库中,有多种选择,其中可能包括将标题文本存储在一个变量中,将这个变量作为一个道具传递给一个组件,并渲染文本。然后你可能会在每个需要这个标题文本的组件中这样做。
正如你可能猜到的那样,这造成了不必要的代码重复,而作为软件开发者,我们应该始终主张保持事情的简单。
相反,你可以使用React.cloneElement 来更容易地实现同样的目标。创建三个可重复使用的组件,即。
HeaderDefaultHeaderBigHeader
Header 组件将接收一个组件作为道具。这个组件最终将渲染标题文本。为了安全起见,DefaultHeader 将是传递给Header 的默认组件。
DefaultHeader 将渲染默认文本。当调用Header ,没有道具时,这个默认文本就会被呈现出来。
同时,BigHeader 组件将有一个message 道具,其值是你选择的标题文本。每次你把BigHeader 传递给Header ,你都可以在BigHeader 渲染之前修改这个message 的道具值。
所有这些在下一个代码块中都有说明。
import React from "react";
import { BrowserRouter as Router, Route, Link } from 'react-router-dom';
const DefaultHeader = (color) => {
return (
<div style={{ color: "#1560bd" }}>
<p>Website of Habdul Hazeez</p>
</div>
)
}
const defaultMessage = 'Website of Habdul Hazeez';
const BigHeader = ({ color, message = defaultMessage }) => {
return (
<div style={{ color, fontSize: '2em' }}>
{message}
</div>
)
}
const Header = ({ hero = <DefaultHeader />}) => {
return (
<div>
{React.cloneElement(hero, { color: "#1560bd"})}
</div>
)
}
const HomePage = () => {
return (
<Header hero={<BigHeader message="This is the home page" />} />
)
}
const AboutMe = () => {
return (
<Header hero={<BigHeader message="Information about me" />} />
)
}
const ContactPage = () => {
return (
<Header hero={<BigHeader message="This contains my contact information." />} />
)
}
function App() {
return (
<React.Fragment>
<Router>
<nav>
<ul>
<li>
<Link to="/">Home</Link>
</li>
<li>
<Link to="/contact-page">Contact</Link>
</li>
<li>
<Link to="about-me">About</Link>
</li>
</ul>
</nav>
<Route exact path="/"><HomePage /></Route>
<Route path="/contact-page"><ContactPage /></Route>
<Route path="/about-me"><AboutMe /></Route>
</Router>
</React.Fragment>
)
}
export default App
添加到子属性
当你添加到一个子属性时,这意味着你已经通过父组件将新的东西插入到子属性中。
本节讨论的以下例子将解释如何通过React.cloneElement() 来添加道具。
注意,正如我在上一节中所说的,新的道具被合并进来,key 和ref 被维护,新的子属性不会被创建(至少目前是这样)。
粗体字
当你看到这一节的标题时,不要气馁,认为:"这很容易"。我知道这很 "容易"--从表面上看。这里的课程是使用React.cloneElement() ,向子元素添加一个属性。
为了告诉你这是如何工作的,我们将重新审视本文的第一个例子,关于重复字符。不过,你不会重复任何字符--相反,你将定义一个自定义的CSS样式,并使用React.cloneElement() 函数添加到子元素中。
这在下一个代码块中有所说明。
import React from "react";

const CreateTextWithProps = ({ text, ...props }) => {
  return (
    <span {...props}>
      {text}
    </span>
  )
};

const BoldText = ({ children }) => {
  return React.cloneElement(children, {
    style: {
      fontWeight: 'bold'
    },
  })
};

function App() {
  return (
    <div>
      <BoldText>
        <CreateTextWithProps
          text="Habdul Hazeez"
        />
      </BoldText>
    </div>
  )
}

export default App;
将道具传递给一个通过以下方式接收的元素React.cloneElement()
这类似于你在上面的 "克隆另一个React元素作为道具 "一节中所做的,但在这里,你将使用React.cloneElement() 克隆一个道具。这个道具必须是一个有效的React元素,比如<h1> 或<button> 。
当你克隆这个道具时,你可以传递额外的属性,如CSS样式或事件处理器。
在下一个代码块中,你将传递一个handleClick 函数给这个道具,它将被AlertOnClick 。因此,每次元素被点击时,handleClick 内的代码就会被执行。
import React from "react";
const AlertOnClick = (props) => {
function handleClick () {
alert("Hello World")
}
const Trigger = props.trigger;
return (
<div>
{React.cloneElement(Trigger, {
onClick: handleClick
})}
</div>
)
}
function App() {
return (
<div>
{
<AlertOnClick trigger={<button>Click me</button>} />
}
</div>
)
}
export default App
扩展子组件的功能
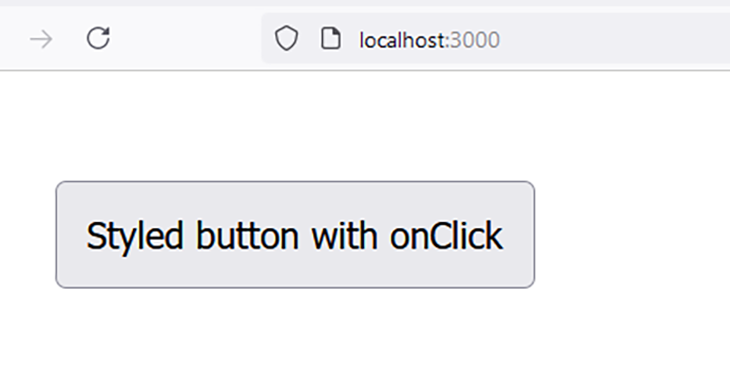
到目前为止,你已经修改和添加了子组件的道具。这个例子展示了克隆元素的最后一个特征,因为我们终于创建了一个新的子元素!这个新的子元素被传递给了第三个子元素。这个新的子元素被作为第三个参数传递给React.cloneElement() 。
点击时的警报
在下一个代码块中,通过React.cloneElement() 从Button 组件创建的新按钮元素有两个额外的转折:一个onClick 事件处理程序和新文本。
import React from "react";
const Button = () => {
return (
<button type="button" style={{ padding: "10px" }}>
This is a styled button
</button>
)
}
function App() {
return (
<section>
{
React.cloneElement(
Button(), // component to overwrite
{
onClick: () => { // additional props
alert("You are making progress!!!")
}
},
<>
Styled button with onClick
</>
)
}
</section>
)
}
export default App
当这段代码被执行时,按钮将呈现出通过React.cloneElement() 函数添加的文本,其内容为 "Styled button with onClick",如下图所示。
总结
这篇文章用七个不同的例子解释了如何使用React.cloneElement() 函数。其中四个例子解释了如何修改子组件的道具;另外两个例子详细说明了如何向子组件添加道具;最后,我们的最后一个例子展示了如何扩展子组件的功能。
希望你在本文中学到的东西可以为你的React应用增添一些创意的色彩
The postUsing the React.cloneElement() function to clone elements appearedfirst on LogRocketBlog.
