

「这是我参与2022首次更文挑战的第2天,活动详情查看:2022首次更文挑战」。
昨天写过Gulp的,今天来说说webpack
Gulp侧重于前端开发的 整个过程 的控制管理(像是流水线),我们可以通过给gulp配置不通的task(通过Gulp中的gulp.task()方法配置,比如启动server、sass/less预编译、文件的合并压缩等等)来让gulp实现不同的功能,从而构建整个前端开发流程。
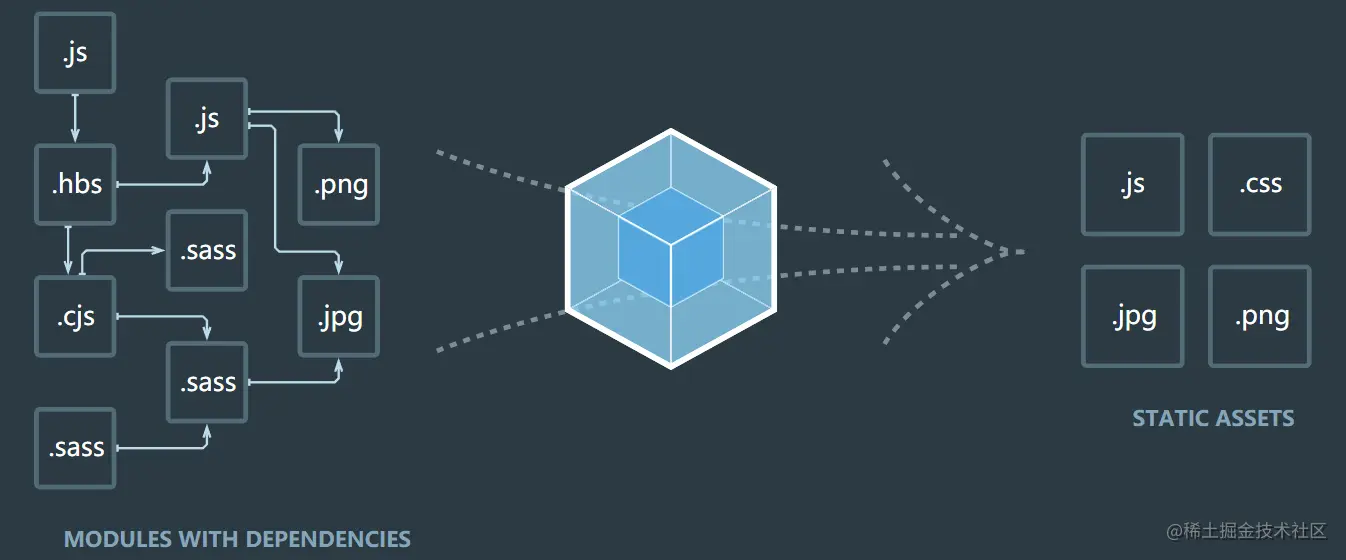
Webpack是一个可以帮我们打包的工具。打包就是我们将前端引用的很多CSS,js、还有图片等文件,全部写进一个js里面。而不是在一个HTML页面里通过link、script标签引用。使用webpack打包之后,可以将所有的静态资源都合并好,减少了请求的次数。还可以重新编译,将浏览器不识别的语言编译成浏览器可识别的语言
webpack初体验
创建项目
// 执行命令 npm init -y ,生成package.json文件
安装依赖
//本地安装
npm install webpack webpack-cli -D
//全局安装
npm install webpack webpack-cli -g
//安装jquery
npm install jquery -S
新建文件
入口文件:index.html
<!DOCTYPE html>
<html lang="en">
<head>
  <meta charset="UTF-8">
  <meta name="viewport" content="width=device-width, initial-scale=1.0">
  <meta http-equiv="X-UA-Compatible" content="ie=edge">
  <title>Document</title>
</head>
<body>
  <ul>
    <li>11</li>
    <li>22</li>
    <li>33</li>
    <li>44</li>
    <li>55</li>
    <li>66</li>
    <li>77</li>
    <li>88</li>
  </ul>
</body>
</html>
<script src="./index.js"></script>
index.js ↓↓↓
import $ from 'jquery'
$('ul li:even').css({background: 'red'})
$('ul li:odd').css({background: 'green'})
此时浏览器打开文件还是没有样式,还有一个报错,因为浏览器并不兼容import引入模块这种方式,所以我们要用到webpack打包
webpack打包
// 执行命令
webpack index.js -o dist/bundle.js
[把index.js output(输出)到dist/bundle.js]
注意:如果出现报错可能因为你没有安装全局的webpack,或者你也可以手动改写package.json,然后执行命令 npm run start
报错解决了,可是样式还是没有显示?别急哈~你还要改动
index.html
把index.html原来引入index.js的地方改成是通过webpack生成的bundle.js
<!--index.html文件-->
<!--<script src="./index.js"></script>-->
<script src="./dist/bundle.js"></script>
完成,最后实现效果如下
在这一步时候还可能有这样的错误
百度说可能是版本号冲突,尝试降低版本号——不行,然后用了另一个方法, 把index.js文件放进src目录里面,然后执行命令
npx webpack src/index.js,就可以生成dist目录
最后一步就是把index.html文件引入js地址改为<script src="./dist/main.js"></script>"
优化
在node_modules同级新建webpack.config.js文件
const path = require('path');

module.exports = {
  entry: path.join(__dirname, './index.js'),
  output: {
    path: path.join(__dirname, './dist'),
    filename: 'bundle.js'
  }
}
此时,package.json文件要改变
"scripts": {
    "start": "webpack --config webpack.config.js"
  }
最后,执行命令npm start
webpack-dev-server(热重载)
① 安装: npm install webpack-dev-server -D
②修改package.json
//package.json
"scripts": {
    "start": "webpack-dev-server --config webpack.config.js --open --port 3002 --hot"
  }
// --open 自动打开浏览器
// --port 服务监听的端口 3002
// --hot  自动更新
③修改index.html中bundle.js引入地址
//index.html
<script src="./bundle.js"></script>
④ 启动 npm run start
完成这一步,你就可以不用刷新就可以看到你改动的新样式,看看完成后效果
html-webpack-plugin
① 安装: npm i html-webpack-plugin -D
② webpack.config.js修改
const path = require('path');
const HtmlWebpackPlugin = require('html-webpack-plugin');

module.exports = {
  entry: path.join(__dirname, './index.js'),
  output: {
    path: path.join(__dirname, './dist'),
    filename: 'bundle.js'
  },
  plugins: [
    new HtmlWebpackPlugin({
      template: path.join(__dirname, './index.html'),
      filename: 'index.html'
    })
  ]
}
③ 删掉index.html文件里面的bundle.js引用,因为html-webpack-plugin会自动把打包出来的bundle自动加到我们的index.html代码里
css-loader和style-loader
①新建index.css文件并在index.js中引入
/* index.css */
body {
    background: skyblue;
}
//index.js
import $ from 'jquery'
$('ul li:even').css({background: 'gray'})
$('ul li:odd').css({background: 'green'})

import './index.css'
此时,又出现报错,因为webpack默认是不识别.css文件的。所以接下里我们要做:
② 安装: npm install css-loader style-loader -D
③ 修改webpack.config.js文件
const path = require('path');
const HtmlWebpackPlugin = require('html-webpack-plugin');

module.exports = {
  entry: path.join(__dirname, './index.js'),
  output: {
    path: path.join(__dirname, './dist'),
    filename: 'bundle.js'
  },
  plugins: [
    new HtmlWebpackPlugin({
      template: path.join(__dirname, './index.html'),
      filename: 'index.html'
    })
  ],
  module: {
    rules: [{
      test: /.css$/,
      use: ['style-loader', 'css-loader']
    }]
  }
}
补充:引入的文件如果是less
需要安装:
npm install less-loader less -D
module: {
    rules: [{
      test: /.less$/,
      use: ['style-loader', 'css-loader', 'less-loader']   // 在这个数组中,顺序是从右向左
    }]
 }
题外话:有时候啊,明明安装没问题,操作也没问题,报错也看不出问题,试试把node_modules删了重新npm i,再运行项目,说不定就成功了。
ES6 转 ES5
①安装
//安装
npm install babel-core babel-loader@7.1.5 babel-plugin-transform-runtime babel-preset-env babel-preset-stage-0 -D
②找到webpack.config.js,在module属性里面的rules中,配置loader :
module.exports = {
  ...,
  module: {
    rules: [
  		...,
  		{
            test:/\.js/,
            use:['babel-loader'],
            exclude:/node_modules/      // 排除node_modules文件夹
        }
  	]
  }
}
③新增.babelrc文件
{
    "presets":["env","stage-0"],
    "plugins":["transform-runtime"]
}
图片引入
方法一:标签
<img src="" alt="">
方法二:css文件
background: url('图片地址')
方法三:js中
let image = new Image();
iamge.url = '图片地址';
document.body.appendChild(image);
方法四:webpack
- 安装:npm install url-loader file-loader -D
- webpack.config .js 的配置
module: {
    rules: [
        ...
        ,
        {
            test: /\.(png|svg|jpg|gif)$/,
            use: [
                {
                    loader: 'url-loader',
                    options: {
                        outputPath: 'image/',  // 指定图片输入的文件夹
                        publicPath: '../dist/image/',  // 指定获取图片的路径
                        limit: 500,
                        name: '[name].[hash:8].[ext]'  // 输入的图片名
                    }
                }
            ]
        }
    ]
}
③执行 npm run dev 进行打包
打包项目
//package.json文件
{
"scripts": {
    "test": "echo \"Error: no test specified\" && exit 1",
    "start": "webpack-dev-server --config webpack.config.js --open --port 3002 --hot",
    "build":"webpack --config webpack.config.js"
  }
}
然后运行命令npm run build,执行成功后目录会多一个dist文件夹
打开dist/index.html,按住alt+b 打开页面即可。
webpack其实知识蛮多的,什么构建过程,构建优化,loader,plugin的,我发现去看相关面试题时候也是有帮助学习理解的,还有强大的B站。
总之每天都要要求自己进步一点点喔~
