1. Yarn资源调度器
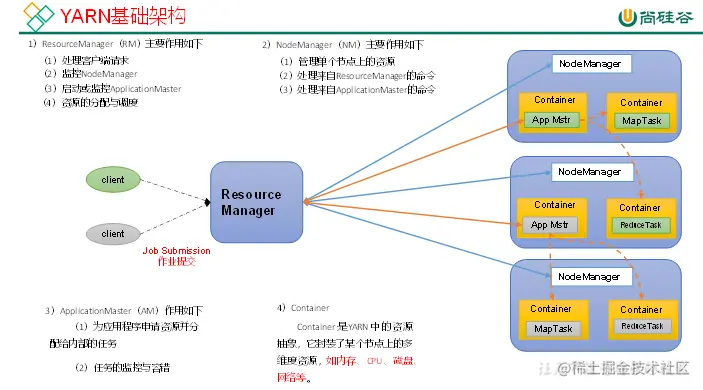
1.1 Yarn基础架构
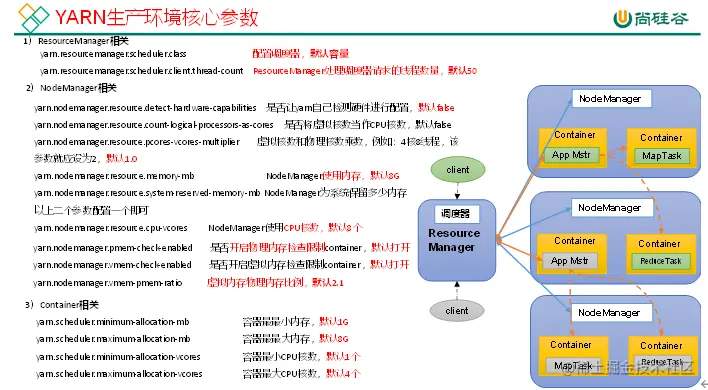
YARN主要由ResourceManager、NodeManager、ApplicationMaster和Container等组件构成
1.2 Yarn工作机制
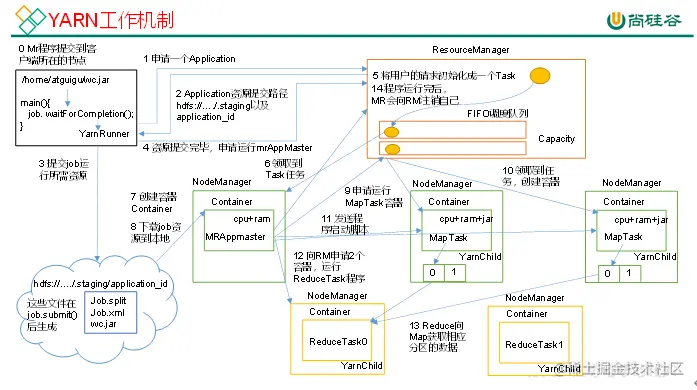
    (1)MR程序提交到客户端所在的节点。
    (2)YarnRunner向ResourceManager申请一个Application。
    (3)RM将该应用程序的资源路径返回给YarnRunner。
    (4)该程序将运行所需资源提交到HDFS上。
    (5)程序资源提交完毕后,申请运行mrAppMaster。
    (6)RM将用户的请求初始化成一个Task。
    (7)其中一个NodeManager领取到Task任务。
    (8)该NodeManager创建容器Container,并产生MRAppmaster。
    (9)Container从HDFS上拷贝资源到本地。
    (10)MRAppmaster向RM 申请运行MapTask资源。
    (11)RM将运行MapTask任务分配给另外两个NodeManager,另两个NodeManager分别领取任务并创建容器。
    (12)MR向两个接收到任务的NodeManager发送程序启动脚本,这两个NodeManager分别启动MapTask,MapTask对数据分区排序。
    (13)MrAppMaster等待所有MapTask运行完毕后,向RM申请容器,运行ReduceTask。
    (14)ReduceTask向MapTask获取相应分区的数据。
    (15)程序运行完毕后,MR会向RM申请注销自己。
1.3 作业提交全过程
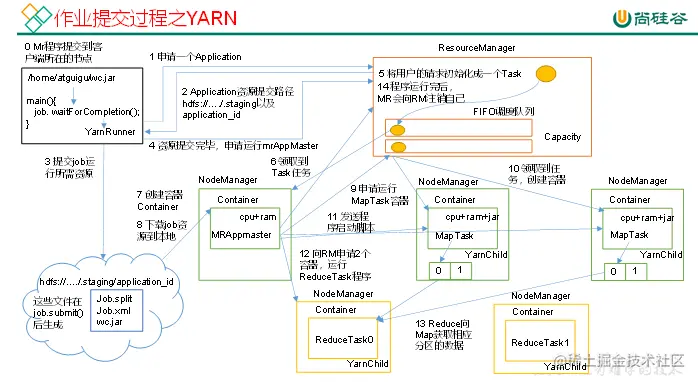
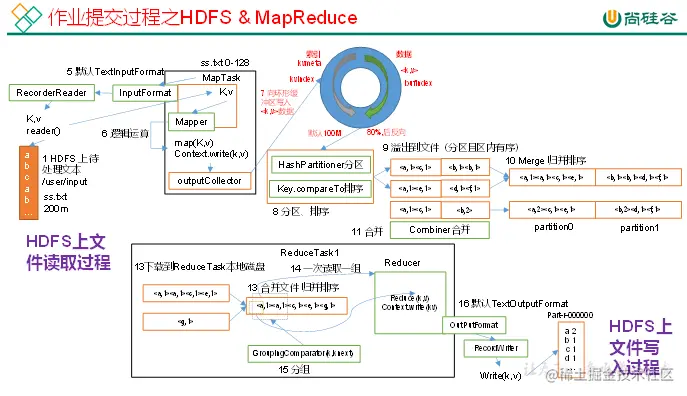
作业提交全过程详解

(1)作业提交

第1步:Client调用job.waitForCompletion方法,向整个集群提交MapReduce作业。

第2步:Client向RM申请一个作业id。

第3步:RM给Client返回该job资源的提交路径和作业id。

第4步:Client提交jar包、切片信息和配置文件到指定的资源提交路径。

第5步:Client提交完资源后,向RM申请运行MrAppMaster。

(2)作业初始化

第6步:当RM收到Client的请求后,将该job添加到容量调度器中。

第7步:某一个空闲的NM领取到该Job。

第8步:该NM创建Container,并产生MRAppmaster。

第9步:下载Client提交的资源到本地。

(3)任务分配

第10步:MrAppMaster向RM申请运行多个MapTask任务资源。

第11步:RM将运行MapTask任务分配给另外两个NodeManager,另两个NodeManager分别领取任务并创建容器。

(4)任务运行

第12步:MR向两个接收到任务的NodeManager发送程序启动脚本,这两个NodeManager分别启动MapTask,MapTask对数据分区排序。

第13步:MrAppMaster等待所有MapTask运行完毕后,向RM申请容器,运行ReduceTask。

第14步:ReduceTask向MapTask获取相应分区的数据。

第15步:程序运行完毕后,MR会向RM申请注销自己。

(5)进度和状态更新

YARN中的任务将其进度和状态(包括counter)返回给应用管理器, 客户端每秒(通过mapreduce.client.progressmonitor.pollinterval设置)向应用管理器请求进度更新, 展示给用户。

(6)作业完成

除了向应用管理器请求作业进度外, 客户端每5秒都会通过调用waitForCompletion()来检查作业是否完成。时间间隔可以通过mapreduce.client.completion.pollinterval来设置。作业完成之后, 应用管理器和Container会清理工作状态。作业的信息会被作业历史服务器存储以备之后用户核查。
1.4 Yarn调度器和调度算法
    目前,Hadoop作业调度器主要有三种:FIFO、容量(Capacity Scheduler)和公平(Fair Scheduler)。Apache Hadoop3.1.3默认的资源调度器是Capacity Scheduler。
    CDH框架默认调度器是Fair Scheduler。
    具体设置详见:yarn-default.xml文件
    <property>
        <description>The class to use as the resource scheduler.</description>
        <name>yarn.resourcemanager.scheduler.class</name>    <value>org.apache.hadoop.yarn.server.resourcemanager.scheduler.capacity.CapacityScheduler</value>
    </property>
1.4.1 先进先出调度器
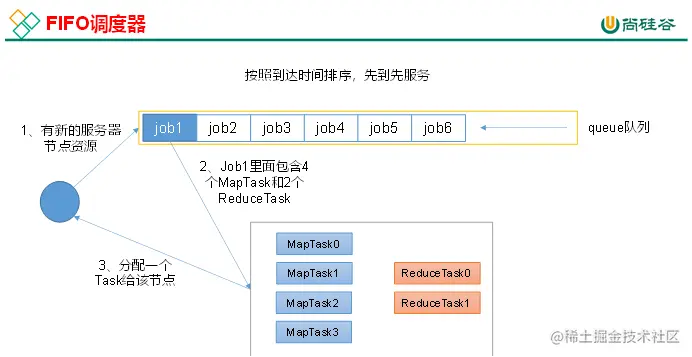
FIFO调度器(First In First Out):单队列,根据提交作业的先后顺序,先来先服务
优点:简单易懂
缺点:不支持多队列,生产环境很少使用
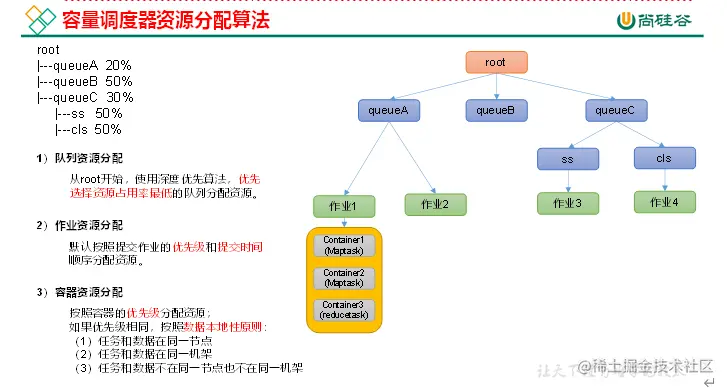
1.4.2 容量调度器(Capacity Scheduler)
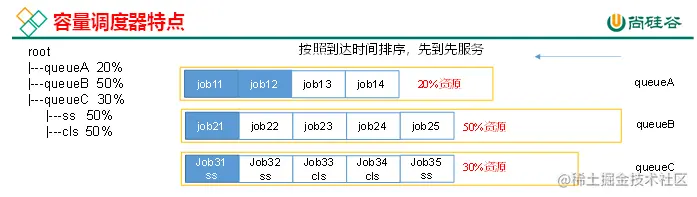
1.多队列:每个队列可配置一定的资源量,每个队列采用FIFO调度策略
2.容量保证:管理员可为每个队列设置资源最低保证和资源使用上线
3.灵活性:如果一个队列中的资源有剩余,可以暂时共享给那些需要资源的队列,而一旦该队列有新的应用程序提交,则其他队列借调的资源会归还该队列
4.多租户:
    支持多用户共享集群和多程序程序同时运行
    为了防止同一个用户的作业独占队列中的资源,该调度器会对统一用户提交的作业所占资源量进行限定
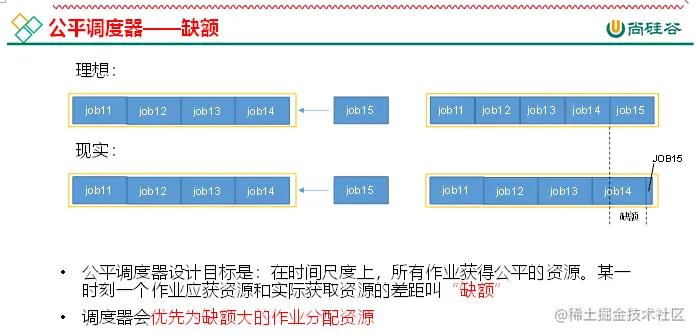
1.4.3 公平调度器(Fair Scheduler)

1.与容量调度器的相同点
(1) 多队列:支持多个队列
(2) 容量保证:管理员可以为每个队列设置资源最低保证和资源使用上限
(3) 灵活性如果一个队列中的资源有剩余,可以暂时共享给那些需要资源的队列,而一旦该队列有新的应用程序提交,则其他队列借调的资源会归还该队列
(4) 多租户:
支持多用户共享集群和多程序程序同时运行
为了防止同一个用户的作业独占队列中的资源,该调度器会对统一用户提交的作业所占资源量进行限定
2.与容量调度器的不同点
(1) 核心调度策略不同
容量调度器:有限选择资源利用率低的队列
公平调度器: 有限选择对资源的缺额比例大的
(2) 每个队列可以单独设置资源分配方式
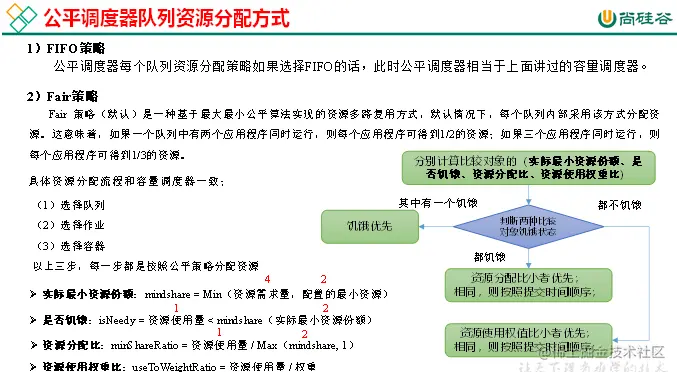
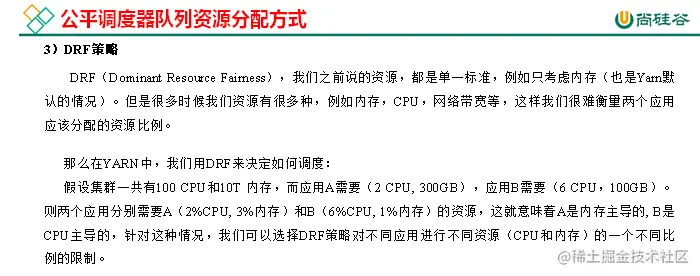
容量调度器:FIFO DRF
公平调度器: FIFO DRF FAIR
1.5 Yarn常用命令
1.5.1 yarn application查看任务
(1)列出所有Application:
    yarn application -list
(2)根据Application状态过滤:yarn application -list -appStates (所有状态:ALL、NEW、NEW_SAVING、SUBMITTED、ACCEPTED、RUNNING、FINISHED、FAILED、KILLED):
    yarn application -list -appStates FINISHED
(3)Kill掉Application:
    yarn application -kill application_1612577921195_0001
1.5.2 yarn logs查看日志
(1)查询Application日志:yarn logs -applicationId <ApplicationId>
    yarn logs -applicationId application_1612577921195_0001
(2)查询Container日志:yarn logs -applicationId <ApplicationId> -containerId <ContainerId>
    yarn logs -applicationId application_1612577921195_0001 -containerId **container_1612577921195_0001_01_000001
1.5.3 yarn applicationattempt查看尝试运行的任务
    (1)列出所有Application尝试的列表:yarn applicationattempt -list <ApplicationId>
         yarn applicationattempt -list application_1612577921195_0001
    (2)打印ApplicationAttemp状态:yarn applicationattempt -status <ApplicationAttemptId>
        yarn applicationattempt -status appattempt_1612577921195_0001_000001
1.5.4 yarn container查看容器
(1)列出所有Container:yarn container -list <ApplicationAttemptId>
    yarn container -list appattempt_1612577921195_0001_000001
(2)打印Container状态: yarn container -status <ContainerId>
    yarn container -status container_1612577921195_0001_01_000001
1.5.5 yarn node查看节点状态
列出所有节点:yarn node -list -all
1.5.6 yarn rmadmin更新配置
加载队列配置:yarn rmadmin -refreshQueues
1.5.7 yarn queue查看队列
打印队列信息:yarn queue -status <QueueName>
    yarn queue -status default
1.6 Yarn生产环境核心参数
2. Yarn案例
2.1 Yarn生产环境核心参数配置案例
1. 需求:
   从1G数据中,统计每个单词出现次数。服务器3台,每台配置4G内存,4核CPU,4线程。
2. 需求分析
   1G / 128m = 8个MapTask;1个ReduceTask;1个mrAppMaster
   平均每个节点运行10个 / 3台 ≈ 3个任务(4     3     3)
3.修改yarn-site.xml配置参数如下:
<property>
<description>The class to use as the resource scheduler.</description>
<name>yarn.resourcemanager.scheduler.class</name>
<value>org.apache.hadoop.yarn.server.resourcemanager.scheduler.capacity.CapacityScheduler<value>
</property>
<property>
<description>Number of threads to handle scheduler interface.</description>
<name>yarn.resourcemanager.scheduler.client.thread-count</name>
<value>8</value>
</property>
<property>
<description>Enable auto-detection of node capabilities such as memory and CPU</description>
<name>yarn.nodemanager.resource.detect-hardware-capabilities</name>
<value>false</value>
</property>
<property>
<description>Flag to determine if logical processors(such as
hyperthreads) should be counted as cores. Only applicable on Linux
when yarn.nodemanager.resource.cpu-vcores is set to -1 and
yarn.nodemanager.resource.detect-hardware-capabilities is true.
</description>
<name>yarn.nodemanager.resource.count-logical-processors-as-cores</name>
<value>false</value>
</property>
<property>
<description>Multiplier to determine how to convert phyiscal cores to
vcores. This value is used if yarn.nodemanager.resource.cpu-vcores
is set to -1(which implies auto-calculate vcores) and
yarn.nodemanager.resource.detect-hardware-capabilities is set to true. The number of vcores will be calculated as number of CPUs * multiplier.
</description>
<name>yarn.nodemanager.resource.pcores-vcores-multiplier</name>
<value>1.0</value>
</property>
<property>
<description>Amount of physical memory, in MB, that can be allocated
for containers. If set to -1 and
yarn.nodemanager.resource.detect-hardware-capabilities is true, it is
automatically calculated(in case of Windows and Linux).
In other cases, the default is 8192MB.
</description>
<name>yarn.nodemanager.resource.memory-mb</name>
<value>4096</value>
</property>
<property>
<description>Number of vcores that can be allocated
for containers. This is used by the RM scheduler when allocating
resources for containers. This is not used to limit the number of
CPUs used by YARN containers. If it is set to -1 and
yarn.nodemanager.resource.detect-hardware-capabilities is true, it is
automatically determined from the hardware in case of Windows and Linux.
In other cases, number of vcores is 8 by default.</description>
<name>yarn.nodemanager.resource.cpu-vcores</name>
<value>4</value>
</property>
<property>
<description>The minimum allocation for every container request at the RM in MBs. Memory requests lower than this will be set to the value of this property. Additionally, a node manager that is configured to have less memory than this value will be shut down by the resource manager.
</description>
<name>yarn.scheduler.minimum-allocation-mb</name>
<value>1024</value>
</property>
<property>
<description>The maximum allocation for every container request at the RM in MBs. Memory requests higher than this will throw an InvalidResourceRequestException.
</description>
<name>yarn.scheduler.maximum-allocation-mb</name>
<value>2048</value>
</property>
<property>
<description>The minimum allocation for every container request at the RM in terms of virtual CPU cores. Requests lower than this will be set to the value of this property. Additionally, a node manager that is configured to have fewer virtual cores than this value will be shut down by the resource manager.
</description>
<name>yarn.scheduler.minimum-allocation-vcores</name>
<value>1</value>
</property>
<property>
<description>The maximum allocation for every container request at the RM in terms of virtual CPU cores. Requests higher than this will throw an
InvalidResourceRequestException.</description>
<name>yarn.scheduler.maximum-allocation-vcores</name>
<value>2</value>
</property>
<property>
<description>Whether virtual memory limits will be enforced for
containers.</description>
<name>yarn.nodemanager.vmem-check-enabled</name>
<value>false</value>
</property>
<property>
<description>Ratio between virtual memory to physical memory when setting memory limits for containers. Container allocations are expressed in terms of physical memory, and virtual memory usage is allowed to exceed this allocation by this ratio.
</description>
<name>yarn.nodemanager.vmem-pmem-ratio</name>
<value>2.1</value>
</property>
2.2 容量调度器多队列提交案例
1)在生产环境怎么创建队列?
    (1)调度器默认就1个default队列,不能满足生产要求。
    (2)按照框架:hive /spark/ flink 每个框架的任务放入指定的队列(企业用的不是特别多)
    (3)按照业务模块:登录注册、购物车、下单、业务部门1、业务部门2
2)创建多队列的好处?
    (1)因为担心员工不小心,写递归死循环代码,把所有资源全部耗尽。
    (2)实现任务的**降级**使用,特殊时期保证重要的任务队列资源充足。11.11  6.18
        业务部门1(重要)=》业务部门2(比较重要)=》下单(一般)=》购物车(一般)=》登录注册(次要)
2.2.1 需求
需求1:default队列占总内存的40%,最大资源容量占总资源60%,hive队列占总内存的60%,最大资源容量占总资源80%。
需求2:配置队列优先级
2.2.2 配置多队列的容量调度器
1)在capacity-scheduler.xml中配置如下:
(1)修改如下配置
<property>
<name>yarn.scheduler.capacity.root.queues</name>
<value>default,hive</value>
<description>
The queues at the this level (root is the root queue).
</description>
</property>
<property>
<name>yarn.scheduler.capacity.root.default.capacity</name>
<value>40</value>
</property>
<property>
<name>yarn.scheduler.capacity.root.default.maximum-capacity</name>
<value>60</value>
</property>
<property>
<name>yarn.scheduler.capacity.root.hive.capacity</name>
<value>60</value>
</property>
<property>
<name>yarn.scheduler.capacity.root.hive.user-limit-factor</name>
<value>1</value>
</property>
<property>
<name>yarn.scheduler.capacity.root.hive.maximum-capacity</name>
<value>80</value>
</property>
<property>
<name>yarn.scheduler.capacity.root.hive.state</name>
<value>RUNNING</value>
</property>
<property>
<name>yarn.scheduler.capacity.root.hive.acl_submit_applications</name>
<value>*</value>
</property>
<property>
<name>yarn.scheduler.capacity.root.hive.acl_administer_queue</name>
<value>*</value>
</property>
<property>
<name>yarn.scheduler.capacity.root.hive.acl_application_max_priority</name>
<value>*</value>
</property>
<property>
<name>yarn.scheduler.capacity.root.hive.maximum-application-lifetime</name>
<value>-1</value>
</property>
<property>
<name>yarn.scheduler.capacity.root.hive.default-application-lifetime</name>
<value>-1</value>
</property>
2)分发配置文件
3)重启Yarn或者执行yarn rmadmin -refreshQueues刷新队列,就可以看到两条队列:
yarn rmadmin -refreshQueues
2.2.3 向Hive队列提交任务
1)hadoop jar的方式
hadoop jar share/hadoop/mapreduce/hadoop-mapreduce-examples-3.1.3.jar wordcount -D mapreduce.job.queuename=hive /input /output
注: -D表示运行时改变参数值
2)打jar包的方式
默认的任务提交都是提交到default队列的。如果希望向其他队列提交任务,需要在Driver中声明:
public class WcDrvier {
public static void main(String[] args) throws IOException, ClassNotFoundException, InterruptedException {
Configuration conf = new Configuration();
conf.set("mapreduce.job.queuename","hive");
Job job = Job.getInstance(conf);
。。。 。。。
boolean b = job.waitForCompletion(true);
System.exit(b ? 0 : 1);
}
}
2.2.4 任务优先级
容量调度器,支持任务优先级的配置,在资源紧张时,优先级高的任务将优先获取资源。默认情况,Yarn将所有任务的优先级限制为0,若想使用任务的优先级功能,须开放该限制
1)修改yarn-site.xml文件,增加以下参数
<property>
    <name>yarn.cluster.max-application-priority</name>
    <value>5</value>
</property>
2)分发配置,并重启Yarn
[atguigu@hadoop102 hadoop]$ xsync yarn-site.xml
[atguigu@hadoop103 hadoop-3.1.3]$ sbin/stop-yarn.sh
[atguigu@hadoop103 hadoop-3.1.3]$ sbin/start-yarn.sh
3)模拟资源紧张环境,可连续提交以下任务,直到新提交的任务申请不到资源为止。
[atguigu@hadoop102 hadoop-3.1.3]$ hadoop jar /opt/module/hadoop-3.1.3/share/hadoop/mapreduce/hadoop-mapreduce-examples-3.1.3.jar pi 5 2000000
4)再次重新提交优先级高的任务
[atguigu@hadoop102 hadoop-3.1.3]$ hadoop jar /opt/module/hadoop-3.1.3/share/hadoop/mapreduce/hadoop-mapreduce-examples-3.1.3.jar pi  -D mapreduce.job.priority=5 5 2000000
5)也可以通过以下命令修改正在执行的任务的优先级。
yarn application -appID <ApplicationID> -updatePriority 优先级
[atguigu@hadoop102 hadoop-3.1.3]$ yarn application -appID application_1611133087930_0009 -updatePriority 5
2.3 公平调度器案例
2.3.1 需求
创建两个队列,分别是test和atguigu(以用户所属组命名)。期望实现以下效果:若用户提交任务时指定队列,则任务提交到指定队列运行;若未指定队列,test用户提交的任务到root.group.test队列运行,atguigu提交的任务到root.group.atguigu队列运行(注:group为用户所属组)。
公平调度器的配置涉及到两个文件,一个是yarn-site.xml,另一个是公平调度器队列分配文件fair-scheduler.xml(文件名可自定义)
2.3.2 配置多队列的公平调度器
1)修改yarn-site.xml文件,加入以下参数
<property>
    <name>yarn.resourcemanager.scheduler.class</name>
   <value>org.apache.hadoop.yarn.server.resourcemanager.scheduler.fair.FairScheduler</value>
    <description>配置使用公平调度器</description>
</property>
<property>
    <name>yarn.scheduler.fair.allocation.file</name>
    <value>/opt/module/hadoop-3.1.3/etc/hadoop/fair-scheduler.xml</value>
    <description>指明公平调度器队列分配配置文件</description>
</property>
<property>
    <name>yarn.scheduler.fair.preemption</name>
    <value>false</value>
    <description>禁止队列间资源抢占</description>
</property>
2)配置fair-scheduler.xml
<?xml version="1.0"?>
<allocations>
<queueMaxAMShareDefault>0.5</queueMaxAMShareDefault>
<queueMaxResourcesDefault>4096mb,4vcores</queueMaxResourcesDefault>
<queue name="test">
<minResources>2048mb,2vcores</minResources>
<maxResources>4096mb,4vcores</maxResources>
<maxRunningApps>4</maxRunningApps>
<maxAMShare>0.5</maxAMShare>
<weight>1.0</weight>
<schedulingPolicy>fair</schedulingPolicy>
</queue>
<queue name="atguigu" type="parent">
<minResources>2048mb,2vcores</minResources>
<maxResources>4096mb,4vcores</maxResources>
<maxRunningApps>4</maxRunningApps>
<maxAMShare>0.5</maxAMShare>
<weight>1.0</weight>
<schedulingPolicy>fair</schedulingPolicy>
</queue>
<queuePlacementPolicy>
<rule name="specified" create="[false]()"/>
<rule name="nestedUserQueue" create="true">
<rule name="primaryGroup" create="false"/>
</rule>
<rule name="reject" />
</queuePlacementPolicy>
</allocations>
3)分发配置并重启Yarn
[atguigu@hadoop102 hadoop]$ xsync yarn-site.xml
[atguigu@hadoop102 hadoop]$ xsync fair-scheduler.xml
[atguigu@hadoop103 hadoop-3.1.3]$ sbin/stop-yarn.sh
[atguigu@hadoop103 hadoop-3.1.3]$ sbin/start-yarn.sh
2.3.3 测试提交任务
1)提交任务时指定队列,按照配置规则,任务会到指定的root.test队列

[atguigu@hadoop102 hadoop-3.1.3]$ hadoop jar /opt/module/hadoop-3.1.3/share/hadoop/mapreduce/hadoop-mapreduce-examples-3.1.3.jar pi -Dmapreduce.job.queuename=root.test 1 1
2)提交任务时不指定队列,按照配置规则,任务会到root.atguigu.atguigu队列

[atguigu@hadoop102 hadoop-3.1.3]$ hadoop jar /opt/module/hadoop-3.1.3/share/hadoop/mapreduce/hadoop-mapreduce-examples-3.1.3.jar pi 1 1
2.4 Yarn的Tool接口案例
0)回顾:
    [atguigu@hadoop102 hadoop-3.1.3]$ hadoop jar wc.jar com.atguigu.mapreduce.wordcount2.WordCountDriver /input /output1
    期望可以动态传参,结果报错,误认为是第一个输入参数。
    [atguigu@hadoop102 hadoop-3.1.3]$ hadoop jar wc.jar com.atguigu.mapreduce.wordcount2.WordCountDriver -Dmapreduce.job.queuename=root.test /input /output1
1)需求:自己写的程序也可以动态修改参数。编写Yarn的Tool接口。
(1)新建Maven项目YarnDemo,pom如下:
<?xml version="1.0" encoding="UTF-8"?>
<project xmlns="http://maven.apache.org/POM/4.0.0"
         xmlns:xsi="http://www.w3.org/2001/XMLSchema-instance"
         xsi:schemaLocation="http://maven.apache.org/POM/4.0.0 http://maven.apache.org/xsd/maven-4.0.0.xsd">
    <modelVersion>4.0.0</modelVersion>
    <groupId>com.atguigu.hadoop</groupId>
    <artifactId>yarn_tool_test</artifactId>
    <version>1.0-SNAPSHOT</version>
    <dependencies>
        <dependency>
            <groupId>org.apache.hadoop</groupId>
            <artifactId>hadoop-client</artifactId>
            <version>3.1.3</version>
        </dependency>
    </dependencies>
</project>
2)创建类WordCount并实现Tool接口
public class WordCount implements Tool {
    private Configuration conf;
    @Override
    public int run(String[] args) throws Exception {
        Job job = Job.getInstance(conf);
        job.setJarByClass(WordCountDriver.class);
        job.setMapperClass(WordCountMapper.class);
        job.setReducerClass(WordCountReducer.class);
        job.setMapOutputKeyClass(Text.class);
        job.setMapOutputValueClass(IntWritable.class);
        job.setOutputKeyClass(Text.class);
        job.setOutputValueClass(IntWritable.class);
        FileInputFormat.setInputPaths(job, new Path(args[0]));
        FileOutputFormat.setOutputPath(job, new Path(args[1]));
        return job.waitForCompletion(true) ? 0 : 1;
    }
    @Override
    public void setConf(Configuration conf) {
        this.conf = conf;
    }
    @Override
    public Configuration getConf() {
        return conf;
    }
    public static class WordCountMapper extends Mapper<LongWritable, Text, Text, IntWritable> {
        private Text outK = new Text();
        private IntWritable outV = new IntWritable(1);
        @Override
        protected void map(LongWritable key, Text value, Context context) throws IOException, InterruptedException {
            String line = value.toString();
            String[] words = line.split(" ");
            for (String word : words) {
                outK.set(word);
                context.write(outK, outV);
            }
        }
    }
    public static class WordCountReducer extends Reducer<Text, IntWritable, Text, IntWritable> {
        private IntWritable outV = new IntWritable();
        @Override
        protected void reduce(Text key, Iterable<IntWritable> values, Context context) throws IOException, InterruptedException {
            int sum = 0;
            for (IntWritable value : values) {
                sum += value.get();
            }
            outV.set(sum);
            context.write(key, outV);
        }
    }
}
(3)新建WordCountDriver
public class WordCountDriver {
private static Tool tool;
public static void main(String[] args) throws Exception {
Configuration conf = new Configuration();
switch (args[0]){
case "wordcount":
tool = new WordCount();
break;
default:
throw new RuntimeException(" No such tool: "+ args[0] );
}
int run = ToolRunner.run(conf, tool, Arrays.copyOfRange(args, 1, args.length));
System.exit(run);
}
}
在HDFS上准备输入文件,假设为/input目录,向集群提交该Jar包
[atguigu@hadoop102 hadoop-3.1.3]$ yarn jar YarnDemo.jar com.atguigu.yarn.WordCountDriver wordcount /input /output
注意此时提交的3个参数,第一个用于生成特定的Tool,第二个和第三个为输入输出目录。此时如果我们希望加入设置参数,可以在wordcount后面添加参数,例如:
[atguigu@hadoop102 hadoop-3.1.3]$ yarn jar YarnDemo.jar com.atguigu.yarn.WordCountDriver wordcount -Dmapreduce.job.queuename=root.test /input /output1


