

👏🏻欢迎来到 CoderStan 的手写 Mini-Vue3 专栏,和我一起✍🏻实现自己的 Mini-Vue3。这是专栏中的第三篇文章,通过这篇文章,你将能够搞清楚 Vue3 在渲染时具体做了哪些工作,还包括 shapeFlag 和注册事件功能等的实现原理。(🙏🏻感谢 阿崔cxr 的 mini-vue)
有不足的地方欢迎大家评论留下意见或建议,如果觉得还不错还请👍🏻支持一下,想看其他部分的文章可以关注我或者关注我的手写 Mini-Vue3专栏,想看逐行注释的源码欢迎访问 GitHub 仓库,也请⭐支持一下。
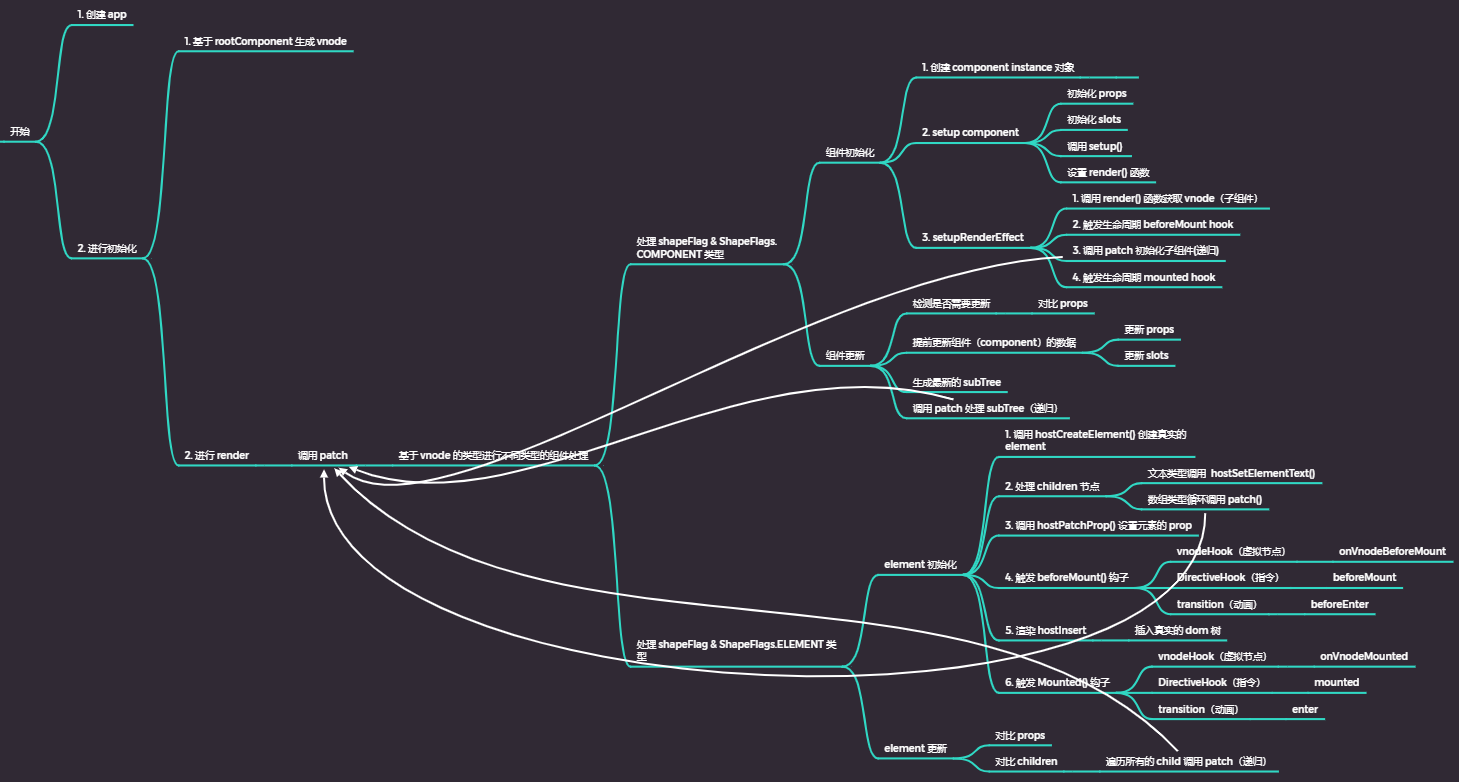
4. 实现 runtime-core 的初始化
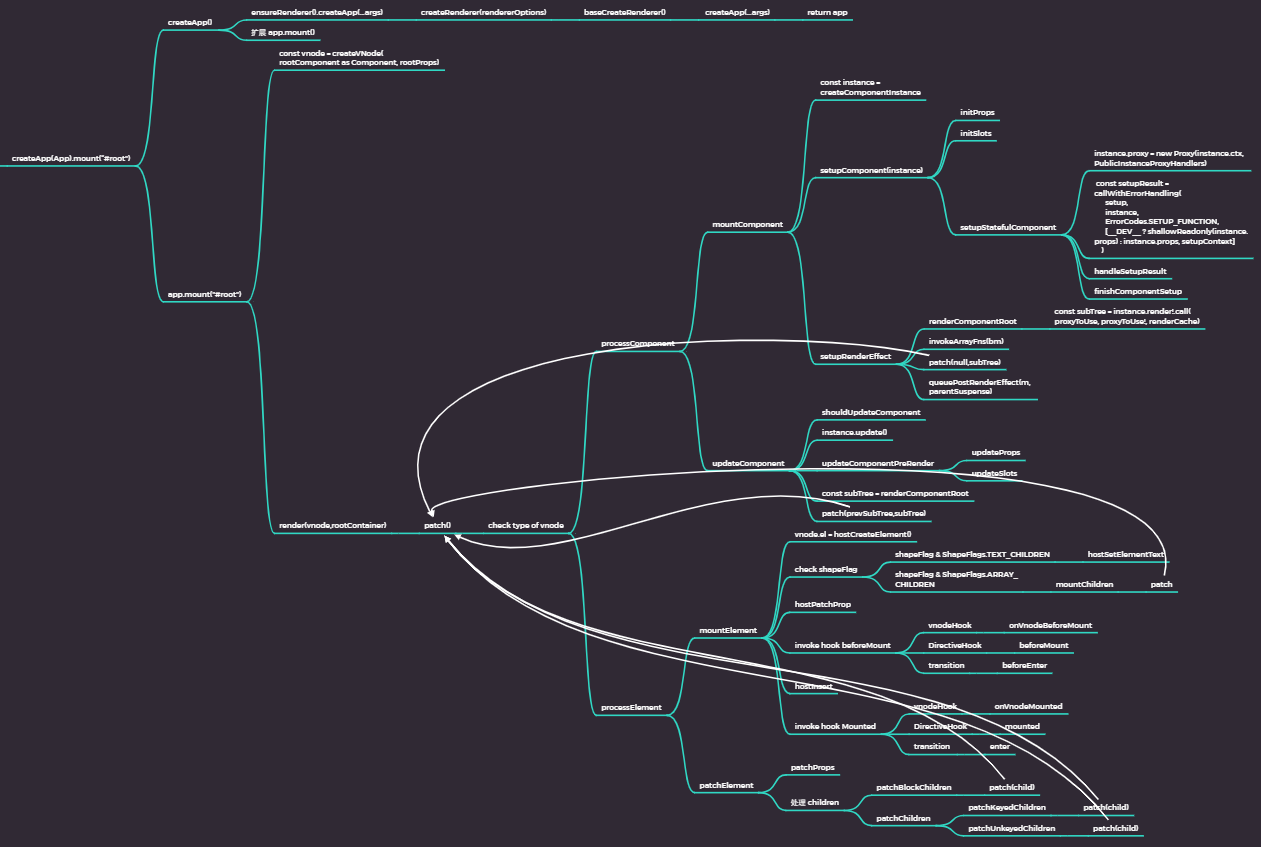
首先大致了解一下 runtime-core 的整体流程,其中的核心就是patch方法,在patch方法中判断 VNode 是 Component 还是 Element,根据 VNode 类型的不同进行不同的处理。
4.1 实现 Component 初始化的主流程
① happy path
在实现 Component 初始化的主流程之前,首先在项目目录下创建example文件夹,用于放置相关的测试程序,再在其中创建HelloWorld文件夹,用于放置第一个测试相关的文件,包括三个文件:index.html、main.js和App.js,三个文件中的内容如下:
<!-- index.html -->

<!DOCTYPE html>
<html lang="en">
  <head>
    <meta charset="UTF-8" />
    <meta http-equiv="X-UA-Compatible" content="IE=edge" />
    <meta name="viewport" content="width=device-width, initial-scale=1.0" />
    <title>Document</title>
  </head>
  <body>
    <!-- 根容器 -->
    <div id="app"></div>
    <script src="main.js" type="module"></script>
  </body>
</html>
/* main.js */

import { App } from './App'

const app = createApp(App)
const vm = app.mount('#app')
/* App.js */

// 根组件选项对象
export const App = {
  // render 函数
  render() {
    // 在 render 函数中通过 this 获取 setup 返回对象的 property
    return h('div', {}, 'hello, ' + this.name)
  },
  // composition API
  setup() {
    // 返回一个对象
    return {
      name: 'mini-vue3'
    }
  }
}
在 Vue3 项目开发过程中,如果使用单文件组件一般会在template标签中写模板,再编译成render函数,而 runtime-core 不具备编译功能,因此在 runtime-core 实现的测试程序中都使用render函数。现在,main.js和App.js文件中的createApp、mount和h都还没有实现,在全部实现之后,能够将根组件选项对象中的内容渲染到页面上:
<div id="app">
  <div>hello, mini-vue3</div>
</div>
② 实现
在 Vue3 中,createApp用于创建应用实例,每个应用都是通过调用createApp函数创建一个新的应用实例开始的:
const app = Vue.createApp({
  /* 选项 */
})
应用实例暴露的大多数方法都会返回同一实例,允许链式调用:
Vue.createApp({})
  .component('SearchInput', SearchInputComponent)
  .directive('focus', FocusDirective)
  .use(LocalePlugin)
在这里可以简单理解,createApp接受一个用于配置根组件的根组件选项对象作为参数,在挂载应用时,根组件将作为渲染的起点,返回一个包含component、directive、use和mount等方法的对象。在src/runtime-core目录下创建createApp.ts文件,在其中实现并导出createApp:
/* createApp.ts */

// 用于创建应用实例
export function createApp(rootComponent) {
  return {
    component() {},
    directive() {},
    use() {},
    mount() {}
  }
}
目前只为了通过以上测试,因此只考虑mount的实现。mount用于将一个应用挂载到一个 DOM 元素中,接受该元素的 selector 并返回根组件实例,例如,要将一个 Vue 应用挂载到<div id="app"></div>,应该传入#app。在mount中首先调用createVNode函数将根组件转换为 VNode,后续所有的逻辑操作都会基于该对象,之后再调用render函数进行后续处理。
/* createApp.ts */

export function createApp(rootComponent) {
  return {
    /* 其他代码 */

    // 用于将应用挂载到根容器中
    mount(rootContainer) {
      // 将根组件转换为 VNode
      const vnode = createVNode(rootComponent)

      render(vnode, rootContainer)
    }
  }
}
这里提及了 VNode,就先来介绍一下 VNode 和以上测试程序中使用到的h。VNode 就是一个普通对象,其中包含向 Vue 描述要在页面上渲染出的节点的信息,包括所有子节点的描述。VNode 类型描述:
interface VNode {
  /* HTML 标签名、组件、异步组件或函数式组件。使用返回 null 的函数将渲染一个注释。此参数是必需的。 */
  type: string | object | Function
  /* 一个对象,与我们将在模板中使用的 attribute、prop 和事件相对应。可选。 */
  props: object
  /* 子代 VNode,使用 h 生成,或者使用字符串来获取“文本 VNode”,或带有插槽的对象。可选。 */
  children: string | Array<VNode> | object
}
h用于手动编写的render函数,返回一个 VNode,在其中就是调用createVNode函数来创建 VNode 并返回,在src/runtime-core目录下创建h.ts文件,在其中实现并导出h:
/* h.ts */

// 用于调用 createVNode 返回一个 VNode
export function h(type, props?, children?) {
  return createVNode(type, props, children)
}
再回到 Component 初始化的主流程,在src/runtime-core目录下创建vnode.ts文件,在其中实现并导出createVNode函数:
/* vnode.ts */

// 用于创建并返回 VNode
export function createVNode(type, props?, children?) {
  const vnode = {
    // HTML 标签名、组件
    type,
    // 保存 attribute、prop 和事件的对象
    props,
    // 子 VNode
    children
  }

  return vnode
}
在render函数中主要就是调用patch方法,这样做是为了方便后续进行递归地处理。在src/runtime-core目录下创建renderer.ts文件,在其中实现并导出render函数:
/* renderer.ts */

// 用于处理 VNode
export function render(vnode, container) {
  patch(vnode, container)
}
patch方法用于处理组件对应的 VNode,在其中首先判断 VNode 的类型,若是 Component 则调用processComponent函数,若是 Element 则调用processElement函数。目前只为了通过以上测试,因此只考虑processComponent函数的实现,processElement函数将会在实现 Element 初始化的主流程时实现。在processComponent函数中主要就是调用mountComponent函数初始化 Component。在src/runtime-core目录下的renderer.ts文件中实现patch方法和processComponent函数:
/* renderer.ts */

// 用于处理组件对应的 VNode
function patch(vnode, container) {
  // TODO: 根据 VNode 类型的不同调用不同的函数

  processComponent(vnode, container)

  // TODO: 调用 processElement
}

// 用于处理 Component
function processComponent(vnode, container) {
  mountComponent(vnode, container)
}
在mountComponent函数中首先调用createComponentInstance函数通过组件对应的 VNode 创建组件实例对象,之后 props、slots 等都会挂载到该对象上。之后调用setupComponent函数和setupRenderEffect函数初始化 Component。在src/runtime-core目录下的renderer.ts文件中实现mountComponent函数:
/* renderer.ts */

// 用于初始化 Component
function mountComponent(vnode, container) {
  // 通过组件对应的 VNode 创建组件实例对象,用于挂载 props、slots 等
  const instance = createComponentInstance(vnode)

  setupComponent(instance)

  setupRenderEffect(instance, container)
}
在src/runtime-core目录下的component.ts文件中实现并导出createComponentInstance函数:
/* component.ts */

// 用于创建组件实例对象
export function createComponentInstance(vnode) {
  const component = {
    vnode,
    type: vnode.type,
    setupState: {}
  }

  return component
}
接下来首先完成setupComponent函数及其中相关函数的实现。setupComponent函数用于初始化 props、初始化 slots 和调用setup以及设置render函数。在setupComponent函数中依次调用initProps函数、initSlots函数和setupStatefulComponent函数,分别初始化 props、初始化 slots 和调用setup以及设置render函数,目前只为了通过以上测试,因此只考虑setupStatefulComponent函数的实现,而initProps函数和initSlots函数会在之后实现。
setupStatefulComponent函数用于初始化有状态的的组件,与其相对的是没有状态的函数式组件。在setupStatefulComponent函数中首先调用setup,之后调用handleSetupResult函数处理该方法的返回值。
在 Vue3 中,setup的返回值是函数或对象,若返回一个函数则将其作为组件的render函数,但目前暂时只考虑setup的返回值是对象的情况。为了在render函数中使用setup返回对象中的响应式 property 时可以省去.value,利用proxyRefs函数对返回对象进行处理,将返回值赋值给组件实例对象的 setupState property,之后再调用finishComponentSetup函数设置render函数。
在finishComponentSetup函数中获取render函数,将其挂载到组件实例对象上。
在src/reactivity/src目录下创建index.ts文件作为 reactivity 的出口文件,在其中将proxyRefs函数导出:
/* src/reactivity/src/index.ts */

export { proxyRefs } from './ref'
在src/runtime-core目录下的component.ts文件中实现并导出setupComponent函数并实现其中相关函数:
/* component.ts */

// 用于初始化 props、初始化 slots 和调用 setup 以及设置 render 函数
export function setupComponent(instance) {
  // TODO: 调用 initProps
  // TODO: 调用 initSlots

  setupStatefulComponent(instance)
}

// 用于初始化有状态的组件(相对的是没有状态的函数式组件)
function setupStatefulComponent(instance) {
  // 通过组件实例对象的 type property 获取组件选项对象
  const Component = instance.type

  // 通过解构赋值获取组件选项对象中的 setup
  const { setup } = Component

  if (setup) {
    // 调用 setup 并获取其返回值
    const setupResult = setup()

    // 处理 setup 的返回值
    handleSetupResult(instance, setupResult)
  }
}

// 用于处理 setup 的返回值
function handleSetupResult(instance, setupResult) {
  // 根据 setup 返回值类型的不同进行不同的处理
  // 若返回一个对象则调用 proxyRefs 并传入该对象,将返回值赋值给组件实例对象的 setupState property
  if (typeof setupResult === 'object') {
    instance.setupState = proxyRefs(setupResult)
  }
  // 若返回一个 function 则将其作为组件的 render 函数
  else if (typeof setupResult === 'function') {
    // TODO: 处理 function
  }

  finishComponentSetup(instance)
}

// 用于设置 render 函数
function finishComponentSetup(instance) {
  // 通过组件实例对象的 type property 获取组件选项对象
  const Component = instance.type

  // 将组件选项对象中的 render 函数挂载到组件实例对象上
  if (Component.render) {
    instance.render = Component.render
  }
}
之后完成setupRenderEffect函数的实现。setupRenderEffect函数用于处理 VNode 树,在其中首先调用组件实例对象的render函数获取 VNode 树,之后再调用patch方法递归地处理 VNode 树。在src/runtime-core目录下的renderer.ts文件中实现setupRenderEffect函数:
/* renderer.ts */

  // 用于处理 VNode 树
function setupRenderEffect(instance, container) {
  // 调用组件实例对象中 render 函数获取 VNode 树
  const subTree = instance.render()

  // 调用 patch 方法处理 VNode 树
  patch(subTree, container)
}
这样就完成了 Component 初始化的主流程,对以上代码进行打包,再在测试程序中进行引入即可通过测试。
4.2 使用 rollup 进行打包
Webpack 一般用于项目的打包,rollup 常用于库的打包,Vue3 就是使用 rollup 进行打包的,因此 mini-vue3 也使用 rollup 进行打包。
-
在项目文件夹下执行
yarn add rollup @rollup/plugin-typescript tslib -D命令分别安装 rollup、rollup 打包 TypeScript 项目时所需的插件 @rollup/plugin-typescript 和该插件依赖的 tslib -
在
src目录下创建index.ts文件作为 mini-vue3 的出口文件,在src/runtime-core目录下创建index.ts文件作为 runtime-core 的出口文件,并在其中将createApp和h导出:/* src/runtime-core/index.ts */ export { createApp } from './createApp' export { h } from './h'再在 mini-vue3 的出口文件中导出 runtime-core:
/* src/index.ts */ export * from './runtime-core' -
在项目文件夹下创建
rollup.config.js文件,用于配置 rollup,在其中添加以下内容:import typescript from '@rollup/plugin-typescript' // 可以直接使用 ESM export default { // 库的入口文件 input: './src/index.ts', // 打包完成后的输出 output: [ // CommonJS { format: 'cjs', file: 'lib/mini-vue3.cjs.js' }, // ESM { format: 'es', file: 'lib/mini-vue3.esm.js' } ], // 配置插件 @rollup/plugin-typescript plugins: [typescript()] } -
在
package.json中配置scripts、main(CommonJS 的入口文件)和module(ESM 的入口文件):"main": "lib/mini-vue3.cjs.js", "module": "lib/mini-vue3.esm.js", "scripts": { "test": "jest", "build": "rollup -c rollup.config.js" } -
对项目文件夹下的
rollup.config.js中的输出路径做对应修改:import pkg from './package.json' import typescript from '@rollup/plugin-typescript' export default { input: './src/index.ts', output: [ // CommonJS { format: 'cjs', file: pkg.main }, // ESM { format: 'es', file: pkg.module } ], plugins: [typescript()] } -
将
tsconfig.json文件中的module项修改为esnext:"module": "esnext" -
在项目文件夹下执行
yarn build命令对项目进行打包,打包完成后lib目录下会生成mini-vue3.cjs.js文件和mini-vue3.esm.js文件 -
将
lib目录下的mini-vue3.esm.js文件中的createApp和h导入到最开始的测试程序中,由于目前的实现还无法处理 DOM 元素的 selector,暂时将根容器传入mount:/* main.js */ const rootContainer = document.querySelector('#app') const app = createApp(App) app.mount(rootContainer)
通过 live server 插件打开example/HelloWorld目录下的index.html文件,可以看到 Component 初始化的主流程正常运行,但是程序出现报错,这是由于 Element 初始化的主流程还没有实现。
4.3 实现 Element 初始化的主流程
在实现 Element 初始化的主流程之前,先对最开始测试程序做一些改动,暂时不获取setup返回对象的 property 而使h的参数更复杂一些,即在页面上渲染更多的内容,对example/HelloWorld目录下的App.js文件中的内容做如下修改:
/* App.js */

export const App = {
  render() {
    // 在 render 函数中能够获取 setup 返回对象的 property
    // return h('div', {}, 'hello, ' + this.name)
    return h('div', { id: 'root', class: 'root' }, [
      h('p', { id: 'p1', class: 'p1' }, 'hello, mini-vue3'),
      h('p', { id: 'p2', class: 'p2' }, 'this is mini-vue3')
    ])
  }

  /* 其他代码 */
}
再在example/HelloWorld目录下的index.html文件中加入简单的样式:
<!-- index.html -->

<!DOCTYPE html>
<html lang="en">
  <head>
    <!-- 其他代码 -->

    <style>
      .p1 {
        color: red;
      }

      .p2 {
        color: blue;
      }
    </style>
  </head>

  <!-- 其他代码 -->
</html>
Element 初始化的主流程是从在patch方法中调用processElement函数开始的。在实现 Component 初始化主流程时提到过,在patch方法中根据 VNode 类型的不同调用不同的处理函数,那么在patch方法中是如何判断 VNode 是 Component 还是 Element 的?答案是通过 VNode 的 type property 的类型来判断 VNode 的类型,若 VNode 的 type property 的值类型是 string 则 VNode 类型是 Component,若是 object 则是 Element。在processElement函数中主要就是调用mountElement函数初始化 Element。在src/runtime-core目录下的renderer.ts文件中完善patch方法并实现processElement函数:
/* renderer.ts */

function patch(vnode, container) {
  // 根据 VNode 类型的不同调用不同的函数
  // 通过 VNode 的 type property 的类型来判断 VNode 类型
  // 若 type property 的类型是 string,则 VNode 类型是 Element
  if (typeof vnode.type === 'string') {
    processElement(vnode, container)
  }
  // 若 type property 的类型是 object,则 VNode 类型是 Component
  else if (isObject(vnode.type)) {
    processComponent(vnode, container)
  }
}

// 用于处理 Element
function processElement(vnode, container) {
  mountElement(vnode, container)
}
在实现mountElement函数前先看一下通常要向一个 DOM 元素中加入子元素是如何操作的,假设要向一个div元素中加入一个p元素,p元素的 attribute 和 prop 保存在props对象中,内容保存在变量content中:
<div id="root"></div>
const props = {
  id: 'p1',
  class: 'child-1'
}
const content = 'hello, mini-vue3'

// 获取父元素
const root = document.querySelector('#root')
// 创建子元素
const child = document.createElement('p')

// 遍历 props 对象,将其中 property 挂载到子元素上
for (const key in props) {
  const val = props[key]
  child.setAttribute(key, val)
}

// 将变量 content 的值赋值给子元素的 textContent property
child.textContent = content

// 将子元素添加到父元素中
root.append(child)
参考以上操作实现mountElement函数。与mountComponent函数类似,mountElement函数用于初始化 Element,在其中,首先根据 Element 对应 VNode 的 type property 创建 DOM 元素。之后通过解构赋值获取 VNode 的 props property 和 children。接下来遍历 props,利用Element.setAttribute()将其中的 property 挂载到新元素上, 其中 key 作为新元素的 attribute 或 prop 名,value 作为 attribute 或 prop 的值,再接下来处理 children,若 children 的类型是 string,则将其赋值给新元素的 textContent property,若 children 的类型是 Array,则调用mountChildren函数。最后利用Element.append()将新元素添加到根容器/其父元素中。这里mountChildren函数用于遍历 children,对其中每个 VNode 调用patch方法进行处理。在src/runtime-core目录下的renderer.ts文件中实现processElement函数和mountChildren函数:
/* renderer.ts */

// 用于初始化 Element
function mountElement(vnode, container) {
  // 根据 Element 对应 VNode 的 type property 创建 DOM 元素
  const el = document.createElement(vnode.type)

  // 通过解构赋值获取 Element 对应 VNode 的 props 对象 和 children
  const { props, children } = vnode

  // 遍历 props 对象,利用 Element.setAttribute() 将其中的 property 挂载到新元素上
  // 其中 key 作为新元素的 attribute 或 property 名,value 作为 attribute 或 property 的值
  for (const key in props) {
    const val = props[key]
    el.setAttribute(key, val)
  }

  // 若 children 的类型是 string,则将其赋值给新元素的 textContent property
  if (typeof children === 'string') {
    el.textContent = children
  }
  // 若 children 的类型是 Array,则调用 mountChildren 函数
  else if (Array.isArray(children)) {
    mountChildren(children, el)
  }

  // 利用 Element.append() 将新元素添加到根容器/其父元素中
  container.append(el)
}

// 用于遍历 children,对其中每个 VNode 调用 patch 方法进行处理
function mountChildren(children, container) {
  children.forEach(child => {
    patch(child, container)
  })
}
在项目文件夹下执行yarn build命令进行打包,打包完成后通过 live server 插件打开example/HelloWorld目录下的index.html文件,可以看到根组件选项对象中的内容被渲染到了页面上,这样就成功通过了修改后的测试。
4.4 实现组件代理对象
再来考虑最开始的测试,完成最后一点,即在render函数中通过 this 获取setup返回对象的 property。将example/HelloWorld目录下的App.js文件中的内容改回最开始的样子:
export const App = {
  render() {
    // 在 render 函数中通过 this 获取 setup 返回对象的 property
    return h('div', {}, 'hello, ' + this.name)
    // return h('div', { id: 'root', class: 'root' }, [
    //   h('p', { id: 'p1', class: 'p1' }, 'hello, mini-vue3'),
    //   h('p', { id: 'p2', class: 'p2' }, 'this is mini-vue3')
    // ])
  }

  /* 其他代码 */
}
首先完善src/runtime-core目录下的component.ts文件中的createComponentInstance函数,在组件实例对象中加入 proxy property:
/* component.ts */

export function createComponentInstance(vnode) {
  const component = {
    vnode,
    type: vnode.type,
    setupState: {},
    proxy: null
  }

  return component
}
在实现 Component 初始化主流程的过程中已经将setup的返回值赋值给了组件实例对象的 setupState property,因此在render函数中获取setup返回对象的 property 就是在 setupState 上获取。在初始化有状态的组件即调用setupStatefulComponent函数时,利用 Proxy 对组件实例对象的 proxy property 的 get 进行代理,在获取 proxy 的 property 时,若 setupState 中有该 property 则返回其值。在setupRenderEffect函数中调用组件实例对象中的render函数时将 this 指向指定为 proxy property。在src/runtime-core目录下的component.ts文件中完善setupStatefulComponent函数:
/* component.ts */

function setupStatefulComponent(instance) {
  const Component = instance.type

  // 利用 Proxy 对组件实例对象的 proxy property 的 get 进行代理
  instance.proxy = new Proxy(
    {},
    {
      get(target, key) {
        // 通过解构赋值获取组件实例对象的 setupState property
        const { setupState } = instance

        // 若组件实例对象的 setupState property 上有该 property 则返回其值
        if (key in setupState) {
          return setupState[key]
        }
      }
    }
  )

  /* 其他代码 */
}
在src/runtime-core目录下的renderer.ts文件中完善setupRenderEffect函数:
/* renderer.ts */

function setupRenderEffect(instance, container) {
  // 通过解构赋值获取组件实例对象的 proxy property
  const { proxy } = instance

  // 调用组件实例对象中 render 函数获取 VNode 树,同时将 this 指向指定为 proxy property,并将其挂载到组件实例对象上
  const subTree = instance.render.call(proxy)

  /* 其他代码 */
}
在项目文件夹下执行yarn build命令进行打包,打包完成后通过 live server 插件打开example/HelloWorld目录下的index.html文件,可以看到根组件选项对象中的内容被渲染到了页面上,这样就成功通过最开始的测试。
在成功通过最开始的测试之后,再考虑一下在render函数中通过 this 的 $el property 获取组件的根元素。对最开始的测试程序做一些改动,以测试这一功能,对example/HelloWorld目录下的App.js文件中的内容做如下修改:
// 用于保存组件的 this
window.self = null

export const App = {
  render() {
    window.self = this

    return h('div', {}, 'hello, ' + this.name)
  }

  /* 其他代码 */
}
首先给 VNode 增加 el property,用于保存对应组件的根元素,默认值设置为 null,在src/runtime-core目录下的vnode.ts文件中完善createVNode函数:
/* vnode.ts */

export function createVNode(type, props?, children?) {
  const vnode = {
    type,
    props,
    children,
    // 对应组件的根元素
    el: null
  }

  return vnode
}
在初始化 Element 即调用mountElement函数时,将根据 Element 对应 VNode 的 type property 创建的 DOM 元素同时挂载到 VNode 上,在获取 VNode 树并递归地处理即调用setupRenderEffect函数时,将 VNode 树的 el property 挂载到 VNode 上,在src/runtime-core目录下的renderer.ts文件中完善mountElement函数和setupRenderEffect函数,相应地修改mountComponent函数:
/* renderer.ts */

function mountElement(vnode, container) {
  // 根据 Element 对应 VNode 的 type property 创建 DOM 元素并挂载到 VNode 上
  const el = (vnode.el = document.createElement(vnode.type))

  /* 其他代码 */
}

function mountComponent(vnode, container) {
  /* 其他代码 */

  setupRenderEffect(instance, vnode, container)
}

function setupRenderEffect(instance, vnode, container) {
  /* 其他代码 */

  // 将 VNode 树的 el property 挂载到 VNode 上
  vnode.el = subTree.el
}
完善组件实例对象的 proxy property,在获取 $el property 时返回 VNode 的 el property,在src/runtime-core目录下的component.ts文件中完善setupStatefulComponent函数:
/* component.ts */

function setupStatefulComponent(instance) {
  const Component = instance.type

  instance.proxy = new Proxy(
    {},
    {
      get(target, key) {
        const { setupState } = instance

        if (key in setupState) {
          return setupState[key]
        }

        // 若获取 $el property 则返回 VNode 的 el property
        if (key === '$el') {
          return instance.vnode.el
        }
      }
    }
  )

  /* 其他代码 */
}
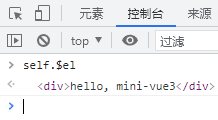
在项目文件夹下执行yarn build命令进行打包,打包完成后通过 live server 插件打开example/HelloWorld目录下的index.html文件,在控制台输入self.$el进行查看,成功输出组件根元素,这样就成功实现了组件代理对象。
在完成所有功能之后再来对代码进行优化,参照 reactivity 的实现,在src/runtime-core目录下创建componentPublicInstance.ts文件,将与创建用于构造 Proxy 的 handlers 相关的代码抽离到其中:
/* componentPublicInstance.ts */

// 用于保存组件实例对象 property 及对应的 getter
const publicPropertiesMap = {
  $el: i => i.vnode.el
}

// 组件实例对象 proxy property 对应的 handlers
export const PublicInstanceHandlers = {
  get({ _: instance }, key) {
    const { setupState } = instance

    if (key in setupState) {
      return setupState[key]
    }

    // 若获取指定 property 则调用对应 getter 并返回其返回值
    const publicGetter = publicPropertiesMap[key]
    if (publicGetter) {
      return publicGetter()
    }
  }
}
对src/runtime-core目录下的component.ts文件中的setupStatefulComponent函数中做相应修改:
/* component.ts */

function setupStatefulComponent(instance) {
  const Component = instance.type

  // 利用 Proxy 对组件实例对象的 proxy property 的 get 进行代理
  instance.proxy = new Proxy({ _: instance }, PublicInstanceHandlers)

  /* 其他代码 */
}
4.5 实现 shapeFlag
shapeFlag 是 VNode 的 property,主要用于判断 VNode 和其中 property 的类型,目前用到的地方有两处,都是在src/runtime-core目录下的renderer.ts文件中,一处是在patch方法中判断 VNode 的类型是 Element 或 Component,另一处是在processElement函数中判断 children 的类型是 string 或 Array。
首先完成一个最简单的实现。创建一个 shapeFlags 对象,其中的 property 即为要进行判断的内容,property 的值默认为 0:
// 用于判断 VNode 的 shapeFlag
const shapeFlags = {
  // 用于判断 VNode 类型是否是 Element
  element: 0,
  // 用于判断 VNode 类型是否是 Component
  stateful_component: 0,
  // 用于判断 children 类型是否是 string
  text_children: 0,
  // 用于判断 children 类型是否是 Array
  array_children: 0
}
若 VNode 类型为 Element 则将 element property 的值设为 1,其他同理:
shapeFlags.element = 1
shapeFlags.stateful_component = 1
shapeFlags.text_children = 1
shapeFlags.array_children = 1
若要判断 VNode 类型是否是 Element 则直接判断 element property,其他同理:
if (shapeFlags.element) {
}
if (shapeFlags.stateful_component) {
}
if (shapeFlags.text_children) {
}
if (shapeFlags.array_children) {
}
这样的实现简单明了、容易理解,但是不够高效,接下来利用位运算进行优化,先复习一下位运算中的与运算(&)、或运算(|)和左移运算符(<<):
- 与运算(&):两位都为 1,结果才为 1
- 或运算(|):两位都为 0,结果才为 0
- 左移运算符(<<):将二进制位全部左移若干位
1 & 1 // => 1
1 & 0 // => 0
0 & 1 // => 0
0 & 0 // => 0

0 | 0 // => 0
0 | 1 // => 1
1 | 0 // => 1
1 | 1 // => 1

1101 & 1011 // => 1001
1010 & 0101 // => 0000
1101 | 1011 // => 1111
1010 | 1000 // => 1000

1 << 1 // => 10
1 << 2 // => 100
101 << 1 // => 1010
101 << 2 // => 10100
然后考虑用四位的 VNode shapeFlag property 来表示 VNode 和 children 的类型:
vnode.shapeFlag === 0101 // => element + text_children
vnode.shapeFlag === 1001 // => element + array_children
vnode.shapeFlag === 0110 // => stateful_component + text_children
vnode.shapeFlag === 1010 // => stateful_component + array_children
默认地,四位均为 0,若 VNode 类型为 Element,children 类型为 string,则将对应位设为 1,其他同理:
vnode.shapeFlag |= 0101 // => element + text_children
vnode.shapeFlag |= 1001 // => element + array_children
vnode.shapeFlag |= 0110 // => stateful_component + text_children
vnode.shapeFlag |= 1010 // => stateful_component + array_children
若要判断 VNode 类型是否是 Element 则直接判断对应位,其他同理:
// VNode 类型是否为 Element
if (vnode.shapeFlag & 0001) {
}
// VNode 类型是否为 Component
if (vnode.shapeFlag & 0010) {
}
// children 类型是否为 string
if (vnode.shapeFlag & 0100) {
}
// children 类型是否为 Array
if (vnode.shapeFlag & 1000) {
}
确定了实现逻辑,最后完成代码。在src/shared目录下创建shapeFlags.ts文件,在其中声明并导出枚举变量ShapeFlags:
// 用于判断 VNode 的 shapeFlag
export const enum ShapeFlags {
  // 用于判断 VNode 类型是否是 Element
  ELEMENT = 1, // 0001
  // 用于判断 VNode 类型是否是 Component
  STATEFUL_COMPONENT = 1 << 1, // 0010
  // 用于判断 children 类型是否是 string
  TEXT_CHILDREN = 1 << 2, // 0100
  // 用于判断 children 类型是否是 Array
  ARRAY_CHILDREN = 1 << 3 // 1000
}
并在src/shared目录下的index.ts文件中将枚举变量ShapeFlags导出:
/* src/shared/index.ts */

export * from './shapeFlags'
在src/runtime-core目录下的vnode.ts文件中完善createVNode函数,在 VNode 中增加 shapeFlag property,并根据 VNode 和 children 的类型设置对应的位:
/* vnode.ts */

export function createVNode(type, props?, children?) {
  const vnode = {
    type,
    props,
    children,
    // VNode 和 children 类型的标志位
    shapeFlag: getShapeFlag(type),
    el: null
  }

  // 根据 children 的类型设置 shapeFlag 对应的位
  if (typeof children === 'string') {
    vnode.shapeFlag |= ShapeFlags.TEXT_CHILDREN
  } else if (Array.isArray(children)) {
    vnode.shapeFlag |= ShapeFlags.ARRAY_CHILDREN
  }

  return vnode
}

// 用于根据 VNode 的 type property 设置 shapeFlag 对应的位
function getShapeFlag(type) {
  return typeof type === 'string'
    ? ShapeFlags.ELEMENT
    : ShapeFlags.STATEFUL_COMPONENT
}
在src/runtime-core目录下的renderer.ts文件中完善patch 方法和mountElement函数,利用 VNode 的 shapeFlag property 判断 VNode 和 children 的类型:
/* renderer.ts */

function patch(vnode, container) {
  // 根据 VNode 类型的不同调用不同的函数
  // 通过 VNode 的 shapeFlag property 与枚举变量 ShapeFlags 进行与运算来判断 VNode 类型
  const { shapeFlag } = vnode
  if (shapeFlag & ShapeFlags.ELEMENT) {
    processElement(vnode, container)
  } else if (shapeFlag & ShapeFlags.STATEFUL_COMPONENT) {
    processComponent(vnode, container)
  }
}

function mountElement(vnode, container) {
  const el = (vnode.el = document.createElement(vnode.type))

  // 通过解构赋值获取 Element 对应 VNode 的 props 对象、shapeFlag property 和 children
  const { props, shapeFlag, children } = vnode

  for (const key in props) {
    const val = props[key]
    el.setAttribute(key, val)
  }

  // 通过 VNode 的 shapeFlag property 与枚举变量 ShapeFlags 进行与运算来判断 children 类型
  if (shapeFlag & ShapeFlags.TEXT_CHILDREN) {
    el.textContent = children
  } else if (shapeFlag & ShapeFlags.ARRAY_CHILDREN) {
    mountChildren(children, el)
  }

  container.append(el)
}
在项目文件夹下执行yarn build命令进行打包,打包完成后通过 live server 插件打开example/HelloWorld目录下的index.html文件,最开始的测试依然成功通过,这样就成功实现了 shapeFlag,对代码进行了重构优化。
位运算的效率是高于获取和修改对象 property 的,因此 shapeFlags 能够提升性能,但是可以看到,代码的可读性是不如之前的,在开发时应该先考虑实现功能同时保持代码可读性,在之后再考虑对代码进行重构提升性能。
4.6 实现注册事件功能
在实现注册事件功能之前,再在最开始的测试中增加注册事件相关的测试代码,对example/HelloWorld目录下的App.js文件中的内容做如下修改:
window.self = null

export const App = {
  render() {
    window.self = this

    return h(
      'div',
      {
        id: 'root',
        class: 'root-div',
        // 注册 onClick 事件
        onClick() {
          console.log('you clicked root-div')
        },
        // 注册 onMousedown 事件
        onMousedown() {
          console.log('your mouse down on root-div')
        }
      },
      'hello, ' + this.name
    )
    // return h('div', { id: 'root', class: 'root' }, [
    //   h('p', { id: 'p1', class: 'p1' }, 'hello, mini-vue3'),
    //   h('p', { id: 'p2', class: 'p2' }, 'this is mini-vue3')
    // ])
  }

  /* 其他代码 */
}
在之前实现 Element 初始化的主流程时,在src/runtime-core目录下的renderer.ts文件中的mountElement函数中处理了 VNode 的 props:遍历 props,利用Element.setAttribute()将其中的 property 挂载到新元素上, 其中 key 作为新元素的 attribute 或 prop 名,value 作为 attribute 或 prop 的值。
/* renderer.ts */

function mountElement(vnode, container) {
  const el = (vnode.el = document.createElement(vnode.type))

  const { props, shapeFlag, children } = vnode

  for (const key in props) {
    const val = props[key]
    el.setAttribute(key, val)
  }

  /* 其他代码 */
}
而注册事件功能的实现其实就是在遍历 props 时增加了判断:若 key 以“on”开头,则利用Element.addEventListener()将该方法挂载到新元素上,其中 key 去掉前两位(也就是“on”)再转为小写后的字符串作为 event 名,value 作为 listener,否则还按之前的处理方式。
/* renderer.ts */

function mountElement(vnode, container) {
  const el = (vnode.el = document.createElement(vnode.type))

  const { props, shapeFlag, children } = vnode

  // 遍历 props,判断 property 的 key 并进行处理
  for (const key in props) {
    const val = props[key]

    // 用于通过正则判断该 property 的 key 是否以 on 开头,是则为注册事件,否则为 attribute 或 property
    const isOn = (key: string) => /^on[A-Z]/.test(key)

    // 若为注册事件
    if (isOn(key)) {
      // 利用 Element.addEventListener() 将该方法挂载到新元素上
      // 其中 key 去掉前两位(也就是 on)再转为小写后的字符串作为事件名,value 作为 listener
      const event = key.slice(2).toLowerCase()
      el.addEventListener(event, val)
    }
    // 否则
    else {
      // 利用 Element.setAttribute() 将该 property 挂载到新元素上
      // 其中 key 作为新元素的 attribute 或 property 名,value 作为 attribute 或 property 的值
      el.setAttribute(key, val)
    }
  }

  /* 其他代码 */
}
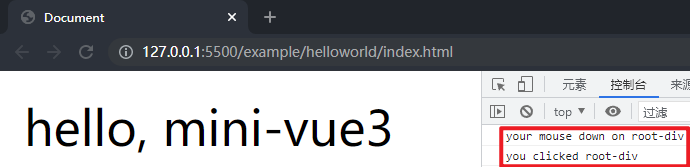
在项目文件夹下执行yarn build命令进行打包,打包完成后通过 live server 插件打开example/HelloWorld目录下的index.html文件,点击页面上的内容,在控制台中输出了对应内容,这样就成功实现了注册事件功能。
4.7 实现props
① happy path
props是setup的第一个参数,用于向一个组件中传入 prop,与使用选项式 API 时的this.$props类似,该props对象将仅包含显性声明的 prop,并且,所有声明了的 prop,不管父组件是否向其传递了,都将出现在props对象中,其中未被传入的可选的 prop 的值会是undefined。同时还要注意,props对象是只读,但不是深度只读的。
在实现props之前,首先在example目录下创建Component-props文件夹,在其中放置props的测试相关文件,包括四个文件:index.html、main.js、App.js和Foo.js,其中index.html和main.js文件中的内容与第一个测试相同,App.js和Foo.js文件中的内容如下:
/* App.js */

export const App = {
  render() {
    return h(
      'div',
      {
        id: 'root'
      },
      [
        h('div', {}, 'hello, ' + this.name),
        // 创建 Foo 组件,向其中传入 count prop
        h(Foo, { count: 1 })
      ]
    )
  },
  setup() {
    return {
      name: 'mini-vue3'
    }
  }
}
/* Foo.js */

// Foo 组件选项对象
export const Foo = {
  // props 对象是 setup 的第一个参数
  setup(props) {
    console.log(props)

    // props 对象是只读的,但不是深度只读的
    props.count++
    console.log(props.count)
  },
  render() {
    // 在 render 函数中通过 this 获取 props 对象的 property
    return h('div', {}, 'foo: ' + this.count)
  }
}
② 实现
实现props就是在src/runtime-core目录下的component.ts文件中的setupStatefulComponent函数中调用setup时传入props对象的 shallowReadonly 响应式副本,而在这之前首先要在setupComponent函数中初始化 props,也就是完成实现 Component 初始化主流程时留下的调用initProps函数的 TODO。initProps函数用于将props对象挂载到组件实例对象上。
首先完善src/runtime-core目录下的component.ts文件中的createComponentInstance函数,在组件实例对象中加入 props property:
/* component.ts */

export function createComponentInstance(vnode) {
  const component = {
    vnode,
    type: vnode.type,
    setupState: {},
    props: {},
    proxy: null
  }

  return component
}
然后在src/runtime-core目录下创建componentProps.ts文件,在其中实现并导出initProps函数:
/* componentProps.ts */

// 用于将 props 对象挂载到组件实例对象上
export function initProps(instance, rawProps) {
  instance.props = rawProps || {}
}
在src/reactivity/src目录下的index.ts文件中将shallowReactive导出:
/* src/reactivity/src/index.ts */

export { shallowReadonly } from './reactive'
接下来完善src/runtime-core目录下的component.ts文件中的setupComponent函数和setupStatefulComponent函数:
/* component.ts */

export function setupComponent(instance) {
  // 将组件对应 VNode 的 props property 挂载到组件实例对象上
  initProps(instance, instance.vnode.props)

  // TODO: 调用 initSlots

  setupStatefulComponent(instance)
}

function setupStatefulComponent(instance) {
  /* 其他代码 */

  if (setup) {
    // 调用 setup 传入 props 对象的 shallowReactive 响应式副本并获取其返回值
    const setupResult = setup(shallowReadonly(instance.props))

    // 处理 setup 的返回值
    handleSetupResult(instance, setupResult)
  }
}
最后再来完善组件实例对象 proxy property 对应的 handlers,也就是src/runtime-core目录下的componentPublicInstance.ts文件中的PublicInstanceHandlers:
/* componentPublicInstance.ts */

export const PublicInstanceHandlers = {
  get({ _: instance }, key) {
    // 通过解构赋值获取组件实例对象的 setupState property 和 props property
    const { setupState, props } = instance

    // 若 setupState property 或 props property 上有该 property 则返回其值
    if (key in setupState) {
      return setupState[key]
    } else if (key in props) {
      return props[key]
    }

    /* 其他代码 */
}
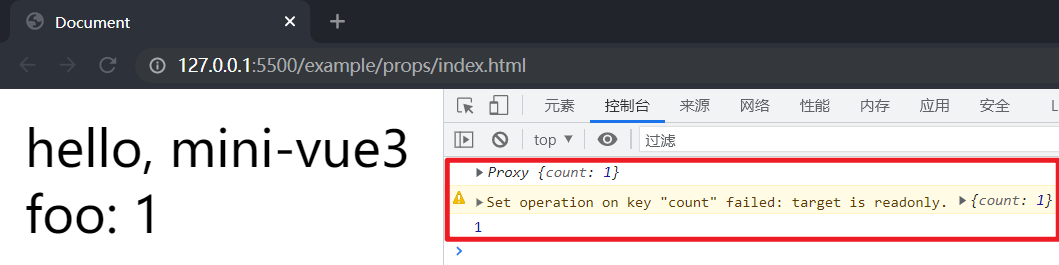
在项目文件夹下执行yarn build命令进行打包,打包完成后通过 live server 插件打开example/Component-props目录下的index.html文件,可以看到根组件和 Foo 组件选项对象中的内容被渲染到了页面上,在控制台中输出了对应内容,这样就成功实现了props。
③ 优化代码
成功实现之后再来对代码做一些优化,在src/shared目录下的index.ts文件中声明并导出hasOwn函数:
/* src/shared/index.ts */

// 用于判断对象中是否有某个 property
export const hasOwn = (val, key) =>
  Object.prototype.hasOwnProperty.call(val, key)

export * from './ShapeFlags'
再利用hasOwn函数对src/runtime-core目录下的componentPublicInstance.ts文件中的PublicInstanceHandlers进行重构:
/* componentPublicInstance.ts */

export const PublicInstanceHandlers = {
  get({ _: instance }, key) {
    const { setupState, props } = instance

    if (hasOwn(setupState, key)) {
      return setupState[key]
    } else if (hasOwn(props, key)) {
      return props[key]
    }

    /* 其他代码 */
}
4.8 实现emit
① happy path
传递给setup的第二个参数是context。context是一个普通的 JavaScript 对象,暴露了其他可能在setup中有用的值,包括attrs、slots、emit和expose,而emit用于触发使用该组件时在props对象中声明的方法。例如在使用 Foo 组件时在props对象中声明了 onBar 方法和 onBarBaz 方法,则在setup中可通过emit('bar')和emit('bar-baz')触发该方法。
在实现emit之前,首先在example目录下创建Component-emit文件夹,在其中放置emit的测试相关文件,同样包括四个文件:index.html、main.js、App.js和Foo.js,其中index.html和main.js文件中的内容与之前的测试相同,App.js和Foo.js文件中的内容如下:
/* App.js */

export const App = {
  render() {
    return h('div', {}, [
      h('div', {}, 'App'),
      h(
        Foo,
        // 使用 Foo 组件时在 props 对象中声明 onBar 方法和 onBarBaz 方法
        {
          onBar(a, b) {
            console.log('onBar', a, b)
          },
          onBarBaz(c, d) {
            console.log('onBarBaz', c, d)
          }
        }
      )
    ])
  },
  setup() {
    return {}
  }
}
/* Foo.js */

// Foo 组件选项对象
export const Foo = {
  setup(props, { emit }) {
    const emitBar = () => {
      console.log('emit bar')
      // 通过 emit 触发使用 Foo 组件时在 props 对象中声明的 onBar 方法
      emit('bar', 1, 2)
    }

    const emitBarBaz = () => {
      console.log('emit bar baz')
      // 通过 emit 触发使用 Foo 组件时在 props 对象中声明的 onBarBaz 方法
      emit('bar-baz', 3, 4)
    }

    return {
      emitBar,
      emitBarBaz
    }
  },
  render() {
    const btnBar = h(
      'button',
      {
        // 在 render 函数中通过 this 获取 setup 返回对象的方法
        onClick: this.emitBar
      },
      'emitBar'
    )

    const btnBaz = h(
      'button',
      {
        onClick: this.emitBarBaz
      },
      'emitBarBaz'
    )

    return h('div', {}, [btnBar, btnBaz])
  }
}
② 实现
实现emit就是在src/runtime-core目录下的component.ts文件中的setupStatefulComponent函数中调用setup时传入一个包含 emit 方法的对象作为第二个参数,而 emit 方法就是组件实例对象的 emit 方法,用于调用props对象中的指定方法并传入参数。
首先完善src/runtime-core目录下的component.ts文件中的createComponentInstance函数,在组件实例对象中加入 emit 方法:
/* component.ts */

export function createComponentInstance(vnode) {
  const component = {
    vnode,
    type: vnode.type,
    setupState: {},
    props: {},
    proxy: null,
    emit: () => {}
  }

  return component
}
在src/runtime-core目录下创建componentEmit.ts文件, 在其中实现并导出emit函数。这里用到了 TPP 的开发思路,即先针对一个特定行为进行编码,再对代码进行重构以适用于通用行为,比如这里就将调用组件时在props对象中声明的方法指定为 onBar 方法:
/* componentEmit.ts */

// 用于调用 props 对象中的指定方法
export function emit(instance, event, ...args) {
  // 通过解构赋值获取组件实例对象的 props property
  const { props } = instance

  const handler = props['onBar']
  handler && handler(...args)
}
再通过Function.prototype.bind()将emit函数第一个参数指定为组件实例对象,将新函数挂载到组件实例对象上:
/* component.ts */

export function createComponentInstance(vnode) {
  const component = {
    vnode,
    type: vnode.type,
    setupState: {},
    props: {},
    proxy: null,
    emit: () => {}
  }

  // 通过 Function.prototype.bind() 将 emit 函数第一个参数指定为组件实例对象,将新函数挂载到组件实例对象上
  component.emit = emit.bind(null, component) as any

  return component
}
接下来完善src/runtime-core目录下的component.ts文件中的setupStatefulComponent函数:
/* component.ts */

function setupStatefulComponent(instance) {
  /* 其他代码 */

  if (setup) {
    // 调用 setup 传入 props 对象的 shallowReactive 响应式副本和包含 emit 方法的对象并获取其返回值
    const setupResult = setup(shallowReadonly(instance.props), {
      emit: instance.emit
    })

    handleSetupResult(instance, setupResult)
  }
}
然后在src/shared目录下的index.ts文件中实现并导出camelize函数、capitalize函数和toHandlerKey函数:
/* src/shared/index.ts */

// 用于将带连字符的字符串转换为驼峰式
export const camelize = (str: string) => {
  return str.replace(/-(\w)/g, (_, c: string) => {
    return c ? c.toUpperCase() : ''
  })
}

// 用于将字符串首字母转换为大写
export const capitalize = (str: string) => {
  return str.charAt(0).toUpperCase() + str.slice(1)
}

// 用于在字符串之前加上 on
export const toHandlerKey = (str: string) => {
  return str ? 'on' + capitalize(str) : ''
}
最后再来重构src/runtime-core目录下的componentEmit.ts文件中的emit函数:
export function emit(instance, event, ...args) {
  const { props } = instance

  const handlerName = toHandlerKey(camelize(event))
  const handler = props[handlerName]
  handler && handler(...args)
}
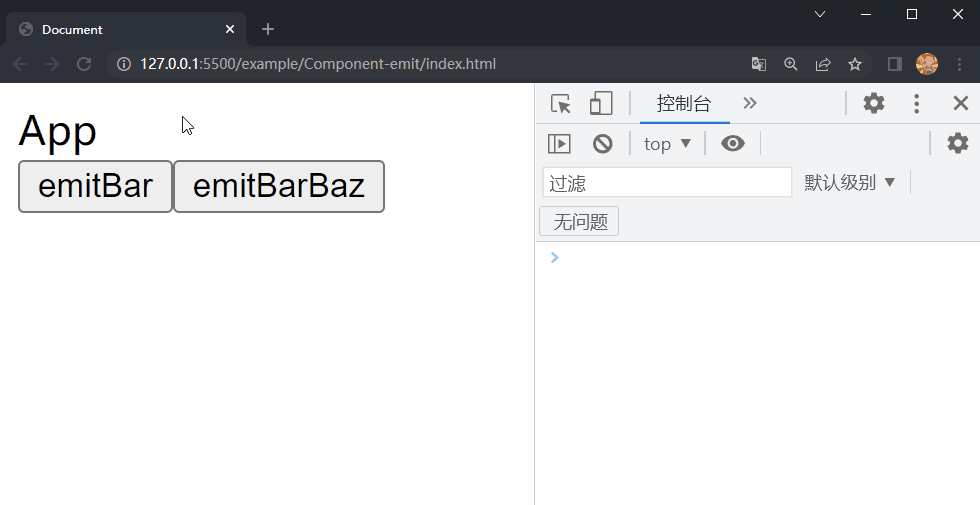
在项目文件夹下执行yarn build命令进行打包,打包完成后通过 live server 插件打开example/Component-emit目录下的index.html文件,可以看到根组件和 Foo 组件选项对象中的内容被渲染到了页面上,依次点击两个按钮在控制台中分别输出了对应内容,这样就成功实现了emit。
总结
至此,就完成了 Mini-Vue3 的 runtime-core 初始化的前半部分,希望这篇文章能够让你有所收获,如果觉得写的不错还请👍🏻支持一下。
