


- 原文地址:Create Your Own NFT Collection With Python
- 原文作者:Ewoud
- 译文出自:掘金翻译计划
“Visa 以 150,000 美元的价格购买了带有莫霍克发型的电子头像的 NFT”
随着时间的推移,NFT 的声誉越来越高。当彭博社报道 Visa 以 15 万美元的价格购买了一个加密朋克(cryptopunk)时,大众开始认识 NFT。对于这样一个只存在于数字领域的简单图像来说,它似乎是一笔巨款。
这个系列包含:
- 第一部分:学习如何使用 Python 创建 100 个类似于 Cryptopunks 的独特头像。
- 第二部分:了解如何生成集合的元数据。
- 第三部分:了解如何将你生成的集合上传到链上。
方法
脚本背后的方法非常简单:通过将不同的特征图组合在一起,成为一个个独特的头像。
获取数据
我们将使用 UniqueNetwork 的 substrapunks 仓库中的数据。
通过这个链接下载数据,并将 zip 文件解压到本地。(特征图在 substrapunks-master > scripts > face_parts 中)
导入必要的库
在此项目中我们将会使用以下的这些库。如果你想了解更多的信息,请点击链接查看。
from PIL import Image
from IPython.display import display
import random
import json
import os
分配特征的稀有度
每个独特的头像都包含五个特征:
- 面孔
- 耳朵
- 头发
- 嘴巴
- 鼻子
有些鼻子必须比其他鼻子更稀有。为此,你需要为不同类型的鼻子分配权重。数组的总和应始终为 100。
我们有两种类型的面孔特征(黑与白)。在程序中,我们指定图像有 60% 的机会被分配为白脸,40% 的机会被分配为黑脸。
# 每个图像由一系列特征组成
# 每个特征的权重决定了其稀有性,加起来为 100%
face = ["White", "Black"]
face_weights = [60, 40]

ears = ["ears1", "ears2", "ears3", "ears4"]
ears_weights = [25, 30, 44, 1]

eyes = ["regular", "small", "rayban", "hipster", "focused"]
eyes_weights = [70, 10, 5, 1, 14]

hair = ['hair1', 'hair10', 'hair11', 'hair12', 'hair2', 'hair3', 'hair4', 'hair5', 'hair6', 'hair7', 'hair8', 'hair9']
hair_weights = [10, 10, 10, 10, 10, 10, 10, 10, 10, 7, 1, 2]

mouth = ['m1', 'm2', 'm3', 'm4', 'm5', 'm6']
mouth_weights = [10, 10, 50, 10, 15, 5]

nose = ['n1', 'n2']
nose_weights = [90, 10]
分类特征
如果你想赋予你的特征不同的名称,可以使用字典。为了简单起见,除了面孔特征和眼睛特征以外,其他图像的名称沿用其文件名。
face1 特征图被归类为白面孔,而 face2 被归类为黑面孔。
# 为每种特征创建一个字典类型的变量
# 每个特征对应的是其文件名
face_files = {
    "White": "face1",
    "Black": "face2"
}

ears_files = {
    "ears1": "ears1",
    "ears2": "ears2",
    "ears3": "ears3",
    "ears4": "ears4"
}

eyes_files = {
    "regular": "eyes1",
    "small": "eyes2",
    "rayban": "eyes3",
    "hipster": "eyes4",
    "focused": "eyes5"
}

hair_files = {
    "hair1": "hair1",
    "hair2": "hair2",
    "hair3": "hair3",
    "hair4": "hair4",
    "hair5": "hair5",
    "hair6": "hair6",
    "hair7": "hair7",
    "hair8": "hair8",
    "hair9": "hair9",
    "hair10": "hair10",
    "hair11": "hair11",
    "hair12": "hair12"
}

mouth_files = {
    "m1": "m1",
    "m2": "m2",
    "m3": "m3",
    "m4": "m4",
    "m5": "m5",
    "m6": "m6"
}

nose_files = {
    "n1": "n1",
    "n2": "n2"
}
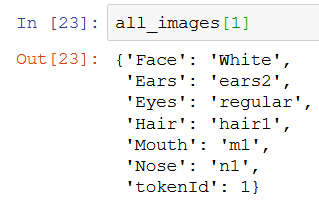
定义图片的特征
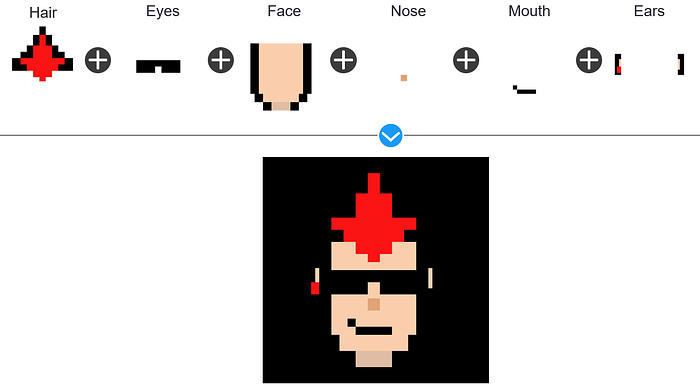
我们将创建的每个头像将是六张图片的组合:面孔、鼻子、嘴巴、耳朵和眼睛。
因此,我们编写了一个 for 循环,将这些特征组合成一张图片,用于指定的图片总数。
这个函数为每张图片创建一个字典,指定它拥有哪些特征。
这些特征是基于 random.choices() 函数给出的。
此函数遍历面部特征列表(白色、黑色)并返回白色(60% 的机率)或黑色(40% 的机率)。
# 生成特征
TOTAL_IMAGES = 100  # 生成的图片数量
all_images = []

# 一个递归函数,用于生成独特的图片组合
def create_new_image():
    new_image = {}
    # 对每一个特征组,根据权重选择一个随机的特征
    new_image["Face"] = random.choices(face, face_weights)[0]
    new_image["Ears"] = random.choices(ears, ears_weights)[0]
    new_image["Eyes"] = random.choices(eyes, eyes_weights)[0]
    new_image["Hair"] = random.choices(hair, hair_weights)[0]
    new_image["Mouth"] = random.choices(mouth, mouth_weights)[0]
    new_image["Nose"] = random.choices(nose, nose_weights)[0]

    if new_image in all_images:
        return create_new_image()
    else:
        return new_image


# 根据权重生成独一无二的图片组合
for i in range(TOTAL_IMAGES):
    new_trait_image = create_new_image()
    all_images.append(new_trait_image)
验证唯一性
对于 NFT 项目来说,唯一性非常重要。因此,你需要检查所有图像是否都是唯一的。我们编写一个简单的函数,它将循环遍历所有图像,存储到一个列表中,并返回重复的图像。
接下来,为每张图像添加一个独特的标识符。
# 返回 True 如果每张图片都是独特的
def all_images_unique(all_images):
    seen = list()
    return not any(i in seen or seen.append(i) for i in all_images)


print("Are all images unique?", all_images_unique(all_images))
# 为每张图片添加一个 tokenId
i = 0
for item in all_images:
    item["tokenId"] = i
    i = i + 1
print(all_images)
特征计数
我们根据预定义的权重和随机函数分配了特征。这意味着即使我们已将白面孔的权重定义为 60,也不可能恰好有 60 个白面孔。要确切地知道每个特征出现了多少次,我们必须跟踪图像集合中的每个特征并计算它们的总数。
为此,我编写了以下的代码:
-
为分类中的每个特征创建一个字典,并初始化为 0。
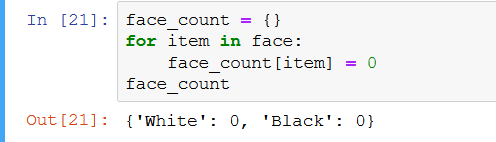
-
遍历每张图片,为字典相应的键加 1。
# 特征计数
face_count = {}
for item in face:
    face_count[item] = 0

ears_count = {}
for item in ears:
    ears_count[item] = 0

eyes_count = {}
for item in eyes:
    eyes_count[item] = 0

hair_count = {}
for item in hair:
    hair_count[item] = 0

mouth_count = {}
for item in mouth:
    mouth_count[item] = 0

nose_count = {}
for item in nose:
    nose_count[item] = 0

for image in all_images:
    face_count[image["Face"]] += 1
    ears_count[image["Ears"]] += 1
    eyes_count[image["Eyes"]] += 1
    hair_count[image["Hair"]] += 1
    mouth_count[image["Mouth"]] += 1
    nose_count[image["Nose"]] += 1

print(face_count)
print(ears_count)
print(eyes_count)
print(hair_count)
print(mouth_count)
print(nose_count)
生成图像
这是魔法发生的部分:创建图像!
对于每张图片,脚本将执行以下操作:
-
Open the image characteristic file where we defined the traits.
-
使用 PIL 库,从文件中选择相应的特征图。
-
将所有特征图组合成一张图像。
-
转换为 RGB,这是最常规的颜色模型。
-
保存到本机中。
# 生成图像
for item in all_images:
    im1 = Image.open(f'./trait-layers/face/{face_files[item["Face"]]}.png').convert('RGBA')
    im2 = Image.open(f'./trait-layers/eyes/{eyes_files[item["Eyes"]]}.png').convert('RGBA')
    im3 = Image.open(f'./trait-layers/ears/{ears_files[item["Ears"]]}.png').convert('RGBA')
    im4 = Image.open(f'./trait-layers/hair/{hair_files[item["Hair"]]}.png').convert('RGBA')
    im5 = Image.open(f'./trait-layers/mouth/{mouth_files[item["Mouth"]]}.png').convert('RGBA')
    im6 = Image.open(f'./trait-layers/nose/{nose_files[item["Nose"]]}.png').convert('RGBA')

    # 创建每一个 composite
    com1 = Image.alpha_composite(im1, im2)
    com2 = Image.alpha_composite(com1, im3)
    com3 = Image.alpha_composite(com2, im4)
    com4 = Image.alpha_composite(com3, im5)
    com5 = Image.alpha_composite(com4, im6)

    # 转换为 RGB 模式
    rgb_im = com5.convert('RGB')
    file_name = str(item["tokenId"]) + ".png"
    rgb_im.save("./images/" + file_name)
生成的头像:

编程快乐!
