

摘要: 本文以docker环境为基础,搭建了nexus私服仓库,用于公司内部使用,为实现统一管理,和方便开发同学使用。
一、docker-compose.yml配置
version: '3'
services:
  nexus:
    image: 'sonatype/nexus3'
    container_name: nexus3
    networks:
      default:
        ipv4_address: 172.18.3.31
    environment:
      - TZ=Asia/Shanghai
    ports:
      - '8081:8081'
    volumes:
      - './nexus-data:/nexus-data'
networks:
  default:
    external:
      name: huzhihui
docker启动docker-compose up -d;注意挂载的目录必须分配777的权限
二、初次登入使用
admin密码在挂载目录nexus-data下cat admin.password;即可查看到。
三、Maven使用
管理员登陆切换到管理菜单下
配置代理仓库地址为阿里云仓库 maven.aliyun.com/nexus/conte…
maven使用配置,setting.xml配置
  <servers>
	<server>
		<id>my-releases</id>
		<username>admin</username>
		<password>密码</password>
	</server>
	<server>
		<id>my-snapshots</id>
		<username>admin</username>
		<password>密码</password>
	</server>
  </servers>

    <mirrors>
        <mirror>
		<id>nexus-my</id>
		<mirrorOf>central</mirrorOf>
		<name>nexus my</name>
		<url>http://192.168.137.100:8081/repository/maven-central/</url>
	</mirror>
  </mirrors>

  <profiles>
      <profile>
		<id>nexus</id>
		<activation>
			<activeByDefault>true</activeByDefault>
		</activation>
		<repositories>
			<repository>
				<id>my-snapshots</id>
				<url>http://192.168.137.100:8081/repository/maven-snapshots/</url>
				<snapshots>
					<enabled>true</enabled>
					<updatePolicy>always</updatePolicy>
				</snapshots>
			</repository>
			<repository>
			<id>my-releases</id>
			<url>http://192.168.137.100:8081/repository/maven-releases/</url>
			<releases>
				<enabled>false</enabled>
				<updatePolicy>always</updatePolicy>
			</releases>
		</repository>
		</repositories>
	</profile>
  </profiles>
pom.xml配置使用
<-- 这里指定的是当前项目特有的镜像仓库推荐这样使用,不用配置在setting.xml中 -->
<repositories>
    <repository>
        <id>my-repository</id>
        <url>http://192.168.137.100:8081/repository/maven-central/</url>
    </repository>
</repositories>

<distributionManagement>
        <repository>
            <id>my-releases</id>
            <url>http://192.168.137.100:8081/repository/maven-releases/</url>
        </repository>
        <snapshotRepository>
            <id>my-snapshots</id>
            <url>http://192.168.137.100:8081/repository/maven-snapshots/</url>
        </snapshotRepository>
    </distributionManagement>

<build>
		<plugins>
			<plugin>
				<groupId>org.apache.maven.plugins</groupId>
				<artifactId>maven-compiler-plugin</artifactId>
				<configuration>
					<source>1.8</source>
					<target>1.8</target>
				</configuration>
			</plugin>
			<plugin>
				<groupId>org.apache.maven.plugins</groupId>
				<artifactId>maven-source-plugin</artifactId>
				<executions>
					<execution>
						<id>attach-sources</id>
						<goals>
							<goal>jar-no-fork</goal>
						</goals>
					</execution>
				</executions>
			</plugin>

		</plugins>
	</build>
特别注意如果是多项目的
maven项目发布,只想发布parent的pom文件,则需要运行mvn clean package deploy -N,这样不会打包下一级的项目
如果子模块不需要打包,则可以加如下配置忽略模块,父
parent打包的时候就不会打包了
<properties>
  <maven.deploy.skip>true</maven.deploy.skip>
</properties>
四、Node使用
创建store
接下来创建如下三个仓库
客户端使用的时候就像平常使用其他仓库一样的方式
五、Docker仓库的使用
创建存储空间
创建
repository
hosted: 本地存储,即同 docker 官方仓库一样提供本地私服功能。proxy: 提供代理其他仓库的类型,如 docker 中央仓库。group: 组类型,实质作用是组合多个仓库为一个地址。
hoted创建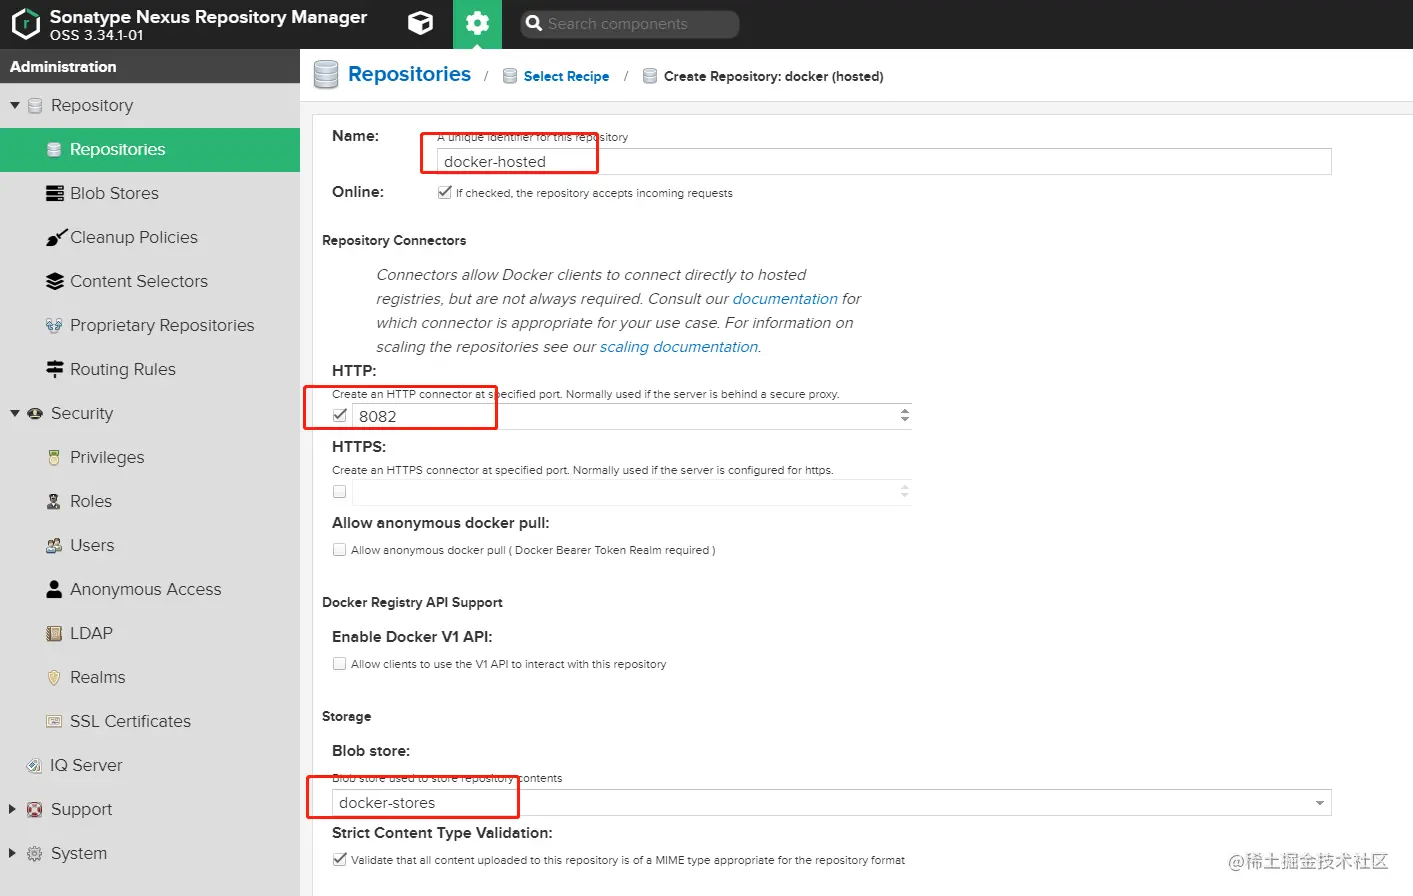
proxy创建
group创建
到这儿,nexus在docker这一块是部署已经完成了,但是这样并不能很好的使用。因为group仓库并不能推送镜像,因为你推送自己制作的镜像到仓库还得通过本地仓库的端口去推送,很不方便!有一个解决方法:通过Nginx来判断推镜像还是拉镜像,然后代理到不同端口
nginx配置
# ip地址可以换成内网ip
upstream nexus_docker_get {
    server 192.168.137.100:8083;
}

upstream nexus_docker_put {
    server 192.168.137.100:8082;
}
server {
    listen 80;
    listen 443 ssl;
    server_name docker.huzhihui.com;
    access_log /var/log/nginx/docker.huzhihui.com.log;
    # 证书
    ssl_certificate /etc/nginx/conf.d/ssl/out/docker.huzhihui.com/docker.huzhihui.com.crt; # 证书路径根据上面生成的来定
    ssl_certificate_key /etc/nginx/conf.d/ssl/out/docker.huzhihui.com/docker.huzhihui.com.key.pem;
    ssl_protocols TLSv1.1 TLSv1.2;
    ssl_ciphers '!aNULL:kECDH+AESGCM:ECDH+AESGCM:RSA+AESGCM:kECDH+AES:ECDH+AES:RSA+AES:';
    ssl_prefer_server_ciphers on;
    ssl_session_cache shared:SSL:10m;
    # disable any limits to avoid HTTP 413 for large image uploads
    client_max_body_size 0;
    # required to avoid HTTP 411: see Issue #1486 (https://github.com/docker/docker/issues/1486)
    chunked_transfer_encoding on;
    # 设置默认使用推送代理
    set $upstream "nexus_docker_put";
    # 当请求是GET,也就是拉取镜像的时候,这里改为拉取代理,如此便解决了拉取和推送的端口统一
    if ( $request_method ~* 'GET') {
        set $upstream "nexus_docker_get";
    }
    # 只有本地仓库才支持搜索,所以将搜索请求转发到本地仓库,否则出现500报错
    if ($request_uri ~ '/search') {
        set $upstream "nexus_docker_put";
    }
    index index.html index.htm index.php;
    location / {
        proxy_pass http://$upstream;
        proxy_set_header Host $host;
        proxy_connect_timeout 3600;
        proxy_send_timeout 3600;
        proxy_read_timeout 3600;
        proxy_set_header X-Real-IP $remote_addr;
        proxy_buffering off;
        proxy_request_buffering off;
        proxy_set_header X-Forwarded-For $proxy_add_x_forwarded_for;
        proxy_set_header X-Forwarded-Proto http;
    }
}
然后按照
docker私服配置了即可使用
