

这是我参与8月更文挑战的第13天,活动详情查看:8月更文挑战
软硬件环境
- windows 10 64bit
- anaconda with python 3.7
- nvidia gtx 1066
- pytorch 1.6
- easyocr
简介
EasyOCR是一款用python语言编写的OCR第三方库,同时支持GPU和CPU,还提供了可直接运行的命令行工具,目前已经支持超过70种语言,当然,中文也是支持的,项目地址是: github.com/JaidedAI/Ea…
安装easyocr
使用conda创建虚拟环境
conda create -n demo python=3.7
conda activate demo
接下来开始安装pytorch,来到官网 pytorch.org/get-started…,选择PyTorch Build为稳定版1.6.0、操作系统选择windows、Package使用pip、Language选择Python、CUDA选择10.1,这些都是需要根据自己的实际情况进行选择。可以看到,前面步骤中我们并没有单独安装CUDA,因为pytorch的安装过程中顺便把CUDA也安装好了,这点非常棒。
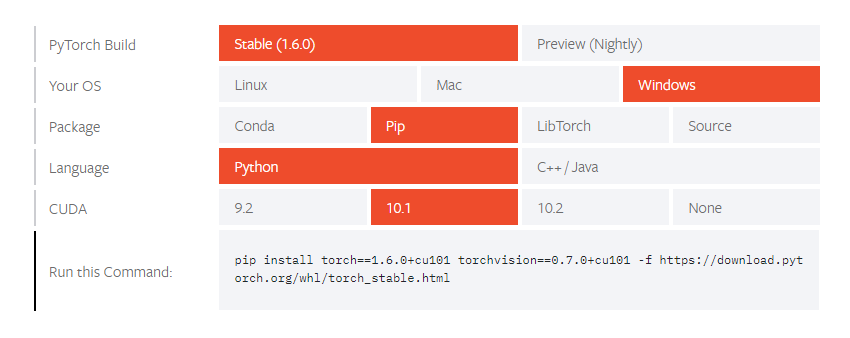
pip install torch==1.6.0+cu101 torchvision==0.7.0+cu101 -f https://download.pytorch.org/whl/torch_stable.html
如果没有GPU环境,安装命令是
pip install torch==1.6.0+cpu torchvision==0.7.0+cpu -f https://download.pytorch.org/whl/torch_stable.html
最后使用pip安装easyocr
pip install easyocr pyyaml
easyocr的使用
easyocr安装好后,我们就可以直接使用easyocr命令了,这一点和 tesseract-ocr 非常类似
# 还有个实用参数--detail=1,1表示详细信息;0表示就只有识别的文本信息
easyocr.exe -l ch_sim en -f .\ocr_test.png --gpu=True

python中使用
import easyocr
# 加载模型,如果是cpu环境的话,reader = easyocr.Reader(['ch_sim','en'], gpu = False)
reader = easyocr.Reader(['ch_sim','en'])
result = reader.readtext('ocr_test.png')
print(result)
执行上述代码,使用测试图片
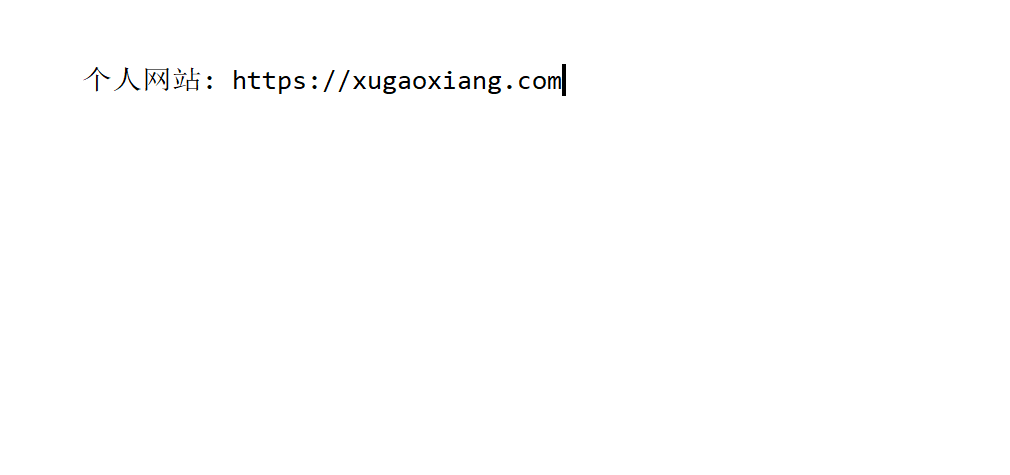
可以得到下面的结果
(demo) C:\Users\admin\Desktop\easyocr>python test.py
[([[80, 62], [571, 62], [571, 103], [80, 103]], '个人网站: https: xugaoxiang com|', 0.07900068163871765)]
在第一次使用easyocr时,需要下载相应的模型,这个动作是自动执行的,模型文件存放在目录~/.EasyOCR/model下

