

笔记来源:拉勾教育 - 大前端就业集训营
文章内容:学习过程中的笔记、感悟、和经验
提示:项目实战类文章资源无法上传,仅供参考
拉勾电影 - NextJS案例实战
项目主要分为两个页面,主页面和详情页面,都使用静态生成制作,其中详情页面使用基于动态路由的静态生成制作
项目初始化、配置
这里因为版本问题,直接使用老师提供的mymovie项目,下面当做参考
- 创建项目:
npm init next-app 项目名 - 安装chakra-ui组件库:
npm i @chakra-ui/core@next,/core@next表示安装最新版本 - 克隆chakra-ui提供的默认主题:
npx chakra-cli init --theme,克隆到项目文件夹中 - chakra目录 - 配置chakra英文文档:
- pages目录下创建_app.js文件,书写引入全局css样式的固定代码
- 从
@chakra-ui/core中引入ChakraProvider和CSSReset两个组件 - 引入chakra中引入默认主题 -
chakra/index.js - 使用ChakraProvider包裹CSSReset和原本的
Component组件,并设置ChakraProvide的theme属性值为chakra引入的默认主题
- 安装三个包:
npm i react-icons @emotion/core @emotion/styled - 想要使用emotion还需要使用到一个bebel预制,让react项目支持css属性
- 安装预制:
npm i @emotion/babel-preset-css-prop -D - 配置预制:跟目录创建
.babelrc文件书写配置,{"presets": ["next/babel", "@emotion/babel-preset-css-prop"]} - 启动项目,没有问题则表示配置成功
// pages/_app.js  配置chakra

import { ChakraProvider, CSSReset } from "@chakra-ui/core"
import theme from "@chakra-ui/theme"

export default function App({ Component, pageProps }) {
  return (
    <ChakraProvider theme={theme}>
      <CSSReset />
      <Component {...pageProps} />
    </ChakraProvider>
  )
}
// .babelrc  配置babel
{
  "presets": ["next/babel", "@emotion/babel-preset-css-prop"]
}
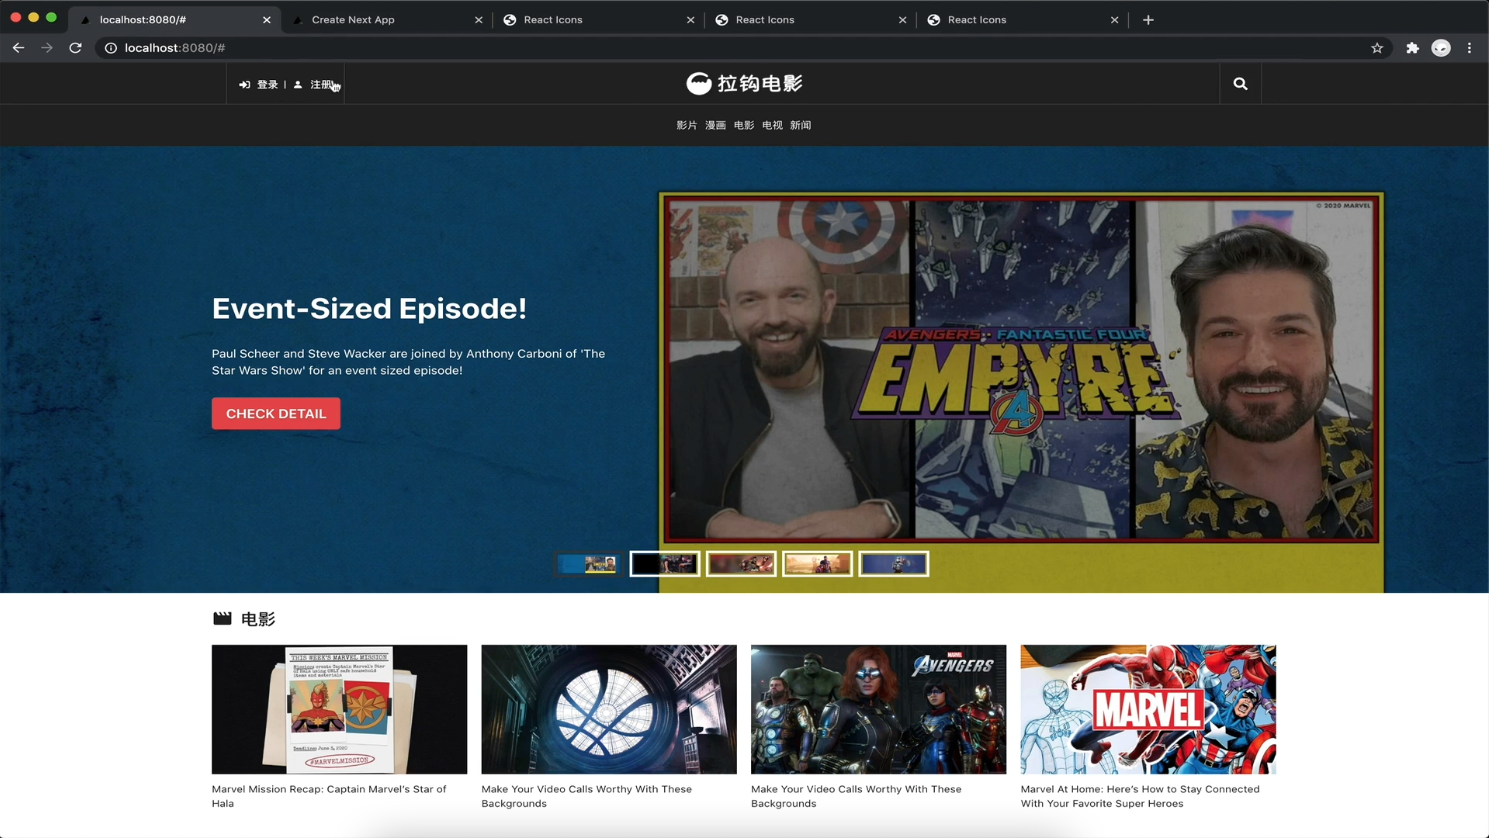
实现导航组件布局
- 创建components目录,放置组件,创建Header.js书写顶部组件
- 顶部通栏有一个宽度100%的盒子背景,使用chakra-ui的Box组件,使用emotion语法设置属性样式
- 内部还有一个盒子使用chakra-ui的Container组件,可大致分为三个部分:
- 左侧登录、注册按钮:使用左浮动、emotion/styled样式组件
- 登录和注册使用chakra-ui的Button组件
- 两个按钮前面添加图标,使用react-icons库,直接给按钮设置leftIcon属性即可
- 设置样式
- 中间拉勾电影LOGO:绝对定位
- 使用chakra-ui的Image组件展示LOGO
- 使用emption/core的css方法设置样式
- 需要设置公共样式 - 字体大小为12px,在chakra/style/index.js中设置
- 右侧搜索按钮:使用右浮动
- 使用样式化组件,使用图标组件、设置样式
- 左侧登录、注册按钮:使用左浮动、emotion/styled样式组件
// Components/Header.js  新建文件书写顶部组件

// chakra组件
import { Box, Container, Button, Image } from '@chakra-ui/core'
// 用于创建基于样式的组件
import styled from '@emotion/styled'
// 图标
import { FaSignInAlt, FaSearch } from 'react-icons/fa'
import { BsPersonFill } from 'react-icons/bs'
// 设置css样式
import { css } from '@emotion/core'

// 中间LOGO样式
const logo = css`
  position: absolute;
  top: 50%;
  left: 50%;
  transform: translate(-50%, -50%);
  width: 140px;
`
// 左侧登录注册按钮样式组件
const Left = styled.div`
  float: left;
  height: 52px;
  border-left: 1px solid #393939;
  border-right: 1px solid #393939;
  padding: 0 6px;
  color: #fff;
  line-height: 52px;
  button {
    padding: 0 10px;
  }
  button:nth-of-type(1):after {
    content: '';
    width: 1px;
    height: 10px;
    background-color: #fff;
    position: absolute;
    right: 0;
    top: 21px;
  }
`
// 右侧搜索按钮样式组件
const Right = styled.a`
  float: right;
  height: 52px;
  padding: 0 10px;
  border-left: 1px solid #393939;
  border-right: 1px solid #393939;
  color: #fff;
  font-size: 20px;
  display: flex;
  align-items: center;
`

function Header() {
  return (
    // 外层盒子,直接使用CSS属性书写样式
    <Box h='52px' bgColor='#202020' borderBottom='1px solid #393939'>
      {/* 中间盒子包裹三个部分 */}
      <Container h='52px' maxW={1200} position='relative'>
        {/* 左侧登录注册按钮,直接使用基于样式组件 */}
        <Left>
          {/* leftIcon - 设置两个图标 */}
          <Button leftIcon={<FaSignInAlt />}>登陆</Button>
          <Button leftIcon={<BsPersonFill />}>注册</Button>
        </Left>
        {/* 中间LOGO,直接使用上面书写的样式 */}
        <Image css={logo} src='/images/logo.png' />
        {/* 右侧搜索按钮 */}
        <Right>
          {/* 使用图标 */}
          <FaSearch />
        </Right>
      </Container>
    </Box>
  )
}

export default Header
// chakra/styles/index.js  在chakra添加全局样式设置

import { mode } from '@chakra-ui/theme-tools'

const styles = {
  global: props => ({
    fontFamily: 'body',
    color: mode('gray.800', 'whiteAlpha.900')(props),
    bg: mode('white', 'gray.800')(props),
    lineHeight: 'base',
    '*::placeholder': {
      color: mode('gray.400', 'whiteAlpha.400')(props),
    },
    '*, *::before, &::after': {
      borderColor: mode('gray.200', 'whiteAlpha.300')(props),
      wordWrap: 'break-word',
    },
    fontFeatureSettings: `"pnum"`,
    fontVariantNumeric: 'proportional-nums',
    fontSize: '12px',
    color: '#202020',
  }),
}

export default styles
// pages/index.js  跟组件引入并使用顶部组件

import Header from '../Components/Header'

export default function Home() {
  return (
    <>
      {/* 顶部组件 */}
      <Header />
    </>
  )
}
注意:这里需要注意基于样式的组件和设置css样式的方法以及设置图标的方法
顶部导航组件布局
- 创建导航组件,并将组件传递给index页面
- 整体是一个大盒子,使用Box组件,设置样式
- 中间链接使用next提供的Link组件创建,创建多个链接
- 让链接水平垂直居中使用Chakra的Hstack组件
//  Components/Navigation.js  新建导航组件

import { Box, HStack } from '@chakra-ui/core'
import Link from 'next/link'

function Navigation() {
  return (
    // 最外层盒子
    <Box h='52px' bgColor='#202020' color='#fff' fontSize='12px'>
      {/* 中间链接使用 HStack组件包裹 */}
      <HStack spacing='5px' h='52px' justifyContent='center'>
        <Link href=''>
          <a>影片</a>
        </Link>
        <Link href=''>
          <a>漫画</a>
        </Link>
        <Link href=''>
          <a>电影</a>
        </Link>
        <Link href=''>
          <a>电视</a>
        </Link>
        <Link href=''>
          <a>新闻</a>
        </Link>
      </HStack>
    </Box>
  )
}

export default Navigation
轮播图组件布局
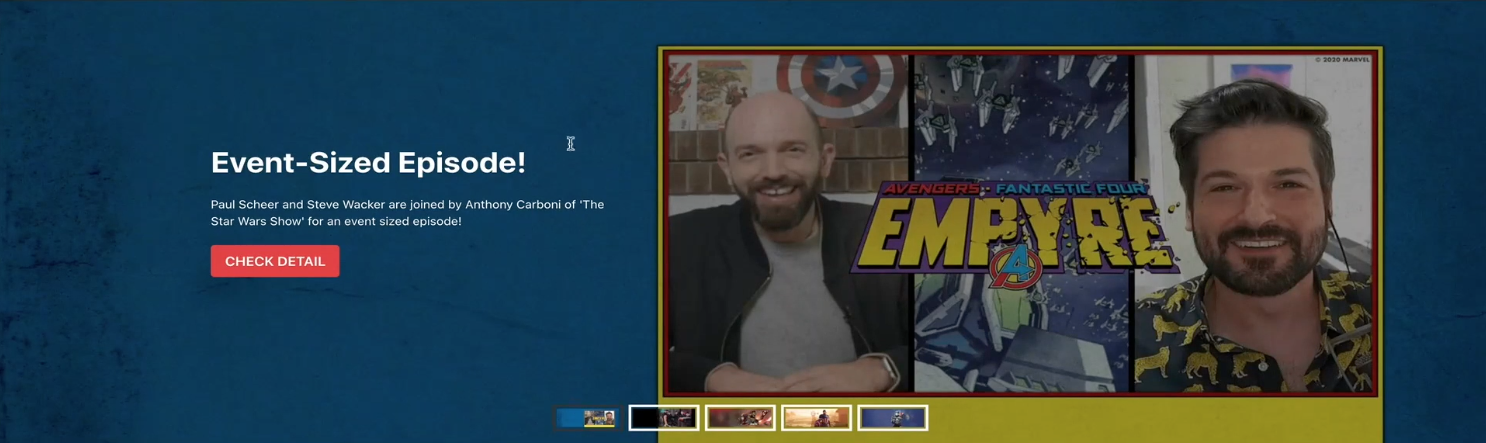
轮播图组件需要使用到一个第三方模块 - React Responsive Carousel
- 安装这个模块
- 新建轮播图组件并引入到index页面中
- 直接使用React Responsive Carousel提供的案例进行轮播图代码书写
- 因为在next中不能直接引入css文件使用,所以使用next提供的修改元数据功能在hade标签中引入css
- 需要先将代码复制出来存储为单个文件在进行引入
- 进行轮播图配置,隐藏不需要的部分
- 通过css属性给轮播图添加样式,使用定位和flex方式把缩略图定位到轮播图内部
- 把轮播图内部的单个轮播页设置为样式化组件,内部使用chakra的Box、Heading、Text三个组件
- 书写三个组件结构
- 使用定位的方式将box设置到合适位置,设置其他样式
- 最后设置一下图片的明亮度,让图片暗一点
// Components/Shuffling.js  新建轮播图组件

import { Carousel } from 'react-responsive-carousel'
import Head from 'next/head'
import { css } from '@emotion/core'
import styled from '@emotion/styled'
import { Box, Heading, Text, Button } from '@chakra-ui/core'

// 样式
const CarouselCss = css`
  position: relative;
  .carousel:last-child {
    position: absolute;
    left: 0;
    bottom: 0;
    ul {
      display: flex;
      justify-content: center;
    }
  }
`

// 样式化组件
const CarouselItem = styled.div`
  position: relative;
  div {
    position: absolute;
    left: 50%;
    top: 50%;
    width: 100%;
    max-width: 1200px;
    transform: translate(-50%, -50%);
    color: #fff;
    text-align: left;
  }
  & > img {
    filter: brightness(50%);
  }
`

function Shuffling() {
  return (
    <>
      {/* 自定义元数据 */}
      <Head>
        {/* 引入样式文件 */}
        <link rel='stylesheet' type='text/css' href='/css/carouse.min.css' />
      </Head>
      {/* 轮播图 */}
      <Carousel
        // 使用上面的样式
        css={CarouselCss}
        // 设置三个部分隐藏
        showArrows={false}
        showStatus={false}
        showIndicators={false}>
        {/* 轮播图成员 */}
        <CarouselItem>
          {/* 图片 */}
          <img src='/images/1.jpg' />
          {/* 中间文字 */}
          <Box className='box'>
            {/* 标题 */}
            <Heading as='h2' size='xl' fontSize='30px'>
              KING IN BLACK
            </Heading>
            {/* 描述文本 */}
            <Text fontSize='14px' w='500px' margin='10px 0'>
              The next shocking chapter in Donny Cates and Ryan Stegman's Venom
              Saga is revealed!
            </Text>
            {/* 按钮,因为版本问题这里无法设置背景色 */}
            <Button colorScheme='red'>CHECK DETAIL</Button>
          </Box>
        </CarouselItem>
        <CarouselItem>
          <img src='/images/2.jpg' />
          <Box className='box'>
            <Heading as='h2' size='xl' fontSize='30px'>
              KING IN BLACK
            </Heading>
            <Text fontSize='14px' w='500px' margin='10px 0'>
              The next shocking chapter in Donny Cates and Ryan Stegman's Venom
              Saga is revealed!
            </Text>
            <Button colorScheme='red'>CHECK DETAIL</Button>
          </Box>
        </CarouselItem>
        <CarouselItem>
          <img src='/images/3.jpg' />
          <Box className='box'>
            <Heading as='h2' size='xl' fontSize='30px'>
              KING IN BLACK
            </Heading>
            <Text fontSize='14px' w='500px' margin='10px 0'>
              The next shocking chapter in Donny Cates and Ryan Stegman's Venom
              Saga is revealed!
            </Text>
            <Button colorScheme='red'>CHECK DETAIL</Button>
          </Box>
        </CarouselItem>
      </Carousel>
    </>
  )
}

export default Shuffling
电影列表布局
- 创建电影列表组件,引入到index页面
- 电影列表只需要设置水平居中,最大宽度1200px即可,使用Box组件
- 总体分为两部分,上面标题图标,下方列表
- 图标使用react-icons,标题使用Heading组件,使用Hstack设置间距
- 列表同样适用Hstack组件,设置间距
- 列表项使用Box,内部使用Image和Text组件,设置文字和样式movie-list
// Components/Movie-list.js  新建电影列表组件

import { Box, Heading, HStack, Image, Text } from '@chakra-ui/core'
import { MdMovie } from 'react-icons/md'

function MovieList() {
  return (
    // 外层容器
    <Box maxW='1200px' mt='20px' mx='auto' fontSize='24px'>
      {/* 上方标题和图标 */}
      <HStack>
        <MdMovie />
        <Heading>电影</Heading>
      </HStack>
      {/* 电影列表 */}
      <HStack mt='20px'>
        {/* 列表成员 */}
        <Box w='300px'>
          {/* 图片 */}
          <Image src='/images/item_1.jpg' />
          {/* 文本描述 */}
          <Text mt='5px' fontSize='14px'>
            The next shocking chapter in Donny Cates and Ryan Stegman's Venom
            Saga is revealed!
          </Text>
        </Box>
        <Box w='300px'>
          <Image src='/images/item_1.jpg' />
          <Text mt='5px' fontSize='14px'>
            The next shocking chapter in Donny Cates and Ryan Stegman's Venom
            Saga is revealed!
          </Text>
        </Box>
        <Box w='300px'>
          <Image src='/images/item_1.jpg' />
          <Text mt='5px' fontSize='14px'>
            The next shocking chapter in Donny Cates and Ryan Stegman's Venom
            Saga is revealed!
          </Text>
        </Box>
        <Box w='300px'>
          <Image src='/images/item_1.jpg' />
          <Text mt='5px' fontSize='14px'>
            The next shocking chapter in Donny Cates and Ryan Stegman's Venom
            Saga is revealed!
          </Text>
        </Box>
      </HStack>
    </Box>
  )
}

export default MovieList
电影详情页面布局
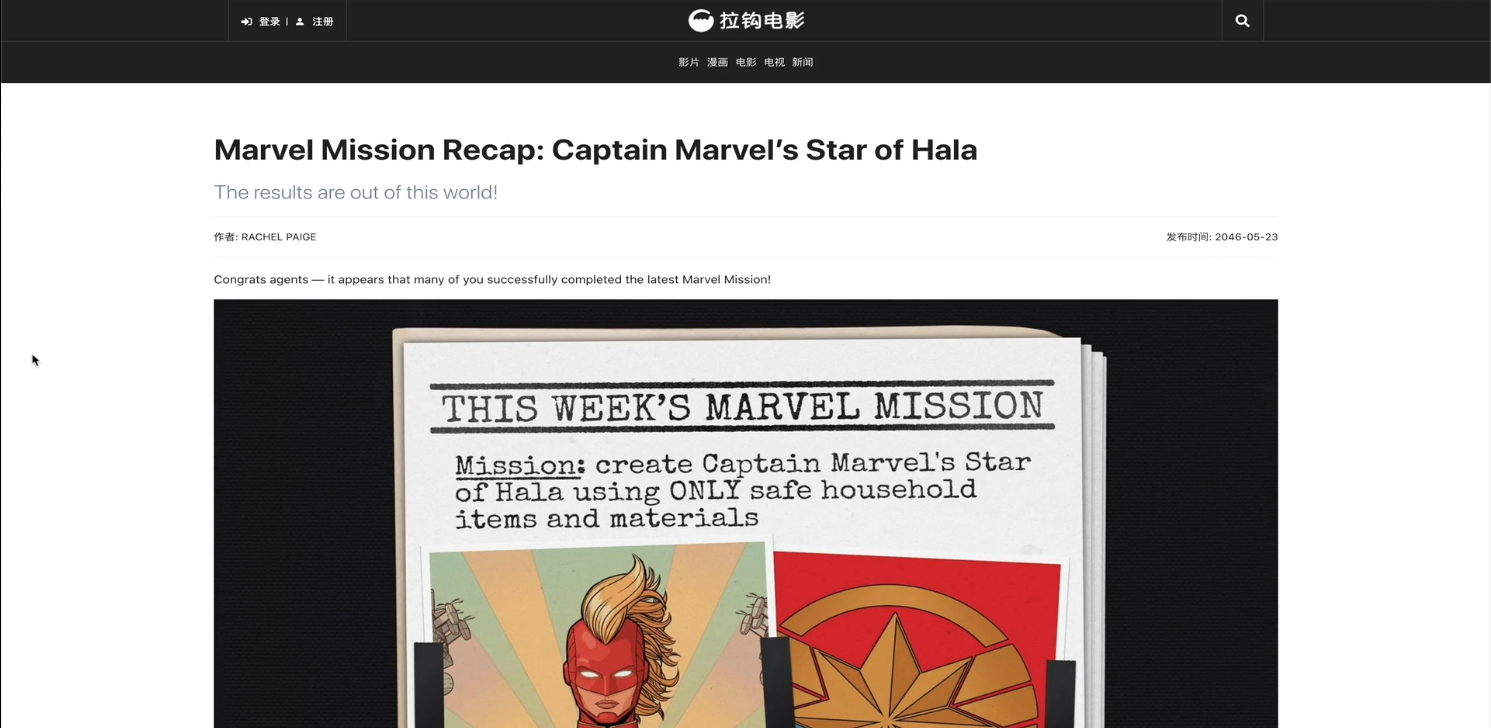
- 详情页面可以看到,头部和导航组件和首页是相同的
- 创建一个布局组件,将头部和导航组件组合成一个新的布局组件再引入其他页面中
- 电影详情页需要使用动态路由生成
- 创建movie目录,内部创建文件书写动态创建逻辑代码
- 详情页除了顶部公共组件外,下面是一个盒子 - Box组件
- 顶部一个主标题,一个副标题 - Heading 组件
- 下方有两条分割线 - Divider组件
- 两条分割线中间添加一个Box组件,内部左右浮动文字 - Text组件
- 下方文章内容包裹在一个Box组件中,样式使用Css属性设置
// Components/Layout.js  新建布局组件

import Header from './Header'
import Navigation from './Navigation'

// 布局组件
function Layout({ children }) {
  return (
    <>
      {/* 头部和导航组件 */}
      <Header />
      <Navigation />
      {/* 其他传入的内容 */}
      {children}
    </>
  )
}

export default Layout
// pages/index.js  使用布局组件

import Layout from '../Components/Layout'
import MovieList from '../Components/Movie-list'
import Shuffling from '../Components/Shuffling'

export default function Home() {
  return (
    // 使用布局组件
    <Layout>
      <Shuffling />
      <MovieList />
    </Layout>
  )
}
// pages/movie/[id].js  新建目录和创建组件

import { Box, Heading, Divider, Text } from '@chakra-ui/core'
import Layout from '../../Components/Layout'
import { css } from '@emotion/core'

// 电影详情Css
const infocss = css`
  margin-top: 10px;
  p {
    font-size: 14px;
    margin-bottom: 10px;
  }
  img {
    display: block;
    margin-bottom: 10px;
  }
`

function MoveItem() {
  return (
    // 使用布局组件
    <Layout>
      {/* 外层大盒子 */}
      <Box maxW='1200px' mt='50px' mx='auto' fontSize='12px'>
        {/* 一级标题 */}
        <Heading as='h2' size='xl' fontSize='30px'>
          The next shocking chapter
        </Heading>
        {/* 二级标题 */}
        <Heading as='h3' size='lg' fontSize='14px' color='#999' mt='10px'>
          The next shocking chapter in Donny Cates and Ryan Stegman's Venom
        </Heading>
        {/* 分割线 */}
        <Divider mt='10px' />
        {/* 作者和发布时间 */}
        <Box mt='10px' overflow='hidden'>
          <Text float='left'>作者:cwn</Text>
          <Text float='right'>发布时间:2024-11-11</Text>
        </Box>
        <Divider mt='10px' />
        {/* 详细内容盒子 */}
        <Box css={infocss}>
          <p>
            The next shocking chapter in Donny Cates and Ryan Stegman's Venom
          </p>
          <p>
            The next shocking chapter in Donny Cates and Ryan Stegman's Venom
          </p>
          <p>
            The next shocking chapter in Donny Cates and Ryan Stegman's Venom
          </p>
          <p>
            The next shocking chapter in Donny Cates and Ryan Stegman's Venom
          </p>
          <p>
            The next shocking chapter in Donny Cates and Ryan Stegman's Venom
          </p>
        </Box>
      </Box>
    </Layout>
  )
}

export default MoveItem
首页组件有数据静态生成
- 课程文件夹中已经提前书写好了数据接口,直接使用即可
- 请求地址前缀可以使用常量存储起来
轮播图数据获取与展示
- 在轮播图组件中导出一个方法 ,用来获取数据
- index页面使用有数据的静态生成,调用轮播图导出的方法,将方法获取到的数据传递给props。
- 然后再把这个数据下下传递给轮播图,轮播图接收到之后使用数据,遍历数据创建轮播图结构
// axiosConfig.js  跟目录新建文件存储接口前缀

// 公共数据
// 接口前缀
export const baseURL = 'http://localhost:3005'
// Components/Shuffling.js  轮播图组件导出一个获取数据的方法,并接收副组件传递过来的数据

import { Carousel } from 'react-responsive-carousel'
import Head from 'next/head'
import { css } from '@emotion/core'
import styled from '@emotion/styled'
import { Box, Heading, Text, Button } from '@chakra-ui/core'
import axios from 'axios'
import { baseURL } from '../axiosConfig'

// 样式
const CarouselCss = css`
  position: relative;
  .carousel:last-child {
    position: absolute;
    left: 0;
    bottom: 0;
    ul {
      display: flex;
      justify-content: center;
    }
  }
`

// 样式化组件
const CarouselItem = styled.div`
  position: relative;
  div {
    position: absolute;
    left: 50%;
    top: 50%;
    width: 100%;
    max-width: 1200px;
    transform: translate(-50%, -50%);
    color: #fff;
    text-align: left;
  }
  & > img {
    filter: brightness(50%);
  }
`
// 接收副组件传递过来的轮播图数据
function Shuffling({ data }) {
  return (
    <>
      {/* 自定义元数据 */}
      <Head>
        {/* 引入样式文件 */}
        <link rel='stylesheet' type='text/css' href='/css/carouse.min.css' />
      </Head>
      {/* 轮播图 */}
      <Carousel
        // 使用上面的样式
        css={CarouselCss}
        // 设置三个部分隐藏
        showArrows={false}
        showStatus={false}
        showIndicators={false}>
        {/* 遍历全部轮播图数据创建结构 */}
        {data.map(item => (
          <CarouselItem key={item.id}>
            {/* 图片 */}
            <img src={item.url} />
            {/* 中间文字 */}
            <Box className='box'>
              {/* 标题 */}
              <Heading as='h2' size='xl' fontSize='30px'>
                {item.title}
              </Heading>
              {/* 描述文本 */}
              <Text fontSize='14px' w='500px' margin='10px 0'>
                {item.description}
              </Text>
              {/* 按钮,因为版本问题这里无法设置背景色 */}
              <Button colorScheme='red'>CHECK DETAIL</Button>
            </Box>
          </CarouselItem>
        ))}
        {/* 轮播图成员 */}
      </Carousel>
    </>
  )
}

export default Shuffling

// 导出一个获取轮播图数据的方法
export function getShuffling() {
  console.log('我执行了')
  return axios.get(`${baseURL}/api/swiper`)
}
// pages/index.js  实现有数据的静态生成

import Layout from '../Components/Layout'
import MovieList from '../Components/Movie-list'
import Shuffling, { getShuffling } from '../Components/Shuffling'

// 获取静态生成的数据
export default function Home({ ShufflingData }) {
  return (
    // 使用布局组件
    <Layout>
      {/* 把数据传递给对应组件 */}
      <Shuffling data={ShufflingData} />
      <MovieList />
    </Layout>
  )
}

// 获取静态生成数据
export async function getStaticProps() {
  // 调用轮播图导出的方法获取轮播图数据
  const { data: ShufflingData } = await getShuffling()
  return {
    props: {
      // 轮播图数据
      ShufflingData,
    },
  }
}
电影列表数据获取与展示
- 与轮播图方法大致相同
// Components/Movie-list.js  电影列表组件导出获取数据方法并接收数据

import { Box, Heading, HStack, Image, Text } from '@chakra-ui/core'
import Axios from 'axios'
import { MdMovie } from 'react-icons/md'
import { baseURL } from '../axiosConfig'

function MovieList({ data }) {
  return (
    // 外层容器
    <Box maxW='1200px' mt='20px' mx='auto' fontSize='24px'>
      {/* 上方标题和图标 */}
      <HStack>
        <MdMovie />
        <Heading>电影</Heading>
      </HStack>
      {/* 电影列表 */}
      <HStack mt='20px'>
        {/* 遍历电影列表创建结构 */}
        {data.map(item => (
          // 列表成员
          <Box w='300px' key={item.id}>
            {/* 图片 */}
            <Image src={item.url} />
            {/* 文本描述 */}
            <Text mt='5px' fontSize='14px'>
              {item.title}
            </Text>
          </Box>
        ))}
      </HStack>
    </Box>
  )
}

export default MovieList

// 导出获取电影列表数据方法
export function getMovieList() {
  return Axios.get('/api/movie', { baseURL })
}
// pages/index.js  页面调用方法获取数据实现有数据静态生成

import Layout from '../Components/Layout'
import MovieList, { getMovieList } from '../Components/Movie-list'
import Shuffling, { getShuffling } from '../Components/Shuffling'

// 获取静态生成的数据
export default function Home({ ShufflingData, MovieListData }) {
  return (
    // 使用布局组件
    <Layout>
      {/* 把数据传递给对应组件 */}
      <Shuffling data={ShufflingData} />
      <MovieList data={MovieListData} />
    </Layout>
  )
}

// 获取静态生成数据
export async function getStaticProps() {
  // 调用轮播图导出的方法获取轮播图数据
  const { data: ShufflingData } = await getShuffling()
  // 调用电影列表导出的方法获取数据
  const { data: MovieListData } = await getMovieList()
  return {
    props: {
      // 轮播图数据
      ShufflingData,
      // 电影列表数据
      MovieListData,
    },
  }
}
实现详情页基于路由参数的静态生成
- 点击详情页按钮和电影列表图片都可以跳转文章详情页面
- 给对应的组件添加点击事件跳转
- 使用Link组件添加跳转
- [id].js文件书写两个异步函数,分别获取所有可能的页面路由参数,和获取对应的静态生成数据
- 使用静态生成数据创建结构
// Components/Shuffling.js  给按钮添加Link标记,点击后跳转路由

import { Carousel } from 'react-responsive-carousel'
import Head from 'next/head'
import { css } from '@emotion/core'
import styled from '@emotion/styled'
import { Box, Heading, Text, Button } from '@chakra-ui/core'
import axios from 'axios'
import { baseURL } from '../axiosConfig'
import Link from 'next/link'

// 样式
const CarouselCss = css`
  position: relative;
  .carousel:last-child {
    position: absolute;
    left: 0;
    bottom: 0;
    ul {
      display: flex;
      justify-content: center;
    }
  }
`

// 样式化组件
const CarouselItem = styled.div`
  position: relative;
  div {
    position: absolute;
    left: 50%;
    top: 50%;
    width: 100%;
    max-width: 1200px;
    transform: translate(-50%, -50%);
    color: #fff;
    text-align: left;
  }
  & > img {
    filter: brightness(50%);
  }
`
// 接收副组件传递过来的轮播图数据
function Shuffling({ data }) {
  return (
    <>
      {/* 自定义元数据 */}
      <Head>
        {/* 引入样式文件 */}
        <link rel='stylesheet' type='text/css' href='/css/carouse.min.css' />
      </Head>
      {/* 轮播图 */}
      <Carousel
        // 使用上面的样式
        css={CarouselCss}
        // 设置三个部分隐藏
        showArrows={false}
        showStatus={false}
        showIndicators={false}>
        {/* 遍历全部轮播图数据创建结构 */}
        {data.map(item => (
          <CarouselItem key={item.id}>
            {/* 图片 */}
            <img src={item.url} />
            {/* 中间文字 */}
            <Box className='box'>
              {/* 标题 */}
              <Heading as='h2' size='xl' fontSize='30px'>
                {item.title}
              </Heading>
              {/* 描述文本 */}
              <Text fontSize='14px' w='500px' margin='10px 0'>
                {item.description}
              </Text>
              {/* 按钮,因为版本问题这里无法设置背景色 */}
              <Button colorScheme='red'>
                {/* 按钮设置Link链接,跳转到响应页面 */}
                <Link href='/movie/[id]' as={`/movie/${item.vid}`}>
                  <a>CHECK DETAIL</a>
                </Link>
              </Button>
            </Box>
          </CarouselItem>
        ))}
        {/* 轮播图成员 */}
      </Carousel>
    </>
  )
}

export default Shuffling

// 导出一个获取轮播图数据的方法
export function getShuffling() {
  return axios.get(`${baseURL}/api/swiper`)
}
// Components/Movie-list.js  给单个电影列表成员添加Link链接,跳转路由

import { Box, Heading, HStack, Image, Text } from '@chakra-ui/core'
import Axios from 'axios'
import { MdMovie } from 'react-icons/md'
import { baseURL } from '../axiosConfig'
import Link from 'next/link'

function MovieList({ data }) {
  return (
    // 外层容器
    <Box maxW='1200px' mt='20px' mx='auto' fontSize='24px'>
      {/* 上方标题和图标 */}
      <HStack>
        <MdMovie />
        <Heading>电影</Heading>
      </HStack>
      {/* 电影列表 */}
      <HStack mt='20px'>
        {/* 遍历电影列表创建结构 */}
        {data.map(item => (
          // 设置Link链接,跳转到响应页面
          <Link key={item.id} href='/movie/[id]' as={`/movie/${item.vid}`}>
            <a>
              {/* // 列表成员 */}
              <Box w='300px'>
                {/* 图片 */}
                <Image src={item.url} />
                {/* 文本描述 */}
                <Text mt='5px' fontSize='14px'>
                  {item.title}
                </Text>
              </Box>
            </a>
          </Link>
        ))}
      </HStack>
    </Box>
  )
}

export default MovieList

// 导出获取电影列表数据方法
export function getMovieList() {
  return Axios.get('/api/movie', { baseURL })
}
// pages/movie/[id].js  执行实现基于动态路由的静态生成

import { Box, Heading, Divider, Text } from '@chakra-ui/core'
import Layout from '../../Components/Layout'
import { css } from '@emotion/core'
import Axios from 'axios'
import { baseURL } from '../../axiosConfig'

// 电影详情Css
const infocss = css`
  margin-top: 10px;
  p {
    font-size: 14px;
    margin-bottom: 10px;
  }
  img {
    display: block;
    margin-bottom: 10px;
  }
`

// 获取静态生成数据并使用
function MoveItem({ data }) {
  return (
    // 使用布局组件
    <Layout>
      {/* 外层大盒子 */}
      <Box maxW='1200px' mt='50px' mx='auto' fontSize='12px'>
        {/* 一级标题 */}
        <Heading as='h2' size='xl' fontSize='30px'>
          {data.title}
        </Heading>
        {/* 二级标题 */}
        <Heading as='h3' size='lg' fontSize='14px' color='#999' mt='10px'>
          {data.sub}
        </Heading>
        {/* 分割线 */}
        <Divider mt='10px' />
        {/* 作者和发布时间 */}
        <Box mt='10px' overflow='hidden'>
          <Text float='left'>作者:{data.author}</Text>
          <Text float='right'>发布时间:{data.publish}</Text>
        </Box>
        <Divider mt='10px' />
        {/* 详细内容盒子 */}
        <Box
          css={infocss}
          // 这里使用dangerouslySetInnerHTML接收结构,否则会被渲染成文本
          dangerouslySetInnerHTML={{ __html: data.content }}></Box>
      </Box>
    </Layout>
  )
}

export default MoveItem

// 获取全部可能生成的路由参数
export async function getStaticPaths() {
  // 调用接口获取路由参数
  const { data: ids } = await Axios.get('/api/videos', { baseURL })
  // 包装数组
  const paths = ids.map(id => ({
    params: { id },
  }))
  // 返回路由
  return {
    paths,
    fallback: false,
  }
}

// 获取静态生成数据
export async function getStaticProps({ params }) {
  // 获取路由id
  const id = params.id
  // 调用接口获取数据
  const { data } = await Axios.get(`/api/detail?id=${id}`, { baseURL })
  // 最终把数据返回出去
  return {
    props: {
      // 详情页所需要的数据
      data,
    },
  }
}
导出静态网站
- 在package.json中添加自定义npm命令
"export": "next build && next export"- 先构建然后导出 - 运行命令后跟目录下的out目录即为导出的静态网站,直接将整个目录内容直接复制到课程提供的服务端程序的静态资源文目录即可,放在任何服务器下也都可以运行
- 这时直接访问http://localhost:3005/(课程提供的服务端接口)即可直接打开网站
自定义next应用服务器
next为我们提供自定义服务器功能,当next为我们提供的基于页面的集成式服务系统不满足要求时使用
- 跟目录下创建server目录
- 创建index.js作为服务器端入口文件
- 安装第三方模块 - express、nodemon
- 书写index.js逻辑
- 修改package.json命令
// server/index.js  新建目录和文件创建自定义服务器

// 引入express和next
const express = require('express')
const next = require('next')

// 判断当前是否为生产环境 production
const dev = process.env.NODE_ENV !== 'production'

// 创建next应用,把dev传递进去
const app = next({ dev })

// 基于页面的路由系统
const handler = app.getRequestHandler()

// 准备next应用,准备完成后执行回调函数
app.prepare().then(() => {
  // 创建服务器
  const server = express()
  // 自定义路由系统
  server.get('/hello', (req, res) => {
    res.send('hello next.js')
  })
  // 如果上面没有此次请求那么我来处理
  server.get('*', (req, res) => {
    // 直接使用基于页面的路由西戎
    handler(req, res)
  })
  // 监听端口,开启监听成功后打印一段文字
  server.listen(3000, () => console.log('服务器启动成功'))
})
// package.json  修改自定义npm指令

"scripts": {
  // 使用nodemon打开server/index.js服务器
  "dev": "nodemon server/index.js",
  "build": "next build",
  "start": "next start",
  "export": "next build && next export"
},
最终直接运行npm run dev即可启动程序
部署next应用到Vercel平台
**Vercel是next作者为我们提供的一个部署平台**
- 把应用发布到getHub当中
- Vercel绑定gethub账号,选择项目进行部署,全程英文不太友好
