

Vue
1、MVVM模式
- 基本定义
- MVVM是Model-View-ViewModel的缩写,MVVM是一种设计思想,Model 层代表数据模型,也可以在Model中定义数据修改和操作的业务逻辑;View 代表UI 组件,它负责将数据模型转化成UI 展现出来,ViewModel 是一个同步View 和 Model的对象,在MVVM架构下,View 和 Model 之间并没有直接的联系,而是通过ViewModel进行交互,Model 和ViewModel 之间的交互是双向的, 因此View 数据的变化会同步到Model中,而Model 数据的变化也会立即反应到View 上,ViewModel 通过双向数据绑定把 View 层和 Model 层连接了起来,而View 和 Model 之间的同步工作完全是自动的,无需人为干涉,因此开发者只需关注业务逻辑,不需要手动操作DOM, 不需要关注数据状态的同步问题,复杂的数据状态维护完全由 MVVM 来统一管理
- 图解
2、Vue双向绑定的原理
- 基本定义
- 在Vue2版本中,双向绑定的原理,采用的是,
数据劫持结合发布者,订阅者模式实现的,通过Object.definePropety()来劫持各个属性的setter,和getter,在数据发生变动的时,发布消息给订阅者,触发相应监听回调,把一个普通的javaScript对象传给Vue实例,作为它的data选项,Vue将遍历所有的属性,利用Object.definePropetype把它们转换为getter/setter,用户看到不到getter/setter,但是在内部使用Vue追踪依赖,在属性被访问和修改时,通知发生变化 - Vue将MVVM作为数据绑定的入口,整合Observer,Compile和Watch三者,通过Observer来监听自己的model数据变化,通过Compile来解析编译模板指令,最用它利用Watcher大气observer和Compile之间的通讯桥梁,达到数据变化,->视图更新,视图交互变化->数据Model变更双向绑定的结果
- 在Vue2版本中,双向绑定的原理,采用的是,
- 代码实现
<body>
  <!-- <script src="https://cdn.jsdelivr.net/npm/vue"></script> -->
  <div id="app"></div>
  <input id="txt"></input>
  <p id="show"></p>
  <script>
    var obj= {}
    // 1- 监听空对象obj,和input输入框
    Object.defineProperty(obj,'txt',{
      // 2- get属性获取外部obj对象
      get:function(){
        return obj
      },
      // 3- set改写,并且把文本,和视图,进行关联
      set:function(newValue){
        document.getElementById('txt').value= newValue
        document.getElementById('show').innerHTML=newValue
      }
    })
    // 4- 监听keyup事件,实现数据同时显示和更新
    document.addEventListener('keyup',function(e){
      obj.txt=e.target.value
    })
  </script>
</body>
3、生命周期函数
- 基本定义
- 生命周期函数,可以为
创建期间和运行期间以及销毁期间- 创建期间
- beforeCreate,created,beforeMount,mounted
- 运行期间
- beforeUpdate,updated
- 销毁期间
- beforeDestroy,destroyed
- 创建期间
- 生命周期函数,可以为
- 详细说明
1- 创建期间- beforeCreate
- Vue或者组件刚刚实例化,data和methods还没有被创建
- created
- 此时data和methods已经被创建,可以使用,但还没有开始编译,如果首屏的ajax请求,可以放到这个钩子中执行
- beforeMount
- created的下一个阶段,此时模板已经被编译,但是还没有挂载到网页中
- mounted
- 模板代码已经加载到了网页中,但此时创建期间所有的事情都已经准备好了,网页开始运行
- beforeCreate
2- 运行期间- beforeUpdate
- 在网页运行期间,data中的数据可能会更新,在这个阶段,数据只是在data中进行更新了,但是没有在模板中进行更新,因此网页显示的还是之前的
- update
- 数据在data中更新了,此时页面上的数据都是最新的
- beforeUpdate
3-销毁期间- beforeDestroy
- Vue实例或者是组件在销毁之前执行的函数,在这一个函数中Vue或者组件中的所有属性,都是可用的
- destroyed
- Vue实例或者组件被销毁后执行的,此时Vue实例上所有的东西都会解绑,所有的时间都会被移除,所有子元素都会被销毁
- beforeDestroy
4、指令系列
- 4-1 常见指令
- v-model
- 用于表单元素的绑定,箭筒用户输出事件的以及更新数据
- v-text
- 更新元素的extContent,将数据解析为纯文本
- v-on
- 绑定事件
- 语法
v-on:click="say" or v-on:click="say('参数', $event) - 简写:
@click='say' - 使用逗号分隔绑定多个事件
<div v-on="click:onClick, keyup:onKeyup, keydown:onKeydown"></div>
- v-for
- 根据数据多次渲染元素或模板
- v-model
遍历数组 item 为当前项,index 为索引
<p v-for="(item, index) in list">{{item}} -- {{index}}</p>
遍历对象 item 为值,key 为键,index 为索引
<p v-for="(item, key, index) in obj">{{item}} -- {{key}}</p>
遍历常量 item为从1开始的递增值
<p v-for="item in 10">{{item}}</p>
- v-bind
- 绑定属性
- 语法:
v-bind:title='msg' - 简写:
:title='msg'
- v-html
- 更新元素的innerHTML,把数据解析为纯文本显示
- v-if/v-else/v-else-if
- 根据表达式值的真假条件,销毁或重建元素v-if,适合条件不大可能的改变的场景,v-if-else和v-else不用脱离v-if单独存在
- v-show
- 根据表达式真假结果,切换元素的diplay css属性,dom元素一直在v-show适合频繁切换
- v-once
- 只渲染元素组件一次,随后重新进行渲染,元素/组件以及其所有子节点,都被视为静态内容跳过,可以优化更新性能
- v-pre
- 主要应用与跳过这个元素和子元素编译过程,可以用来显示原始标签,跳过大量没有指令的节点,加快编译
- 4-2 自定义指令
- 基本定义
- 自定义指令分为: 全局自定义指令/局部自定义指令
- 使用
Vue.directive('focus',{bind(el,binding){},inserted(){} })实现全局自定义指令 - 参数1: 指令的名称
- 参数2: 是一个对象,在这个对象上,有对应的钩子函数
- 钩子函数
- 一个指令定义的对象,可以提供以下几个钩子函数(均为可选)
- insterted: 被绑定元素插入父节点时调用(仅保证父节点存在,但不一定被插入文档中)
- bind: 只会调用一次,指令第一个绑定到元素调用时,在这里可以进行一次性的初始化设置
- update: 所有组件的VNode更新时调用,但是可能发生在其子VNode更新之前,指令的值可能发生了变化,也可能没有,但是可以通过比较更新前后的值来忽略不必要的模板更新
- componentUpdated: 指令所在组件的VNode及其子VNode全部更新后调用
- unbind: 只调用一次,指令与元素解绑时调用
- 一个指令定义的对象,可以提供以下几个钩子函数(均为可选)
- 指令钩子的参数
- el: 指令所绑定的元素,可以用来直接操作DOM在每个函数中,第一个参数el,表示被绑定了指令的那个元素,这个el参数,是一个原生的js对象
- binding: 一个对象,包含以下属性
- name: 指令的名字,不包括v-前缀
- value: 指令的绑定值
- oldValue: 指令绑定前的一个值,仅在updata和componentUpdated钩子中可用,无论值是否改变都可以使用
- expression: 字符串形式的指令表达式
- arg: 传给指令的参数,可选
- modiflers: 一个包含修饰符的对象
- vnode: Vue编译时生成的虚拟节点
- oldVnode: 上一个虚拟节点,仅在update和componentUpdate钩子中可用
- 全局指令
- 基本定义
// 2.全局指令,一般在main.js中定义
   // 为绑定的元素自动获取焦点:
   Vue.directive('focus', {
      inserted: function (el) { // inserted 表示被绑定元素插入父节点时调用
        el.focus();
      }
    })
- 局部指令
// 1.创建局部指令
var app = new Vue({
    el: '#app',
    data: {
    },
    // 创建指令(可以多个)
    directives: {
        // 指令名称
        dir1: {
            inserted(el) {
                // 指令中第一个参数是当前使用指令的DOM
                console.log(el);
                console.log(arguments);
                // 对DOM进行操作
                el.style.width = '200px';
                el.style.height = '200px';
                el.style.background = '#000';
            }
        },
        color: { // 为元素设置指定的字体颜色
          bind(el, binding) {
            el.style.color = binding.value;
          }
        }
})
- 使用方式
//3.指令的使用
<div id="app">
    <div v-dir1  v-color="'red'"></div>
    <input type="text" v-focus />
</div>
- 4-3 指令面试题
- 4-4 过滤器
5、组件系列
- 5-1 组件的基本定义
- 命名方式
- 横线分隔
- 命名方式
Vue.component('my-component-name',{})
- 驼峰命名
Vue.component('MyComponentName',{})
  - 注意事项
     - 当使用首字母大写的方式定义组件时,在引用这个自定义元素时,两种方式都可以使用,但是直接在DOM(非字符串的模板)中使用时,只有`my-componen`t的方式才是有效的
- 注册组件
- 全局注册
自定义组件 ```
- 5-2 父子组件传值
- 基本定义
- 父子组件传值,使用是
props实现的,其实就是利用属性读取的方式,在子组件使用props接收父组件传递过来的参数
- 父子组件传值,使用是
- 使用方式
- 父组件
- 基本定义
<template>
  <div class="hello">
      //  1- 通过绑定在子组件上属性
    <Child :parentMessage="parentMessage"></Child>
  </div>
</template>
<script>
import Child from './Child.vue'
export default {
  components: {
    Child
  },
  data () {
    return {
        // 可以传递给子组件任意类型的数据,但是需要在props中指定接收的类型
      parentMessage: "我是来自父组件的消息"
    }
  }
}
</script>
- 子组件
<template>
  <div>
    <span>{{parentMessage}}</span>
  </div>
</template>
<script>
export default {
// 使用props用来接收,父组件中传递过来的信息
  props: {
    parentMessage: {
        // 声明字符的方式
      type: String,
      defalut:'显示默认信息'
    }
  }
}
</script>
- 5-3 子父组件传值
- 基本定义
- 子父组件传值的方式使用
$emit的方式,把子组件中的参数,发射出来,通过函数的形式进行传递,this.$emit('arg1',arg2)arg1: 方法名字, arg2: 要传递的值
- 子父组件传值的方式使用
- 使用方式
- 子组件
- 基本定义
<template><div> <p>{{msg}}</p><button @click="toParent">点击我,向父组件传递数据</button></div></template><script>export default{ data(){ return { msg:'我是子组件中的值' } }, methods:{ toParent(){ this.$emit("toParent",this.msg) } }}</script><style >p{ color:red;}</style>
- 父组件
<template> <div class="hello"> <span>等待接收子组件的值{{parentMessage2}}</span> <hr> // 子组件上,绑定事件 <ChildTwo @toParent="getMsg"/> </div></template><script>import ChildTwo from './ChildTwo.vue'export default { components: { ChildTwo }, data () { return { parentMessage2: "" } }, methods:{ // 声明的事件,形参位置保存的是,子组件中传递进来的数据 getMsg(msg){ // 保存子组件数据的形参,赋值给父组件中声明的parentMessage2 this.parentMessage2=msg } }}</script>
- 5-4 兄弟组件传值
- 基本定义
- 兄弟组件之间传值的方式,核心就是利用一个新的Vue实例,作为一个中转,实现传值
- 使用方式
- 组件一
- 基本定义
<template>
  <div>
    <hr>
    <p>我是第一个子组件,要给Child-Two组件传值</p>
    <button @click="toBrother">点击给兄弟组件传值</button>
  </div>
</template>
<script>
export default {
  data () {
    return {
      to: 'Hello Child-Two'
    }
  },
  methods: {
      // 这里和子传父采用的方式一样,都是使用$emit,通过触发事件,把当前数据发射出去
    toBrother () {
      this.bus.$emit('toBrother', this.to)
    }
  }
}
</script>
- 组件二
<template> <div> <p>我是第二个子组件</p> <span>我得到的兄弟组件信息是:--->{{get}}</span> </div></template><script>export default { data () { return { get: '' } }, beforeCreate () { // 使用实例对象中的$on方法,获取toBrother,第二个参数,是传递过来的msg,然后赋值给当前的get this.bus.$on('toBrother', msg => { this.get = msg }) }}</script><style >p { color: red;}</style>
- Event-Bus(vue-cli/main.js中定义)
Vue.prototype.bus=new Vue()
5-5 爷孙组件传值
- 基本定义
- 使用
provide()和inject()可以实现嵌套组件之间的数据传递,这两个函数只能在setup()函数中使用,父组件中使用provide()函数向下传递,子级组件中使用inject()获取上层传递过来的数据
- 使用
- 使用方式
- 共享普通数据
App.vue根组件
- 共享普通数据
<template>
  <div id="app">
    <h1>App 根组件</h1>
    <hr />
    <LevelOne />
  </div>
</template>

<script>
import LevelOne from './components/LevelOne'
// 1. 按需导入 provide
import { provide } from '@vue/composition-api'

export default {
  name: 'app',
  setup() {
    // 2. App 根组件作为父级组件,通过 provide 函数向子级组件共享数据(不限层级)
    //    provide('要共享的数据名称', 被共享的数据)
    provide('globalColor', 'red')
  },
  components: {
    LevelOne
  }
}
</script>
LevelOne.vue组件
<template>
  <div>
    <!-- 4. 通过属性绑定,为标签设置字体颜色 -->
    <h3 :style="{color: themeColor}">Level One</h3>
    <hr />
    <LevelTwo />
  </div>
</template>

<script>
import LevelTwo from './LevelTwo'
// 1. 按需导入 inject
import { inject } from '@vue/composition-api'

export default {
  setup() {
    // 2. 调用 inject 函数时,通过指定的数据名称,获取到父级共享的数据
    const themeColor = inject('globalColor')

    // 3. 把接收到的共享数据 return 给 Template 使用
    return {
      themeColor
    }
  },
  components: {
    LevelTwo
  }
}
</script>
LevelTwo.vue组件
<template>
  <div>
    <!-- 4. 通过属性绑定,为标签设置字体颜色 -->
    <h5 :style="{color: themeColor}">Level Two</h5>
  </div>
</template>

<script>
// 1. 按需导入 inject
import { inject } from '@vue/composition-api'

export default {
  setup() {
    // 2. 调用 inject 函数时,通过指定的数据名称,获取到父级共享的数据
    const themeColor = inject('globalColor')

    // 3. 把接收到的共享数据 return 给 Template 使用
    return {
      themeColor
    }
  }
}
</script>
- 共享refs数据
如下代码实现了点按钮切换主题颜色的功能,主要修改了App.vue组件中的代码,LevelOne.vue和LevelTwo.vue中的代码不受任何改变:
<template>
  <div id="app">
    <h1>App 根组件</h1>

    <!-- 点击 App.vue 中的按钮,切换子组件中文字的颜色 -->
    <button @click="themeColor='red'">红色</button>
    <button @click="themeColor='blue'">蓝色</button>
    <button @click="themeColor='orange'">橘黄色</button>

    <hr />
    <LevelOne />
  </div>
</template>

<script>
import LevelOne from './components/LevelOne'
import { provide, ref } from '@vue/composition-api'

export default {
  name: 'app',
  setup() {
    // 定义 ref 响应式数据
    const themeColor = ref('red')

    // 把 ref 数据通过 provide 提供的子组件使用
    provide('globalColor', themeColor)

    // setup 中 return 数据供当前组件的 Template 使用
    return {
      themeColor
    }
  },
  components: {
    LevelOne
  }
}
</script>
- 5-6 组件中的data为什么必须是一个函数?
- 基本定义
- 一个组件的data选项必须是一个函数,因此每个实例可以维护一份被返回对象的独立拷贝,从而可以保证组件中数据互相不受影响
- 详细解释
- 定义组件中的data
- 基本定义
data:function(){
	rerurn {
        count: 0
    }
}
- data选项是一个函数
<template>
  <div class="title">
    <h1>按钮被点击了{{ count }}次</h1>
    <button v-on:click="count++">点击</button>
  </div>
</template>
<script>
export default {
  name: 'ComOne',
  data() {
   return{
     count:0
   }
  }
}
</script>
<style>
.title {
  background-color: pink;
}
</style>
- 实现组件复用(相互是独立的,不受影响的)<br />
- 当把data选项修改为一个对象(相互之间都会受到影响)<br />
- 5-7 组件中插槽的作用
- 基本定义
- 插槽
slot就是子组件中提供给父组件使用的一个占位符,用<slot></slot>表示,父组件可以在这个占位符中填充任何模板代码,如HTML/组件等,填充的内容会替换子组件的<slot><slot>,默认情况下,是不允许在内部添加内容的,可以使用slot在内部添加内容
- 插槽
- 具名插槽(多个组件,控制输入到子组件的不同位置)
- 在child双标签下写入对应内容,在标签上加入一个
slot=xxx,在子组件中的name值<slot name=xxx>在标签中加入想要插入的内容
- 在child双标签下写入对应内容,在标签上加入一个
- 基本定义
Parent-父组件
<template>
  <div class="parent">
    <span>父组件</span>
      <Child>
        <p slot="top">插入组件中的内容----上</p>
        <p slot="bottom">插入组件中的内容----下</p>
      </Child>
  </div>
</template>

<script>
import Child from './Child.vue'
export default {
  name: 'parent',
  components: {
    Child
  },
  data () {
    return {
      msg: ""
    }
  }
}
</script>
Child-子组件
<template>
  <div class="child">
   <span>子组件</span>
   <slot name="top">后备内容1</slot>
   <hr>
   <slot name="bottom">后备内容2</slot>
  </div>
</template>
<script>
export default {
  data () {
    return {
      msg: 'Hello Child'
    }
  }
}
</script>
效果展示插入多个参数,只需要包裹一个父级标签即可
<template> <div class="parent"> <span>父组件</span> <Child> <div slot="top"> <p>插入组件中内容----上1</p> <p>插入组件中内容----上2</p> <p>插入组件中内容----上3</p> <p>插入组件中内容----上4</p> <p>插入组件中内容----上5</p> </div> <p slot="bottom">插入组件中的内容----下</p> </Child> </div></template>
效果展示
- 作用域插槽(用于子组件向父组件内对应插槽传入数据)
- 首先必须要在对应插槽名字的位置上加入属性
slot-scope=props,props可以随意写,对应处即可,使用{{props.text}}显示子组件插槽传递过来的数据parent-父组件
- 首先必须要在对应插槽名字的位置上加入属性
<template>
  <div class="parent">
    <span>父组件</span>
    <Child>
        <!--需要在父组件中,添加一个slot-scope,接收子插槽传递过来的数据 -->
      <div slot="top" slot-scope='props'>
        <p>{{props.text}}</p>
      </div>
      <p slot="bottom">插入组件中的内容----下</p>
    </Child>
  </div>
</template>

<script>
import Child from './Child.vue'
export default {
  name: 'parent',
  components: {
    Child
  },
  data () {
    return {
      msg: ""
    }
  }
}
</script>
<style>
.parent{
 text-align: center;

}
</style>
- `child-子组件`
<template>
  <div class="child">
   <span>子组件</span>
<!-- 定义一个text属性,这个属性值,保存的就是需要传递的数据 -->
   <slot name="top" text='子插槽向父组件传递的数据'>后备内容1</slot>
   <hr>
   <slot name="bottom">后备内容2</slot>
  </div>
</template>
<script>
export default {
  data () {
    return {
      msg: 'Hello Child'
    }
  }
}
</script>
- `效果展示`<br />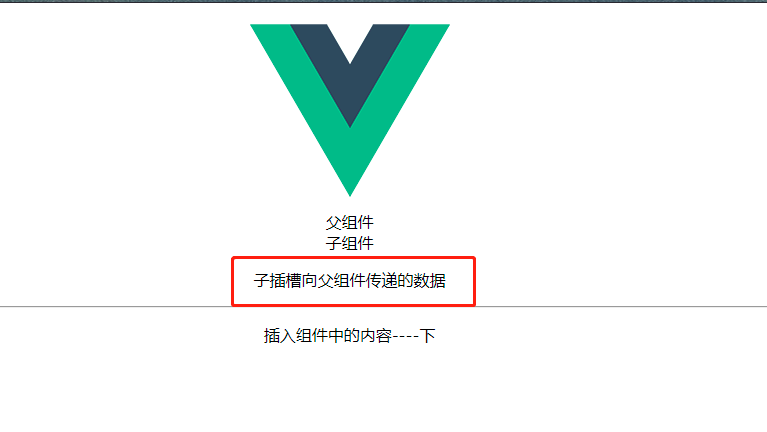
- 匿名插槽
- 5-8 如何实现组件缓存?
- 基本定义
- 使用keep-alive内置组件,可以实现组件缓存,
keep-alive包裹动态组件的时候,会缓存不活动的组件实例,而不是销毁他们,并且它也是一个抽象的组件,它自身是不会渲染成一个DOM元素的,同时也不会在父组件链中
- 使用keep-alive内置组件,可以实现组件缓存,
- 具体使用
- 只有在包含动态组件的时候,才会产生效果,如果不是动态效果组件,则会无效
- 基本定义
<keep-alive> <my-component></my-component></keep-alive>
- 使用场景1,使用内置组件`component`
<keep-alive> <component :is="view"></component></keep-alive>
- 使用场景2,当出现判断条件的子组件
<keep-alive> <com-a v-if="a">1</com-a>> <com-b v-else></com-b></keep-alive>
- 使用场景3,结合路由使用时
<keep-alive> <router-view></router-view> </keep-alive>
  - 以上三种缓存的方式,都可以实现缓存,但是会把每一个组件都进行缓存,可以根据`<keep-alive>`提供的两个属性`include`和`exclude`按照需要进行配置
     - `include: 只有匹配的组件才会被缓存`
     - `exclude: 任何匹配的组件都不会被缓存`
<keep-alive include="system">
    <router-view></router-view>
</keep-alive>
6、Watch和Computed以及Methods的应用以及加载顺序
- 基本定义
- Watch
- watch是一个对象,键是需要观察的表达式,值是对应的回调函数,这个属性,可以监听data中指定数据的变化,然后出发watch中对应的function函数
- Watch
<div id="app">
      <input type="type" v-model="firstname"/>+
      <input type="type" v-model="lastname" />=
      <input type="type" v-model="fullname" />
    </div>
    <script>
      // watch监听使用方式
      var vm = new Vue({
        el: '#app',
        data() {
          return {
            firstname: '',
            lastname: '',
            fullname: '',
          }
        },
        watch:{
          'firllname':function(newValue){
            this.fullname=newValue+this.lastname
          },
          'lastname':function(newValue){
            this.fullname=this.firstname+newValue
          }
        }
      })
    </script>
- Computed
- 计算属性,在这个属性中只要任意的数据发生变化,都会重新执行,视图也会进行更新,结果会被缓存,只要数据不发生变化,那么就不需要再次更新
 <div id="app">
      <input type="type" v-model="firstname"/>+
      <input type="type" v-model="lastname" />=
      <input type="type" v-model="fullname" />
    </div>
    <script>
    let vm = new Vue({
      el:'#app',
      data(){
        return {
          firstname:'',
          lastname:''
        }
      },
      computed:{
        	'fullname':function(){
          		return this.firstname+this.lastname
        	}
     	 }
    })
    </script>
- Methods
- Methods方法是一个具体的操作,主要用于书写业务逻辑
<div id="app">
      <input type="type" v-model="firstname" @keyup="getFullname" />+
      <input type="type" v-model="lastname" @keyup="getFullname" />=
      <input type="type" v-model="firstname" />
 </div>
 <script>
      // methods的基本使用方式
      var vm = new Vue({
        el: '#app',
        data() {
          return {
            firstname: '',
            lastname: '',
            fullname: '',
          }
        },
        methods:{
          getFullname(){
            this.firstname=this.firstname+this.lastname
          }
        }
      })
    </script>
- 执行顺序
7、Vue-Router系列
- 7-1 Vue-Router实现的原理
- Hash模式
- vue-router默认hash模式,使用URL的hash来模拟一个完整的URL,于是当URL改变的时候,页面不会重新加载,hash(#)代表的是URL的锚点,并且不会被包含在Http请求中,对后端完全没有影响,因为改变Hash不会重载页面,hash模式的实现原理采用的是,
onhashchange事件(检测hash值的变化),可以window对象上面监听这个事件
- vue-router默认hash模式,使用URL的hash来模拟一个完整的URL,于是当URL改变的时候,页面不会重新加载,hash(#)代表的是URL的锚点,并且不会被包含在Http请求中,对后端完全没有影响,因为改变Hash不会重载页面,hash模式的实现原理采用的是,
- History模式
- 由于hash模式会在URL地址栏后面携带#,要美观的展示,就可以采用history的模式,只需要在添加路由时加入
mode:history,这种模式利用H5中history interface中新增的pushState和replaceState()方法,这两个方法提供了对历史记录修改的功能,只是当它们修改时,虽然改变了当前的URL,但浏览器不会立即向后端发送请求
- 由于hash模式会在URL地址栏后面携带#,要美观的展示,就可以采用history的模式,只需要在添加路由时加入
- Hash模式
- 7-2 如何配置动态路由
- 基本定义
- 在某些情况下,一个页面的path路径可能是不确定的,比如进入用户界面的时候,希望是这样的路径显示
user/aaa或者/user/bbb除了前面的/user外,后面还跟上了用的ID信息,这种path和Cpmponent的匹配关系,我们称之为动态路由(也是路由传参的一种方式)
- 在某些情况下,一个页面的path路径可能是不确定的,比如进入用户界面的时候,希望是这样的路径显示
- 具体实现
route/index.js
- 基本定义
// 1- 在路由配置对象中,path属性值,后面加上参数
{
    path: '/about/:id',
    component: About
  }
about.vue组件
// 2- 在需要跳转的组件中,使用$route.params实现参数的传递
<template>
  <div>
    <h2>我是关于标题</h2>
    <p>{{$route.params.id}}</p>
  </div>
</template>

<script>
export default {
  name: 'about'

}
</script>

<style lang="stylus"></style>
效果展示- 7-3 传递参数的方式
- 通过标签中的to传参
- 核心定义
- 核心就是采用
router-link组件中的to属性,分别设置对应的name和params - 上面的to前边的是带冒号的,后边跟的一个对象形式的字符串
- name: 在路由配置文件中起的name值,叫做命名路由
- params: 要传递的参数,对象的形式,可以在对象中传递多个值
- 核心就是采用
- 具体实现
- 1- 在\src\App.vue组件里面导航中添加以下代码
- 核心定义
- 通过标签中的to传参
<template>
  <div id="app">
    <router-link to="/home">首页</router-link><br>
      // 1- to属性是加上冒号的,设置对象,并且使用params来组建要传递的参数
    <router-link :to="{name:'about',params:{userName:'test1234'}}">关于</router-link>
    <router-view></router-view>
  </div>
</template>
<script>
export default {
  name: 'App',
}
</script>
- 2- 在\src\router\index.js 路由配置文件中添加name字段
{
    path: '/about',
    // 2- 在路由配置对象中,添加上name属性,要和to中写入的name保持一致
    name:'about',
    component: About
  }
- 3- 在src/components/About.vue 中接收参数
<template>
  <div>
      // 3- 使用$route呈现传递的参数
    <h2>{{$route.params.userName}}</h2>
    <p></p>
  </div>
</template>

<script>
export default {
  name: 'about'

}
</script>
- 4- 效果展示<br />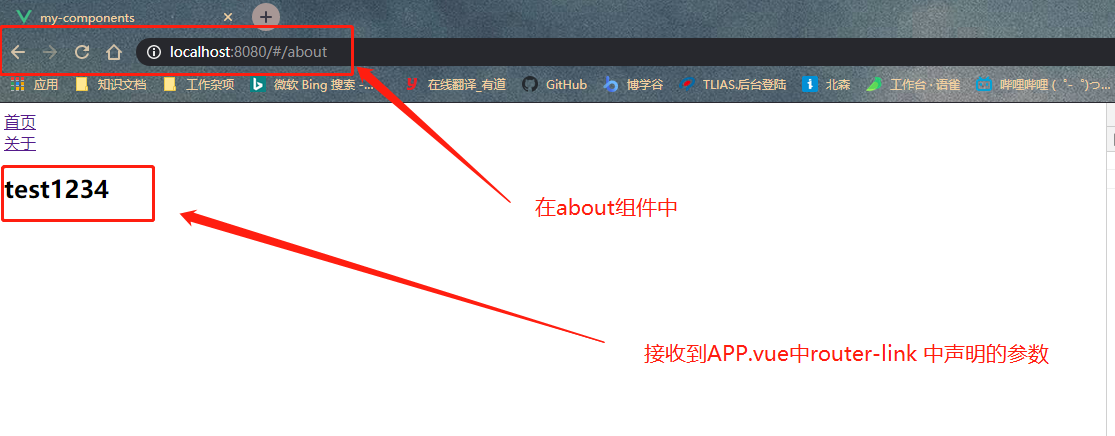
- url中传递参数
- 核心定义
- 在需要接收的组件中使用
$route.params来获取传递进来的数据,传递回来的是一个对象,可以通过点语法,实现对值的获取
- 在需要接收的组件中使用
- 具体实现
- 1- 在路由中以冒号进行传递,在src/router/index.js中添加
- 核心定义
{
    // 可以直接设置规则,约定传递的参数特定格式
    path: '/about:id(\\d+)/:name',
    component: About
  }
- 2- 接受参数,src\views\about.vue
<template>
  <div>
      //
    <h2>{{$route.params.id}}</h2>
    <h2>{{$route.params.name}}</h2>
    <p></p>
  </div>
</template>
<script>
export default {
  name: 'about'
}
</script>
- 3- 路由跳转,在\src\App.vue中添加
<template>
  <div id="app">
    <router-link to="/home">首页</router-link><br>
      // 2- 设置to属性中的参数
    <router-link to="about/1/张三和李四">关于</router-link>
    <router-view></router-view>
  </div>
</template>
<script>
export default {
  name: 'App',
}
</script>
<style>
</style>
- 4- 效果展示<br />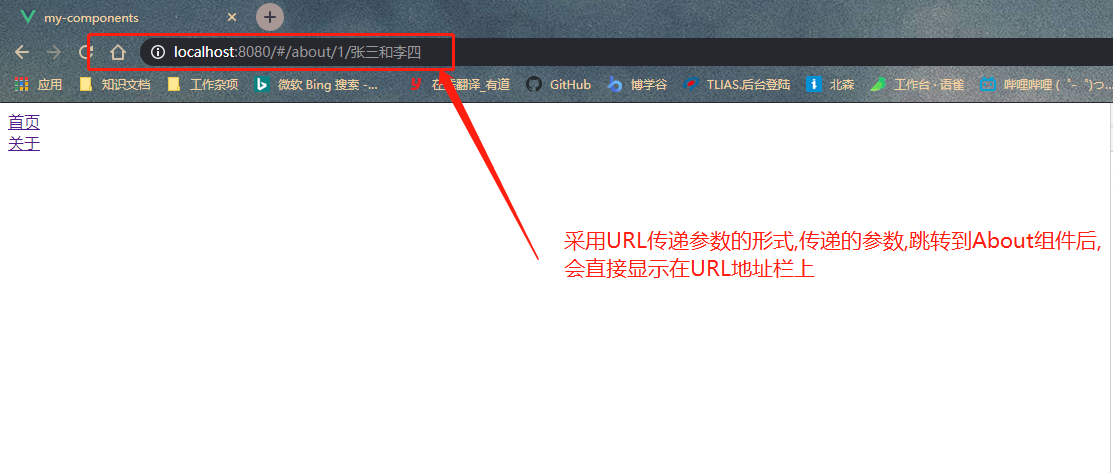
- 编程式导航-params传递参数
- 核心定义
- 设置路由配置对象中的信息,添加name字段,然后在接收参数的组件中,使用
$.route.params来进行接收,在要传递参数的组件中,通过创建一个方法,在方法内部使用$.router.push方式组装一个传递参数的对象,这个对象中有两个字段,分别是{name: xxx}目标组件的名称,以及params: {id: xxx ,name: 'xxx'},两者都是放在$router.push()方法中,进行的组装 - 注意事项:
- 动态路由使用params传递参数,在this.$router.push()方法中path不能和params一起使用,否则params将无效,需要name来指定页面
- 以下方式参数不会显示在浏览器的URL地址栏中,如果刷新了一次,就获取不到参数了,改进方式将path:
about/:id/:name按照这种形式改进
- 设置路由配置对象中的信息,添加name字段,然后在接收参数的组件中,使用
- 具体实现
- 1- 在src/router/index.js中添加以下代码
- 核心定义
{
   // 这种方式,刷新页面后,会丢失参数
    path: '/about',
    // 改进为:
     path: '/about/:id/:name'
     // 添加上name字段
    name:'about',
    component: About
  }
- 2- 在src/component/about.vue中,设置接收的参数名称
<template>
  <div>
      // 2- 通过$route.params来接收参数
    <h2>id:{{$route.params.id}}</h2>
    <h2>name:{{$route.params.name}}</h2>
    <p></p>
  </div>
</template>
<script>
export default {
  name: 'about'

}
</script>
- 3- 在src\App.vue组件中,添加一个事件,通过`$router.push`的方式,传递参数
<template>
  <div id="app">
    <router-link to="/home">首页</router-link><br>
    <router-link to="/about">关于</router-link>
    <router-view></router-view>
      // 3- 添加一个事件,触发methods中的一个方法
    <button @click="toAboutPage">点击我,向About组件传递参数</button>
  </div>
</template>
<script>
export default {
  name: 'App',
  methods: {
      // 4- 实现传参的方法,核心就是通过$router.push方法,组装一个对象,把值进行传递
    toAboutPage () {
      this.$router.push({ name: 'about', params: { id: 1, name: "jack" } })
    }
  }
}
</script>
<style>
</style>
- 实现效果<br />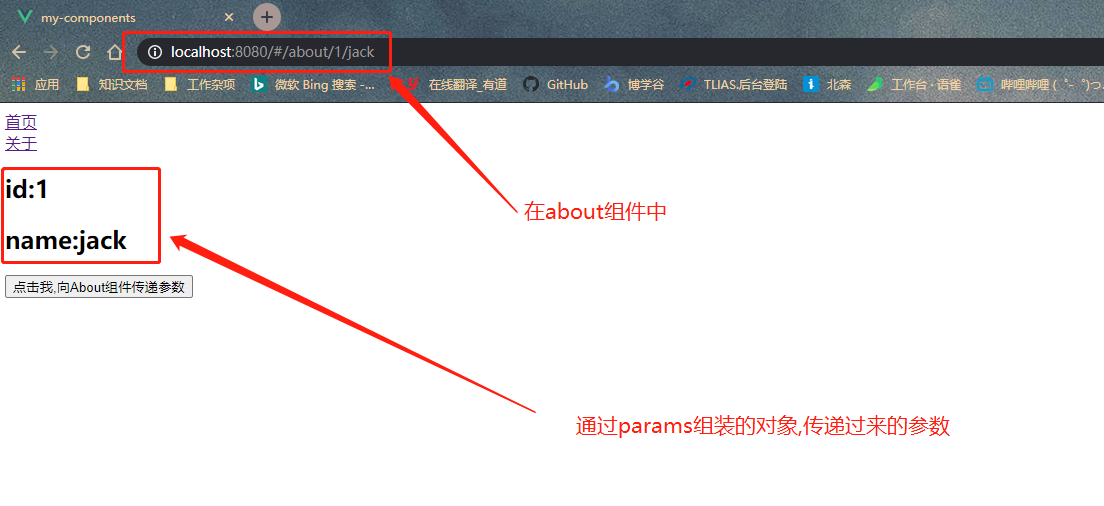
- 编程式导航-query传递参数
- 核心定义
- 和使用params的方式相同,只不过在parmas替换成query即可,两者最大不同的地方在于,使用query方式传递的参数,会直接暴露在URL地址栏上,而使用params方式传递的参数则不会
- 实现方式
- 1- 在src\router\index.js中写入需要传参的组件名称
- 核心定义
{
    // 1- 在这里添加上需要传参组件的名称
    path: '/about',
    name:'about',
    component: About
  }
- 2- 在src\views\about.vue中,改为query的方式
<template>
  <div>
      // 2- 在接收参数的组件内,使用query的方式,接收传递过来的参数
    <h2>id:{{$route.query.id}}</h2>
    <h2>name:{{$route.query.name}}</h2>
    <p></p>
  </div>
</template>
<script>
export default {
  name: 'about'

}
</script>
- 3- 在发送参数的组件内,创建一个方法,使用$router.push()组装一个传递的query对象
<template>
  <div id="app">
    <router-link to="/home">首页</router-link><br>
    <router-link to="/about">关于</router-link>
    <router-view></router-view>
    <button @click="toAboutPage">点击我,向About组件传递参数</button>
  </div>
</template>
<script>
export default {
  name: 'App',
  methods: {
    toAboutPage () {
        // 3- 核心是这里,把之前的params该写为query的方式
      this.$router.push({ name: 'about', query: { id: 1, name: "jack" } })
    }
  }
}
</script>
- 4- 效果展示<br />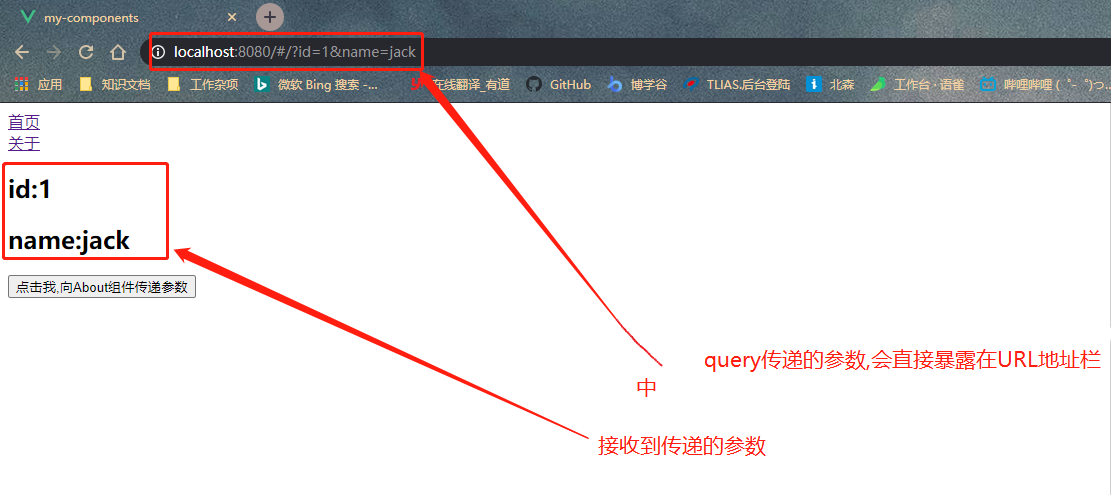
- 7-4 Vue-Router中存在哪些钩子函数
- 全局钩子函数
- 具体实现
- 全局钩子函数
// 定义- 全局导航钩子函数- 进入页面时,实现拦截登录
router.beforeEach((to,from,next)=>{
  // 此处可以加入登录逻辑判断
  // 放行
  next()
})

// 定义- 全局后置钩子函数-常用于结束动画后的操作
router.afterEach(()=>{
  // 不接受next()
})
  - 常用参数
     - to:Router 即将要进入的目标[路由对象]
     - from: Router 当前守卫要离开的路由
     - next: Function 继续执行函数
        - next() 继续执行
        - next(false) 中断当前执行
        - next('/')或者next({path: '/'}) 跳转新的页面,常用于登陆失效后跳转登陆
- 路由单独钩子函数
- 基本使用
{
    path:'home',
    component: Home,
     // 路由内钩子
     beforeEnter: (to,from,next=>{
         console.log('进入前执行')
         next()
     })
}
- 组件内钩子函数
- 基本使用
- beforeRouterEnter: 进入页面时调用
- beforeRouterUpdate: 页面路由改变时调用,一般需要携带参数
- beroreRouterLeave: 离开页面时调用
- 实现方式
- 基本使用
<script>
export default {
    name: 'Two',
    data () {
        return {
            msg: 'Hi, I am Two Page!'
        }
    },
    // 进入页面前调用
    beforeRouteEnter(to, from, next) {
        console.log('进入enter路由钩子')
        next()
    },
    // 离开页面调用
    beforeRouteLeave(to,from, next){
        console.log('进入leave路由钩子')
        next()
    },
    // 页面路由改变时调用
    beforeRouteUpdate(to, from, next) {
        console.log('进入update路由钩子')
        console.log(to.params.id)
        next()
    }
}
</script>
- 7-5 嵌套路由的实现
- 基本定义
- 子路由,也叫嵌套路由,采用在
children后跟路由数组实现,数组中和其它配置路由信息基本相同,需要配置path和component,然后在对应的位置添加上<router-view></router-view>来展示子页面信息,相当于嵌套ifname
- 子路由,也叫嵌套路由,采用在
- 具体实现
- 1- src\components\Home.vue(父组件)
- 基本定义
<template>
  <div>
    <h1>{{msg}}</h1>
    <!-- 添加子路由导航 -->
      <router-link to="/home">首页</router-link>
      <br>
      <hr>
      <router-link to="/home/ComOne">ComOne组件-展示区域</router-link>
      <br>
      <hr>
      <router-link to="/home/ComTwo">ComTwo组件-展示区域</router-link>
    <!-- 展示子组件 -->
    <router-view></router-view>
  </div>
</template>
<script>
export default {
  name: 'Home',
  data () {
    return {
      msg: 'Hello Home'
    }
  }
}
</script>
- 2- src\components\ComOne.vue
<template>
  <div>
    <h2>{{msg}}</h2>
  </div>
</template>
<script>
export default {
name:'ComOne',
data(){
  return {
    msg:'Hello ComOne'
  }
  }
}
</script>
- 3- src\components\ComTwo.vue
<template>
<div>
  <h2>{{msg}}</h2>
</div>
</template>
<script>
export default {
name:'ComTwo',
data(){
  return {
    msg:"Hello ComTwo"
  }
  }
}
</script>
- 4- src\router\index.js
import Vue from 'vue'
import VueRouter from 'vue-router'
// 配置路由的映射关系
import Home from '@/components/Home.vue'
import ComOne from '@/components/ComOne.vue'
import ComTwo from '@/components/ComTwo.vue'

// 1- 注入插件
Vue.use(VueRouter)

// 2- 定义路由
const routes = [
  // 默认展示组件home
  {
    path: '/',
    redirect: '/home'
  },
  {
    path: '/home', // 父级路由
    component: Home,
    children: [ // 定义嵌套路由的关键属性children
      {
        path: 'ComOne', // 子路由1
        component: ComOne
      },
      {
        path: 'ComTwo', // 子路由2
        component: ComTwo
      }
    ]
  }
]
// 3- 创建Router实例
const router = new VueRouter({
  routes
})
// 4- 导出实例
export default router
- 效果展示
- 7-6
$route和$router的区别- $route
- 基本定义
- $route是路由参数对象,包括了path,params,hash,query,fullPath,matched,name等路由信息参数
- $route是路由参数对象,包括了path,params,hash,query,fullPath,matched,name等路由信息参数
- 常用参数
$route.path- 字符串形式,对应当前路由的路径,总是解析为绝对路径,如"/ComOne"
$route.params- 一个key/value对象,包含了动态片段和全匹配片段,如果没有路由参数,那么是一个空对象形式
$route.query- 一个key/value对象,表示URL查询参数,例如,对于路径/home?user=1,则有$router.user为1,如果没有查询参数,是一个空对象形式
$route.fullPath- 完整解析后的URL,包含查询的参数和hash的完整路径信息
$router.matched- 数组形式,包含当前的路径中所包含的所有片段和对应的配置参数对象
$route.name- 当前路径的名字
- 基本定义
- $router
- 基本定义
- $router是路由实例对象,即VueRouter创建的实例,包括了路由的跳转方法,钩子函数等
- $router是路由实例对象,即VueRouter创建的实例,包括了路由的跳转方法,钩子函数等
- 常用方法
go()- 跳转到上次浏览的页面
- 基本定义
- $route
 showRouter: function () {
    // 1- 跳转到上次浏览的页面
this.$router.go(-1)
 }
     - `replace()`
        - 跳转到指定地址
showRouter: function(){
    // 2- 跳转到指定地址
     this.$router.replace('/ComTwo')
}
- 跳转到指定名字地址
showRouter: function () {
      // 3-指定跳转路由的名字下
     this.$router.replace({name:'ComTwo'})
}

// router/index.js
// 需要在router配置文件中,设置对象name字段,才可以实现跳转
 {
        path: 'ComTwo',
        // 添加上name属性
        name:'ComTwo',
        component: ComTwo
 }
     - `push()`
        - 跳转到指定位置
 showRouter: function(){
    // 4- 通过push跳转
    this.$router.push('/ComTwo')
  }
- 跳转到指定名字地址
 showRouter: function () {
    // 4- 通过push跳转
    this.$router.push({name:"'/ComTwo'"})
 }
// router/index.js
// 需要在router配置文件中,设置对象的name字段,才可以实现跳转
{
        path: 'ComTwo',
        // 添加上name属性
        name:'ComTwo',
        component: ComTwo
}
     - `$router.push和$router.repleace`的区别
        - 使用`push`方法的跳转会向`history`栈添加一个新的记录,当点击浏览器的back返回按钮时,可以看到之前的页面
        - 使用`replace`方法不会向`history`添加新记录,而是替换掉当前的`history`记录,也就是`replace`跳转到页面后,back按钮不能查看到之前的页面
- 7-7 路由懒加载
- 核心定义
- Vue是单页面应用,如果没有应用懒加载技术,那么通过webpack打包后的文件将会异常的庞大,造成用户进入页面的时候,一次加载的内容过多,时间过长,那么就会造成白屏出现,及时做了loading也是不利于用户体验,使用了懒加载则可以把页面进行划分,在需要的时候加载,可以有效的分担首页所承担的加载压力,减少首页加载用时
- 具体实现
- Vue异步组件
- 核心定义
compoent: (resolve)=> require(['@/component/One'],resolve)
- ES6-import(常用的方式)
component: ()=>import('@/components/Two')
- webpack提供的require.ensure()
component: r=> require.ensure([], ()=> rrequire('@/component/Three')), 'group-home')
8、Vuex系列
- 8-1 单向数据流
- 核心定义
- Vuex是一个专门为Vue提供的
状态管理模式,它采用的是集中式存储管理应用的所有组件的状态,并以相应的规则保证状态,按照以一种可预测的方式发生变化 - 单向数据流
- 示图说明
- State: 驱动应用的数据源(单向数据流)
- View: 以声明方式将State映射到视图(静态显示出来的数据源)
- Actions: 处理用户在view上面操作而导致的状态变化(数据源追踪)
- 示例代码
<template>
    <div>
        <!-- view -->
        <div>{{ count }}</div>
        <button @click="increment">increment</button>
    </div>
</template>
<script>
export default {
    // state
    data () {
        return {
            count: 0
        }
    },
    // actions
    methods: {
        increment () {
            this.count++
        }
    }
}
</script>
- 8-2 Vuex实现流程
- 核心定义
- 示图说明
- 1- Vue Component: Vue组件,HTML页面上,负责接收用户操作等行为,执行dispatch方法触发对应的action进行回应
- 2- Dispatch: 操作行为触发方法,是唯一执行action的方法
- 3- Actions: 操作行为处理模块,负责处理components接收到的所有交互行为,包含同步/异步操作,支持多个同名方法,按照注册的顺序依次触发,向后台API请求的操作就在这个模块中进行,包括触发其它aciton以及提交的mutaion操作,同时该模块提供了对Promise的封装,以支持action的链式触发
- 4- Commit: 状态改变提交操作方法,对mutation进行提交,是唯一能执行mutation的方法
- 5- Mutations: 状态改边的操作方法,是Vuex修改state的唯一推荐方法,其它修改方式在
严格模式下会报错,该方法只能进行同步操作,并且是全局唯一,操作之中会有hook暴露出来,以进行state的监控等 - 6- State: 页面状态管理容器对象,几种存储Vue components中data对象的零散数据,全局唯一,以进行统一的状态管理,页面显示所需的数据从该对象中进行获取,利用Vue的细粒度数据响应机制进行高效的状态更新
- 7- Getters: state对象读取方法,图中没有单独列出该模块,应该被包含在了render中,Vue Components通过该方法读取全局state对象
- 总结描述
- Vue组件的接收行为,
用dispatch方法触发action相关处理,若页面状态需要改变,则调用commit方法提交mutation修改state,通过getters获取到state新值,重新渲Vue Components,界面随之更新
- Vue组件的接收行为,
- 具体实现
- src/vuex/store.js
- 核心定义
// 引入vue
import Vue from 'vue'
// 引入vuex
import Vuex from 'vuex'

// 使用Vuex
Vue.use(Vuex)

// 1- state 创建初始化状态
const state = {
  // 放置初始状态
  count: 1
}

// 2- mutations 创建改变状态的方法
const mutations = {
  // 状态函数,一般大写
  ADD (state, n) {
    state.count += n
  }
}

// 3- getters 提供外部获取state
const getters = {
  count: function (state) {
    return state.count
  }
}

// 4- actions 创建驱动方法改变mutations
const actions = {
  // 触发mutations中相应的方法,一般小写
  add ({ commit }, data) {
    commit('ADD', data)
  }
}

// 5- 全部注入到store中
const store = new Vuex.Store({
  state,
  mutations,
  getters,
  actions
})

// 6- 导出store
export default store
- src/main.js
import Vue from 'vue'
import App from './App.vue'
import router from './router'
// 引入store
import store from './vuex/index'

Vue.config.productionTip = false

new Vue({
  router,
  store, // 注入到全局
  render: h => h(App),
}).$mount('#app')
- src/component/Count.vue
<template>
  <div>
    <h1>{{msg}}</h1>
    <h2>{{count}}</h2>
    <button @click="clickAdd">新增</button>
  </div>
</template>
<script>
export default {
  name: 'Count',
  data () {
    return {
      msg:'Hello Vuex'
    }
  },
  computed:{
    // 1- 获取state的值
    count(){
      return this.$store.state.count
    }
  },
  methods:{
    clickAdd(){
      // 2- 分发action中的add方法
      this.$store.dispatch('add',1)
    }
  }
}
</script>
- **效果展示**<br />
- 8-3 介绍一下Vuex中的核心属性
- State(唯一数据源,所有数据都要放到state中存储)
- 全局中的唯一容器,用于存储components中data对象的零散数据,今天统一的状态管理,页面中显示的数据从该对象中进行获取
- 1- 定义state
- State(唯一数据源,所有数据都要放到state中存储)
    export default new Vuex.Store({
      state:{
        count:0
      }
    })
- 2- 组件访问state中数据的第一种方式($store.state的方式)
    <template>
    <div>
        // 第一种访问的方式, 直接通过 $store.state访问,在template中,可以省略this
      <h1>当前最新的count的值为:{{$store.state.count}}</h1>
      <button>+1</button>
    </div>
    </template>

    <script>
    export default {
      name:"Addition",
      data(){
        return{
        }
      }
    }
    </script>
- 3- 组件访问state中数据的第二种方式(mapState的方式)
      <template>
      <div>
        <h1>当前最新的count的值为:{{count}}</h1>
        <button>+1</button>
      </div>
      </template>

      <script>
       // 1- 按需导入mapSate
      import {mapState} from 'vuex'
      export default {
        name:"Addition",
        data(){
          return{}
        },
        computed:{
          // 2-  将全局函数,映射为当前组件的计算属性
          ...mapState(['count'])
        }
      }
      </script>
- Mutation(用于变更state中的数据)
- 只能通过mutation变更store中的数据,不可以直接操作state中的数据,并且可以集中管理store中的数据
- Mutation本质上也是一个函数,只能通过Mutation修改state中的数据,并且保证必须是同步的操作,否则将无法追踪
- 1- 定义Mutations
  export default new Vuex.Store({
  state: {
      count: 0
  },
    mutations: {
      // 两个参数: 参数1是当前的state 参数2是要传递进来的值
      addN (state, step) {
        // 变更state的状态
        state.count += step
      },
       sub(state){
           state.count--
       }
    },
  })
- 2- 触发mutations的第一种方式(commit()传递参数)
<template>
<div>
    <h1>当前最新的count的值为:{{count}}</h1>
  <button @click="addCount">+1</button>
  </div>
</template>
  <script>
  export default {
    name:"Addition",
    data(){
      return{
      }
    }
    methods:{
      addCount(){
        // 两个参数, 参数1是 mutation创建的方法名称,参数2是addN方法的第二个形参
        // commit的作用就是为了触发一个mutation
        return this.$store.commit('addN',1)
      }
    }
  }
  </script>
- 3- 触发mutions的第二种方式(mapMutations函数)
<template>
<div>
    <h1>当前最新的count的值为:{{$store.state.count}}</h1>
  <button @click="but">-1</button>
  </div>
  </template>

  <script>
  // 1- 按需导入mapMution
  import { mapMutations } from 'vuex'
  export default {
    name:"Subtraction",
    data(){
      return{ }
    },
    methods:{
      // 2- 展开mapMutations函数,并且传入参数
      ...mapMutations(['sub'])
    }
  }
  </script>
- Action(用于处理异步任务-本质上是一个函数)
- 如果需要操作异步任务,只能通过Action,不能使用Mutation,但是在Action中触发Mutation的方式间接变更数据
- 为了执行异步操作,VueX在组件和Mutation之间增加了Action这个
中间媒介 - Action中通过
异步的方式获取数据,并且把数据转交给MutIon,最终由Mutation负责变更State中的数据 - 1- 定义Action
// 引入vue
import Vue from 'vue'
// 引入vuex
import Vuex from 'vuex'

// 使用Vuex
Vue.use(Vuex)
export default new Vuex.Store({
  state: {
    count: 0
  },
  mutations: {
    // 两个参数: 参数1是当前的state 参数2是要传递进来的值
    addN (state, step) {
      // 变更state的状态
      state.count += step
    },
    sub (state) {
      state.count--
    }
  },
  actions: {
    // 使用actions来处理所有的异步操作
    addAsync(context){
      setTimeout(()=>{
        // 在Action中不能直接修改state中的数据,要想修改,只能触发一个mutation才可以
        context.commit('addN',3)
      },1000)
    },
    subAsync(context){
         setTimeout(()=>{
        // 在Action中不能直接修改state中的数据,要想修改,只能触发一个mutation才可以
        context.commit('sub',)
      },1000)
    }
  }
})
- 2- 触发action的第一种方式(dispatch)
<template>
<div>
  <h1>当前最新的count的值为:{{count}}</h1>
  <button @click="AddHandle">+1--Async</button>
</div>
</template>
<script>
export default {
  name:"Addition",
  data(){
    return{
    }
  }
  methods:{
    AddHandle(){
      // 触发Action的第一种方式
      this.$store.dispatch('addAsync')
    }
  }
}
</script>
- 3- 触发action的第二种方式(导入napActions)
<template>
<div>
  <h1>当前最新的count的值为:{{$store.state.count}}</h1>
  <button @click="subAsync">-1 Async</button>
</div>
</template>

<script>
// 1- 按需导入mapActions
import { mapActions } from 'vuex'
export default {
  name:"Subtraction",
  data(){
    return{
    }
  },
  methods:{
    // 2- 展开mapAction函数,并且传入参数
    ...mapActions(['subAsync'])
  }
}
</script>
- Getter(Vuex中的计算属性-本质也是一个函数)
- 定义Getter
- Getter本质上是一个函数,是VueX中的计算属性,Getter可以依赖于Store中原始数据的变化,并返回计算后的新数据
- Getter的返回值会被缓存起来,只有依赖项发生变化的时候,Getter的值才会被从新计算
- 定义Getter
// 引入vue
import Vue from 'vue'
// 引入vuex
import Vuex from 'vuex'

// 使用Vuex
Vue.use(Vuex)

export default new Vuex.Store({
  state: {
    count: 0
  }
  getters: {
    // getter本质上就是一个函数,第一个形参永远都是state
    countPlus (state) {
      return state.count * 2
    }
  }
})
- 使用Getter的第一种方式
<template>
<div>
    <p>当前cuount最新的值为:{{this.$store.getters.countPlus}}</p>
    <!--
	1- 在template模板中,可以省略掉this,直接写成以下方式
     -->
    <p>当前cuount最新的值为:{{$store.getters.countPlus}}</p>

</div>
</template>
<script>
import {mapState} from 'vuex'
export default {
  name:"Addition",
  data(){
    return{
    }
  }
}
</script>
- 使用Getter的第二种方式
<template>
<div>
  <p>当前cuount最新的值为:{{countPlus}}</p>
</div>
</template>

<script>
import {mapState,mapGetters} from 'vuex'
export default {
  name:"Addition",
  data(){
    return{

    }
  },
  computed:{
    // mapGetters辅助函数,仅仅是将state中的getter映射为当前组件的计算属性
    ...mapGetters(['countPlus'])
  }
}
</script>
- Module(命名空间,为了防止命名冲突)
- 声明用户模块
export default {
  state: () => ({
    userInfo: {
      name: 'jack',
      age: 20
    }
  }),
  mutations: {
    updateUserInfo (state) {
      console.log(state);
      // 更新用户信息
      state.userInfo = { name: 'rows', age: 30 }
    }
  }
}
- 注册用户模块
// 引入vue
import Vue from 'vue'

// 引入vuex
import Vuex from 'vuex'

// 导入用户模块
import moduleUser from './ModuleUser'

// 使用Vuex
Vue.use(Vuex)

export default new Vuex.Store({
  modules: {
    // user就是用户模块的注册名称
    user: moduleUser
  }
})
- 使用模块数据中的第一种方式
<template>
  <div class='container'>
      <!-- 在template中可以使用this的方式,同时也可以使用$store的方式来访问数据-->
    <p>{{$store.state.user.userInfo.name}}</p>
    <p>{{this.$store.state.user.userInfo.age}}</p>
  </div>
</template>
<script>
export default {
  data () {
    return {}
  }
</script>
<style scoped lang='less'>
</style>
- 使用模块数据中的第二种方式
<template>
  <div class='container'>
  </div>
</template>

<script>
import {mapState } from 'vuex'
export default {
  data () {
    return {}
  },
  computed:{
// 把User模块中的数据,映射为当前组件的计算属性
   ...mapState({
       userinfo: state=> state.user.userinfo
   })
  }
}
</script>
<style scoped lang='less'>
</style>
- 调用模块中Mutation方法的第一种方式
<template>
  <div class='container'>
  <button @click="onBtnClick">点击我,查看updateUserInfo方法</button>
  </div>
</template>

<script>
import { mapMutations } from 'vuex'
export default {
  data () {
    return {}
  }
  methods: {
    // 访问命名空间下的state数据
     // 参数1: 命名空间的名字
    // 参数2: 要映射的方法名字列表(数组或对象)
    ...mapMutations('user', ['updateUserInfo']),
    // 按钮的点击事件处理函数
    onBtnClick () {
      console.log(this.updateUserInfo())
    }
  }
}
</script>
<style scoped lang='less'>
</style>
- 访问命名空间下的action和getter
<template>
  <div class='container'>
  </div>
</template>
<script>
import { mapGetters, mapActions} from 'vuex'
export default {
  data () {
    return {}
  },
  computed: {
    // 把User模块中的数据,映射为当前组件的计算属性
    ...mapActions('user',['userinfo'])
  },
  methods: {
    // 访问命名空间下的state数据
    // 参数1: 命名空间的名字
    // 参数2: 要映射的方法名字列表(数组或对象)
    ...mapGetters('user',['userinfo']),
  }
}
</script>
<style scoped lang='less'>
</style>
10、webpack系列
- 10-1 webpack概述
- webpakc是一个模块化JavaScript的工具,在webpakc里一切文件皆都是模块,通过
Loader转换文件,通过Plugin注入钩子,最后输出由多个模块组合成的文件,Webpack专注于构建模块化项目,
一切文件: JavaScrip,CSS、SCSS、图片、模板,在 Webpack 眼中都是一个个模块,这样的好处是能清晰的描述出各个模块之间的依赖关系,以方便 Webpack 对模块进行组合和打包。 经过 Webpack 的处理,最终会输出浏览器能使用的静态资源
Webpack具有很大的灵活性,,能配置如何处理文件,大致使用如下
- webpakc是一个模块化JavaScript的工具,在webpakc里一切文件皆都是模块,通过
module.exports={
    // 所有的模块如快快快,webpakc从入口开始递归解析出所有依赖的模块
    entry: './app.js'
    output: {
    // 把入口所依赖的所有模块,打包成一个文件bundle.js文件
    filename: 'bundle.js'
	}
}
- webpakc的优点是
- 专注于处理模块化的项目,能做到开箱即用,一步到位
- 通过Plugin扩展,完整好用又不失灵活
- 使用场景不仅限于web
- 庞大的社区,并且活跃度很高,经常引入紧跟时代的的新特新,能为大多数场景找到已有的开源拓展
- 良好的开发体验
- webpack的缺点是
- 只能采用模块化开发的项目
