一、创建rights子分支,并推送到云端
- 1.git branch:查看当前所处分支
- 2.git checkout -b rights:创建rights分支
- 3.git branch
- 4.git push -u origin rights:提交分支
二、通过路由展示权限列表组件
1.components下创建power文件夹,下有Rights.vue组件
<template>
  <div>
    <h1>用户权限列表组件</h1>
  </div>
</template>
<script>
export default {
  data: () => ({})
}
</script>
<style lang="less" scoped>
</style>
2.配置路由
import Rights from '../components/power/Rights.vue'
{
path: '/home',
component: Home,
redirect: '/welcome',
children: [
{
path: '/welcome',
component: Welcome
},
{
path: '/users',
component: Users
},
{
path: '/rights',
component: Rights
}
]
}
三、绘制面包屑导航和卡片视图
<template>
<div>
<el-breadcrumb separator-class="el-icon-arrow-right">
<el-breadcrumb-item :to="{ path: '/home' }">首页</el-breadcrumb-item>
<el-breadcrumb-item>权限管理</el-breadcrumb-item>
<el-breadcrumb-item>权限列表</el-breadcrumb-item>
</el-breadcrumb>
<el-card>111</el-card>
</div>
</template>
<script>
export default {
data: () => ({})
}
</script>
<style lang="less" scoped>
</style>
四、调用api获取权限列表的数据
data: () => ({
rightsList: []
}),
created() {
this.getRightsList()
},
methods: {
async getRightsList() {
const { data: res } = await this.$http.get('rights/list')
if (res.meta.status !== 200) return this.$message.error('获取权限列表失败!')
this.rightsList = res.data
console.log(this.rightsList)
}
}
五、渲染权限列表
<!-- 卡片视图区域 -->
    <el-card>
      <el-table :data="rightsList" border stripe>
        <el-table-column type="index"></el-table-column>
        <el-table-column label="权限名称" prop="authName"></el-table-column>
        <el-table-column label="路径" prop="path"></el-table-column>
        <el-table-column label="权限等级" prop="level">
          <template slot-scope="scope">
            <el-tag v-if="scope.row.level === '0'">一级</el-tag>
            <el-tag type="success" v-else-if="scope.row.level === '1'">二级</el-tag>
            <el-tag type="warning" v-else>三级</el-tag>
          </template>
        </el-table-column>
      </el-table>
    </el-card>
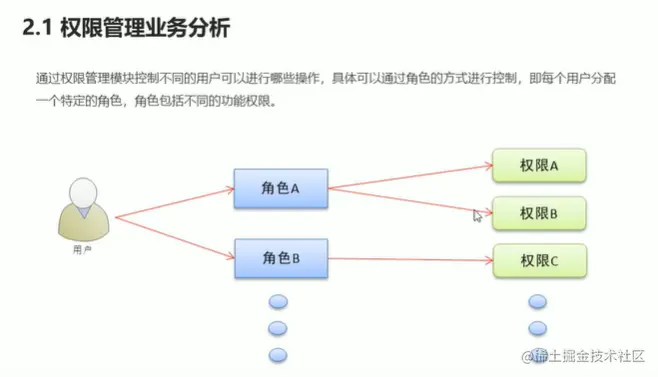
六、用户-角色-权限 三者之间的关系
- 用户分为A和B两种,他们的权限不相同,比如有些用户有修改权限,没有删除权限,有些用户有删除权限而没有修改权限
七、通过路由展示角色列表组件
1.在power下创建Roles.vue组件
<template>
  <div><h1>角色列表组件</h1></div>
</template>
<script>
export default {
  data: () => ({})
}
</script>
<style lang="less" scoped>
</style>
2.配置路由
import Roles from '../components/power/Roles.vue'


  {
    path: '/home',
    component: Home,
    redirect: '/welcome',
    children: [
      {
        path: '/welcome',
        component: Welcome
      },
      {
        path: '/users',
        component: Users
      },
      {
        path: '/rights',
        component: Rights
      },
      {
        path: '/roles',
        component: Roles
      }
    ]
  }
八、绘制角色列表基本布局结构,并获取角色列表数据(同用户列表页面一样的)
<template>
<div>
<el-breadcrumb separator-class="el-icon-arrow-right">
<el-breadcrumb-item :to="{ path: '/home' }">首页</el-breadcrumb-item>
<el-breadcrumb-item>角色管理</el-breadcrumb-item>
<el-breadcrumb-item>角色列表</el-breadcrumb-item>
</el-breadcrumb>
<el-card>
<el-row>
<el-col>
<el-button type="primary">添加角色</el-button>
</el-col>
</el-row>
<el-row>
<el-table></el-table>
</el-row>
</el-card>
</div>
</template>
<script>
export default {
data: () => ({
rolesList: []
}),
created() {
this.getRolesList()
},
methods: {
async getRolesList() {
const { data: res } = await this.$http.get('roles')
if (res.meta.status !== 200) {
return this.$message.error('获取角色列表失败!')
}
this.rolesList = res.data
console.log(this.rolesList)
}
}
}
</script>
<style lang="less" scoped>
</style>
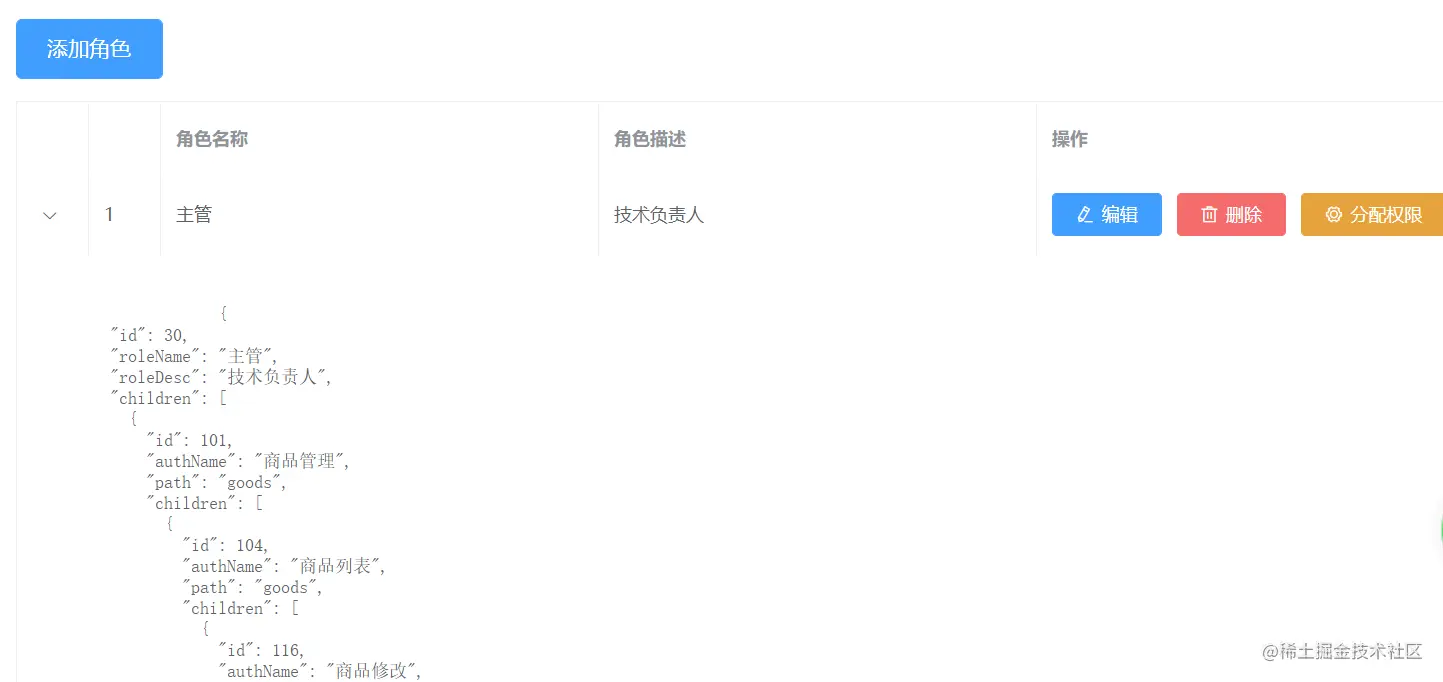
九、渲染角色列表数据
<!-- 角色列表区域 -->
<el-table :data="rolesList" border stripe>
<el-table-column type="expand"></el-table-column>
<el-table-column type="index"></el-table-column>
<el-table-column label="角色名称" prop="roleName"></el-table-column>
<el-table-column label="角色描述" prop="roleDesc"></el-table-column>
<el-table-column label="操作" width="300px">
<template>
<el-button size="mini" type="primary" icon="el-icon-edit">编辑</el-button>
<el-button size="mini" type="danger" icon="el-icon-delete">删除</el-button>
<el-button size="mini" type="warning" icon="el-icon-setting">分配权限</el-button>
</template>
</el-table-column>
</el-table>
十、渲染权限
- 获取到每一行的权限数据,标签可以使数据格式化,美观,但是权限是分级别的,需要再细分。
<!-- 展开列 -->
        <el-table-column type="expand">
          <template slot-scope="scope">
            <pre>
                {{ scope.row }}
              </pre>
          </template>
        </el-table-column>
1.通过第一层for循环渲染一级权限
<!-- 展开列 -->
<el-table-column type="expand">
<template slot-scope="scope">
<el-row v-for="(item1) in scope.row.children" :key="item1.id">
<el-col :span="5">
<el-tag>
{{ item1.authName }}
</el-tag>
</el-col>
<el-col :span="19"></el-col>
</el-row>
<pre>
{{ scope.row }}
</pre
>
</template>
</el-table-column>
2.第二层for循环、第三层for循环渲染二级、三级权限
<!-- 渲染二级、三级权限 -->
<el-col :span="19">
<el-row
:class="[i2 === 0 ? '' : 'rolesTop','vcenter']"
v-for="(item2, i2) in item1.children"
:key="item2.id"
>
<el-col :span="6">
<el-tag type="success">{{ item2.authName }}</el-tag>
<i class="el-icon-caret-right"></i>
</el-col>
<el-col :span="18">
<el-tag type="warning" v-for="item3 in item2.children" :key="item3.id">{{
item3.authName
}}</el-tag>
</el-col>
</el-row>
</el-col>
十一、完成根据id删除角色下指定权限的功能
1.给el-tag组件添加closable属性(显示一个×)
2.给el-tag组件添加关闭事件(close:关闭 Tag 时触发的事件)
<!-- 展开列 -->
        <el-table-column type="expand">
          <template slot-scope="scope">
            <el-row
              :class="['rolesBottom', i1 === 0 ? 'rolesTop' : '', 'vcenter']"
              v-for="(item1, i1) in scope.row.children"
              :key="item1.id"
            >
              <!-- 渲染一级权限 -->
              <el-col :span="5">
                <el-tag closable @close="removeRightById(scope.row, item1.id)">
                  {{ item1.authName }}
                </el-tag>
                <i class="el-icon-caret-right"></i>
              </el-col>
              <!-- 渲染二级、三级权限 -->
              <el-col :span="19">
                <!-- 通过for循环 嵌套渲染二级权限 -->
                <el-row
                  :class="[i2 === 0 ? '' : 'rolesTop', 'vcenter']"
                  v-for="(item2, i2) in item1.children"
                  :key="item2.id"
                >
                  <el-col :span="6">
                    <el-tag
                      type="success"
                      closable
                      @close="removeRightById(scope.row, item2.id)"
                      >{{ item2.authName }}</el-tag
                    >
                    <i class="el-icon-caret-right"></i>
                  </el-col>
                  <el-col :span="18">
                    <el-tag
                      type="warning"
                      v-for="item3 in item2.children"
                      :key="item3.id"
                      closable
                      @close="removeRightById(scope.row, item3.id)"
                      >{{ item3.authName }}</el-tag
                    >
                  </el-col>
                </el-row>
              </el-col>
            </el-row>
            <!-- <pre>
                {{ scope.row }}
              </pre> -->
          </template>
        </el-table-column>
async removeRightById(role, rightId) {
const confirmResult = await this.$confirm('此操作将永久删除该文件, 是否继续?', '提示', {
confirmButtonText: '确定',
cancelButtonText: '取消',
type: 'warning'
}).catch(err => err)
if (confirmResult !== 'confirm') {
return this.$message.info('取消了删除!')
}
const { data: res } = await this.$http.delete(`roles/${role.id}/rights/${rightId}`)
if (res.meta.status !== 200) {
return this.$message.error('删除权限失败')
}
role.children = res.data
}
十二、弹出分配权限对话框,并获取对话框数据
<el-button
              size="mini"
              type="warning"
              icon="el-icon-setting"
              @click="showSetRightDialog"
              >分配权限</el-button
            >


<!-- 分配权限弹框 -->
    <el-dialog title="分配权限" :visible.sync="showSetRightDialogVisible">
      <el-table>
        <el-table-column
          property="date"
          label="日期"
          width="150"
        ></el-table-column>
        <el-table-column
          property="name"
          label="姓名"
          width="200"
        ></el-table-column>
        <el-table-column property="address" label="地址"></el-table-column>
      </el-table>
    </el-dialog>
data: () => ({
rolesList: [],
showSetRightDialogVisible: false,
rightsList: []
}),
async showSetRightDialog() {
const { data: res } = await this.$http.get('rights/tree')
if (res.meta.status !== 200) {
return this.$message.error('获取权限列表tree失败!')
}
this.rightsList = res.data
console.log(this.rightsList)
this.showSetRightDialogVisible = true
}
十三、初步配置并使用el-tree树形控件
1.引入树形控件
<!-- 分配权限弹框 -->
<el-dialog title="分配权限" :visible.sync="showSetRightDialogVisible">
<el-tree
:data="rightsList"
:props="treeProps"
></el-tree>
</el-dialog>
2.将el-tree中的data属性绑定权限数据,props属性在data中定义绑定对象
data: () => ({
rolesList: [],
showSetRightDialogVisible: false,
rightsList: [],
treeProps: {
label: 'authName',
children: 'children'
}
}),
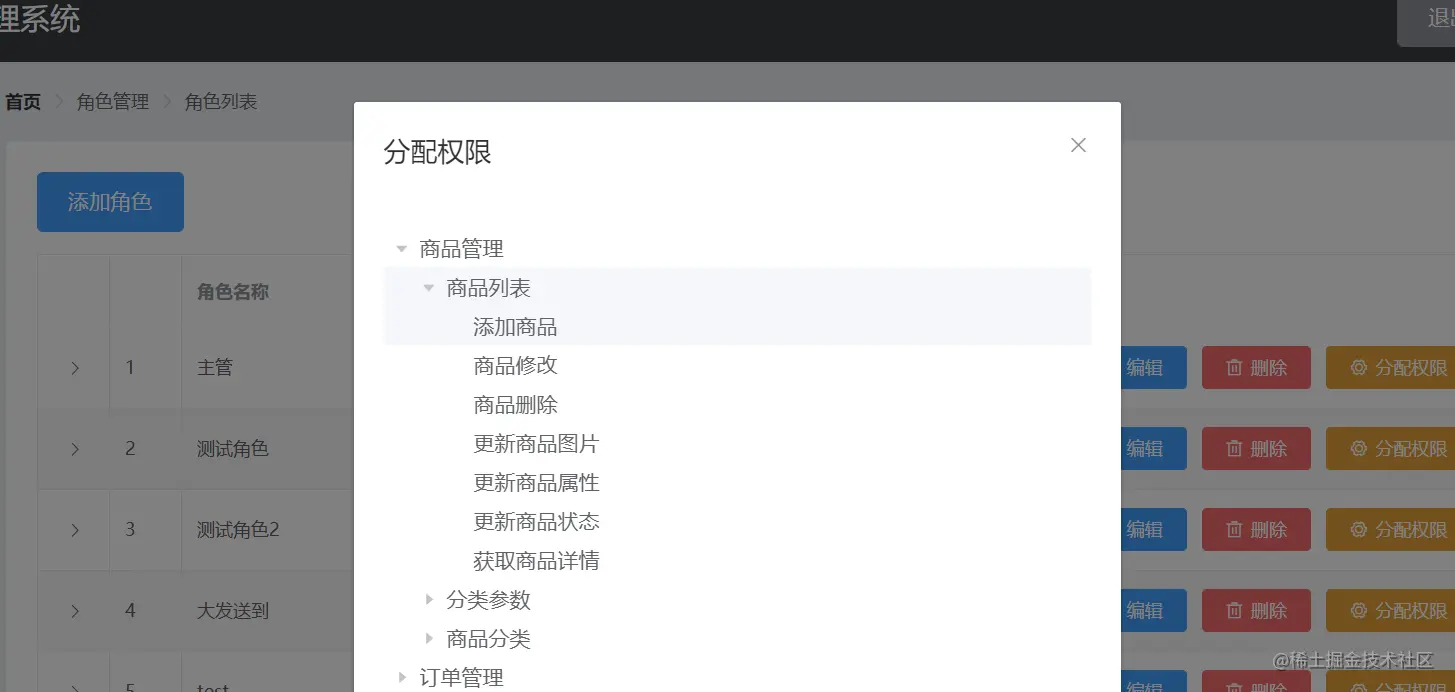
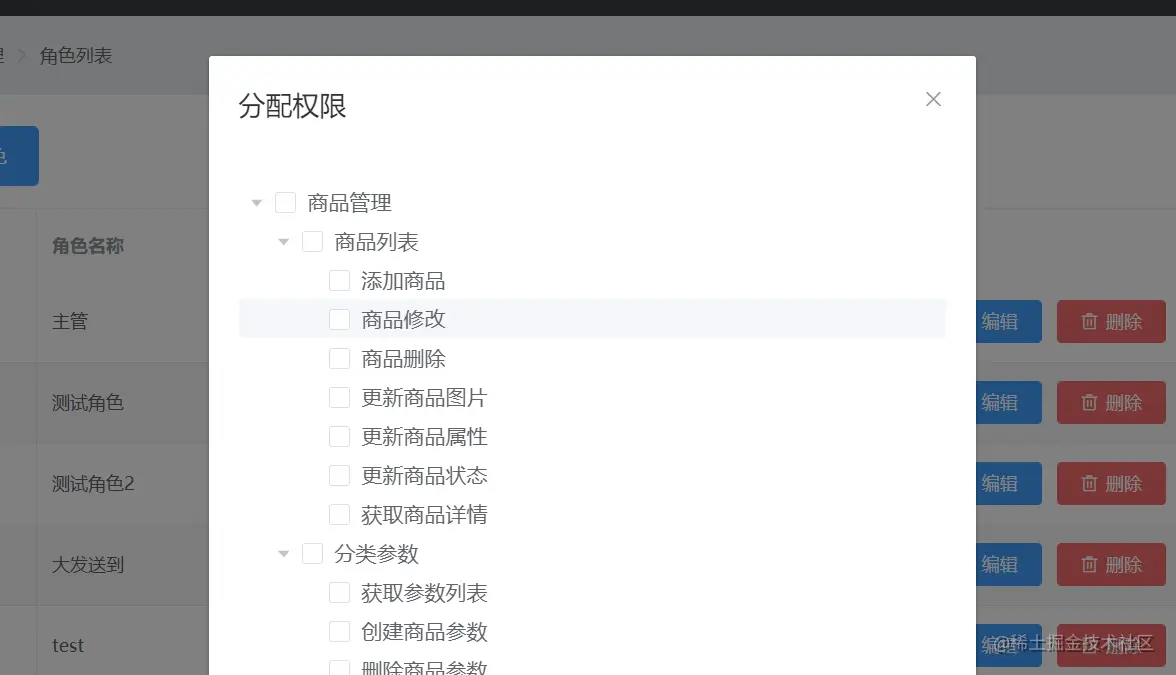
3.优化树形控件的显示效果
- show-checkbox:复选框
- node-key="id":每个树节点用来作为唯一标识的属性,整棵树应该是唯一的
- default-expand-all:是否默认展开所有节点
<el-tree
        :data="rightsList"
        :props="treeProps"
        show-checkbox
        node-key="id"
        default-expand-all
      ></el-tree>
十四、加载当前角色已有的权限
1.给el-tree添加default-checked-keys属性(默认展开的节点的 key 的数组)
<el-tree
        :data="rightsList"
        :props="treeProps"
        show-checkbox
        node-key="id"
        default-expand-all
        default-checked-keys="defkeys"
      ></el-tree>
data: () => ({
rolesList: [],
showSetRightDialogVisible: false,
rightsList: [],
treeProps: {
label: 'authName',
children: 'children'
},
defkeys: []
}),
2. 通过递归的形式,获取角色下所有三级权限的id,并保存到defkeys数组中
async showSetRightDialog(role) {
const { data: res } = await this.$http.get('rights/tree')
if (res.meta.status !== 200) {
return this.$message.error('获取权限列表tree失败!')
}
this.rightsList = res.data
this.getLeafKeys(role, this.defkeys)
this.showSetRightDialogVisible = true
},
getLeafKeys(node, arr) {
if (!node.children) {
return arr.push(node.id)
}
node.children.forEach(item => {
this.getLeafKeys(item, arr)
})
},
十五、(解决bug)在关闭权限对话框时重置defkeys数组,这样就不会使后面点开的对话框拥有前面对话框的选中内容了
1.给对话框添加关闭事件
<!-- 分配权限弹框 -->
    <el-dialog
      title="分配权限"
      :visible.sync="showSetRightDialogVisible"
      width="50%"
      @close="setRightDialogClose"
    >
2.实现该关闭事件
setRightDialogClose() {
this.defkeys = []
}
十六、调用API完成分配权限的功能
1.在点击分配权限按钮时就将该角色的id保存到data中,供后面使用
data: () => ({
rolesList: [],
showSetRightDialogVisible: false,
rightsList: [],
treeProps: {
label: 'authName',
children: 'children'
},
defkeys: [],
roleId: ''
}),
async showSetRightDialog(role) {
this.roleId = role.id
const { data: res } = await this.$http.get('rights/tree')
if (res.meta.status !== 200) {
return this.$message.error('获取权限列表tree失败!')
}
this.rightsList = res.data
this.getLeafKeys(role, this.defkeys)
this.showSetRightDialogVisible = true
},
2.在点击确定按钮时,获取到整个树形结构中的半选和全选状态的id值,将它们合并成一个完整的数组
- getCheckedKeys: 若节点可被选择(即 show-checkbox 为 true),则返回目前被选中的节点的 key 所组成的数组
- getHalfCheckedKeys: 若节点可被选择(即 show-checkbox 为 true),则返回目前半选中的节点的 key 所组成的数组
- 1.给确定按钮添加点击事件,并给el-tree组件添加ref
<!-- 分配权限弹框 -->
<el-dialog
title="分配权限"
:visible.sync="showSetRightDialogVisible"
width="50%"
@close="setRightDialogClose"
>
<el-tree
:data="rightsList"
:props="treeProps"
show-checkbox
node-key="id"
default-expand-all
:default-checked-keys="defkeys"
ref="treeRef"
></el-tree>
<span slot="footer" class="dialog-footer">
<el-button @click="showSetRightDialogVisible = false">取 消</el-button>
<el-button type="primary" @click="allotRights">确 定</el-button>
</span>
</el-dialog>
async allotRights() {
const keys = [
...this.$refs.treeRef.getCheckedKeys(),
...this.$refs.treeRef.getHalfCheckedKeys()
]
}
3.把得到的数组做一次字符串拼接,用英文的逗号隔开
async allotRights() {
const keys = [
...this.$refs.treeRef.getCheckedKeys(),
...this.$refs.treeRef.getHalfCheckedKeys()
]
const idStr = keys.join(',')
}
4.发起请求,把之前1中保存的角色id,和拼接的新字符串发送到服务器端
async allotRights() {
const keys = [
...this.$refs.treeRef.getCheckedKeys(),
...this.$refs.treeRef.getHalfCheckedKeys()
]
const idStr = keys.join(',')
const { data: res } = await this.$http.post(`roles/${this.roleId}/rights`, { rids: idStr })
console.log(res)
if (res.meta.status !== 200) {
return this.$message.error('分配权限失败!')
}
this.$message.success('分配权限成功!')
}
5.刷新角色列表
async allotRights() {
const keys = [
...this.$refs.treeRef.getCheckedKeys(),
...this.$refs.treeRef.getHalfCheckedKeys()
]
const idStr = keys.join(',')
const { data: res } = await this.$http.post(`roles/${this.roleId}/rights`, { rids: idStr })
console.log(res)
if (res.meta.status !== 200) {
return this.$message.error('分配权限失败!')
}
this.$message.success('分配权限成功!')
this.getRolesList()
}
6.关闭对话框
async allotRights() {
const keys = [
...this.$refs.treeRef.getCheckedKeys(),
...this.$refs.treeRef.getHalfCheckedKeys()
]
const idStr = keys.join(',')
const { data: res } = await this.$http.post(`roles/${this.roleId}/rights`, { rids: idStr })
console.log(res)
if (res.meta.status !== 200) {
return this.$message.error('分配权限失败!')
}
this.$message.success('分配权限成功!')
this.getRolesList()
this.showSetRightDialogVisible = false
}
十七、完成对用户的角色分配(写到了用户列表的实现的笔记中,但是现实的代码是在rights分支中的,此处不再说)
十八、提交代码
-
- 查看当前分支git branch
-
- 查看当前状态git status
-
- git add .
-
- git commit -m '完成权限功能的开发'
-
- git status
-
- git push提交rights分支
-
- git checkout master
-
- git merge rights在主分支中合并rights分支
-
- git push更新主分支


