

在这篇文章里,我们创建一个小的RSS阅读器。当我们完成这整个过程,我们将学会如何使用最基本的控件来展示内容,并使用不同的布局。
\
特别提醒:在模拟器中参阅文章"怎么在Ubuntu手机中打开开发者模式"打开开发者模式,这样才可以把应用部署到模拟器中。
\
让我们开始吧!
1)创建一个最基本的应用框架
首先,我们来打开自己的Qt Creator来创建一个名叫“developernews”的项目。我们使用"App with Simple UI"模版。
\
在这里注意maintainer的格式。如果有红色的错误显示,查看一下在“ < ”的左边有没有留有一个空格。如果你还没有安装好自己的SDK的话,请参照文章“Ubuntu SDK 安装”来完成自己的安装。我们可以直接运行已经创建好的应用。为了显示的更像一个是一个手机的界面,我们直接把“main.qml"中的尺寸设置如下:
    width: units.gu(50)
    height: units.gu(75)
\
分辨率无关:
Ubuntu的用户界面工具包的重要功能是把用户定义多个设备尺寸进行匹配。采取的方法是定义一个新的单元类型,网格单元(简写为gu)。网格单位转换为像素值取决于应用程序运行在屏幕上和设备的类型。下面是一些例子:\
| Device | Conversion |
|---|---|
| Most laptops | 1 gu = 8 px |
| Retina laptops | 1 gu = 16 px |
| Smart phones | 1 gu = 18 px |
更多的关于分辨率无关的知识可以在 链接找到。
我们可以点击SDK屏幕左下方的绿色的运行按钮,或使用热键(Ctrl + R),运行应用。 如下图所示:
\
最原始的应用其实没有什么。你可以按一下按钮改变方框中的文字。下面我们来开始设计我们的应用。
2)删除我们不需要的代码
\
由于最初的代码其实对我们来书没有多大的用处。我们现在来修改我们的代码:
\
1)删除在"main.qml"中不需要的代码,以使得代码如下图所示:
\
\
\
2)修改page中的title使之成为"Developer News"。
\
我们重新运行程序,我们将看到没有任何内容的应用
\
\
\
3)加入一个PageStack
PageStack可以使得我们让一个Page推到另外一个page之上。他可以跟踪这些页面的变化,并自动提供一个" back"的按钮可以让我回到以前的页面。
\
首先,我们在项目的根目录下创建一个如下的“components”目录:
\
\
\
现在我们来使用PageStack来重新设计我们的应用。把整个在"main.qml"中的的Page代码换成如下的代码:
\
import QtQuick 2.0
import Ubuntu.Components 1.1

MainView {
    // objectName for functional testing purposes (autopilot-qt5)
    objectName: "mainView"

    // Note! applicationName needs to match the "name" field of the click manifest
    applicationName: "com.ubuntu.developer.liu-xiao-guo.developernews"

    /*
     This property enables the application to change orientation
     when the device is rotated. The default is false.
    */
    //automaticOrientation: true

    width: units.gu(50)
    height: units.gu(75)

    PageStack {
        id: pageStack
        anchors.fill: parent
        Component.onCompleted: {
            console.log('pagestack created')
            pageStack.push(listPage)
        }

        Page {
            id: listPage
            title: i18n.tr("Articles")
            visile: false
         }
    }
}
\
\
这里,我们可以看到每个component在被装载完成之后,有一个event事件onCompleted被调用。我们可以用这个方法来初始化我们的一下需要处理的事情。这里,我们把listPage压入堆栈尽管没有任何东西。
\
这时如果我们重新运行程序,我们会发现界面没有任何新的变化。这是因为我们的page中没有任何的数据。我们在“Application Output”窗口会发现如下的输出:
pagestack created
这说明我们的代码是成功运行的。
\
4)加入我们自己的控件
我们将加入一个新的QML控件。这个控件的名称叫做“ArticleListView"。它将被定义在一个叫做"ArticleListView.qml"的文件中。控件的名字通常是以大写字母开始的。
\
首先我们在项目的目录下创建一个叫做“components”(按照如下的任何一种方法即可)的目录:
\
\
\
\
\
\
\
\
我们点击项目的右键,加入一个名字叫做“ArticleListView.qml”文件。并把文件放入"components"的目录之中。在默认的情况下,"ArticeListView.qml"除了定义一个方框外,没有任何其他的东西。我们接下来向其中添加我们所需要的内容。
\
4)定义ArticleListView
我们将用UbuntuListView来显示来自 developer.ubuntu.com的RSS 条目。UbuntuListView是继承于Qt中的ListView。但是它加入了一些新的一些feature。比如说pull-to-refresh。它也可以很方便地来搜索文字。下面我们来详细介绍如何做:
\
1)把"ArticleListView.qml"中的代码换成如下的代码:
\
import QtQuick 2.0
import QtQuick.XmlListModel 2.0
import Ubuntu.Components 1.1
import Ubuntu.Components.ListItems 1.0

UbuntuListView {
   id: listView
   property alias status: rssModel.status

   model: XmlListModel {
       id: rssModel
       source: "https://developer.ubuntu.com/en/blog/feeds/"
       query: "/rss/channel/item"
       XmlRole { name: "title"; query: "title/string()" }
       XmlRole { name: "published"; query: "pubDate/string()" }
       XmlRole { name: "content"; query: "description/string()" }
   }

   delegate: Subtitled {
       text: published
       subText: { return "<b>" + title + "</b>"; }

       progression: true
   }

   // Define a highlight with customized movement between items.
    Component {
        id: highlightBar
        Rectangle {
            width: 200; height: 50
            color: "#FFFF88"
            y: listView.currentItem.y;
            Behavior on y { SpringAnimation { spring: 2; damping: 0.1 } }
        }
    }

   focus: true
   highlight: highlightBar

   Scrollbar {
       flickableItem: listView
   }
}
\
\
\
\
这里我们使用了一个 UbuntuListView,它继承于QML中的 ListView。它需要一个model来提供数据来显示。这个Model数据可以由QML中的 ListModel或 XmlListModel提供。“ delegate”是用来展示列表中每一项如何显示的。这里我们使用了Ubuntu给我们已经提供好的一个delegate “ Ubuntu.Components.ListItems.Subtitled”来显示我们ListView中的项。这个delegate可以帮我们显示行文字。它也可以是另外一个单独的自己定义的Compent来完成。这个可以留个我们自己做练习完成。“ highlight”是用来显示当前选中项如何被显示的。这里我们使用了一个黄色的框来显示当前的项。
\
这里你们可以看到我们定义了一个alias status的属性。对很多初学者来说,可能并不好理解。你可以理解为C语言中的指针虽然并不那么确切。它实际上就是把一个component中的其他item中的属性暴露出来以使得该属性在这个component(比如UbuntuListView)被引用时可以被修改或被引用。
\
你的第一个挑战。在XmlListModel中我们必须定义我们所需要的feed。对developer.ubuntu.com的RSS的地址是 developer.ubuntu.com/feed/。为了能够在我们的应用中使用它,我们必须在我们的例程中定义它。具体的property,请参考 API documentation of XmlListModel。tips:大家可以查看" source"属性。我们在浏览器中输入地址 developer.ubuntu.com/feed,我们可以看到如下的内容
\
\
\
\
对于有些开发者来说,如果你的电脑不能上网的话。如果你的电脑可以上网的话,请忽略下面的步骤,直接做下一节的练习。 “XmlListModel”中将不会有任何的数据。我们可以通过如下的方式来创建一个假想的数据。在自己的components目录下创建一个叫做Model.qml的文件。其内容如下:
\
import QtQuick 2.0

ListModel {

    ListElement {
        title: "This is a beautiful night!"
        published: "Fri, 05 Dec 2014 15:04:00 +0000"
        content: "This is a beautiful night!"
    }
    ListElement {
        title: "We miss the days we were together"
        published: "Fri, 05 Dec 2014 15:04:00 +0000"
        content: "We miss the days we were together"
    }
    ListElement {
        title: "This the most wonderful thing I've had"
        published: "Fri, 05 Dec 2014 15:04:00 +0000"
        content: "This is a good thing I like"
    }
    ListElement {
        title: "This is the city I like"
        published: "Fri, 05 Dec 2014 15:04:00 +0000"
        content: "This is the most beautiful city I've ever visited!"
    }
    ListElement {
        title: "I enjoy the training very much"
        published: "Fri, 05 Dec 2014 15:04:00 +0000"
        content: "This is so nice!"
    }
    ListElement {
        title: "I enjoy the training very much"
        published: "Fri, 05 Dec 2014 15:04:00 +0000"
        content: "This is so nice!"
    }
    ListElement {
        title: "I enjoy the training very much"
        published: "Fri, 05 Dec 2014 15:04:00 +0000"
        content: "This is so nice!"
    }
    ListElement {
        title: "I enjoy the training very much"
        published: "Fri, 05 Dec 2014 15:04:00 +0000"
        content: "This is so nice!"
    }
    ListElement {
        title: "I enjoy the training very much"
        published: "Fri, 05 Dec 2014 15:04:00 +0000"
        content: "This is so nice!"
    }
    ListElement {
        title: "I enjoy the training very much"
        published: "Fri, 05 Dec 2014 15:04:00 +0000"
        content: "This is so nice!"
    }
    ListElement {
        title: "I enjoy the training very much"
        published: "Fri, 05 Dec 2014 15:04:00 +0000"
        content: "This is so nice!"
    }
    ListElement {
        title: "I enjoy the training very much"
        published: "Fri, 05 Dec 2014 15:04:00 +0000"
        content: "This is so nice!"
    }
    ListElement {
        title: "I enjoy the training very much"
        published: "Fri, 05 Dec 2014 15:04:00 +0000"
        content: "This is so nice!"
    }
    ListElement {
        title: "I enjoy the training very much"
        published: "Fri, 05 Dec 2014 15:04:00 +0000"
        content: "This is so nice!"
    }
    ListElement {
        title: "I enjoy the training very much"
        published: "Fri, 05 Dec 2014 15:04:00 +0000"
        content: "This is so nice!"
    }
    ListElement {
        title: "I enjoy the training very much"
        published: "Fri, 05 Dec 2014 15:04:00 +0000"
        content: "This is so nice!"
    }
}
\
这里,我们定义了这个ListModel的“id”为“mymodel”。我们可以在UbuntuListView中直接使用这个model:
\
    UbuntuListView {
        id: listView
      ...
        model: Model {}

        ...
    }
通过这样的方法,我们可以使得我们的练习可以做下去。对于可以链接网路的同学们来说,不需要做这个步骤。大家可以参考源码:
\
\
5)使用ArticleListView
我们在上节中已经设计了一个自己的component。在这节中,我们来使用它,就像原本我们已有的其他的控件一样。我们把我们设计好的ArticleListView放到我们已经设计好的“main.qml”中来。在你的main.qml中的“listPage”中加入如下的Page:
\
           ArticleListView {
               id: articleList
               objectName: "articleList"
               anchors.fill: parent
               clip: true
           }
\
另外也别忘了在“main.qml”中的开始部分加入如下的句子:
\
import "components"
\
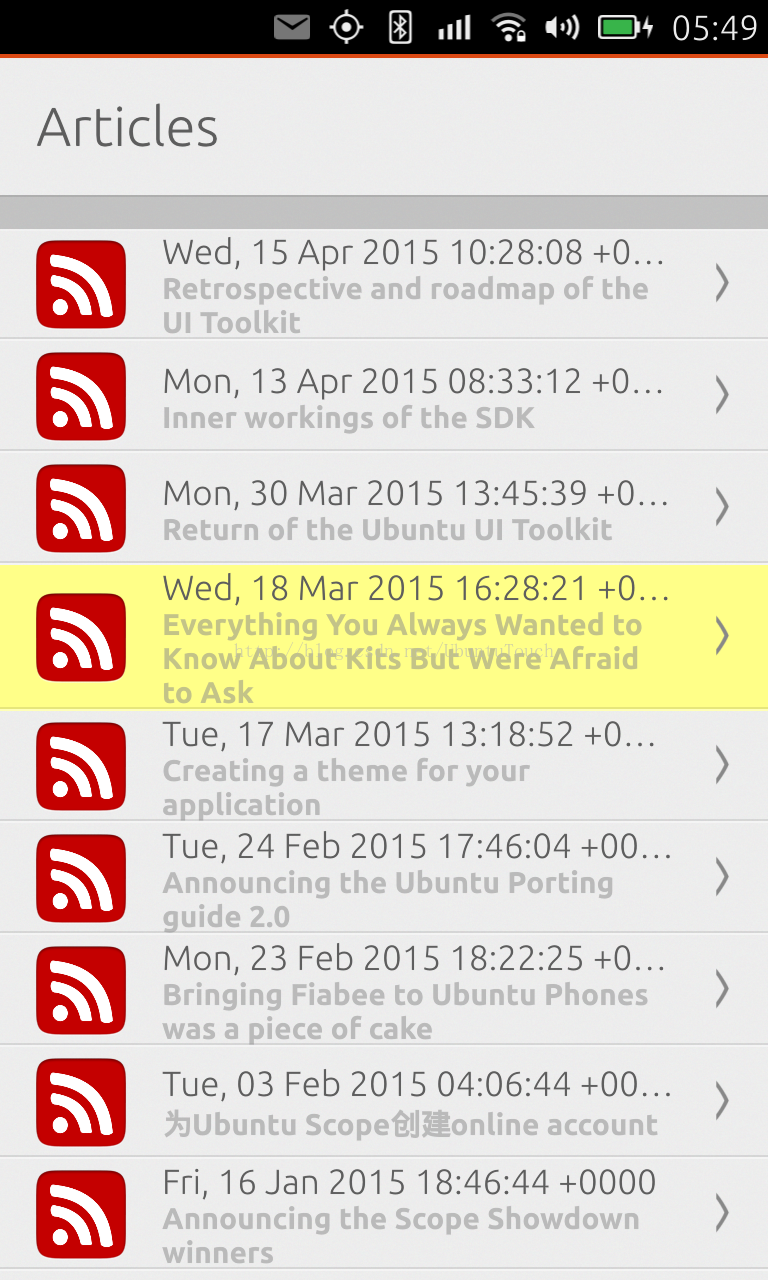
重新运行我们的应用。我们可以看到我们几乎快成功了。我们可以看到来自developer.ubuntu.com的文章列表了。如果你还没有看到这个运行的结果。请查看一下你的XmlListModel中的source是否已经设置正确。\
\
\
\
6)创建一个新的Component
就像上面我们创建的ArticleListView一样,我们来创建一个新的ArticleContent的component。该component的文件名字叫做"ArticleContent.qml"。文件位于和ArticleListView一样的路经(components)。下面我们来向这个新创建的component中加入我们所需要的内容。打开文件"component/ArticleContent.qml",并输入如下的代码:
\
import QtQuick 2.0
import Ubuntu.Components 1.1

Item {
   property alias text: content.text

   Flickable {
       id: flickableContent
       anchors.fill: parent

       Text {
           id: content
           textFormat: Text.RichText
           wrapMode: Text.WordWrap
           width: parent.width
       }

       contentWidth: parent.width
       contentHeight: content.height
       clip: true
   }


   Scrollbar {
       flickableItem: flickableContent
   }
}
\
\
在这里我们可以看到,我们创建了一个最基本的继承于Item的component。这里我们使用了 Flickable控件。Flickable可以使得我们在一个小的控件中放入一个大的控件。用户可以通过手势“Flick”或“Scroll”来移动里面的控件。。另外我们使用的一个控件是Text,我们可以在 Text网址找到更多关于Text的一些属性以更好地使用它。
\
\
\
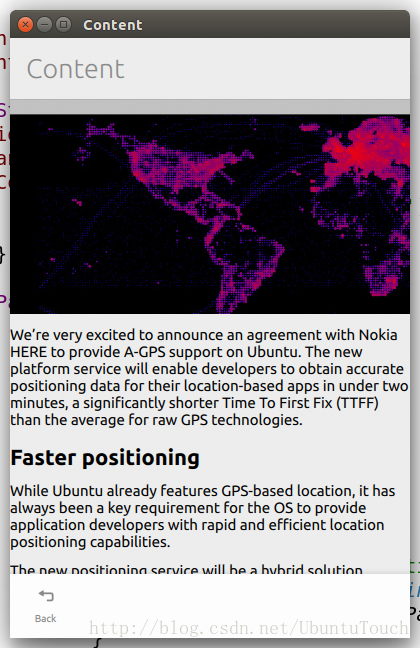
7)把ArticleContent和app的其它内容连起来
\
到目前为止,我们已经创建了一个ArticleContent的控件。我们可以在我们的应用中使用它。每当一个在ArticleListView中的一个item被点击后,我们可以用它来显示详细的内容。
\
首先,我们必须在ArticleListView中每个item被点击时生成一个signal,并把这个signal连接到我们需要产生的动作。我们可以定义一个名叫"clicked"的signal。
\
1)打开"ArticleListView.qml"文件,并定义如下的signal:
\
signal clicked(var instance)
2) 在“Subtitled"项加入如下的代码:
\
| ```javascript onClicked: listView.clicked(model)
| ---------------------------------------------------- | ---------------------------------------------------------------------------------------------------------------------------------------------------------------------------------------- |
\
\
3)使用我们已经创建好的ArticleContent控件。我们在"main.qml"文件中创建一个新的Page,并使用PageStack。
\
| ```javascript
PageStack { id: pageStack anchors.fill: parent Component.onCompleted: { console.log('pagestack created') pageStack.push(listPage) } Page { id: listPage title: i18n.tr("Articles") visile:false ArticleListView { id: articleList objectName: "articleList" anchors.fill: parent clip:true onClicked: { console.log('[flat] article clicked: '+instance.title) articleContent.text = instance.content pageStack.push(contentPage) } } } Page { id: contentPage title: i18n.tr("Content") visile:false ArticleContent { id: articleContent objectName: "articleContent" anchors.fill: parent } } }
``` |  |
| ----------------------------------------------------------------------------------------------------------------------------------------------------------------------------------------------------------------------------------------------------------------------------------------------------------------------------------------------------------------------------------------------------------------------------------------------------------------------------------------------------------------------------------------------------------------------------------------------------------------------------------------------------------------------------------------------------------------------------------------------------------------------------------------------------------------------------------------------------------------------------------------------------------------------------------------------------------------------------------------------------------------------------------------------------------- | ---------------------------------------------------------------------------------------------------------------------------------------------------------------------------------------- |
\
\
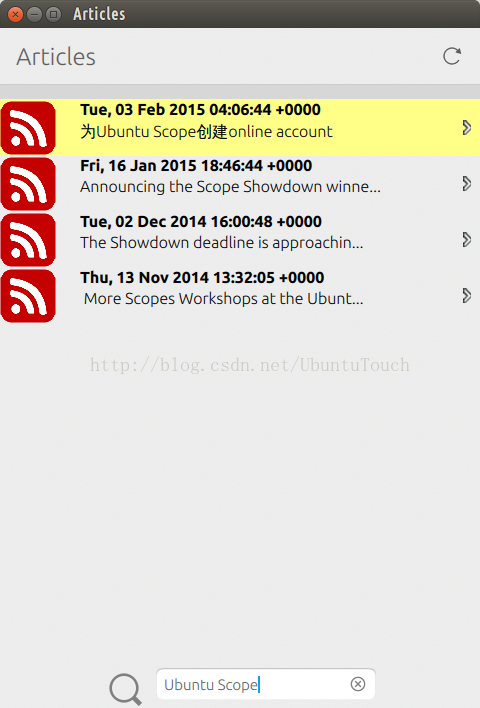
我们这时运行程序,可以看到如下的图片。我们可以点击在主界面中的item,并查看具体的内容:
\
 \
\
至此我们已经完成了第一个阶段的代码。整个程序的代码可以在如下的网址看到。
\
bzr branch lp:\~liu-xiao-guo/debiantrial/developernews1\
\
# 8)添加一个reload按钮
\
在这里,我们想添加一个“reload"的按钮,这样我们可以随时查看最新的在developer.ubuntu.com的内容。这里我们来定义一个"reload"方法以使得它能在“main.qml"文件中被调用。它的作用是使得XmlListModel中的refresh方法被调用。
\
1)打开"components/ArticleListView\.qml"文件,加入如下的方法到UbuntuListView中去:
\
```javascript
/*
Functions can be added to any Component definition, and can be called on
using any instance of that Component. Here we will define a 'reload'
function that we can call from our main application file that will cause
the interal XmlListModel to reload it's content
*/
function reload() {
console.log('reloading')
rssModel.update()
}
挑战自己:请查看 XmlListModel。你将发现上面的"update()"方法其实不是真正的方法。请找出正确的方法替换它。
\
2)在MainView的定义中加入如下的Action
\
| ```javascript Action { id: reloadAction text: "Reload" iconName: "reload" onTriggered: articleList.reload() }
| --------------------------------------------------------------------------------------------------------------------------------------------------- | -------------------------------------------------------- |
\
3\) 在"listPage"中,加入如下的ToolbarButton。
\
| ```javascript
tools: ToolbarItems { ToolbarButton { action: reloadAction } }
``` | 在article的contengPage,我们想显示一个toolbar按钮 在browser中打开该文章。因为我们已经定义好了一个 可以重复使用的的Action,我们只需要引用它的即可 |
| -------------------------------------------------------------------------------------------------------------------------------------------- | -------------------------------------------------------------------------------------------- |
\
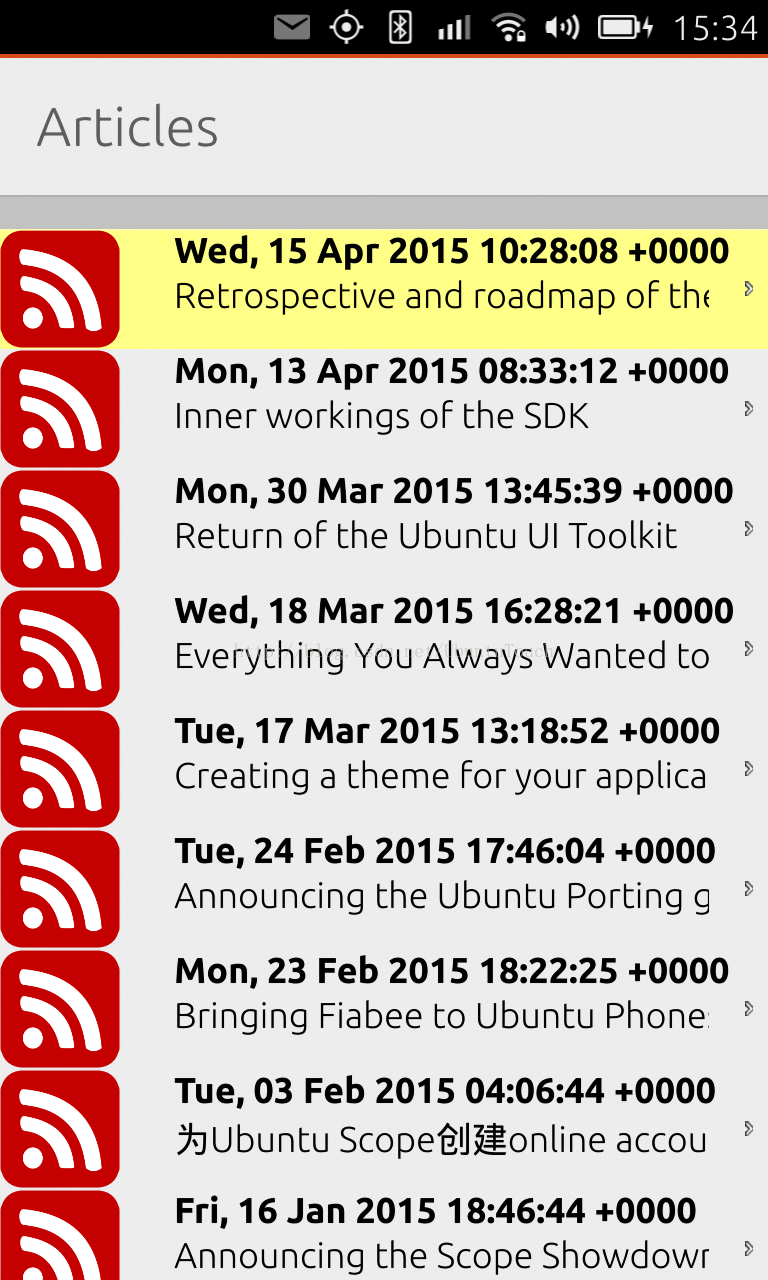
重新运行应用,我们可以看到如下的画面。你们可以尝试点击" **reload**"看看有什么反应。
\
\
\
\
当然我们也可以使用 [UbuntuListView](https://developer.ubuntu.com/api/qml/sdk-14.10/Ubuntu.Components.UbuntuListView/)中的“PullToRefresh”功能实现这个功能。整个项目的源码在如下的地址可以找到:
\
bzr branch lp:\~liu-xiao-guo/debiantrial/developernews2\
\
# 9)挑战自己
a) 如何实现在列表的左边加入自己定制的一个图片:
\
\
\
b) 实现一个自己的delegate Component来用自己喜欢的格式来展示列表的内容:
\
\
\
c) 通过加入一个输入框,并可以搜索相匹配的rss内容,并在ListView中显示出来
\
\
 \
\
[代码](https://gitcafe.com/ubuntu/rssreader_new)。
\
d) **终结挑战 1**:彻底换掉练习中所使用的RSS feed,我们使用一个新的RSS feed:
\
<http://my.poco.cn/rss_gen/poco_rss_channel.photo.php?sub_icon=figure>\
\
使用如下的方式来访问数据:
\
```html
ListModel {
id: model
}
\
    XmlListModel {
        id: picoRssModel
        source: "http://my.poco.cn/rss_gen/poco_rss_channel.photo.php?sub_icon=figure"
        query: "/rss/channel/item[child::enclosure]"

        onStatusChanged: {
            if (status === XmlListModel.Ready) {
                for (var i = 0; i < count; i++) {
//                    console.log("title: " + get(i).title);
//                    console.log("published: " + get(i).published );
//                    console.log("image: " + get(i).image);

                    var title = get(i).title.toLowerCase();
                    var published = get(i).published.toLowerCase();
                    var content = get(i).content.toLowerCase();
                    var word = input.text.toLowerCase();

                    if ( (title !== undefined && title.indexOf( word) > -1 )  ||
                         (published !== undefined && published.indexOf( word ) > -1) ||
                         (content !== undefined && content.indexOf( word ) > -1) ) {

                        model.append({"title": get(i).title,
                                         "published": get(i).published,
                                         "content": get(i).content,
                                         "image": get(i).image
                                     })
                    }
                }
            }
        }

        XmlRole { name: "title"; query: "title/string()" }
        XmlRole { name: "published"; query: "pubDate/string()" }
        XmlRole { name: "content"; query: "description/string()" }
        XmlRole { name: "image"; query: "enclosure/@url/string()" }
    }
\
写出自己的PicoDelegate.qml来完成如下的用户界面:
\
\
\
在我们的ListView中使用picoRssModel所产生的数据来填充我们的ListView。
\
e) 终极挑战2: 还是利用上面的Pico RSS feed,修改我们的ListView为GridView:
\
    GridView {
        id: gridview
        width: parent.width
        height: parent.height - inputcontainer.height
        clip: true
        cellWidth: parent.width/2
        cellHeight: cellWidth + units.gu(1)
        x: units.gu(1.2)
        model: model

        delegate: GridDelegate {}

        Scrollbar {
            flickableItem: gridview
        }
    }
\
编写自己的GridDelegate.qml来实现不同的展示。我们还是使用同样的model,只是不同的展示。
\
\
\
10)玩一玩应用的一些属性
虽然目前我们的应用已经完成了我们大部分的所需要的功能。在这里,我们来尝试修改应用的一些属性来看看有什么一些变化。
\
1)定义应用MainView的id以使得我们在下面的章节中被引用
\
id: mainView
2)在 MainView中找到相应的一些属性来尝试修改看看应用有什么变化。尝试改变boolean值来看看应用有那些变化。
\
3)我们尝试改变如下的值:
\
   automaticOrientation: true
   useDeprecatedToolbar: false
\
再重新运行应用,我们发现应用在我们转动屏幕的时候会发生相应的转动。你也可以同时看到toolbar的位置也发生了相应的变化。
\
\
\
至此我们整个应用在第一阶段基本已经完成了。
\
整个应用的源码可以在地址下载:
\
bzr branch lp:~liu-xiao-guo/debiantrial/developernews3\
\
\
我们可以在下 一个章节中继续学习conditional layout来完成整个的练习!
\
终极挑战1 代码。
终极挑战2 代码。
\
\
11)更多教程
更多的教程可以在 地址获得。
\
