

本文相关的代码保存于github 源码,建议结合该代码来阅读文章,便于食用。
前言
今天在开发cli工具的时候遇到了一个场景,通过命令向项目添加完sentry后,需要自动向shared.module.ts文件添加两行ts代码用于引入依赖。如下:
import { NgModule } from '@angular/core';
import { CommonModule } from '@angular/common';
import { RouterModule } from '@angular/router';
import { TranslateModule } from '@ngx-translate/core';
import { ReactiveFormsModule, FormsModule } from '@angular/forms';
import { COMPONENTS } from './components';
import { DIRECTIVES } from './directives';
import { ZorroModule } from '@modules/zorro/zorro.module';
import { PIPES } from './pipes';
import { SENTRY_PROVIDERS } from '@core/sentry'; // 需要添加的代码

@NgModule({
  imports: [
    CommonModule,
    FormsModule,
    RouterModule,
    TranslateModule,
    ReactiveFormsModule,
    ZorroModule,
  ],
  declarations: [...COMPONENTS, ...DIRECTIVES, ...PIPES],
  exports: [
    CommonModule,
    FormsModule,
    RouterModule,
    TranslateModule,
    ReactiveFormsModule,
    ZorroModule,
    ...COMPONENTS,
    ...DIRECTIVES,
    ...PIPES,
  ],
  providers: [SENTRY_PROVIDERS], // 需要添加的代码
})
class SharedModule {}

export { SharedModule };
刚开始咱是通过正则的方式来处理,但在 review 代码过程中,大佬表示这种方式风险性太高,建议用babel来处理这种情况。由于之前只用过babel来做些简单的兼容处理,从未用其来生成代码,于是便利用闲暇时间进行了一番摸索。本文主要概括了babel几个核心插件的使用方法和开发中的部分技巧,希望能给大家一些帮助。
Babel 介绍
一想到babel,大家第一反应应该是它在兼容方面的处理。它可以将 ECMAScript 2015+ 版本的代码转换为向后兼容的 JavaScript 语法,以便能够运行在当前和旧版本的浏览器或其他环境中。但在这里,我们主要是介绍如果使用babel来生成咱们期望的javascript代码。
先介绍下咱们将用到的babel插件
- @babel/parser:将
javascript代码编译为抽象语法树(Abstract Syntax Tree,AST)(后续简称AST) - @babel/traverse:遍历
AST,通过这个插件,我们可以对AST上的任意节点进行增删查改 - @babel/types:AST 节点类型,通过该库咱们可以生成想要的
AST节点 - @babel/generator:编译
AST来生成javascript代码
创建项目 && 安装依赖
mkdir ast-demo && cd ast-demo && npm init #  创建项目并初始化package.json
mkdir code && cd code && touch demo.ts # 新建code/demo.ts用于放置待解析的ts代码
touch run.js # 用于放置核心逻辑
npm install @babel/parser @babel/traverse @babel/types @babel/generator @babel/core --save-dev
最后将待解析的这段代码粘贴至ast-demo/code/demo.ts文件中,如下:
import { NgModule } from '@angular/core';
import { CommonModule } from '@angular/common';
import { RouterModule } from '@angular/router';
import { TranslateModule } from '@ngx-translate/core';
import { ReactiveFormsModule, FormsModule } from '@angular/forms';
import { COMPONENTS } from './components';
import { DIRECTIVES } from './directives';
import { ZorroModule } from '@modules/zorro/zorro.module';
import { PIPES } from './pipes';

@NgModule({
  imports: [
    CommonModule,
    FormsModule,
    RouterModule,
    TranslateModule,
    ReactiveFormsModule,
    ZorroModule,
  ],
  declarations: [...COMPONENTS, ...DIRECTIVES, ...PIPES],
  exports: [
    CommonModule,
    FormsModule,
    RouterModule,
    TranslateModule,
    ReactiveFormsModule,
    ZorroModule,
    ...COMPONENTS,
    ...DIRECTIVES,
    ...PIPES,
  ],
  providers: [], // 需要添加的代码
})
class SharedModule {}

export { SharedModule };
转换 javascript 代码
使用@babel/parser 解析 javascript 代码生成 AST
第一步,我们要将对应的javascript代码解析为AST。这里因为涉及到文件的读写,后续我们都用node来处理:
需要注意的是,在使用@babel/parser时,由于待解析代码中有装饰器,所以必须添加decorators-legacy这个插件才能识别,否则会报错:
SyntaxError: This experimental syntax requires enabling one of the following parser plugin(s): 'decorators-legacy, decorators' (11:0)。
const { parse } = require('@babel/parser');
const path = require('path');
const fs = require('fs');
const codePath = './code/demo.ts'; // 待解析代码路径,
const file = fs.readFileSync(path.resolve(__dirname, codePath)).toString();
const ast = parse(file, {
  sourceType: 'module',
  plugins: ['decorators-legacy'], // 如果待代码中有装饰器,需要添加该plugin,才能识别。
});
使用@babel/traverse 遍历 AST 节点,并对特殊节点进行处理
在获取到对应的AST后,我们便可以对其节点进行修改
这里我们拿import xx from xx这个语法举例,在run.js中添加该代码
const { parse } = require('@babel/parser');
const traverse = require('@babel/traverse').default; // 遍历ast,对各个节点进行处理
const path = require('path');
const fs = require('fs');
const codePath = './code/demo.ts'; // 待解析代码路径,
const file = fs.readFileSync(path.resolve(__dirname, codePath)).toString();
const ast = parse(file, {
  sourceType: 'module',
  plugins: ['decorators-legacy', 'typescript'], // 如果待代码中有装饰器,需要添加该插件,才能识别;如果代码中有类型声明等ts特性,需要添加typescript插件
});
let num = 0;
traverse(ast, {
  ImportDeclaration(path) {
    num++;
    console.log(num); //  输出1,2,3,4,5,6,7,8,9
  },
});
执行命令node run.js结果如下
接下来,回到正题,我们期望的结果是:
- 在
@NgModule装饰器里面添加一个键值对,providers: [SENTRY_PROVIDERS]
那么如何知道我们class SharedModule对应的AST节点类型呢?
这里由于AST 节点类型实在太多了,去官方文档查看的话,会花费很多时间。这里推荐使用AST Explorer。
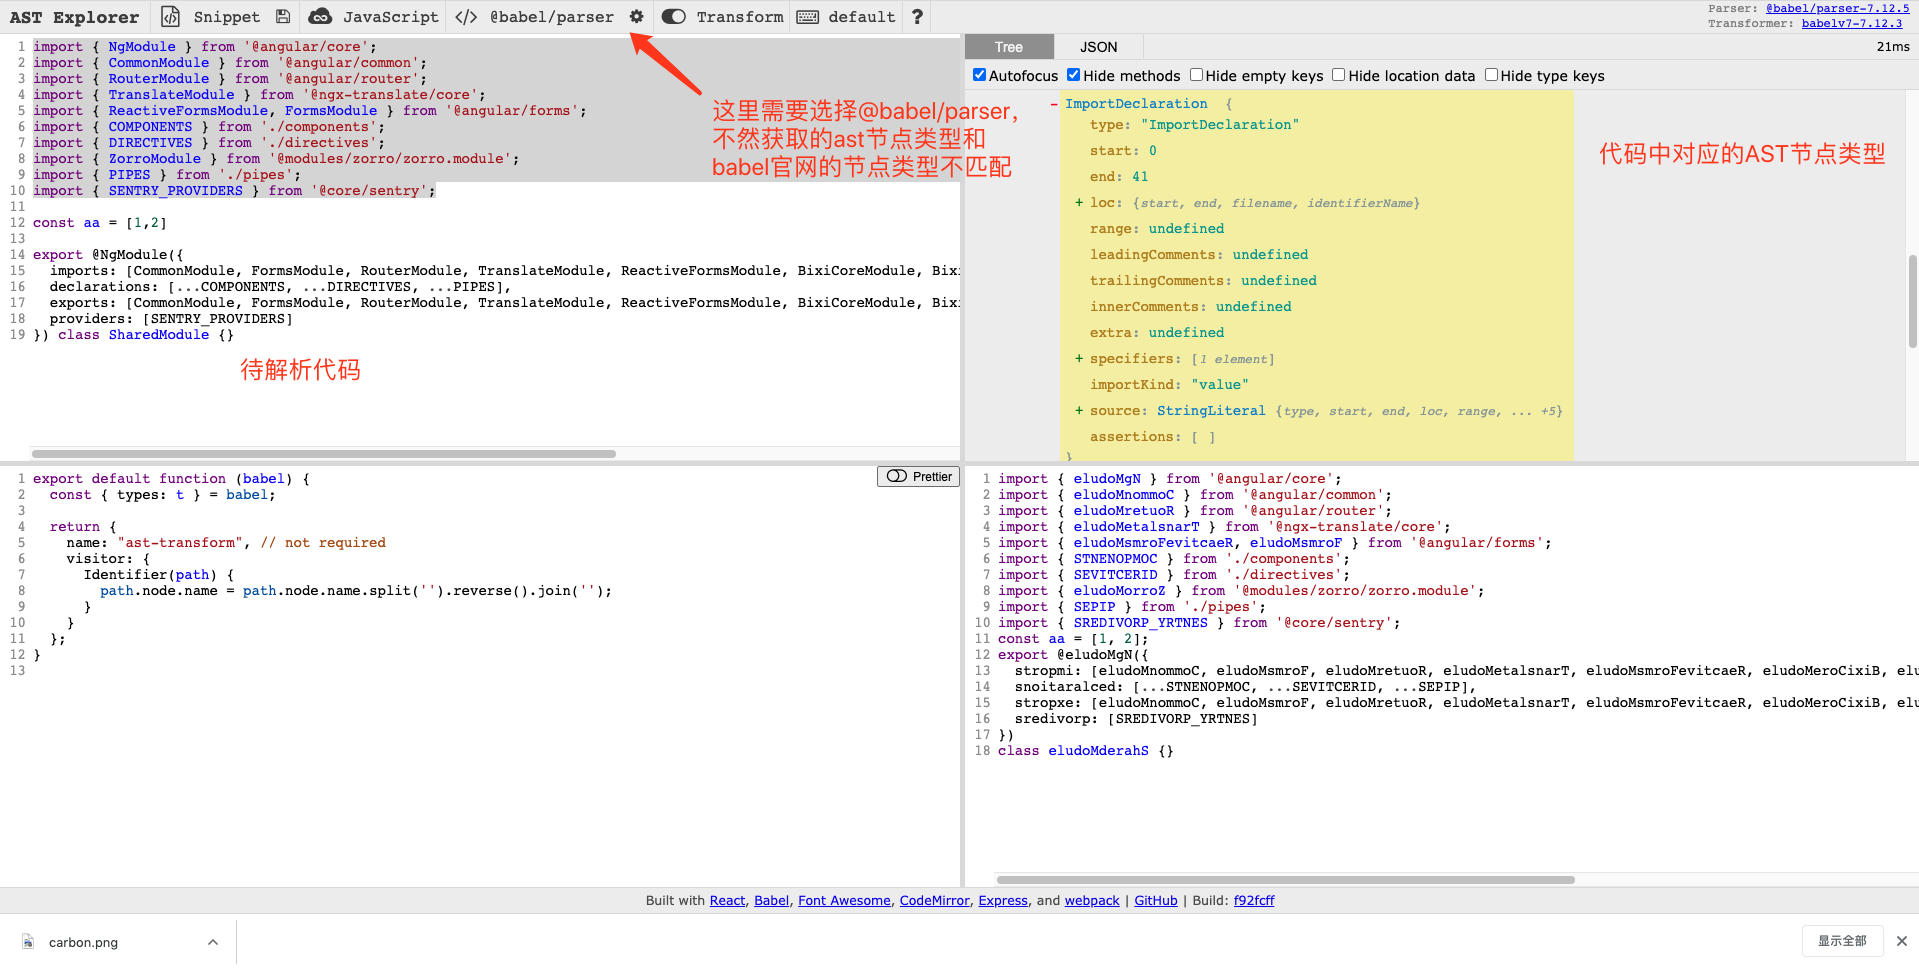
如果希望获取某个具体的节点,在左侧源码中选择对应的代码即可,右侧黄色部分即节点类型
知道了如何获取AST节点类型后,接下来我们便可以通过同样的方式来获取class对应的节点类型
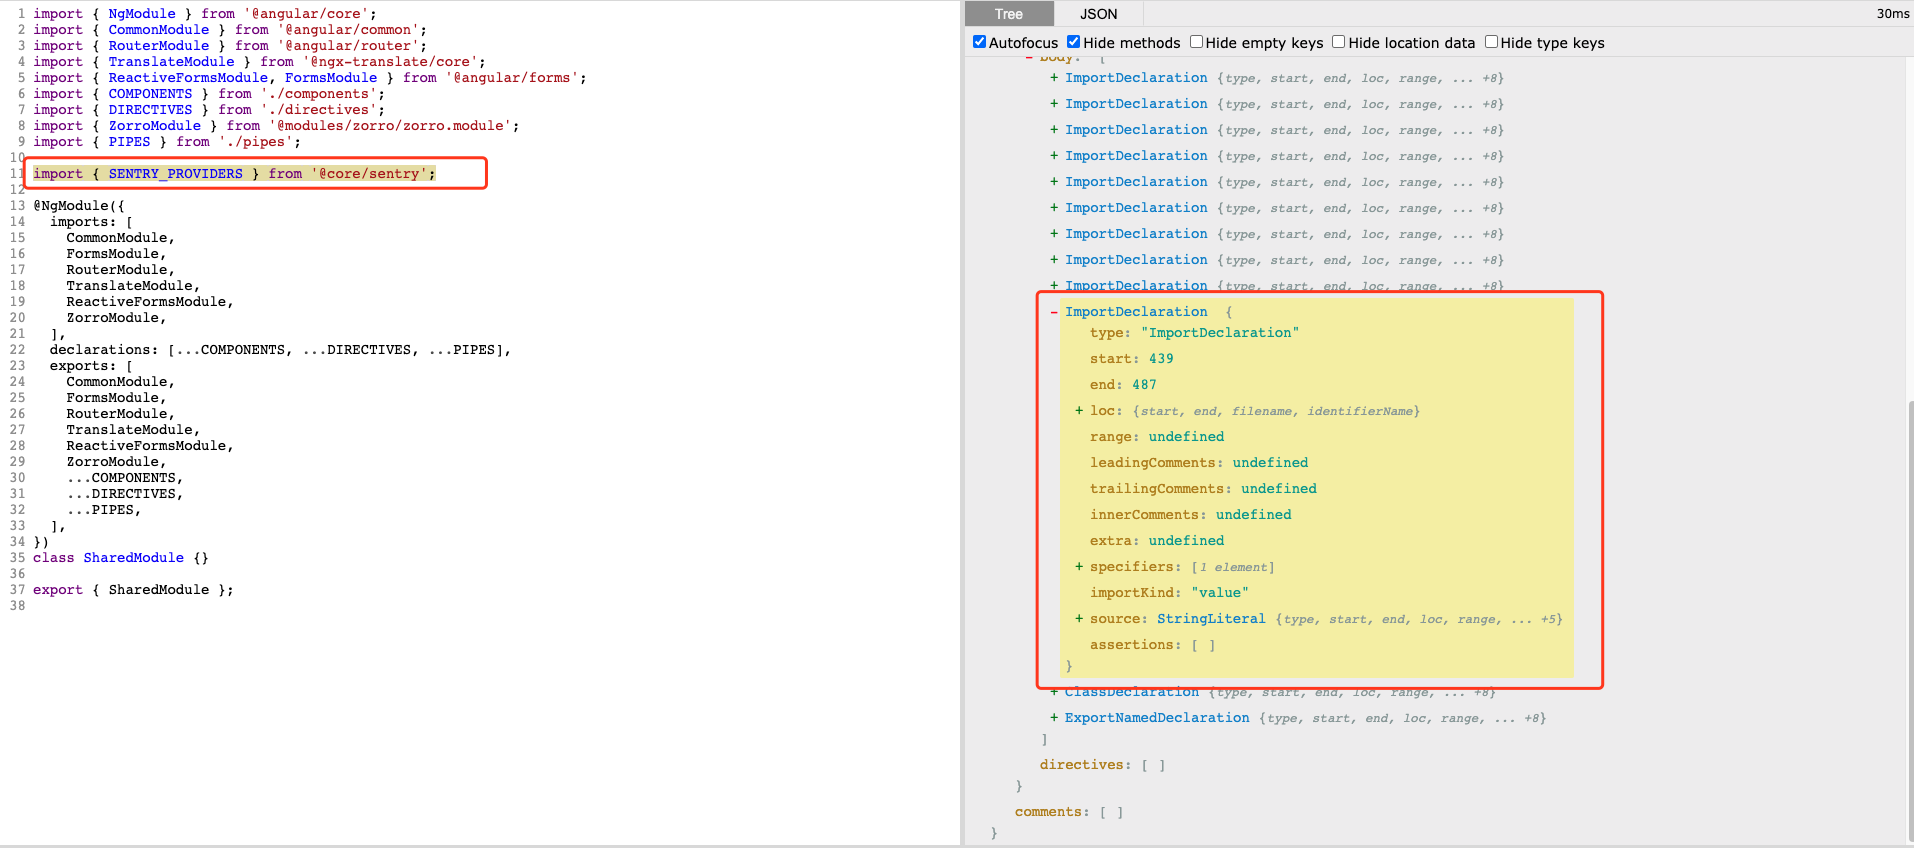
这里大家可以发现和咱们代码中表现的不同,ClassDeclaration内部包含了节点Decorator,而不是咱们代码中直观看到的装饰器与类是同级的。这也填了咱们前文中的坑。如果直接在@NgModule的前一个节点添加ImportDeclaration,那么它会添加在ClassDeclaration的内部,不是我们期望的结果。熟悉装饰器的同学也应该知道,装饰器可以装饰类、属性、方法等,而不会独立存在的。所以如果你理解装饰器,这里应该第一想到的是应该去ClassDeclaration前面添加需要的节点,当然,通过AST Explorer也可以直观的得出结果。
接下来修改run.js并运行,通过path.node属性可以获取对应的AST节点
const { parse } = require('@babel/parser');
const traverse = require('@babel/traverse').default; // 遍历ast,对各个节点进行处理
const path = require('path');
const fs = require('fs');
const codePath = './code/demo.ts'; // 待解析代码路径,
const file = fs.readFileSync(path.resolve(__dirname, codePath)).toString();
const ast = parse(file, {
  sourceType: 'module',
  plugins: ['decorators-legacy'], // 如果待代码中有装饰器,需要添加该plugin,才能识别。
});

traverse(ast, {
  ClassDeclaration(path) {
    console.log(path.node); // add it
  },
});
使用@babel/types 创建新的 AS 节点
通过@babel/traverse和AST Explorer,我们找到了class sharedModule对应的AST节点类型。接下来,我们来生成新代码import { SENTRY_PROVIDERS } from '@core/sentry'。
这时候便是@babel/types登场了,它可以帮助我们创建AST节点。详情可以参考@babel/types api 文档。
在文档中,我们可以看到许多的 api,可以帮助你创建任意已知的AST节点。那么问题来了,我怎么知道如何组合这些 api 来生成我的代码呢?
我们拿import { SENTRY_PROVIDERS } from '@core/sentry'这行代码举例。同样需要AST Explorer,观察其对应的AST
显而易见,它的AST节点类型是ImportDeclaration
接着,我们便查看@babel/types api 文档是如何生成一个ImportDeclaration节点的。
通过文档,我们了解到,要生成import xx from xx这种格式的代码,需要两个参数specifiers和source。那么我们可以先添加如下代码
const t = require('@babel/types');

t.importDeclaration(specifiers, source); // specifiers, source为定义
而specifiers的类型是Array<ImportSpecifier | ImportDefaultSpecifier | ImportNamespaceSpecifier>数组对象。如果你现在不确定其节点类型是ImportSpecifier | ImportDefaultSpecifier | ImportNamespaceSpecifier的哪一个话,那么便可以回到AST Explorer去查看。
点击SENTRY_PROVIDERS可以获取当前的节点类型Identifier,其可以理解为咱们的变量/标识,其父级便是ImportSpecifier类型。
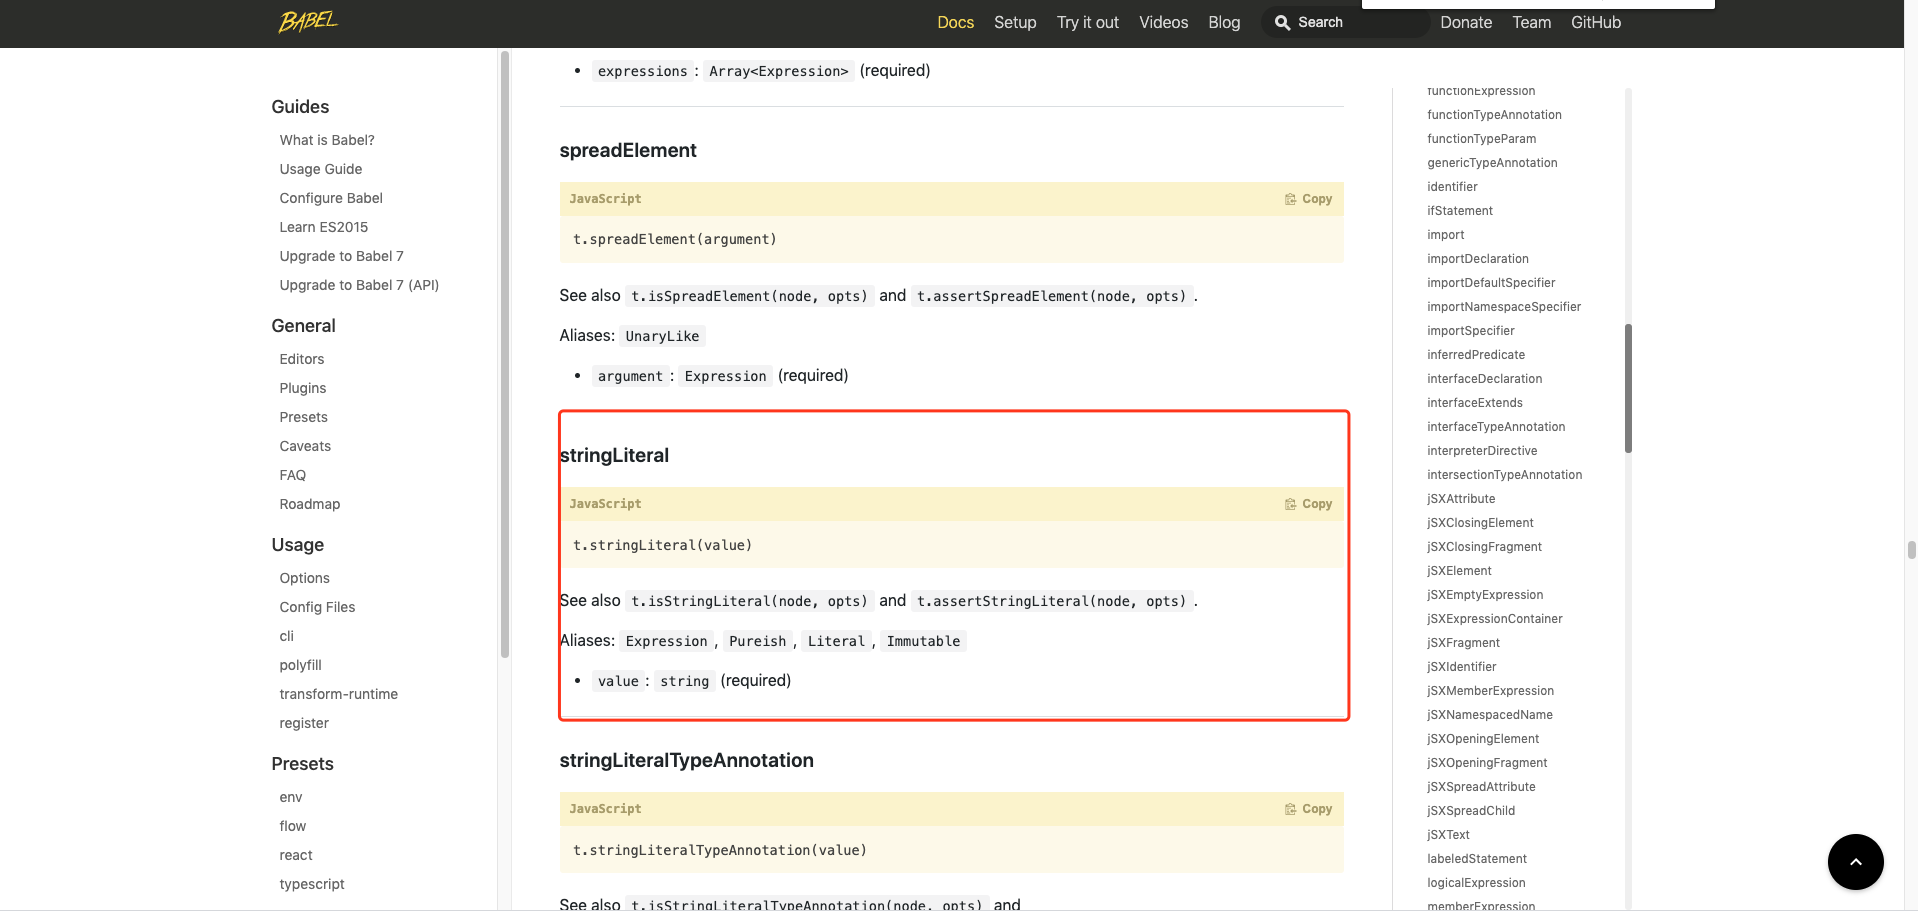
确定类型后,返回@babel/types api 文档,查看生成ImportSpecifier节点,需要local imported和importKind参数,而local和imported必填,是Identifier类型,也就是变量。
修改代码如下
const t = require('@babel/types');
const local = t.Identifier('SENTRY_PROVIDERS');
const imported = t.Identifier('SENTRY_PROVIDERS');
const specifiers = [t.ImportSpecifier(local, imported)];
const importDeclaration = t.importDeclaration(specifiers, source); // source未定义
完成了ImportSpecifier节点的生成,接下来我们查看ImportDeclaration所需要的第二个参数,即source对应的节点类型是StringLiteral,采用同样的方式去查找生成StringLiteral节点所需的参数。
修改代码如下,便获得了最终import xx from 'xx'这个语法对应的AST
const { parse } = require('@babel/parser');
const traverse = require('@babel/traverse').default; // 遍历ast,对各个节点进行处理
const t = require('@babel/types');
const path = require('path');
const fs = require('fs');
const codePath = './code/demo.ts'; // 待解析代码路径,
const file = fs.readFileSync(path.resolve(__dirname, codePath)).toString();
const ast = parse(file, {
  sourceType: 'module',
  plugins: ['decorators-legacy'], // 如果待代码中有装饰器,需要添加该plugin,才能识别。
});

traverse(ast, {
  ClassDeclaration(path) {
    const local = t.Identifier('SENTRY_PROVIDERS');
    const imported = t.Identifier('SENTRY_PROVIDERS');
    const specifiers = [t.ImportSpecifier(local, imported)];
    const source = t.stringLiteral('@core/sentry');
    const importDeclaration = t.importDeclaration(specifiers, source);

    console.log(importDeclaration);
  },
});
对当前的 ast 节点进行操作
在获得了ImportDeclaration的AST后,我们需要对原来的AST进行修改,从而生成新的AST。
这里便需要用到@babel/traverse中的path参数了。 相关的参数可以查看babel 操作手册-转换操作。文档中对已知的 api 都进行了说明。
我们需要在ClassDeclaration前面添加ImportDeclaration节点,修改代码如下:
const { parse } = require('@babel/parser');
const traverse = require('@babel/traverse').default; // 遍历ast,对各个节点进行处理
const t = require('@babel/types');
const path = require('path');
const fs = require('fs');
const codePath = './code/demo.ts'; // 待解析代码路径,
const file = fs.readFileSync(path.resolve(__dirname, codePath)).toString();
const ast = parse(file, {
  sourceType: 'module',
  plugins: ['decorators-legacy'], // 如果待代码中有装饰器,需要添加该plugin,才能识别。
});

traverse(ast, {
  ClassDeclaration(path) {
    const local = t.Identifier('SENTRY_PROVIDERS');
    const imported = t.Identifier('SENTRY_PROVIDERS');
    const specifiers = [t.ImportSpecifier(local, imported)];
    const source = t.stringLiteral('@core/sentry');
    const importDeclaration = t.importDeclaration(specifiers, source);

    path.insertBefore(importDeclaration); // update it
  },
});
这里还有一步操作是在@NgModule装饰器里面添加providers: [SENTRY_PROVIDERS]键值对,使用的是上述同样方法。直接上代码:
const { parse } = require('@babel/parser');
const traverse = require('@babel/traverse').default; // 遍历ast,对各个节点进行处理
const path = require('path');
const fs = require('fs');
const codePath = './code/demo.ts'; // 待解析代码路径,
const file = fs.readFileSync(path.resolve(__dirname, codePath)).toString();
const ast = parse(file, {
  sourceType: 'module',
  plugins: ['decorators-legacy'], // 如果待代码中有装饰器,需要添加该plugin,才能识别。
});
let code;
let hasProviders = false;

traverse(ast, {
  ClassDeclaration(path) {
    const local = t.Identifier('SENTRY_PROVIDERS');
    const imported = t.Identifier('SENTRY_PROVIDERS');
    const specifiers = [t.ImportSpecifier(local, imported)];
    const source = t.stringLiteral('@core/sentry');
    const importDeclaration = t.importDeclaration(specifiers, source);

    path.insertBefore(importDeclaration); // 在当前ClassDeclaration节点前插入importDeclaration节点
  },
  ObjectProperty(path) {
    // ObjectProperty 对应js语法中的键值对, xx: xx
    if (path.node.key.name === 'providers') {
      // 这里判断,如果代码中已经存在 key值 providers,直接进行添加
      hasProviders = true;
      path.node.value.elements.push(t.identifier('SENTRY_PROVIDERS')); // path.node.value.elements可以通过AST Explorer来查看对应层级
    }
    if (!hasProviders && isEnd(path.getAllNextSiblings())) {
      // 判断如果遍历到最后一个ObjectProperty,仍没有providers属性,则添加键值对
      hasProviders = false;
      // 在当前节点后面添加一个键值对
      path.insertAfter(
        t.objectProperty(t.identifier('providers'), t.arrayExpression())
      );
    }
  },
});

function isEnd(nodes) {
  return !nodes.some((item) => item.node.type === 'ObjectProperty');
}
使用@babel/generator 生成代码
最后使用@babel/generator将其AST编译为代码。可以在@babel/generator api来获取更多信息。接着使用fs模块将代码写入到目标文件中
添加代码如下:
...

fs.writeFileSync(codePath, generate(ast, {}, code).code);
console.log('Success to generate it');
完整代码: github 源码
