

一些说明
- 这篇文章并不是专注于介绍响应式 API 的文章,所以如果你想搞清楚新的 API 该怎么用,那么你应当关注官方的 Migration Guide
- 为了更明确的说明一些问题,我可能会删减许多代码。但这些代码并非是不必要的,只是对于我们要阐述的主题来说,它们是毫无必要的
从 CreateApp 开始
在这一节,我们会介绍 Vue.js 的入口函数 createApp,以及这之后的一整套渲染过程。阅读这一部分的内容有助于你理解响应式系统在整个 Vue.js 中扮演了怎样的角色。
当你使用 Vue3 写一个组件时,你可能会这样做:
const vm = createApp({
    // ...
}).mount("#app")
你应该发现了,这是个链式调用。换句话说,createApp 函数产出了一个东西,这个东西是带有 mount 方法的。其次,createApp 函数的参数就是你写主要逻辑的地方。
明确了函数的输入与输出,我们接下来看一下具体的代码:
export const createApp = ((...args) => {
    const app = ensureRenderer().createApp(...args)

    // ...

    app.mount = (containerOrSelector: Element | string): any => {
        // ...
    }

    return app
}) as CreateAppFunction<Element>
这个函数的逻辑非常清晰。创建一个 app 对象,然后重写 app 的 mount 方法。
创建渲染器
其中这一句:
const app = ensureRenderer().createApp(...args)
ensureRenderer 函数创建了一个渲染器对象。我们来看看它是怎么做的。
// index.ts
let rederer: Renderer<Element> | HydrationRenderer
const rendererOptions = extend(
    { patchProp, forcePatchProp }, nodeOps
)

function ensureRenderer() {
    return renderer || (renderer = createRenderer<Node, Element>(rendererOptions))
}

// renderer.ts
export function createRenderer<
    HostNode = RendererNode,
    HostElement = RendererElement
>(options: RendererOptions<HostNode, HostElement>) {
    return baseCreateRenderer<HostNode, HostElement>(options)
}
你会发现 ensureRenderer 函数并没有直接产出一个渲染器,而是通过 Currying 延迟创建了。这样做的原因是,如果用户只依赖响应式模块,那么 tree shaking 就能移除渲染器相关的代码。
接下来 baseCreateRenderer 就是具体实现渲染器的函数了。在实际的源码中你可能会看到许多重载,不过我们不关注那些,直接关注渲染器的具体实现:
function baseCreateRenderer(
    options: RendererOptions,
    createHydrationFns?: typeof createHydrationFunction
): any {
    // ...

    const {
        insert: hostInsert,
        remove: hostRemove,
        patchProp: hostPatchProp,
        // ...
        insertStaticContent: hostInsertStaticContent
    } = options

    const patch: PatchFn = (
        n1, n2, container, anchor,
        parentComponent, parentSuspense,
        isSVG, optimized
    ) => {
        // ...
    }

    const processText: ProcessTextOrCommentFn = (
        n1, n2, container, anchor
    ) => {
        // ...
    }

    // ...

    const render: RootRenderFunction = (vnode, container) => {
        // ...
    }

    // ...

    return {
        render,
        hydrate,
        createApp: createAppAPI(render, hydrate)
    }
}
这个函数很长,主要是使用闭包的方式实现渲染器的相关函数。另外返回的内容可以看出,有 createApp 函数。这就是我们用来创建 app 的方法。
重写 mount 方法
接下来是这两句:
const { mount } = app
app.mount = (containerOrSelector: Element | string): any => {
    // ...

    const proxy = mount(container)

    // ...

    return proxy
}
就是在外面调用的 mount 函数:
const vm = createApp({
    // ...
}).mount("#app")
挂载
接下来,逻辑会走入改写好的 mount 函数,我们来看一下实际的改写实现:
const { mount } = app
app.mount = (containerOrSelector: Element | string): any => {
    // ...

    const proxy = mount(container)

    // ...

    return proxy
}
这个 mount 函数被包裹在了 createAppAPI 函数中,不过我们暂时不关心如何导出这些 api,而是直接看 mount 函数的内容:
mount(rootContainer: HostElement, isHydrate?: boolean): any {
    if (!isMounted) {
        const vnode = createVNode(
            rootComponent as ConcreteComponent,
            rootProps
        )

        // ...

        if (isHydrate && hydrate) {
            hydrate(vnode as VNode<Node, Element>, rootContainer as any)
        } else {
            render(vnode, rootContainer)
        }

        // ...
    } else if (__DEV__) {
        warn(
            // 警告信息
        )
    }
}
整体逻辑很清晰,创建 vnode ,然后渲染它。你可能会注意到 hydrate 这个函数。它是用来 SSR 渲染 的。你暂时不必关心它。
render 函数就是在 baseCreateRenderer 这个超长函数中实现的。刚才我们略过了其具体实现,下面来看一下:
渲染
const render: RootRenderFunction = (vnode, container) => {
    if (vnode == null) {
        if (container._vnode) {
            unmount(container._vnode, null, null, true)
        }
    } else {
        patch(container._vnode || null, vnode, container)
    }
    // ...
    container._vnode = vnode
}
主要逻辑就一个 if...else。简单来说,vnode 若不存在,执行 unmount 函数卸载,若存在,则执行 patch 函数。
unmount 没啥好说的,我们直接看 patch 函数。
patch
不过在看具体代码之前,我们应该搞清楚这个函数具体是干啥的。简单来说,它是用来确认旧 node 应当怎样与新 node 相互替换的。为了帮助你理解,我整理了一下 patch 函数可能会遇到的几种情况。
当旧子节点是单个子节点时
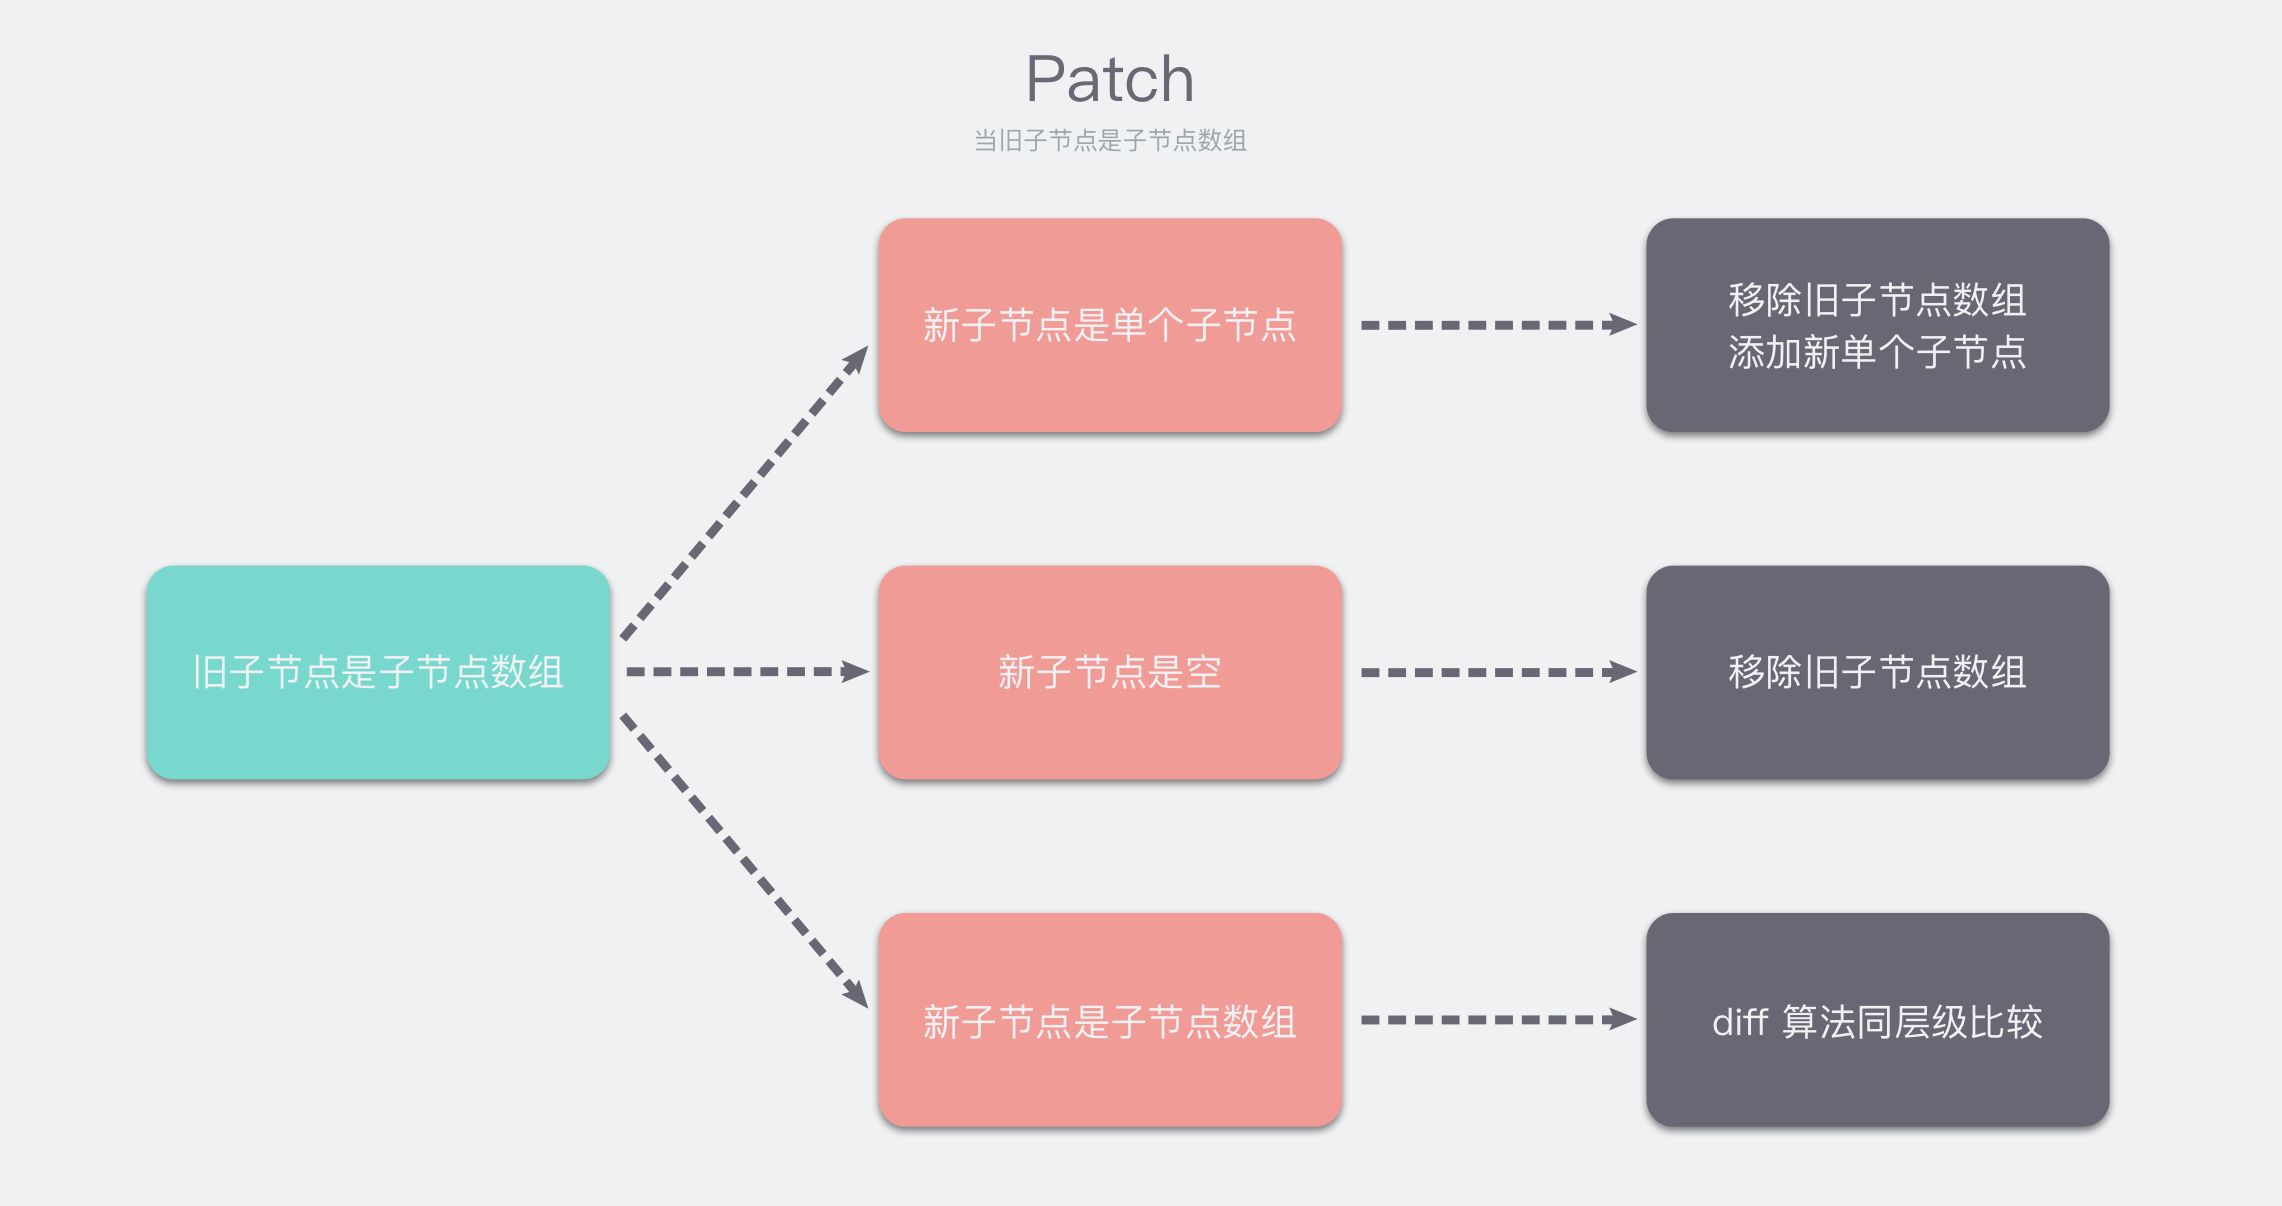
当旧子节点是空
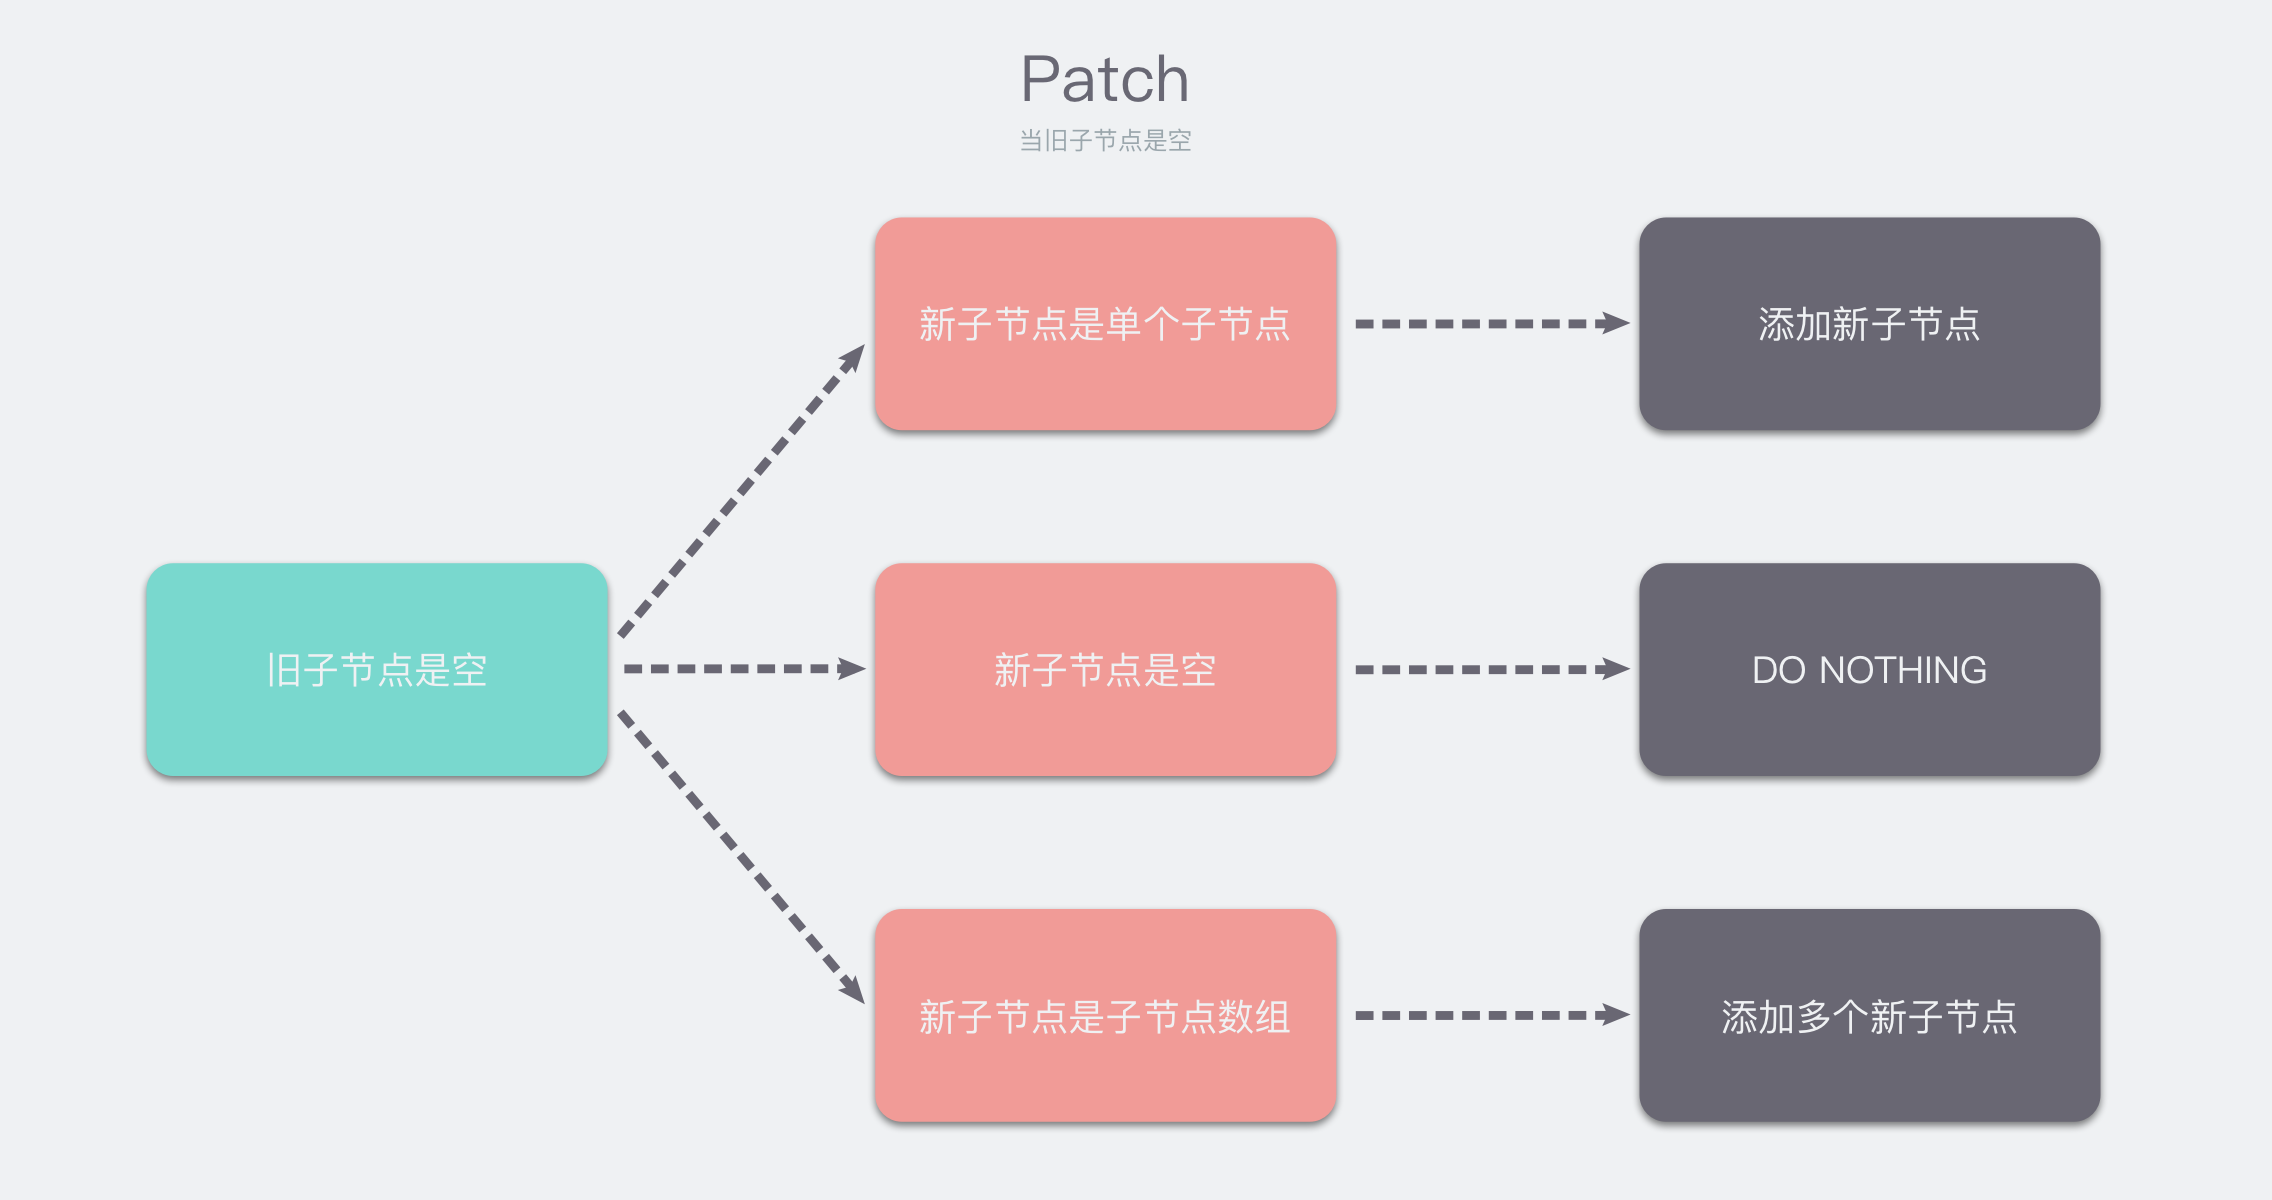
当旧子节点是子节点数组

明白了 patch 函数的基本流程后,我们就可以很容易的读懂 patch 函数的实现了。
processComponent
不过我们这里直接略过 patch 函数的具体源码,因为比较长,你可以根据上面的逻辑图来阅读源码。我们直接跳到 processComponent 函数。
// ...

else if (shapeFlag & ShapeFlags.COMPONENT) {
    processComponent(
        n1, n2, container, anchor,
        parentComponent, parentSuspense,
        isSVG, optimized
    )
}

// ...

const processComponent = (
    n1: VNode | null,
    n2: VNode,
    container: RendererElement,
    anchor: RendererNode | null,
    parentComponent: ComponentInternalInstance | null,
    parentSuspense: SuspenseBoundary | null,
    isSVG: boolean,
    optimized: boolean
) => {
    if (n1 == null) {
        if (n2.shapeFlag & ShapeFlag.COMPONENT_KEPT_ALIVE) {
            // ...
        } else {
            mountComponent(
                n2,
                container,
                anchor,
                parentComponent,
                parentSuspense,
                isSVG,
                optimized
            )
        }
    } else {
        updateComponent(n1, n2, optimized)
    }
}
那个省略的部分是 keep-alive 组件的处理,暂时不需要管。我们这里需要关注的是 mountComponent 函数。因为我们需要关注组件更新时调用的函数,具体是从哪来的。你会在 updateComponent 函数的实现中看到它。
mountComponent
这个函数是用来挂载组件的,我们重点关注它的实现:
const mountComponent: MountComponentFn = (
    initialVNode,
    container,
    anchor,
    parentComponent,
    parentSuspense,
    isSVG,
    optimized
) => {

    // 创建实例
    const instance: ComponentInternalInstance = (initialVNode.component = createComponentInstance(
        initialVNode,
        parentComponent,
        parentSuspense
    ))

    // ...

    // 配置组件实例
    // props、slots 等在这里注入
    setupComponent(instance)

    // ...

    // 运行带副作用的渲染函数
    setupRenderEffect(
        instance,
        initialVNode,
        container,
        anchor,
        parentSuspense,
        isSVG,
        optimized
    )
}
注意到我们这里创建了组件实例,并进行了一些配置。其中最重要的就是 setupRenderEffect 函数。它是带副作用的渲染函数。我们来看看它的实现:
const setupRenderEffect: SetupRenderEffectFn = (
    instance,
    initialVNode,
    container,
    anchor,
    parentSuspense,
    isSVG,
    optimized
) => {
    // create reactive effect for rendering
    instance.update = effect(
        function componentEffect() {
            // ...
        },
        __DEV__ ? createDevEffectOptions(instance) : prodEffectOptions
    )
}
注意到 instance.update 的赋值。调用响应式系统的 effect 函数,创建了渲染的副作用函数。
这里也就是响应式系统的一个“入口”。
最后
我们在这里梳理了 Vue.js 的大致流程,尽管这些流程都是渲染相关的,但讲清楚它们是必要的,因为这是响应式系统的目的。换句话说,响应式系统实际上就是为渲染服务的。
另外的,我们没有深入谈论 componentEffect 函数,因为它应当被放在渲染相关的专题里讨论。
总而言之,说了这么多,最重要的就这一行代码:
instance.update = effect(
    function componentEffect() {
        // ...
    },
    __DEV__ ? createDevEffectOptions(instance) : prodEffectOptions
)
也许你还不明白为什么重要,等下一篇文章我们讨论完整个儿响应式系统后,你再回过头来看,就会恍然大悟了。(因为我就是这样
本文首发于我的博客:www.bebopser.com/