

本文分享zabbix对系统软件、硬件监控具体操作和实践目标,不讲述具体二次开发具体应用搭建,其实看完本文,加上自己熟练操作了解,一般的程序员都会有具体的二次开发实施具体方案。
监控平台版本:
zabbix-release-4.0
本文讲述操作具体目标:
- mysql、nginx、等开发软件性能监控
- snmp第三方硬件性能监控
- 物理磁盘IO监控
Zabbix 部署准备及安装配置
1、准备文件

2、安装编译zabbix服务器。
cd /usr/local/src/zabbix
/**开始安装MySql**/
mkdir ../MySql
tar -xf ./MySQL-5.1.72-1.glibc23.x86_64.rpm-bundle.tar -C /usr/local/src/MySql/
cd ../MySql/
Chmod a+x MySQL-*
/**为了安装顺利,先将服务器的mysql预安装的相关全删掉**/
rpm -aq | grep mysql
Yum -y remove mysql-libs*
/**安装自己的版本**/
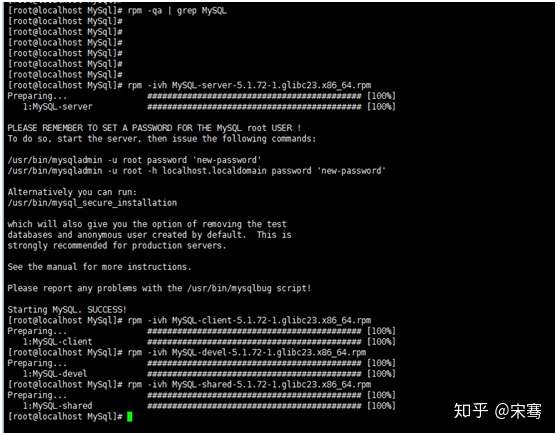
rpm -ivh MySQL-server-5.1.72-1.glibc23.x86_64.rpm
rpm -ivh MySQL-client-5.1.72-1.glibc23.x86_64.rpm
rpm -ivh MySQL-devel-5.1.72-1.glibc23.x86_64.rpm
rpm -ivh MySQL-shared-5.1.72-1.glibc23.x86_64.rpm
cd ../zabbix/conf/
cp my.cnf /etc
cd /usr/bin/
./mysql_install_db --user=root
chkconfig mysql on
mysqladmin -u root password 'sa'
/** 开始安装libxml依赖 **/
cd /usr/local/src/zabbix/tools/
tar -zxvf ./libxml2-2.9.1.tar.gz -C /usr/local/src/
cd ../../libxml2-2.9.1/
./configure --with-python=no --enable-shared=no --with-pic=PIC
make && make install
/** 开始安装zabbix服务 **/
cd /usr/local/src/zabbix/tools/
tar -zxvf ./perl-5.28.1.tar.gz -C /usr/local/src/
cd ../../perl-5.28.1/
CFLAGS='-m64 -mtune=nocona' ./Configure -des -A ccflags=-fPIC
make && make install
注意:
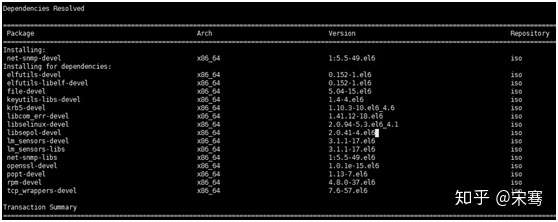
yum install -y net-snmp-devel
yum install libevent-devel -y
yum -y install pcre*
yum install curl-devel -y
或者 (当上述操作遇到错误阻障时)
cd  /usr/local/src/zabbix/tools/net-snmp-devel
rpm -Uvh --force --nodeps *.rpm
cd /usr/local/src/zabbix/tools/libevent-devel
rpm -Uvh --force --nodeps *.rpm
cd /usr/local/src/zabbix/tools/curl-devel
tar -zxvf ./curl-7.64.0.tar.gz ./
cd ./curl-7.64.0
mkdir /usr/local/curl-devel
configure --prefix=/usr/local/curl-devel
make && make install


cd /usr/local/src/zabbix
tar -zxvf ./zabbix-4.0.4.tar.gz -C /usr/local/src/
cd ../zabbix-4.0.4/
./configure --prefix=/usr/local/zabbix --enable-server --enable-agent --enable-proxy --with-mysql --enable-ipv6 --with-net-snmp --with-libcurl --with-libxml2
make && make install
3、开始安装php nginx服务。
cd /usr/local/src/zabbix/tools/
tar -zxvf ./openssl-1.0.1s.tar.gz -C /usr/local/src/
tar -zxvf ./pcre-8.21.tar.gz -C /usr/local/src/
cd ../
tar -xf ./nginx-1.15.1.tar.gz -C /usr/local/src
cd ../openssl-1.0.1s/
./config --prefix=/usr/local/openssl
make && make install
cd ../nginx-1.15.1/
./configure --prefix=/usr/local/nginx --with-pcre=/usr/local/src/pcre-8.21 --with-openssl=/usr/local/src/openssl-1.0.1s --with-http_ssl_module
--with-http_stub_status_module
make && make install
cd /usr/local/src/zabbix/tools/
tar -zxvf ./jpegsrc.v9c.tar.gz -C /usr/local/src
cd ../../jpeg-9c/
./configure --prefix=/usr/local/jpeg --enable-shared --enable-static
make && make install
cd /usr/local/src/zabbix/tools/
tar -zxvf ./db-4.7.25.tar.gz -C /usr/local/src
cd ../../db-4.7.25/build_unix/
../dist/configure --prefix=/usr/local/BerkeleyDB
make && make install
cd /usr/local/src/zabbix/tools/
tar -zxvf ./openldap-2.4.40.tgz -C /usr/local/src
cd ../../openldap-2.4.40/
CPPFLAGS="-I/usr/local/BerkeleyDB/include/"
export CPPFLAGS
LDFLAGS="-L/usr/local/lib -L/usr/local/BerkeleyDB/lib/"
export LDFLAGS
LD_LIBRARY_PATH="/usr/local/BerkeleyDb/lib/"
export LD_LIBRARY_PATH
./configure --prefix=/usr/local/openldap
make && make install
cd /usr/local/src/zabbix/tools/
tar -zxvf ./freetype-2.4.0.tar.gz -C /usr/local/src
cd ../../freetype-2.4.0/
./configure --perfix=/usr/local/freetype
make && make install
cd /usr/local/src/zabbix/tools/
tar -zxvf ./libpng-1.2.58.tar.gz -C /usr/local/src
cd ../../libpng-1.2.58/
./configure --prefix=/usr/local/libpng --enable-shared --enable-static
make && make install
cd /usr/local/src/zabbix
tar -zxvf ./php-7.1.26.tar.gz -C /usr/local/src
cd ../php-7.1.26/
groupadd -g 101 zabbix-web
useradd zabbix-web -g zabbix-web -p 123456
./configure --prefix=/usr/local/php --enable-fpm --with-fpm-user=zabbix-web --with-fpm-group=zabbix-web --with-openssl --with-libxml-dir
--with-zlib --enable-mbstring --enable-bcmath --with-mysqli=mysqlnd --enable-mysqlnd --with-pdo-mysql --with-gd --with-png-dir=/usr/local/libpng/
--with-jpeg-dir=/usr/local/jpeg/ --with-zlib-dir --with-gettext --with-ldap=/usr/local/openldap/ --with-freetype-dir=/usr/local/freetype --enable-sockets
--with-curl --enable-maintainer-zts
make && make install
cp php.ini-development /usr/local/php/lib/php.ini
cp /usr/local/php/etc/php-fpm.conf.default /usr/local/php/etc/php-fpm.conf
cp/usr/local/php/etc/php-fpm.d/www.conf.default /usr/local/php/etc/php-fpm.d/www.conf
cd ../zabbix/conf/
cp php-fpm /etc/init.d/
cp nginx /etc/init.d/
cd /etc/init.d/
chmod a+x nginx php-fpm
chkconfig --add php-fpm
chkconfig php-fpm on
chkconfig --add nginx
chkconfig nginx on
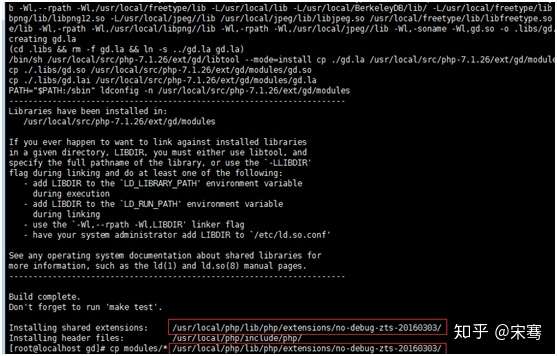
cd /usr/local/src/php-7.1.26/ext/gd/
./configure --with-php-config=/usr/local/php/bin/php-config --with-jpeg-dir=/usr/local/jpeg/ --with-freetype-dir=/usr/local/freetype
--with-png-dir=/usr/local/libpng/
make && make install
cp modules/* /usr/local/php/lib/php/extensions/no-debug-zts-20160303/
cd /usr/local/src/zabbix/conf/
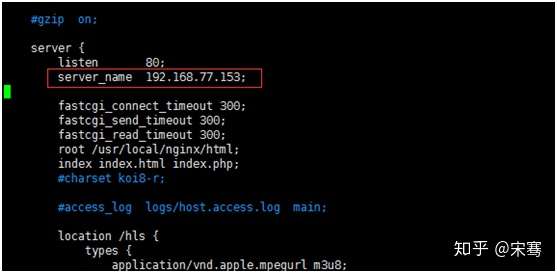
cp nginx.conf /usr/local/nginx/conf/
cp php.ini /usr/local/php/lib/
vim /usr/local/nginx/conf/nginx.conf
service php-fpm start
service nginx start
cd /usr/local/src/zabbix-4.0.4/frontends/php/
mkdir /usr/local/nginx/html/zabbix
cp -R * /usr/local/nginx/html/zabbix/
4、开始导入zabbix 基础数据库
service mysql start
注意:如果启动mysql出现Manager of pid-file quit without updating file,使用下面方法解决
ln -s /tmp/mysql.sock /var/lib/mysql/mysql.sock
chown -R mysql:mysql /var/lib/mysql/
mysql -uroot -psa
use mysql
update user set password=password('sa') where user='root';
update user set host='%' where user='root' and host='localhost';
flush privileges;
create user zabbix identified by 'zabbix';
grant all privileges on *.* to 'zabbix'@'%' identified by 'zabbix' with grant option;
flush privileges;
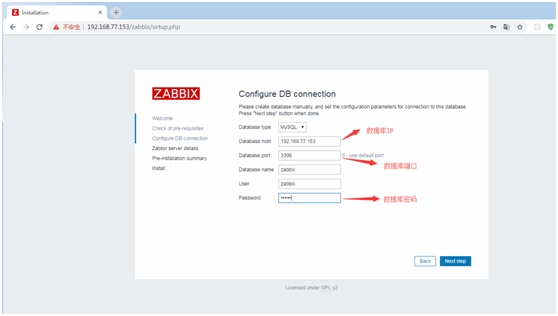
create database zabbix character set utf8 collate utf8_bin;
grant all privileges on zabbix.* to 'zabbix'@'%' identified by 'zabbix';
flush privileges;
exit
cd /usr/local/src/zabbix/zabbix_scripts/zabbix-server-mysql-4.0.4/
zcat create.sql.gz | mysql -uzabbix -h192.168.77.153 --database=zabbix -p
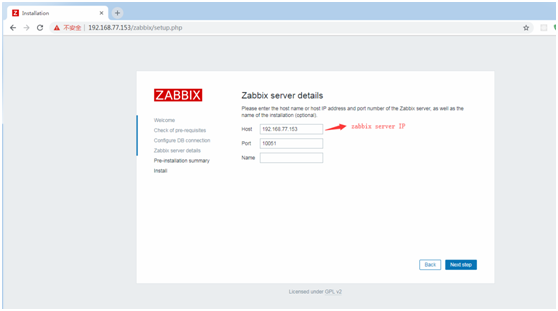
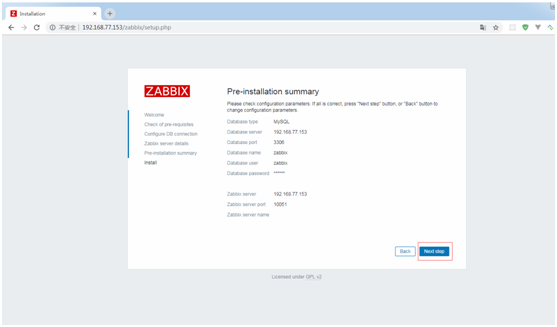
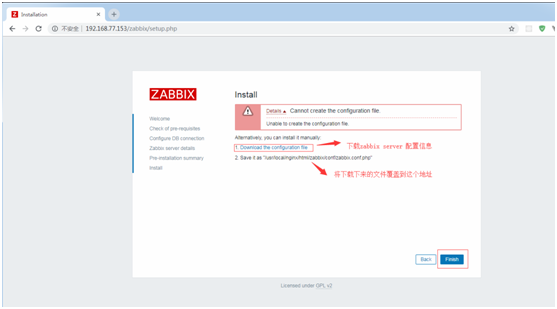
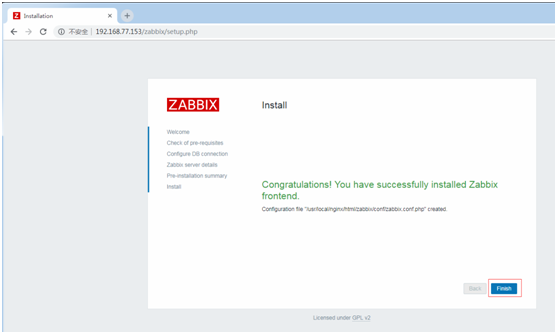
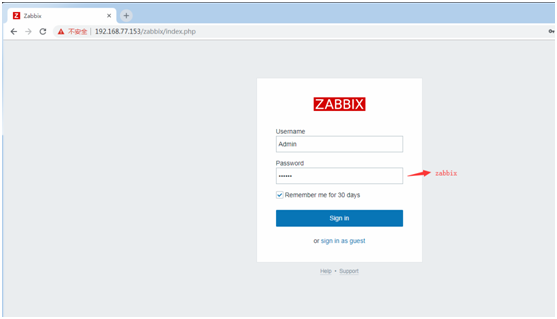
5、开始配置zabbix web端。
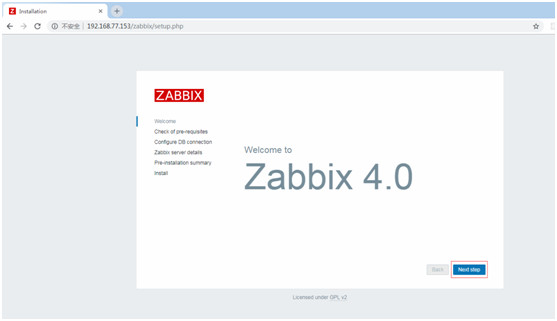
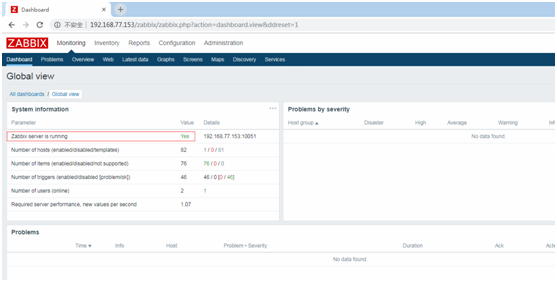
http://192.168.77.153/zabbix/index.php or
http://192.168.77.153/zabbix/setup.php
Zabbix Server开机运行及配置。
cd /usr/local/zabbix/
cp /usr/local/src/zabbix/conf/zabbix-server /etc/init.d/
cp /usr/local/src/zabbix/conf/zabbix-agent /etc/init.d/
cp /usr/local/src/zabbix/conf/zabbix_agentd.conf /usr/local/zabbix/etc/
cp /usr/local/src/zabbix/conf/zabbix_server.conf /usr/local/zabbix/etc/
chmod a+x/etc/init.d/zabbix-agent /etc/init.d/zabbix-server
chkconfig zabbix-server on
chkconfig zabbix-agent on
vim ./etc/zabbix_server.conf

修改以下配置项:
ListenPort=10051
DBHost=192.168.77.153
DBName=zabbix
DBUser=zabbix
DBPassword=zabbix
DBPort=3306
ListenIP=192.168.77.153
AllowRoot=1
User=root

service zabbix-server start
vim ./etc/zabbix_agent
修改以下配置项:
Server=192.168.77.153
ListenPort=10050
ListenIP=192.168.77.153
ServerActive=192.168.77.153
Hostname=Zabbix server
AllowRoot=1
User=root
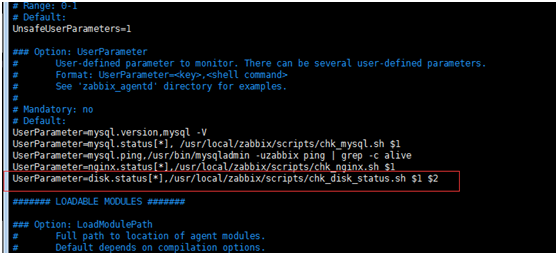
UnsafeUserParameters=1
UserParameter=mysql.version,mysql -V
UserParameter=mysql.status[*], /usr/local/zabbix/scripts/chk_mysql.sh $1
UserParameter=mysql.ping,/usr/bin/mysqladmin -uzabbix ping | grep -c alive
UserParameter=nginx.status[*],/usr/local/zabbix/scripts/chk_nginx.sh $1
service zabbix-agent start

Zabbix Agent 开机运行及配置。
cd /usr/local/zabbix/
cp /usr/local/src/zabbix/conf/zabbix-agent /etc/init.d/
cp /usr/local/src/zabbix/conf/zabbix_agentd.conf /usr/local/zabbix/etc/
chmod a+x /etc/init.d/zabbix-agent
chkconfig zabbix-agent on
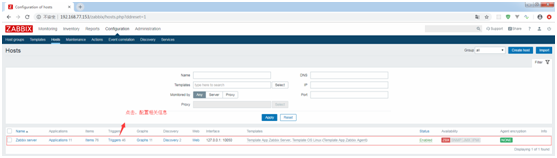
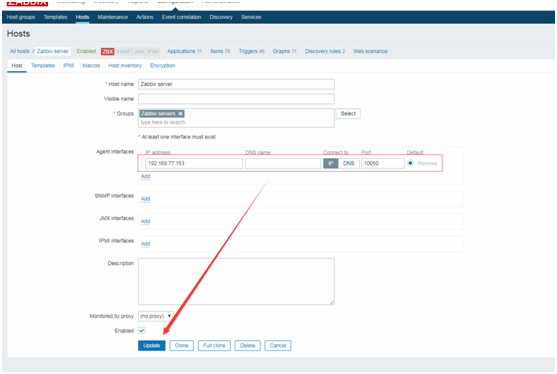
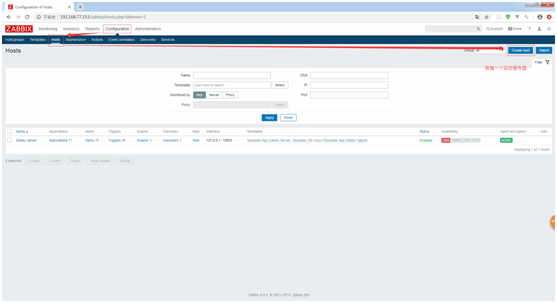
打开浏览器,增加一个监控客户端。

vim ./etc/zabbix_agent

修改以下配置项:
Server=192.168.77.153
ListenPort=10050
ListenIP=192.168.77.153
ServerActive=192.168.77.153
Hostname=153_agent
AllowRoot=1
User=root
UnsafeUserParameters=1
UserParameter=mysql.version,mysql -V
UserParameter=mysql.status[*], /usr/local/zabbix/scripts/chk_mysql.sh $1
UserParameter=mysql.ping,/usr/bin/mysqladmin -uzabbix ping | grep -c alive
UserParameter=nginx.status[*],/usr/local/zabbix/scripts/chk_nginx.sh $1

service zabbix-agent start
数据库的监控配置。
cd /usr/local/zabbix/
mkdir scripts
cp /usr/local/src/zabbix/zabbix_scripts/chk_mysql.sh /usr/local/zabbix/scripts/
chmod a+x ./scripts/chk_mysql.sh
chown -R root:root ./scripts/chk_mysql.sh
killall zabbix_agentd
service zabbix-agent start

nginx http服务监控配置。
cd /usr/local/zabbix/
mkdir scripts
cp /usr/local/src/zabbix/zabbix_scripts/chk_nginx.sh /usr/local/zabbix/scripts/
chmod a+x ./scripts/chk_nginx.sh
chown -R root:root ./scripts/chk_nginx.sh
vim ./scripts/chk_nginx.sh

killall zabbix_agentd
service zabbix-agent start
snmp第三方硬件设备监控。
cd /usr/local/src/zabbix/tools/
tar -zxvf net-snmp-5.7.3.tar.gz -C /usr/local/src/
cd ../../net-snmp-5.7.3/
./configure --prefix=/usr/local/snmp
Make && make install
vim /etc/profile

Source /etc/profile
注意:SNMP监控第三方设备公共的OID。
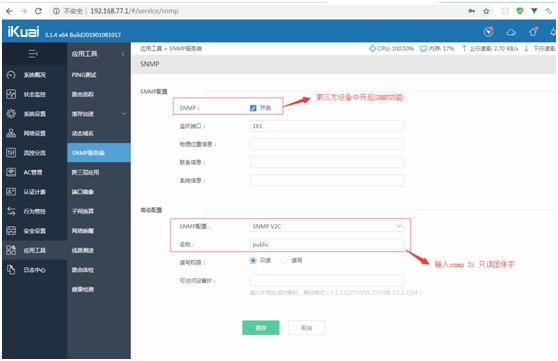
这里使用IKuai软路由模拟第三方交换机设备,打开交换机配置页,开启SNMP功能。
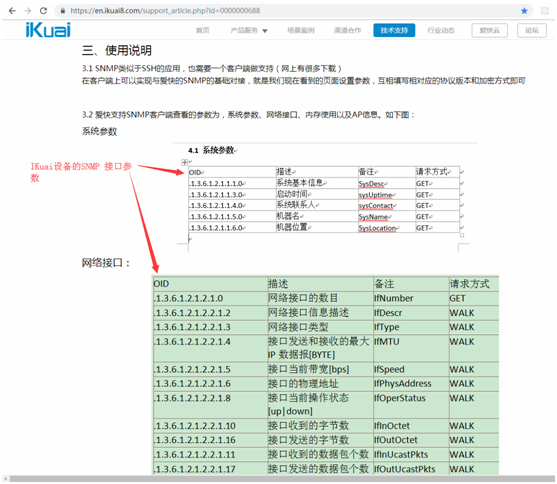
从官网上查找到设备型号SNMP的参数值。
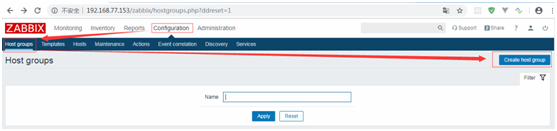
新增主机组。

输入主机组名字。

新增监控模版。
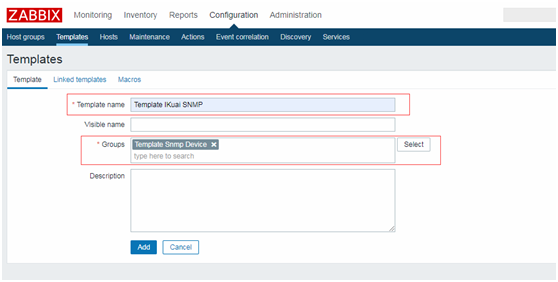
输入监控模版名称和绑定主机组。

找到刚刚新增的模版,点击进去配置监控项。
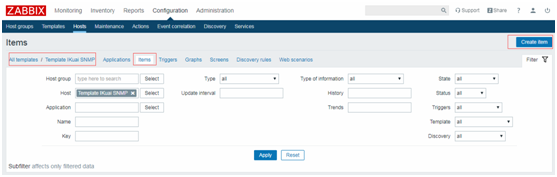
点击Items -> create Item.

用snmpwalk测试IKuai 中几个内存OID,确认服务器SNMP没问题。
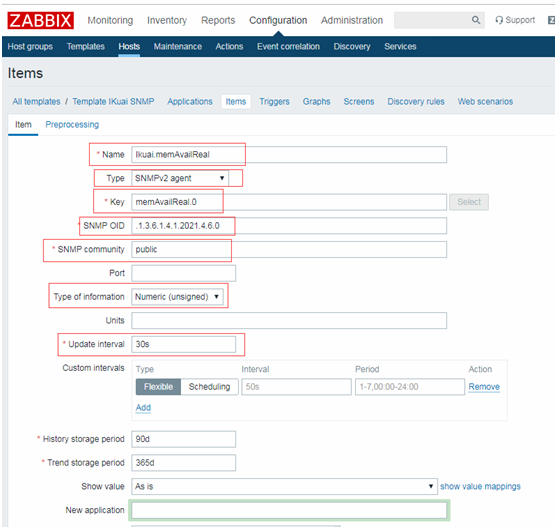
继续配置监控项的相关参数,确认保存。
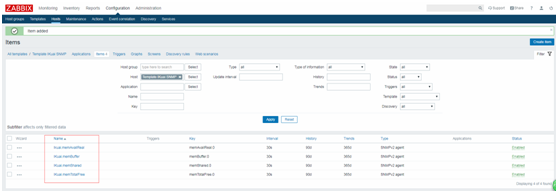
按上述的图片,完成需要监控的OID配置,这里新增了4个OID监控项。

点击Graphs -> Create graps.
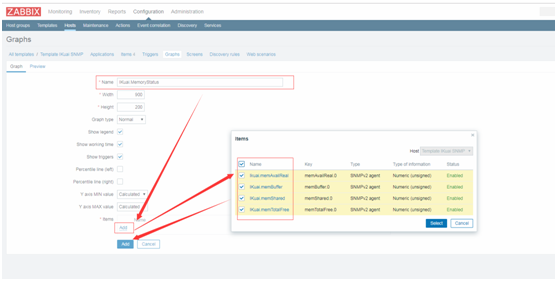
选择需要绘制图表的监控项,确认保存。

点击选中某个监控服务器。
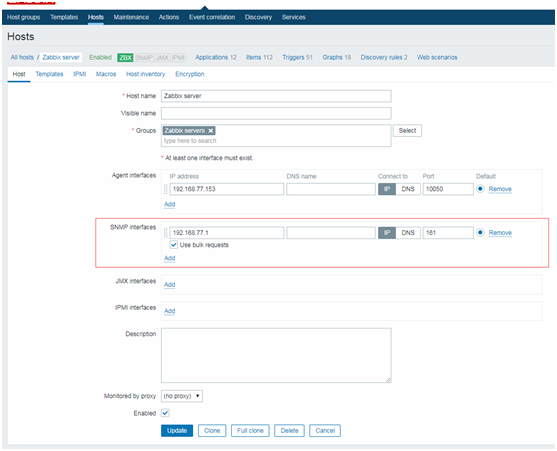
配置SNMP设备地址。
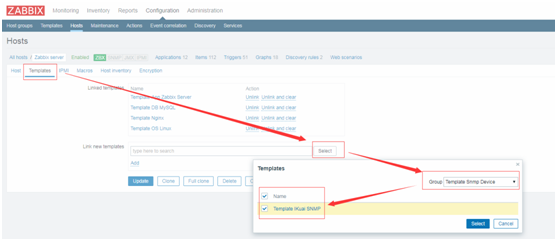
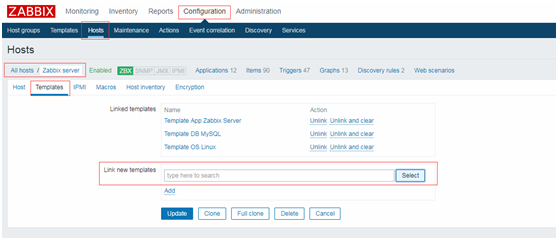
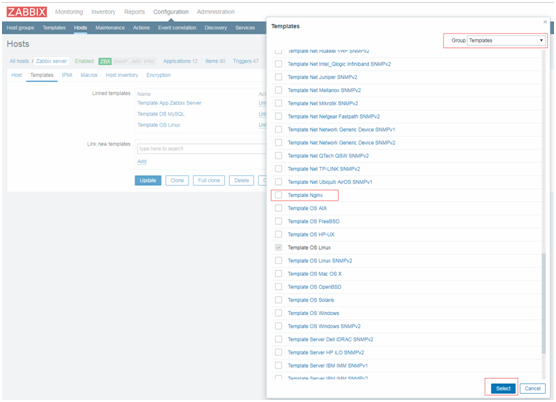
给监控主机绑定模版。
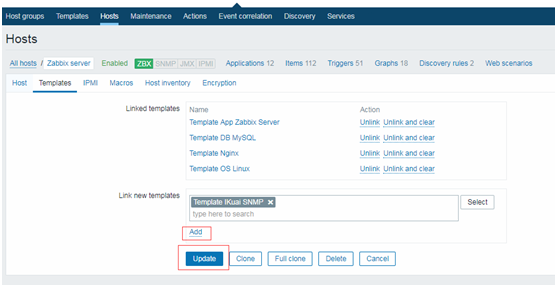
确认,添加模版 ,更新。
等待几分钟,确认SNMP为绿色。
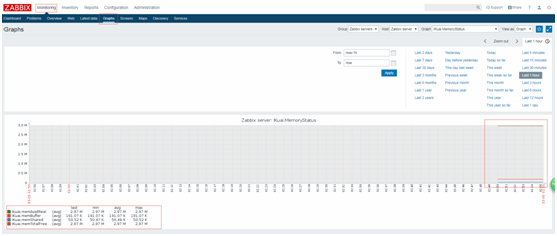
点击Monitoring -> Graphs -> IKuai MemoryStatus,即可看到交换机使用信息。
注意:SNMP监控第三方设备的私有OID
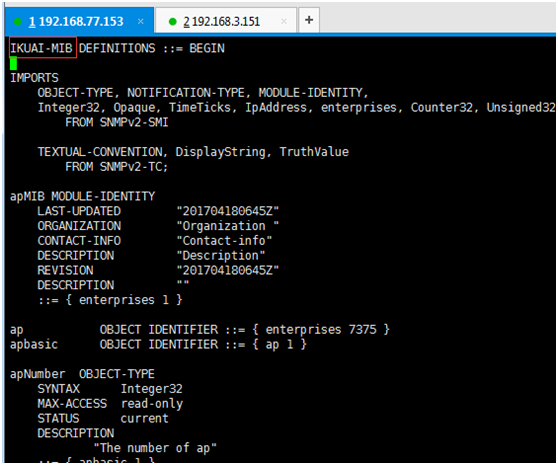
1、准备好官方的私有mib文件。
net-snmp-config --default-mibdirs

cd /usr/local/snmp/share/snmp/mibs/
cp /usr/local/src/zabbix/conf/ikuai-mib.txt /usr/local/snmp/share/snmp/mibs/
Vim ./ikuai-mib.txt
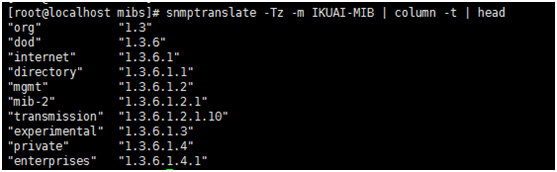
snmptranslate -Tz -m IKUAI-MIB | column -t | head
snmpwalk -v 2c -p public 192.168.77.1 1.3.6.1.4
磁盘IO监控
yum install sysstat
cp /usr/local/src/zabbix/zabbix_scripts/chk_disk_status.sh /usr/local/zabbix/scripts/
cd /usr/local/zabbix/scripts/
chmod a+x chk_disk_status.sh
vim ../etc/zabbix_agentd.conf
killall zabbix_agentd
service zabbix-agent start
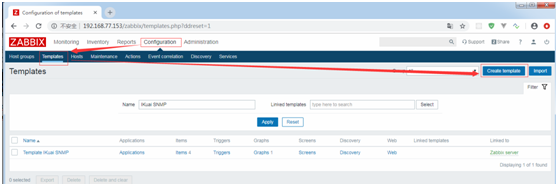
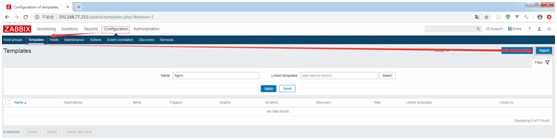
新增一个监控模版。
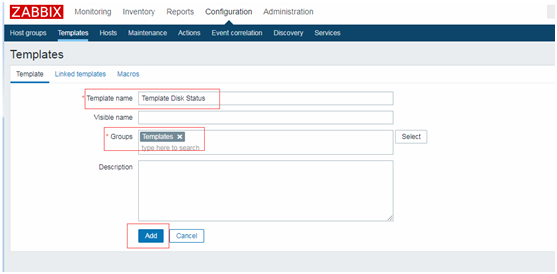
输入模版名称和主机组。

点击新建的监控模板。
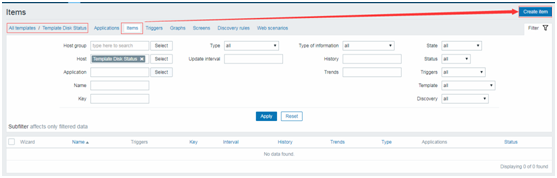
点击Items -> create item。
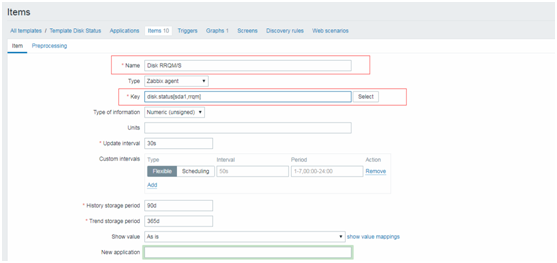
配置Name & Key即可。
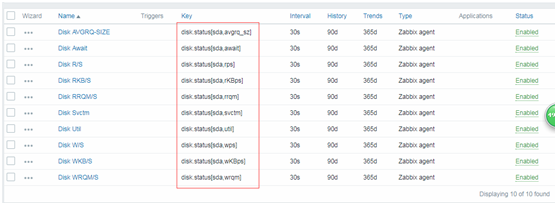
按上述图片完成下面所有监控项的配置。注:dist.status[2] 2=监控项。

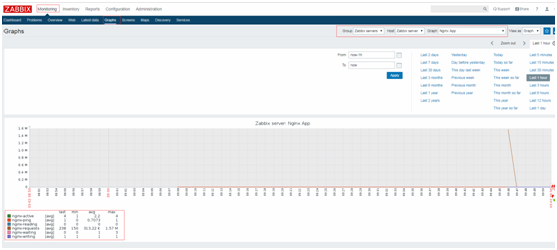
创建一个图表。
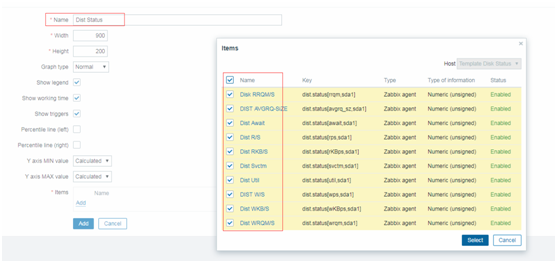
输入图表名称,选中所有的监控项,完成。
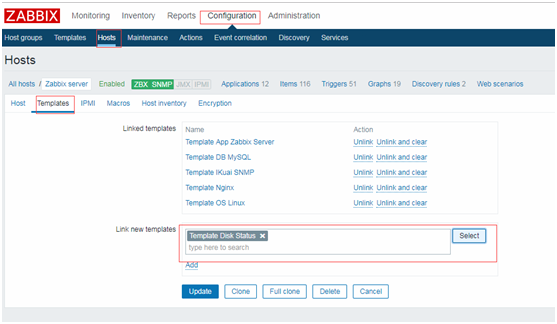
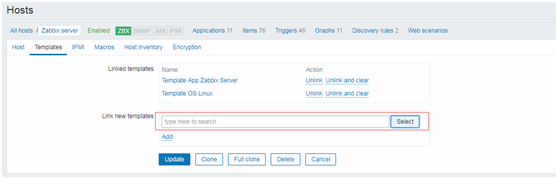
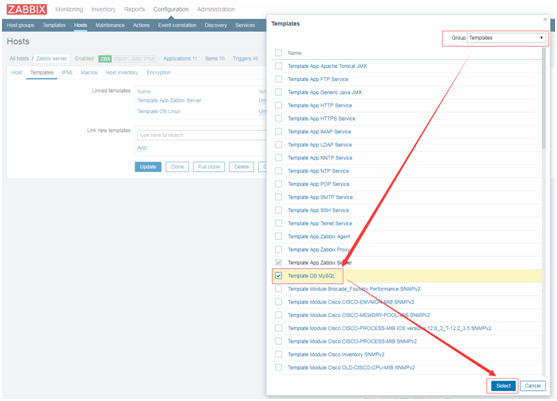
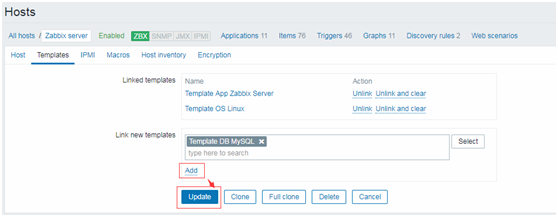
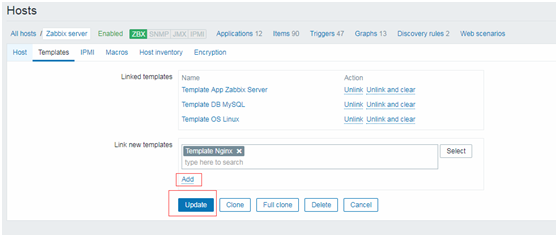
选中一个监控主机,点击Template,Link new template选择刚刚新建的模版即可。
关键脚本代码
以下是上述操作过程中,需要配事完成监控工作的shell脚本代码,在下面贴出来,一起参考,如需要本人的目录结构全包文件,可以私信本人,看到来信,会私信共享。
nginx
#!/bin/sh
#
# nginx - this script starts and stops the nginx daemon
#
# chkconfig:   - 85 15
# description:  NGINX is an HTTP(S) server, HTTP(S) reverse \
#               proxy and IMAP/POP3 proxy server
# processname: nginx
# config:      /etc/nginx/nginx.conf
# config:      /etc/sysconfig/nginx
# pidfile:     /var/run/nginx.pid

# Source function library.
. /etc/rc.d/init.d/functions

# Source networking configuration.
. /etc/sysconfig/network

# Check that networking is up.
[ "$NETWORKING" = "no" ] && exit 0

nginx="/usr/local/nginx/sbin/nginx"
prog=$(basename $nginx)

NGINX_CONF_FILE="/usr/local/nginx/conf/nginx.conf"

[ -f /etc/sysconfig/nginx ] && . /etc/sysconfig/nginx

lockfile=/var/lock/subsys/nginx

make_dirs() {
   # make required directories
   user=`$nginx -V 2>&1 | grep "configure arguments:" | sed 's/[^*]*--user=\([^ ]*\).*/\1/g' -`
   if [ -z "`grep $user /etc/passwd`" ]; then
       useradd -M -s /bin/nologin $user
   fi
   options=`$nginx -V 2>&1 | grep 'configure arguments:'`
   for opt in $options; do
       if [ `echo $opt | grep '.*-temp-path'` ]; then
           value=`echo $opt | cut -d "=" -f 2`
           if [ ! -d "$value" ]; then
               # echo "creating" $value
               mkdir -p $value && chown -R $user $value
           fi
       fi
   done
}

start() {
    [ -x $nginx ] || exit 5
    [ -f $NGINX_CONF_FILE ] || exit 6
    make_dirs
    echo -n $"Starting $prog: "
    daemon $nginx -c $NGINX_CONF_FILE
    retval=$?
    echo
    [ $retval -eq 0 ] && touch $lockfile
    return $retval
}

stop() {
    echo -n $"Stopping $prog: "
    killproc $prog -QUIT
    retval=$?
    echo
    [ $retval -eq 0 ] && rm -f $lockfile
    return $retval
}

restart() {
    configtest || return $?
    stop
    sleep 1
    start
}

reload() {
    configtest || return $?
    echo -n $"Reloading $prog: "
    killproc $nginx -HUP
    RETVAL=$?
    echo
}

force_reload() {
    restart
}

configtest() {
  $nginx -t -c $NGINX_CONF_FILE
}

rh_status() {
    status $prog
}

rh_status_q() {
    rh_status >/dev/null 2>&1
}

case "$1" in
    start)
        rh_status_q && exit 0
        $1
        ;;
    stop)
        rh_status_q || exit 0
        $1
        ;;
    restart|configtest)
        $1
        ;;
    reload)
        rh_status_q || exit 7
        $1
        ;;
    force-reload)
        force_reload
        ;;
    status)
        rh_status
        ;;
    condrestart|try-restart)
        rh_status_q || exit 0
            ;;
    *)
        echo $"Usage: $0 {start|stop|status|restart|condrestart|try-restart|reload|force-reload|configtest}"
        exit 2
esac
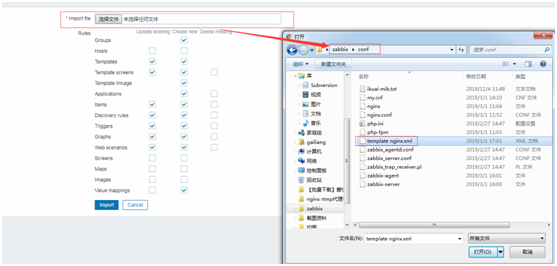
template nginx.xml
此外内容过多,起出文系统字符限制,暂不贴出代码。
zabbix-agent
#!/bin/sh
#
# chkconfig: - 86 14
# description: Zabbix agent daemon
# processname: zabbix_agentd
# config: /etc/zabbix/zabbix_agentd.conf
#

### BEGIN INIT INFO
# Provides: zabbix-agent
# Required-Start: $local_fs $network
# Required-Stop: $local_fs $network
# Should-Start: zabbix zabbix-proxy
# Should-Stop: zabbix zabbix-proxy
# Default-Start:
# Default-Stop: 0 1 2 3 4 5 6
# Short-Description: Start and stop Zabbix agent
# Description: Zabbix agent
### END INIT INFO

# Source function library.
. /etc/rc.d/init.d/functions

if [ -x /usr/local/zabbix/sbin/zabbix_agentd ]; then
    exec=/usr/local/zabbix/sbin/zabbix_agentd
else
    exit 5
fi

prog=${exec##*/}
conf=/usr/local/zabbix/etc/zabbix_agentd.conf
pidfile=$(grep -e "^PidFile=.*$" $conf | cut -d= -f2 | tr -d '\r')
timeout=10

if [ -f /etc/sysconfig/zabbix-agent ]; then
    . /etc/sysconfig/zabbix-agent
fi

lockfile=/var/lock/subsys/zabbix-agent

start()
{
    echo -n $"Starting Zabbix agent: "
    daemon $exec -c $conf
    rv=$?
    echo
    [ $rv -eq 0 ] && touch $lockfile
    return $rv
}

stop()
{
    echo -n $"Shutting down Zabbix agent: "
    killproc -p $pidfile -d $timeout $prog
    rv=$?
    echo
    [ $rv -eq 0 ] && rm -f $lockfile
    return $rv
}

restart()
{
    stop
    start
}

case "$1" in
    start|stop|restart)
        $1
        ;;
    force-reload)
        restart
        ;;
    status)
        status -p $pidfile $prog
        ;;
    try-restart|condrestart)
        if status $prog >/dev/null ; then
            restart
        fi
        ;;
    reload)
        action $"Service ${0##*/} does not support the reload action: " /bin/false
        exit 3
        ;;
    *)
	echo $"Usage: $0 {start|stop|status|restart|try-restart|force-reload}"
	exit 2
	;;
esac
zabbix-server
#!/bin/sh
#
# chkconfig: - 85 15
# description: Zabbix server daemon
# config: /etc/zabbix/zabbix_server.conf
#

### BEGIN INIT INFO
# Provides: zabbix
# Required-Start: $local_fs $network
# Required-Stop: $local_fs $network
# Default-Start:
# Default-Stop: 0 1 2 3 4 5 6
# Short-Description: Start and stop Zabbix server
# Description: Zabbix server
### END INIT INFO

# Source function library.
. /etc/rc.d/init.d/functions

if [ -x /usr/local/zabbix/sbin/zabbix_server ]; then
    exec=/usr/local/zabbix/sbin/zabbix_server
else
    exit 5
fi

prog=${exec##*/}
conf=/usr/local/zabbix/etc/zabbix_server.conf
pidfile=$(grep -e "^PidFile=.*$" $conf | cut -d= -f2 | tr -d '\r')
timeout=10

if [ -f /etc/sysconfig/zabbix-server ]; then
    . /etc/sysconfig/zabbix-server
fi

lockfile=/var/lock/subsys/zabbix-server

start()
{
    echo -n $"Starting Zabbix server: "
    daemon $exec -c $conf
    rv=$?
    echo
    [ $rv -eq 0 ] && touch $lockfile
    return $rv
}

stop()
{
    echo -n $"Shutting down Zabbix server: "
    killproc -p $pidfile -d $timeout $prog
    rv=$?
    echo
    [ $rv -eq 0 ] && rm -f $lockfile
    return $rv
}

restart()
{
    stop
    start
}

case "$1" in
    start|stop|restart)
        $1
        ;;
    force-reload)
        restart
        ;;
    status)
        status -p $pidfile $prog
        ;;
    try-restart|condrestart)
        if status $prog >/dev/null ; then
            restart
        fi
        ;;
    reload)
        action $"Service ${0##*/} does not support the reload action: " /bin/false
        exit 3
        ;;
    *)
	echo $"Usage: $0 {start|stop|status|restart|try-restart|force-reload}"
	exit 2
	;;
esac
chk_nginx.sh
#!/bin/bash
# date : 2018-05-04
# Description:zabbix监控nginx性能以及进程状态
# Note:此脚本需要配置在被监控端,否则ping检测将会得到不符合预期的结果

HOST="192.168.77.1"
PORT="80"

# 检测nginx进程是否存在
function ping {
    /sbin/pidof nginx | wc -l
}
# 检测nginx性能
function active {
    /usr/bin/curl "http://$HOST:$PORT/status" 2>/dev/null| grep 'Active' | awk '{print $NF}'
}
function reading {
    /usr/bin/curl "http://$HOST:$PORT/status" 2>/dev/null| grep 'Reading' | awk '{print $2}'
}
function writing {
    /usr/bin/curl "http://$HOST:$PORT/status" 2>/dev/null| grep 'Writing' | awk '{print $4}'
}
function waiting {
    /usr/bin/curl "http://$HOST:$PORT/status" 2>/dev/null| grep 'Waiting' | awk '{print $6}'
}
function accepts {
    /usr/bin/curl "http://$HOST:$PORT/status" 2>/dev/null| awk NR==3 | awk '{print $1}'
}
function handled {
    /usr/bin/curl "http://$HOST:$PORT/status" 2>/dev/null| awk NR==3 | awk '{print $2}'
}
function requests {
    /usr/bin/curl "http://$HOST:$PORT/status" 2>/dev/null| awk NR==3 | awk '{print $3}'
}
# 执行function
$1
chk_mysql.sh
#!/bin/bash
# 用户MYSQL_USER='zabbix'
MYSQL_USER='zabbix'
# 密码
MYSQL_PWD='zabbix'
# 主机地址/IP
MYSQL_HOST='192.168.77.1'
# 端口
MYSQL_PORT='3306'
# 数据连接
#MYSQL_CONN="/usr/bin/mysqladmin -u${MYSQL_USER} -p${MYSQL_PWD} -h${MYSQL_HOST} -P${MYSQL_PORT}"
MYSQL_CONN="/usr/bin/mysqladmin "
# 参数是否正确
if [ $# -ne "1" ];then
    echo "arg error!"
fi
# 获取数据
case $1 in
    Uptime)
        result=`${MYSQL_CONN} status|cut -f2 -d":"|cut -f1 -d"T"`
        echo $result
        ;;
    Com_update)
        result=`${MYSQL_CONN} extended-status |grep -w "Com_update"|cut -d"|" -f3`
        echo $result
        ;;
    Slow_queries)
        result=`${MYSQL_CONN} status |cut -f5 -d":"|cut -f1 -d"O"`
        echo $result
        ;;
    Com_select)
        result=`${MYSQL_CONN} extended-status |grep -w "Com_select"|cut -d"|" -f3`
        echo $result
                ;;
    Com_rollback)
        result=`${MYSQL_CONN} extended-status |grep -w "Com_rollback"|cut -d"|" -f3`
                echo $result
                ;;
    Questions)
        result=`${MYSQL_CONN} status|cut -f4 -d":"|cut -f1 -d"S"`
                echo $result
                ;;
    Com_insert)
        result=`${MYSQL_CONN} extended-status |grep -w "Com_insert"|cut -d"|" -f3`
                echo $result
                ;;
    Com_delete)
        result=`${MYSQL_CONN} extended-status |grep -w "Com_delete"|cut -d"|" -f3`
                echo $result
                ;;
    Com_commit)
        result=`${MYSQL_CONN} extended-status |grep -w "Com_commit"|cut -d"|" -f3`
                echo $result
                ;;
    Bytes_sent)
        result=`${MYSQL_CONN} extended-status |grep -w "Bytes_sent" |cut -d"|" -f3`
                echo $result
                ;;
    Bytes_received)
        result=`${MYSQL_CONN} extended-status |grep -w "Bytes_received" |cut -d"|" -f3`
                echo $result
                ;;
    Com_begin)
        result=`${MYSQL_CONN} extended-status |grep -w "Com_begin"|cut -d"|" -f3`
                echo $result
                ;;

        *)
        echo "Usage:$0(Uptime|Com_update|Slow_queries|Com_select|Com_rollback|Questions|Com_insert|Com_delete|Com_commit|Bytes_sent|Bytes_received|Com_begin)"
        ;;
esac
chk_disk_status.sh
#!/bin/bash
Device=$1

function rrqm {
    /usr/local/bin/iostat -dxkt 1 2|grep "\b$Device\b"|tail -1|awk '{print $2}'
}

function wrqm {
    /usr/local/bin/iostat -dxkt 1 2|grep "\b$Device\b"|tail -1|awk '{print $3}'
}

function rps {
    /usr/local/bin/iostat -dxkt 1 2|grep "\b$Device\b"|tail -1|awk '{print $4}'
}

function wps {
    /usr/local/bin/iostat -dxkt 1 2|grep "\b$Device\b" |tail -1|awk '{print $5}'
}

function rKBps {
    /usr/local/bin/iostat -dxkt 1 2|grep "\b$Device\b" |tail -1|awk '{print $6}'
}

function wKBps {
    /usr/local/bin/iostat -dxkt 1 2|grep "\b$Device\b" |tail -1|awk '{print $7}'
}

function avgrq_sz {
    /usr/local/bin/iostat -dxkt 1 2|grep "\b$Device\b" |tail -1|awk '{print $8}'
}

function await {
    /usr/local/bin/iostat -dxkt 1 2|grep "\b$Device\b" |tail -1|awk '{print $10}'
}

function svctm {
    /usr/local/bin/iostat -dxkt 1 2|grep "\b$Device\b" |tail -1|awk '{print $11}'
}

function util {
    /usr/local/bin/iostat -dxkt |grep "\b$Device\b" |tail -1|awk '{print $12}'
}

$2
