

Netty线程模型
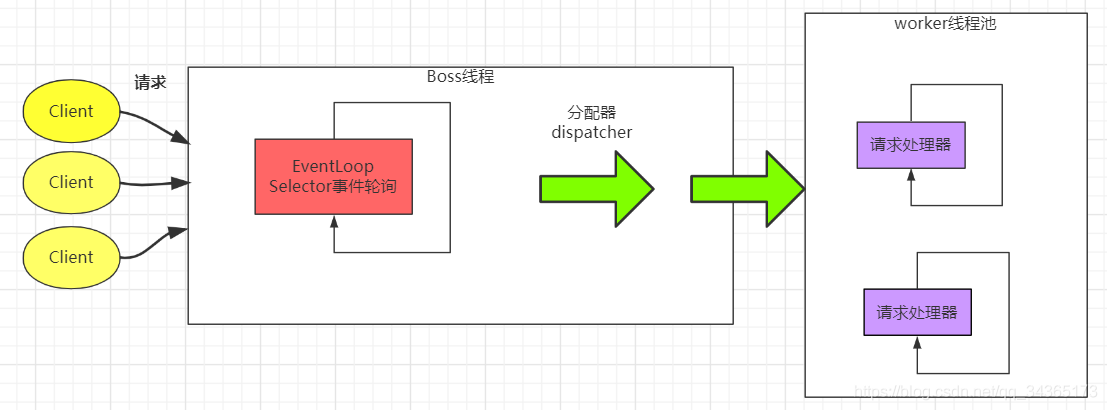 Netty实现了Reactor线程模型,有四个部分:
- resources:资源,任务,就是客户端的请求
- 同步事件复用器:事件轮询,boss线程的selector轮询获取客户端的事件
- dispatcher:分配器,boss线程会把客户端的请求分配给worker中的线程,进行I/O处理
- 请求处理器,处理客户端的I/O请求
代码示例
 	static final int PORT = Integer.parseInt(System.getProperty("port", "8099"));

	public static void main(String[] args) {
	     //创建EventLoopGroup
	     EventLoopGroup bossGroup = new NioEventLoopGroup(1);
	     EventLoopGroup workerGroup = new NioEventLoopGroup();
	     final EchoServerHandler handler = new EchoServerHandler();
	     try {
	         //创建启动器
	         ServerBootstrap bootstrap = new ServerBootstrap();
	         //配置启动器
	         bootstrap.group(bossGroup, workerGroup)
	                 .channel(NioServerSocketChannel.class)
	                 .option(ChannelOption.SO_BACKLOG, 100)
	                 .childHandler(new ChannelInitializer<SocketChannel>() {
	                     @Override
	                     protected void initChannel(SocketChannel socketChannel) throws Exception {
	                         ChannelPipeline p = socketChannel.pipeline();
	                         p.addLast(handler);
	                     }
	                 });
	         //绑定端口,启动
	         ChannelFuture f = bootstrap.bind(PORT).sync();
	         //关闭启动器
	         f.channel().closeFuture().sync();
	     } catch (InterruptedException e) {
	         e.printStackTrace();
	     } finally {
	         bossGroup.shutdownGracefully();
	         workerGroup.shutdownGracefully();
	     }
}
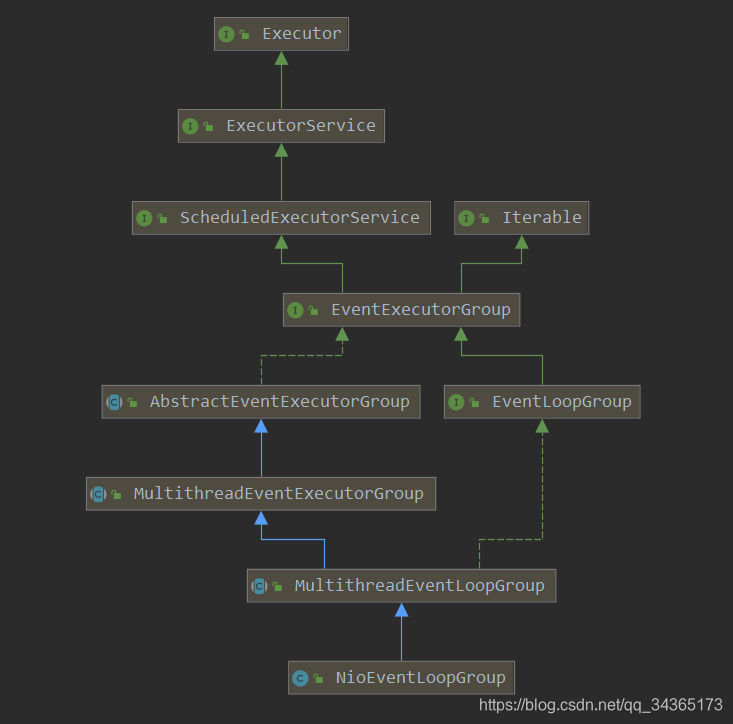
NioEventLoopGroup初始化过程
==第一步:== 先new一个NioEventLoopGroup
EventLoopGroup workerGroup = new NioEventLoopGroup()
==第二步:== 初始化的时候进入NioEventLoopGroup的构造方法:
public NioEventLoopGroup() {
    this(0);
}

public NioEventLoopGroup(int nThreads) {
    this(nThreads, (Executor)null);
}

public NioEventLoopGroup(int nThreads, Executor executor) {
    this(nThreads, executor, SelectorProvider.provider());
}

public NioEventLoopGroup(int nThreads, Executor executor, SelectorProvider selectorProvider) {
        this(nThreads, executor, selectorProvider, DefaultSelectStrategyFactory.INSTANCE);
}

public NioEventLoopGroup(int nThreads, Executor executor, SelectorProvider selectorProvider, SelectStrategyFactory selectStrategyFactory) {
        super(nThreads, executor, new Object[]{selectorProvider, selectStrategyFactory, RejectedExecutionHandlers.reject()});
}
看上面代码最后一个方法: nThreads:要创建的线程数量,如果使用的是无参构造函数,nThreads值为0,如果使用的是有参构造函数,nThreads的值为传入的值 Executor :可以自己定义,如果自己定义了,后面就不会进行初始化了,如果没有定义,默认是null,会在后面进行初始化 SelectorProvider :通过SelectorProvider.provider()创建;SelectorProvider就是为了创建DatagramChannel,Pipe,Selector,ServerSocketChannel,SocketChannel,System.inheritedChannel()等 selectStrategyFactory: DefaultSelectStrategyFactory.INSTANCE,选择策略工厂 RejectedExecutionHandlers.reject():线程池的拒绝策略,当向线程池中添加任务时,如果线程池任务已经满了,就会执行拒绝策略
==第三步:== 进入MultithreadEventLoopGroup类 这个是上一步父类的构造方法,可以看到selectorProvider, selectStrategyFactory, RejectedExecutionHandlers.reject()都放到了Object... args这个数组中了。 这个构造方法干了一件事,如果前面传过来的nThreads是0,就使用默认的DEFAULT_EVENT_LOOP_THREADS,这个值是CPU的核数的2倍,如果前面传过来的nThreads不为0,就使用传过来的线程数量。
protected MultithreadEventLoopGroup(int nThreads, Executor executor, Object... args) {
        super(nThreads == 0 ? DEFAULT_EVENT_LOOP_THREADS : nThreads, executor, args);
}
==第四步:== 进入MultithreadEventExecutorGroup类 DefaultEventExecutorChooserFactory.INSTANCE,是事件执行选择工厂,是通过new DefaultEventExecutorChooserFactory() 创建出来的对象
protected MultithreadEventExecutorGroup(int nThreads, Executor executor, Object... args) {
        this(nThreads, executor, DefaultEventExecutorChooserFactory.INSTANCE, args);
}
接着会进入下面的方法,由于这部分代码比较长,下面源码删除了一部分:
 protected MultithreadEventExecutorGroup(int nThreads, Executor executor, EventExecutorChooserFactory chooserFactory, Object... args) {
        this.terminatedChildren = new AtomicInteger();
        this.terminationFuture = new DefaultPromise(GlobalEventExecutor.INSTANCE);
        if (nThreads <= 0) {
            throw new IllegalArgumentException(String.format("nThreads: %d (expected: > 0)", nThreads));
        } else {
            if (executor == null) {
                executor = new ThreadPerTaskExecutor(this.newDefaultThreadFactory());
            }

            this.children = new EventExecutor[nThreads];

            int j;
            for(int i = 0; i < nThreads; ++i) {
                boolean success = false;
                boolean var18 = false;

                try {
                    var18 = true;
                    this.children[i] = this.newChild((Executor)executor, args);
                    success = true;
                    var18 = false;
                } catch (Exception var19) {
                    throw new IllegalStateException("failed to create a child event loop", var19);
                } finally {

                }

            this.chooser = chooserFactory.newChooser(this.children);
        }
}
this.newDefaultThreadFactory()会创建一个线程工厂,它的作用就是用来创建线程的; new ThreadPerTaskExecutor会创建一个线程执行器; this.children = new EventExecutor[nThreads];创建一个数组children,指定大小为nThreads,这个数组里就是一个个线程,即存放NioEventLoop的; this.children[i] = this.newChild((Executor)executor, args);通过循环的方式,创建NioEventLoop; this.chooser = chooserFactory.newChooser(this.children);创建一个线程执行器的选择器
1:newDefaultThreadFactory
protected ThreadFactory newDefaultThreadFactory() {
   return new DefaultThreadFactory(this.getClass());
}
newDefaultThreadFactory实现了ThreadFactory接口,当调用ThreadFactory的new Thread()时,就会创建一个线程,然后会给线程起名字,NioEventLoop-x-x,第一个x代表的意思是哪个线程组,如bossGroup、workerGroup,第二个x代表的意思是当前线程组下面线程的序号。
2:ThreadPerTaskExecutor
public ThreadPerTaskExecutor(ThreadFactory threadFactory) {
   if (threadFactory == null) {
        throw new NullPointerException("threadFactory");
    } else {
        this.threadFactory = threadFactory;
    }
}

public void execute(Runnable command) {
    this.threadFactory.newThread(command).start();
}
ThreadPerTaskExecutor实现了Executor接口,当调用它的execute方法时,会创建一个线程并且启动,在每一个NioEventLoop,只会创建一个线程。
3:创建一个个的NioEventLoop
 private final EventExecutor[] children;
 private final EventExecutorChooser chooser;

 this.children = new EventExecutor[nThreads];
 int j;
 for(int i = 0; i < nThreads; ++i) {
       boolean success = false;
       boolean var18 = false;

       try {
           var18 = true;
           this.children[i] = this.newChild((Executor)executor, args);
           success = true;
           var18 = false;
       } catch (Exception var19) {
           throw new IllegalStateException("failed to create a child event loop", var19);
       } finally {

       }
   this.chooser = chooserFactory.newChooser(this.children);
}
先创建了一个EventExecutor数组,数组的大小就是传入的nThreads值,数组里面就是一个个的NioEventLoop,创建完数组之后,需要对数组中每一个NioEventLoop进行初始化:
 protected EventLoop newChild(Executor executor, Object... args) throws Exception {
        return new NioEventLoop(this, executor, (SelectorProvider)args[0], ((SelectStrategyFactory)args[1]).newSelectStrategy(), (RejectedExecutionHandler)args[2]);
    }
newChild方法是NioEventLoopGroup中的,返回的是NioEventLoop,return中再次调用了NioEventLoop的构造方法:
NioEventLoop(NioEventLoopGroup parent, Executor executor, SelectorProvider selectorProvider, SelectStrategy strategy, RejectedExecutionHandler rejectedExecutionHandler) {
        super(parent, executor, false, DEFAULT_MAX_PENDING_TASKS, rejectedExecutionHandler);
        if (selectorProvider == null) {
            throw new NullPointerException("selectorProvider");
        } else if (strategy == null) {
            throw new NullPointerException("selectStrategy");
        } else {
            this.provider = selectorProvider;
            NioEventLoop.SelectorTuple selectorTuple = this.openSelector();
            this.selector = selectorTuple.selector;
            this.unwrappedSelector = selectorTuple.unwrappedSelector;
            this.selectStrategy = strategy;
        }
 }
selectorTuple.selector会创建一个netty改造后的selector,即多路复用选择器 再次调用它的父类,跟踪进去看到:
 protected SingleThreadEventLoop(EventLoopGroup parent, Executor executor, boolean addTaskWakesUp, int maxPendingTasks, RejectedExecutionHandler rejectedExecutionHandler) {
        super(parent, executor, addTaskWakesUp, maxPendingTasks, rejectedExecutionHandler);
        this.tailTasks = this.newTaskQueue(maxPendingTasks);
}
再进入SingleThreadEventExecutor:
 protected SingleThreadEventExecutor(EventExecutorGroup parent, Executor executor, boolean addTaskWakesUp, int maxPendingTasks, RejectedExecutionHandler rejectedHandler) {
        super(parent);
        this.threadLock = new Semaphore(0);
        this.shutdownHooks = new LinkedHashSet();
        this.state = 1;
        this.terminationFuture = new DefaultPromise(GlobalEventExecutor.INSTANCE);
        this.addTaskWakesUp = addTaskWakesUp;
        this.maxPendingTasks = Math.max(16, maxPendingTasks);
        this.executor = (Executor)ObjectUtil.checkNotNull(executor, "executor");
        this.taskQueue = this.newTaskQueue(this.maxPendingTasks);
        this.rejectedExecutionHandler = (RejectedExecutionHandler)ObjectUtil.checkNotNull(rejectedHandler, "rejectedHandler");
    }
上面创建了两个队列tailTasks和taskQueue,taskQueue是用来存放任务的队列,tailTasks是用来存放收尾工作的队列
4:chooserFactory.newChooser(this.children) 线程执行器的选择器,NioEventLoopGroup中有一组NioEventLoop,即有一组线程,当有客户端的连接过来时,需要对它进行I/O操作,但是具体是哪一个线程去操作呢,线程执行器的选择器就是做这个活的: 轮询,当有一个客户端过来了,先取出线程组中的第一个线程,又一个客户端过来了,再取线程组中的第二个线程。每来一个客户端 channel,先获取计数器的值,然后用计数器的值对数组取模,然后再将计数器加一,当线程数是 2 的整数次方时,netty 就用位运算的方式来进行取模运算;当线程数不是 2 的整数次方时,netty 就使用取模的方式去计算。
看下整体的类图:
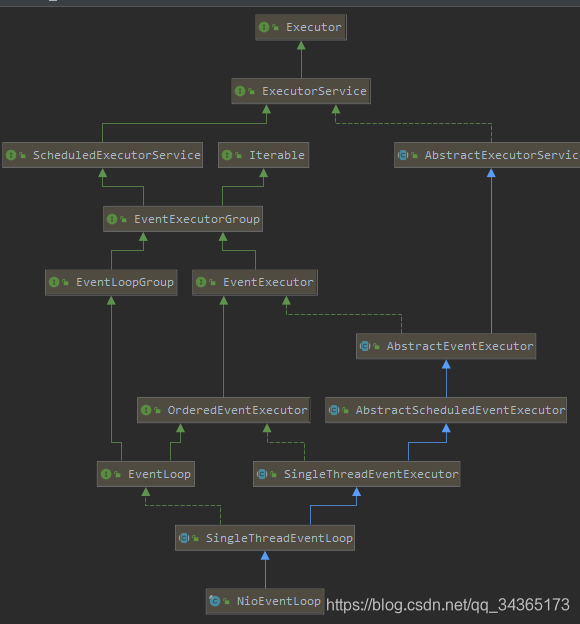 步骤总结:
1:先走构造函数,确定线程的数量,未指定默认是CPU核数*2
3:构建线程执行器,初始化线程执行器
4:创建一个个EventLoop线程
5:创建Selector选择器
6:创建taskQueue队列
步骤总结:
1:先走构造函数,确定线程的数量,未指定默认是CPU核数*2
3:构建线程执行器,初始化线程执行器
4:创建一个个EventLoop线程
5:创建Selector选择器
6:创建taskQueue队列
NioEventLoopGroup启动过程
NioEventLoopGroup的启动,其实就是NioEventLoopGroup中的线程启动,也就是NioEventLoop的启动,NioEventLoop启动有两种方式:服务端启动会触发NioEventLoop启动,客户端连接过来也会触发NioEventLoop启动,下面以服务端启动为例。
public ChannelFuture register(Channel channel) {
    return this.next().register(channel);
}
next是chooser的一个方法,返回一个NioEventLoop,然后调用注册方法 继续跟踪代码:
public ChannelFuture register(Channel channel) {
    return this.register((ChannelPromise)(new DefaultChannelPromise(channel, this)));
}
 eventLoop.execute(new Runnable() {
	public void run() {
	     AbstractUnsafe.this.register0(promise);
	 }
});
public void execute(Runnable task) {
        if (task == null) {
            throw new NullPointerException("task");
        } else {
            //判断当前线程是不是EventLoop线程
            boolean inEventLoop = this.inEventLoop();
            //把任务添加到队列
            this.addTask(task);
            if (!inEventLoop) {
                //启动线程
                this.startThread();
                if (this.isShutdown()) {
                    boolean reject = false;
                    try {
                        if (this.removeTask(task)) {
                            reject = true;
                        }
                    } catch (UnsupportedOperationException var5) {
                    }

                    if (reject) {
                        reject();
                    }
                }
            }

            if (!this.addTaskWakesUp && this.wakesUpForTask(task)) {
                this.wakeup(inEventLoop);
            }

        }
    }
启动服务端后,启动的是main线程,所以会进入下面的方法
private void startThread() {
        if (this.state == 1 && STATE_UPDATER.compareAndSet(this, 1, 2)) {
            try {
                this.doStartThread();
            } catch (Throwable var2) {
                STATE_UPDATER.set(this, 1);
                PlatformDependent.throwException(var2);
            }
        }

    }
private void doStartThread() {
        assert this.thread == null;
        this.executor.execute(new Runnable() {
            public void run() {
                SingleThreadEventExecutor.this.thread = Thread.currentThread();
                if (SingleThreadEventExecutor.this.interrupted) {
                    SingleThreadEventExecutor.this.thread.interrupt();
                }

                boolean success = false;
                SingleThreadEventExecutor.this.updateLastExecutionTime();
                boolean var112 = false;

                int oldState;
                label1907: {
                    try {
                        var112 = true;
                        //启动NioEventLoop
                        SingleThreadEventExecutor.this.run();
                        success = true;
                        var112 = false;
                        break label1907;
                    } catch (Throwable var119) {

                    } finally {
                    }
            }
        });
 }
步骤总结: 1:execute请求执行任务 2:addTask,把任务加入到任务队列 3:判断是不是当前的EventLoop调用 4:startThread和doStartThread,启动一个线程,调用executor.execute
channel的初始化过程
以服务端的channel为例: 首先需要知道channel的类型为NioServerSocketChannel
 bootstrap.group(bossGroup, workerGroup)
	.channel(NioServerSocketChannel.class)
	.option(ChannelOption.SO_BACKLOG, 100)
	.childHandler(new ChannelInitializer<SocketChannel>() {
	@Override
	protected void initChannel(SocketChannel socketChannel) throws Exception {
	    ChannelPipeline p = socketChannel.pipeline();
	    p.addLast(handler);
	}
});
跟踪下一步会进入AbstractBootstrap的channel方法:
 public B channel(Class<? extends C> channelClass) {
        if (channelClass == null) {
            throw new NullPointerException("channelClass");
        } else {
            return this.channelFactory((io.netty.channel.ChannelFactory)(new ReflectiveChannelFactory(channelClass)));
        }
    }
创建了一个ReflectiveChannelFactory,并且赋值给了channelFactory,ReflectiveChannelFactory是用来生产channel的工厂。
@Deprecated
public B channelFactory(ChannelFactory<? extends C> channelFactory) {
     if (channelFactory == null) {
         throw new NullPointerException("channelFactory");
     } else if (this.channelFactory != null) {
         throw new IllegalStateException("channelFactory set already");
     } else {
         this.channelFactory = channelFactory;
         return this.self();
     }
 }
下面是服务端绑定端口跟踪到的源码: 它主要是初始化channel,还有端口的绑定
 private ChannelFuture doBind(final SocketAddress localAddress) {
        final ChannelFuture regFuture = this.initAndRegister();
        final Channel channel = regFuture.channel();
        if (regFuture.cause() != null) {
            return regFuture;
        } else if (regFuture.isDone()) {
            ChannelPromise promise = channel.newPromise();
            doBind0(regFuture, channel, localAddress, promise);
            return promise;
        } else {
            final AbstractBootstrap.PendingRegistrationPromise promise = new AbstractBootstrap.PendingRegistrationPromise(channel);
            regFuture.addListener(new ChannelFutureListener() {
                public void operationComplete(ChannelFuture future) throws Exception {
                    Throwable cause = future.cause();
                    if (cause != null) {
                        promise.setFailure(cause);
                    } else {
                        promise.registered();
                        AbstractBootstrap.doBind0(regFuture, channel, localAddress, promise);
                    }

                }
            });
            return promise;
        }
    }
看下initAndRegister方法: 这个方法用来初始化channel和把channel注册到selector上
final ChannelFuture initAndRegister() {
        Channel channel = null;

        try {
            //实例化channel
            channel = this.channelFactory.newChannel();
            //调用初始化方法
            this.init(channel);
        } catch (Throwable var3) {
            if (channel != null) {
                channel.unsafe().closeForcibly();
                return (new DefaultChannelPromise(channel, GlobalEventExecutor.INSTANCE)).setFailure(var3);
            }

            return (new DefaultChannelPromise(new FailedChannel(), GlobalEventExecutor.INSTANCE)).setFailure(var3);
        }
        //调用register方法,将channel注册到selector
        ChannelFuture regFuture = this.config().group().register(channel);
        if (regFuture.cause() != null) {
            if (channel.isRegistered()) {
                channel.close();
            } else {
                channel.unsafe().closeForcibly();
            }
        }

        return regFuture;
    }
进入newChannel,会再次调用constructor.newInstance()
public T newChannel() {
        try {
            return (Channel)this.constructor.newInstance();
        } catch (Throwable var2) {
            throw new ChannelException("Unable to create Channel from class " + this.constructor.getDeclaringClass(), var2);
        }
}
通过这个调用,会调用到NioServerSocketChannel的无参构造函数:
public NioServerSocketChannel() {
        this(newSocket(DEFAULT_SELECTOR_PROVIDER));
    }
然后调用了newSocket:
private static java.nio.channels.ServerSocketChannel newSocket(SelectorProvider provider) {
        try {
            return provider.openServerSocketChannel();
        } catch (IOException var2) {
            throw new ChannelException("Failed to open a server socket.", var2);
        }
    }
最后一直跟踪到父类的方法:
protected AbstractNioChannel(Channel parent, SelectableChannel ch, int readInterestOp) {
        super(parent);
        this.ch = ch;
        this.readInterestOp = readInterestOp;

        try {
             //设置为非阻塞模式
            ch.configureBlocking(false);
        } catch (IOException var7) {
            try {
                ch.close();
            } catch (IOException var6) {
                if (logger.isWarnEnabled()) {
                    logger.warn("Failed to close a partially initialized socket.", var6);
                }
            }

            throw new ChannelException("Failed to enter non-blocking mode.", var7);
        }
    }
上面的代码看着就有些熟悉了,注册事件,设置为非阻塞模式
