

本文主要总结,组件使用过程中的用法和优化方式
函数组件
本质上就是一个javascript函数, 接收一个' props'(代表属性)对象与并返回一个 React 元素
看一个例子:
    class Panel extends React.Component {
        renderHead () {}

        renderBody () {}

        renderFoot () {}

        render () {
            return (
                <div>
                    {this.renderHead()}
                    {this.renderBody()}
                    {this.renderFoot()}
                </div>
            )
        }
    }
看完上面的例子,细心的同学可能发现了,其实这并没有分解组件本身,在函数renderHead, renderBody, renderFoot中依旧可以访问原先的state, props以及class methods。那怎么减少其复杂程度呢?
    const RenderHead = (props) => {
        return (
            <h3>{props.title}</h3>
        )
    }

    const RenderBody = (props) => {
        return (
            <h3>{props.body}</h3>
        )
    }

    const RenderFoot = (props) => {
        return (
            <h3>{props.foot}</h3>
        )
    }

    class Panel extends React.Component {
        constructor () {
            super()
            this.state = {
                title: '测试标题',
                body: '测试内容',
                foot: '测试结尾'
            }
        }
        render () {
            return (
                <div>
                    <RenderHead title={this.state.title} />
                    <RenderBody body={this.state.body} />
                    <RenderFoot foot={this.state.foot} />
                </div>
            )
        }
    }
这种写法使函数组件更清晰,更短,更易于阅读。也没有必要使用this关键字。防止泛滥组件state,采用props替代。
==注意:如果你的组件没有render()方法以外的方法,就请不要使用class组件==
引出:
我不知道大家有没有注意到在开发过程中当我们更改组件状态的时候,组件就会渲染一次,有时这些重新渲染可能是必要的,但大多数情况下不是必需的,所以这些不必要的这将导致我们的应用程序严重减速,降低了性能。这就造成了渲染的浪费
解决方案:React.memo()
那么如何使用React.memo()?
我们只需要把函数组件作为参数传递给React.memo()函数,返回一个纯组件,我们将在JSX标记中渲染此组件。每当组件中的props和state发生变化时,React会检查上一个state和props以及下一个props和state是否相等,如果不相等,则重新渲染,如果相等,则函数组件不会渲染
    // Index.js
    import React, { Component } from 'react';
    import TestC from './TestC'

    // React.meno防止重复渲染

    class Index extends Component {
        constructor () {
            super()
            this.state = {
                num: 5
            }
        }

        handleClick () {
            this.setState({
                num: 50
            })
        }

        render() {
            return (
                <div>
                    <TestC count={this.state.num} />
                    <div onClick={this.handleClick.bind(this)}>click me</div>
                </div>
             );
        }
    }

    export default Index;


    // TestC.js
    import React from 'react';
    const TestC = (props) => {
        return (
            <div>
                {props.count}
            </div>
        )
    }
    export default React.memo(TestC)
执行结果:
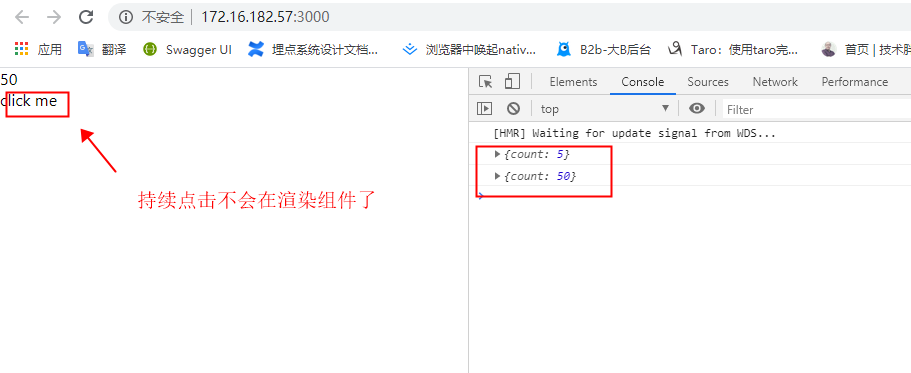
请对照的上面的React.memo()的使用说明看这个例子。
这时候可能有人会发现一个问题,如果我们传对象,数组,复杂的嵌套数据结构,React.memo()是否也能支持 ?
我说明下:React.memo()默认情况下只会对props的复杂对象做浅层对比(浅对比就是只会对比前后两次的props对象引用是否相同,不会对比对象里面的内容是否相同),如果你想控制对比过程,请将自定义的比较函数通过第二个参数传入实现
    import React, { Component } from 'react';

    // 对比上一次传入数据和这次传入的传入的数据是否一致
    const isEqual = (prevProps, nextProps) => {
        if (JSON.stringify(prevProps.data) !== JSON.stringify(nextProps.data)) {
            return false;
        }
        return true;
    }

    const RenderHead = React.memo((props) => {
        console.log('我渲染了')
        return (
            <h3>{props.title}</h3>
        )
    }, isEqual)

    class Index extends Component {
        constructor () {
            super()
            this.state = {
                title: '测试标题',
                titleData: { id: '111', name: '2222' }
            }
        }

        handleClick () {
            this.setState({
                title: '测试标题2',
                titleData: { id: '111', name: '3333' }
            })
        }

        render () {
            return (
                <div>
                    <button onClick={this.handleClick.bind(this)}>换标题</button>
                    <RenderHead title={this.state.title} data={this.state.titleData} />
                </div>
            )
        }
    }

    export default Index
执行结果:
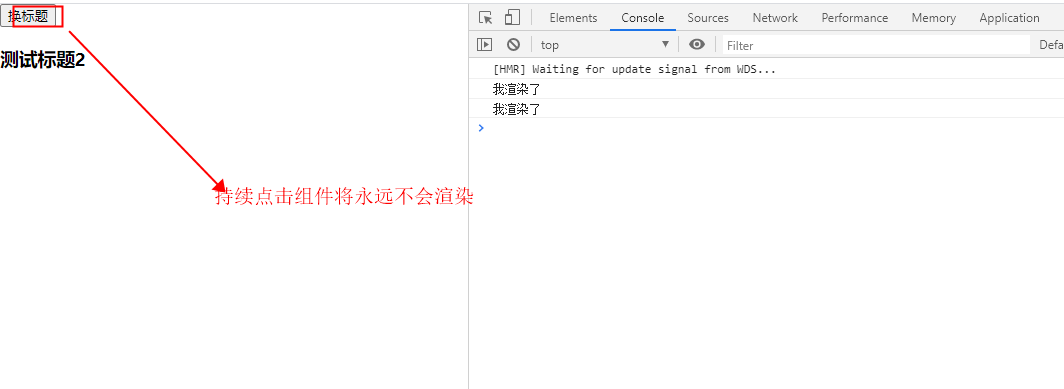
如果你使用过shouldComponentUpdate()这个方法,你会对React.memo()第二个参数非常的熟悉,如果没使用过也没有关系,在类组件中,我们会讲到它的用法。上面这个isEqual有两个参数,如果把 nextProps 传入 render 方法的返回结果与将 prevProps 传入 render方法的返回结果一致则返回true, 否则返回 false。这里的返回值和shouldComponentUpdate()有所不同,如果返回值为false, 组件则重新渲染, 如果返回值为true, 组件则不会渲染。 在isEqual函数内,两个参数的对比就比较灵活,可以自定义方法进行对比
类组件
    class Welcome extends React.Component {
      render() {
        return <h1>Hello, {this.props.name}</h1>;
      }
    }
在函数组件中,我们有了减少组件渲染解决方案。类组件中当然也存在对应的处理方案
为了避免这种情况,React给了我们一个shouldComponentUpdate的生命周期方法
shouldComponentUpdate 方法是一个生命周期方法,当 React 渲染一个组件时,这个方法不会被调用 ,并根据返回值来判断是否要继续渲染组件。
/**
    * nextProps: 组件接收的下一个props值
    * nextState: 组件接收的下一个state值
**/
shouldComponentUpdate (nextProps, nextState) {
    return true
}
当shouldComponentUpdate返回值为true, 就是告诉React要渲染我们的组件
当shouldComponentUpdate返回值为false, 就是告诉React不要渲染我们的组件
    class Index extends Component {
        constructor(props) {
            super(props);
            this.state = {
                count: 0
            }
        }
        componentWillUpdate(nextProps, nextState) {
            console.log('componentWillUpdate')
        }
        componentDidUpdate(prevProps, prevState) {
            console.log('componentDidUpdate')
        }
        shouldComponentUpdate(nextProps, nextState) {
            if (this.state.count === nextState.count) {
                return false
            }
            return true
        }
        render() {
            return (
                <div>
                { this.state.count }
                <button onClick = {() => this.setState({ count: 1 }) }> 点我 </button></div>
            );
        }
    }
    export default Index;
执行后你会发现:
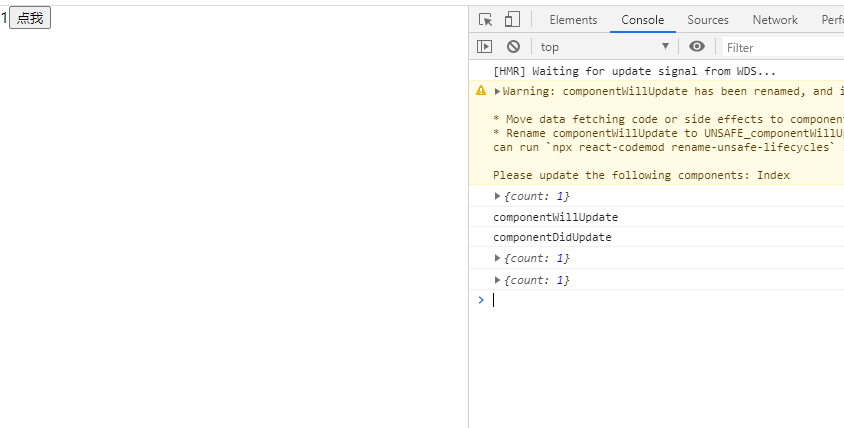
看完上图,你会发现当前的组件在操作完点击按钮只渲染了一次页面。就如上面我们介绍shouldComponentUpdate生命周期所说的返回true渲染组件,返回false不对组件进行渲染,shouldComponentUpdate检查当前this.state.count的计数值是否等于下一个状态nextState.count的计数值。如果相等则不应该渲染,所以返回false, 如果不相等则返回true, 组件渲染展示新值
==注意,这个shouldComponentUpdate生命周期适合使用于类组件中,函数组件没有状态,不能像类组件中一样使用生命周期==
除了上面我们介绍的这个方案,我们还有一个解决方案React.PureComponent
    // Index.js
    class Index extends React.Component {
        constructor(props) {
            super(props);
            this.state = {
                words: ['markar']
            }
        }

        setTitle () {
            const words = this.state.words
            words.push('marklar')
            this.setState({words: words})
        }

        render() {
            return (
                <div>
                    <button onClick={this.setTitle.bind(this)}>click</button>
                    <Child words={this.state.words} />
                </div>
            );
        }
    }

    export default Index;

    // Child.js
    class Child extends React.PureComponent {
        render() {
            console.log(this.props)
            return (
                <div>
                    {this.props.words.join(',')}
                </div>
            );
        }
    }
    export default Child;
上面例子,我们无论怎么点击Child组件都不会进行渲染。原因在于Index中的word引用地址都是一致的,如果要其改变,可以改变引用地址
    setTitle () {
        const words = this.state.words.slice(0) // 改变引用地址
        words.push('marklar')
        this.setState({words: words})
    }
==注意:PureComponent会忽略属性和状态突变的情况,也就是说我的数据变化了,但我的引用地址一致的时候,组件是不会被渲染的的。大家使用的时候要牢记这点。==
==注意:继承React.PureComponent时,不能在重写shouldComponentUpdate, 两者不可同时使用,否则会引发警告==
总结:

    React.memo()是函数组件,优化函数组件中的重新渲染

    React.PureComponent()是类组件,优化类组件中的重新渲染
好了,介绍完函数组件和类组件,我们简单介绍一下,其他几个类型的组件
展示组件与容器组件
我们在实际开发过程中是如何处理数据与视图的关系的?如何更好的区分我们的代码逻辑,所以提出了展示组件和容器组件这对概念
    class Index extends Component {
        constructor(props) {
            super(props);
            this.state = {
                comments: []
            }
        }
        // 数据的调用
        componentDidMount () {
            this.setState({
                comments: [{
                    name: '姓名1',
                    body: '内容1'
                },{
                    name: '姓名2',
                    body: '内容2'
                },{
                    name: '姓名3',
                    body: '内容3'
                }]
            })
        }

        renderComment ({name, body}) {
            return <li key={name}>{name} - {body}</li>
        }

        render() {
            return <ul>{this.state.comments.map(this.renderComment)}</ul>
        }
    }

    export default Index;
目前我们项目中,多数都是使用componentWillMount,选择componentDidMount有以下几个原因:
- 官方建议在componentDidMount中,获取外部数据
- 在17版本中,将去掉componentWillMount
- 如果你的组件需要渲染子组件,而子组件取决与父组件的某个属性,这时候父组件的对应的属性还没有完整获取,因此在子组件使用componentDidUpdate中处理。也就是说如果你要获取外部数据并加载到组件上,只能在组件已经挂载到真实的网页上才能作这件事
- componentDidMount方法中的代码,是在组件已经完全挂载到网页上才会调用被执行,所以可以保证数据的加载。此外,在这方法中调用setState方法,会触发重渲染。所以,官方设计这个方法就是用来加载外部数据用的,或处理其他的副作用代码。
- 在componentWillMount中fetch data,数据一定在render后才能到达,如果你忘记了设置初始状态,用户体验不好。
- 在react16.0以后,componentWillMount可能会被执行多次。
这是一个列表展示组件,一眼看上去,是觉得没什么问题。但我们应该避免写出这样的组件,它负责初始化state, 同时还负责了获取外部数据和渲染列表内容。在实际过程中,可能还会存在更多的功能依赖。后期维护的时候,不管我们要修改数据交互还是页面样式内容,都会去修改同一个组件,逻辑严重耦合,多个功能在同一个组件中维护也不利于团队协作。
    // 容器组件
    class Index extends Component {
        constructor() {
            this.state = {
                comments: []
            }
        }
        // 数据的调用
        componentDidMount () {
            this.setState({
                comments: [{
                    name: '姓名1',
                    body: '内容1'
                },{
                    name: '姓名2',
                    body: '内容2'
                },{
                    name: '姓名3',
                    body: '内容3'
                }]
            })
        }
        render() {
            return <CommentList comments={this.state.comments} />
        }
    }

    export default Index;

    // 展示组件
    class CommentList extends Component {
        constructor(props) {
            super(props)
        }
        renderComment ({name, body}) {
            return <li key={name}>{name} - {body}</li>
        }

        render() {
            return <ul>{this.props.comments.map(this.renderComment)}</ul>
        }
    }

    export default CommentList;
总结下(取的别人的结论,本人表达不是很好):
展示组件
- 主要负责组件内容如何展示
- 从props接收父组件传递来的数据
- 大多数情况可以通过函数定义组件声明
容器组件
- 主要关注组件数据如何交互
- 拥有自身的state,从服务器获取数据,或与redux等其他数据处理模块协作
- 需要通过类定义组件声明,并包含生命周期函数和其他附加方法
那么这样写具体有什么好处呢?
- 解耦了界面和数据的逻辑
- 更好的可复用性,比如同一个回复列表展示组件可以套用不同数据源的容器组件
- 利于团队协作,一个人负责界面结构,一个人负责数据交互
有状态和无状态组件
其实这两个状态的组件,在文章开头的函数组件中就已经讲过了,下面说下两者的概念:
有状态组件:组件能够改变组件本身的状态数据,React中就是state, this.setState方法等调用
无状态组件:只接收其他组件的数据,一般只能看到对this.props的调用,通常可以使用函数定义组件的方式声明
受控与非受控组件
受控组件:值由props或者state传入,用户在元素上交互或者输入的内容引起了state改变。state改变之后重新渲染组件,我们才能在页面中看到元素中值的变化
非受控组件:用户输入不会直接引用state变化,也不会为非受控组件进行传入值。想要获取非受控组件,我们需要使用一个特殊的ref属性,同样也可以使用defaultValue属性来为其指定一次性的默认值
    // 受控组件
    class ControlledInput extends React.Component {
      constructor() {
        super()
        this.state = {value: '请输入'}
      }

      handleChange(event) {
        console.log('输入的值:',event.target.value)
        this.setState({value: event.target.value})
      }

      render() {
        return (
          <label>
            Controlled Component:
            <input type="text"
                   value={this.state.value}
                   onChange={(e) => this.handleChange(e)}
            />
          </label>
        );
      }
    }

    // 非受控组件
    class UncontrolledInput extends React.Component {
      constructor() {
        super();
      }

      handleChange() {
        console.log('输入的值:',this.input.value);
      }

      render() {
        return (
            <label>
              Uncontrolled Component:
              <input type="text"
                     defaultValue='请输入'
                     ref={(input) => this.input = input}
                     onChange={() =>this.handleChange()}
              />
            </label>
        );
      }
    }
