

不要停下脚步,一往无前
前言
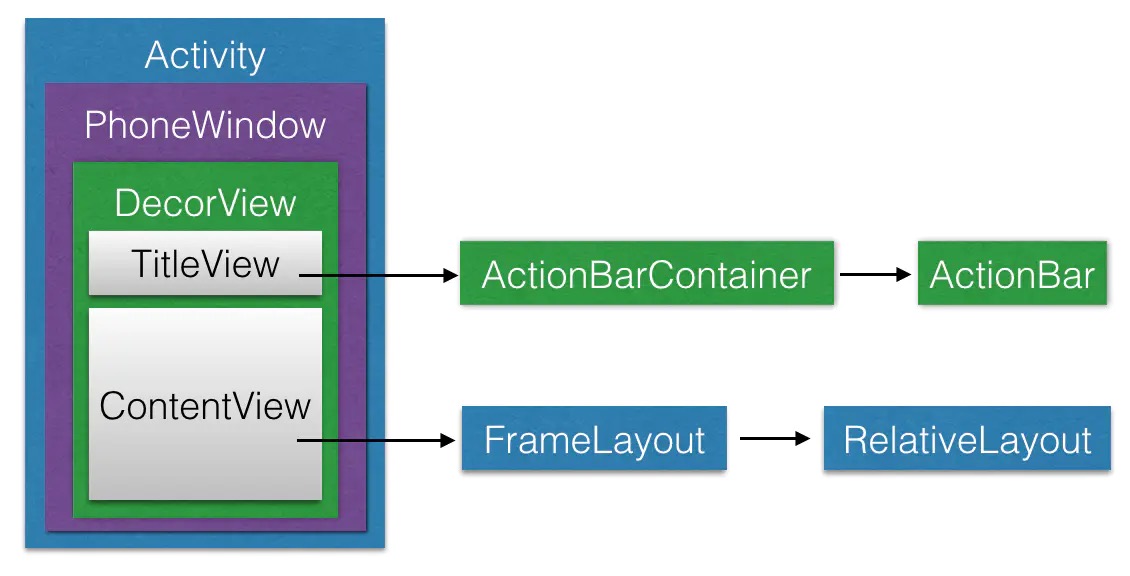
Android View的绘制流程是View相关的核心知识点,也是高阶UI必须要了解的前提。在Android系统中,Window是最基本的窗口单元,每个activity都会创建一个,PhoneWindow是Window的唯一实现类,是View系统和Activity(可以理解为控制器)之前的纽带。Window下有个DecorView,DecorView是一个FrameLayout,是我们自己布局的载体。
一、window的创建
startActivity最终会调用到ActivityThread的handleLaunchActivity方法来创建Activity,
private void handleLaunchActivity(ActivityClientRecord r, Intent customIntent) {
    ....
    // 创建Activity,会调用Activity的onCreate方法
    // 从而完成window的创建
    Activity a = performLaunchActivity(r, customIntent);
    if (a != null) {
        r.createdConfig = new Configuration(mConfiguration);
        Bundle oldState = r.state;
        handleResumeActivity(r.tolen, false, r.isForward, !r.activity..mFinished && !r.startsNotResumed);
    }
}
具体的创建过程是在performLaunchActivity方法中完成的,代码如下:
private Activity performLaunchActivity(ActivityClientRecord r, Intent customIntent) {
       	......
				// 根据反射创建activity
        Activity activity = null;
        try {
            java.lang.ClassLoader cl = r.packageInfo.getClassLoader();
            activity = mInstrumentation.newActivity(
                    cl, component.getClassName(), r.intent);
        }
  			......
        try {
            Application app = r.packageInfo.makeApplication(false, mInstrumentation);
            if (activity != null) {
                // ......
                Window window = null;
               	......
              	// actitiy和window绑定
                activity.attach(appContext, this, getInstrumentation(), r.token,
                        r.ident, app, r.intent, r.activityInfo, title, r.parent,
                        r.embeddedID, r.lastNonConfigurationInstances, config,
                        r.referrer, r.voiceInteractor, window);
            }
        }
  			......
        return activity;
    }
activity的attach方法,将window与activity绑定:
final void attach(Context context, ......,Window window) {
        attachBaseContext(context);
        mFragments.attachHost(null /*parent*/);
        // 创建PhoneWindow,并赋值给activity的mWindow成员
        mWindow = new PhoneWindow(this, window);
        mWindow.setWindowControllerCallback(this);
        mWindow.setCallback(this);
        mWindow.setOnWindowDismissedCallback(this);
        mWindow.getLayoutInflater().setPrivateFactory(this);
  	......
}
二、DecorView的创建和加载
创建好Activity,并且与创建好的Window绑定后,会调用ActivityThread的handleResumeActivity方法
final void handleResumeActivity(IBinder token,boolean clearHide, boolean isForward, 	boolean reallyResume, int seq, String reason) {
    ......
    unscheduleGcIdler();
    mSomeActivitiesChanged = true;

    // 调用activity的onResume方法
    r = performResumeActivity(token, clearHide, reason);

    if (r != null) {
        final Activity a = r.activity;
				......
        if (r.window == null && !a.mFinished && willBeVisible) {
            r.window = r.activity.getWindow();
          	// 获取到window中的decorView
            View decor = r.window.getDecorView();
            decor.setVisibility(View.INVISIBLE);
          	// 得到了WindowManager,WindowManager是一个接口
            // 并且继承了接口ViewManager
            ViewManager wm = a.getWindowManager();
            WindowManager.LayoutParams l = r.window.getAttributes();
            a.mDecor = decor;
            l.type = WindowManager.LayoutParams.TYPE_BASE_APPLICATION;
            l.softInputMode |= forwardBit;
            ......
            // 实际调用的是WindowManagerImpl(WindowManager接口实现类)的addView方法
            if (a.mVisibleFromClient && !a.mWindowAdded) {
                a.mWindowAdded = true;
                wm.addView(decor, l);
            }
          ......
        }
       ......
    }
}
除了Window和DecorView这两个主力之外,还有一个很重要的角色是ViewRoot,ViewRoot是连接WindowManager和DecorView之间的纽带,View的三大流程均由其来完成。在ActivityThread中,当Activity对象被创建完毕后,会将DecorView添加到Window中,同时会创建ViewRootImpl对象,并将ViewRootImpl对象和DecorView建立关联,相关源码如下所示:
// WindowManagerGlobal的addView方法中
public void addView(View view, ViewGroup.LayoutParams params,
        Display display, Window parentWindow) {
    ......
    ViewRootImpl root;
    View panelParentView = null;

    synchronized (mLock) {
        ......
        // 创建ViewRootImpl实例
        root = new ViewRootImpl(view.getContext(), display);
        view.setLayoutParams(wparams);
        mViews.add(view);
        mRoots.add(root);
        mParams.add(wparams);
    }

    try {
      	// 把DecorView加载到Window中
        root.setView(view, wparams, panelParentView);
    } catch (RuntimeException e) {
        // BadTokenException or InvalidDisplayException, clean up.
        synchronized (mLock) {
            final int index = findViewLocked(view, false);
            if (index >= 0) {
                removeViewLocked(index, true);
            }
        }
        throw e;
    }
}
三、绘制的整体流程
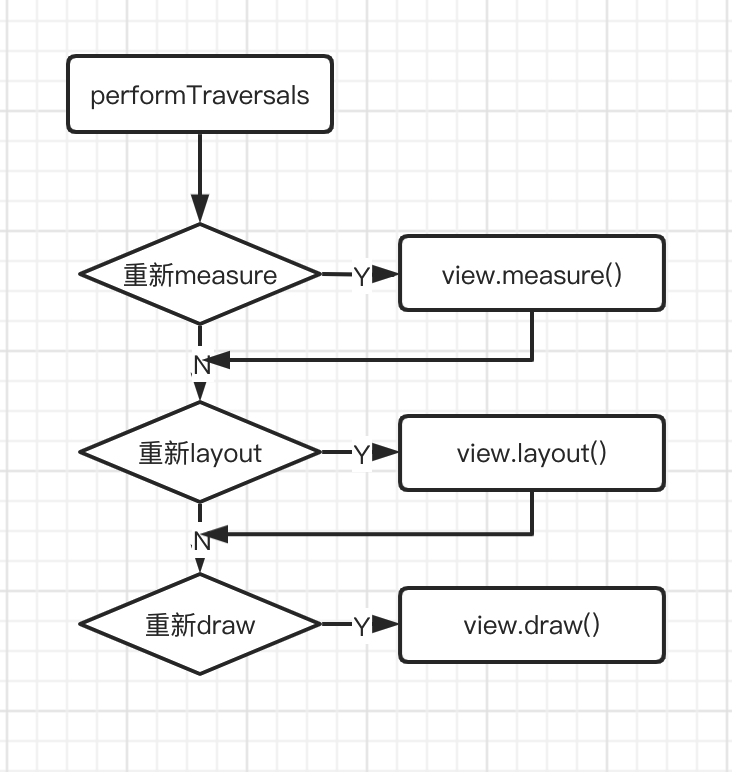
整个绘图流程在ViewRoot类的performTraversals()函数展开,该函数所做 的工作可简单概况为是否需要重新计算视图大小(measure)、是否需要重新安置视图的位置(layout)、以及是否需要重绘(draw)
private void performTraversals() {
    ...
    //最外层ViewGroup是MATCH_PARENT,在实例被创建时确定
    int childWidthMeasureSpec = getRootMeasureSpec(mWidth, lp.width);
    int childHeightMeasureSpec = getRootMeasureSpec(mHeight, lp.height);
  	...
    //测量流程
    performMeasure(childWidthMeasureSpec, childHeightMeasureSpec);
  	...
    //布局流程
    performLayout(lp, mWidth, mHeight);
		...
    //绘制流程
    performDraw();
  	...
}
大概的流程图如下:
0.MeasureSpec
需要先了解MeasureSpec,它是一个32位的整形值,其高2位表示测量模式SpecMode,低30位表示某个测试模式下的规格大小SpecSize。
测量模式有三种:
// 不指定模式, 父视图没有限制子视图的大小,子视图可以是想要
// 的任何尺寸,通常用于系统内部,应用开发中很少用到。
public static final int UNSPECIFIED = 0 << MODE_SHIFT;

// 精确模式,视图宽高指定为match_parent或具体数值时生效,
// 表示父视图已经决定了子视图的精确大小,这种模式下View的测量
// 值就是SpecSize的值。
public static final int EXACTLY     = 1 << MODE_SHIFT;

// 最大值测量模式,当视图的宽高指定为wrap_content时生效,此时
// 子视图的尺寸可以是不超过父视图允许的最大尺寸的任何尺寸。
public static final int AT_MOST     = 2 << MODE_SHIFT;
1) DocerView的MeasureSpec创建
//desiredWindowWidth和desiredWindowHeight是屏幕的尺寸
childWidthMeasureSpec = getRootMeasureSpec(desiredWindowWidth, lp.width);
childHeightMeasureSpec = getRootMeasureSpec(desiredWindowHeight, lp.height);
performMeasure(childWidthMeasureSpec, childHeightMeasureSpec);

private static int getRootMeaureSpec(int windowSize, int rootDimension) {
    int measureSpec;
    switch (rootDimension) {
        case ViewGroup.LayoutParams.MATRCH_PARENT:
            // Window can't resize. Force root view to be windowSize.
            measureSpec = MeasureSpec.makeMeasureSpec(windowSize, MeasureSpec.EXACTLY);
            break;
        case ViewGroup.LayoutParams.WRAP_CONTENT:
            // Window can resize. Set max size for root view.
            measureSpec = MeasureSpec.makeMeasureSpec(windowSize, MeasureSpec.AT_MOST);
            break
        default:
            // Window wants to be an exact size. Force root view to be that size.
            measureSpec = MeasureSpec.makeMeasureSpec(rootDimension, MeasureSpec.EXACTLY);
            break;
    }
    return measureSpec;
}
2)子View的MeasureSpec创建
子View的MeasureSpec值是根据子View的布局参数(LayoutParams)和父容器的MeasureSpec值计算得来的,具 体计算逻辑封装在getChildMeasureSpec()里。
/**
*
* 目标是将父控件的测量规格和child view的布局参数LayoutParams相结合,得到一个 * 最可能符合条件的child *	view的测量规格。
* @param spec 父控件的测量规格
* @param padding 父控件里已经占用的大小
* @param childDimension child view布局LayoutParams里的尺寸
* @return child view 的测量规格
*/
public static int getChildMeasureSpec(int spec, int padding, int childDimesion) {
    int specMode = MeasureSpec.getMode(spec);//父控件的测量模式
    int specSize = MeasureSpec.getSize(spec);//父控件的测量大小

    // padding是指父容器中已占用的空间大小,因此子元素可用的
    // 大小为父容器的尺寸减去padding
    int size = Math.max(0, specSize - padding);

    int resultSize = 0;
    int resultMode = 0;

    switch (sepcMode) {
        // 当父控件的测量模式 是 精确模式,也就是有精确的尺寸了
        case MeasureSpec.EXACTLY:
        		//如果child的布局参数有固定值,比如"layout_width" = "100dp"
						//那么显然child的测量规格也可以确定下来了,测量大小就是100dp,测量模式也是EXACTLY
            if (childDimension >= 0) {
                resultSize = childDimension;
                resultMode = MeasureSpec.EXACTLY;
            }
        		//如果child的布局参数是"match_parent",也就是想要占满父控件
        		//而此时父控件是精确模式,也就是能确定自己的尺寸了,那child也能确定自己大小了
        		else if (childDimension == LayoutParams.MATCH_PARENT) {
                // Child wants to be our size. So be it.
                resultSize = size;
                resultMode = MeasureSpec.EXACTLY;
            }
        		//如果child的布局参数是"wrap_content",也就是想要根据自己的逻辑决定自己大小,
        		//比如TextView根据设置的字符串大小来决定自己的大小
						//那就自己决定自己的大小,不过你的大小肯定不能大于父控件的大小
						//所以测量模式就是AT_MOST,测量大小就是父控件的size
        		else if (childDimesion == LayoutParams.WRAP_CONTENT) {
                resultSize = size;
                resultMode = MeasureSpec.AT_MOST;
            }
            break;

        // 当父控件的测量模式 是 最大模式,也就是说父控件自己还不知道自己的尺寸,但是大小不能超过size
        case MeasureSpec.AT_MOST:
        		//同样的,既然child能确定自己大小,尽管父控件自己还不知道自己大小,也优先满足孩子的需求
            if (childDimension >= 0) {
                resultSize = childDimension;
                resultMode = MeasureSpec.EXACTLY;
            }
        		//child想要和父控件一样大,但父控件自己也不确定自己大小,所以child也无法确定自己大小
        		//但同样的,child的尺寸上限也是父控件的尺寸上限size
        		else if (childDimension == LayoutParams.MATCH_PARENT) {
                resultSize = size;
                resultMode = MeasureSpec.AT_MOST;
            }
        		//child想要根据自己逻辑决定大小,那就自己决定自己的尺寸,但不能超过父控件
        		else if (childDimension == LayoutParams.WRAP_CONTENT) {
                resultSize = size;
                resultMode = MeasureSpec.AT_MOST;
            }
            break;

        // Parent asked to see how big we want to be
        case MeasureSpec.UNSPECIFIED:
            if (childDimension >= 0) {
                // Child wants a specific size... let him have it
                resultSize = childDimension;
                resultMode = MeasureSpec.EXACTLY;
            } else if (childDimension == LayoutParams.MATCH_PARENT) {
                // Child wants to be our size... find out how big it should be
                resultSize = 0;
                resultMode = MeasureSpec.UNSPECIFIED;
            } else if (childDimension == LayoutParams.WRAP_CONTENT) {
                // Child wants to determine its own size....
                // find out how big it should be
                resultSize = 0;
                resultMode == MeasureSpec.UNSPECIFIED;
            }
            break;
        }
    return MeasureSpec.makeMeasureSpec(resultSize, resultMode);
}
可以看到,对于应用层 View ,其 MeasureSpec 由父容器的 MeasureSpec 和自身的 LayoutParams 来共同决定对于不同的父容器和view本身不同的LayoutParams,view就可以有多种MeasureSpec。
- 当view采用固定宽 高的时候,不管父容器的MeasureSpec是什么,view的MeasureSpec都是精确模式并且其大小遵循Layoutparams中的大小;
- 当view的宽高是match_parent时,这个时候如果父容器的模式是精准模式,那么 view也是精准模式并且其大小是父容器的剩余空间,如果父容器是最大模式,那么view也是最大模式并且其大小不会超过父容器的剩余空间;
- 当view的宽高是wrap_content时,不管父容器的模式是精准还是最大化,view的模式总是最大化并且大小不能超过父容器的剩余空间。
- Unspecified模式,这个模式主要用于系统内 部多次measure的情况下,一般来说,我们不需要关注此模式。
1. measure流程
测试流程从ViewRootImpl.performMeasure()开始:
//=============ViewRootImpl.java==============
private void performMeasure(int childWidthMeasureSpec, int childHeightMeasureSpec) {
       ......
       mView.measure(childWidthMeasureSpec, childHeightMeasureSpec);
       ......
}
此处的mView在ViewRootImpl的setView方法中赋值
//=============ViewRootImpl.java==============
public void setView(View view, WindowManager.LayoutParams attrs, View panelParentView) {
    	...
      // 此处的view,就是在ActivityThread的addView方法中传过来的,也就是DecorView
      mView = view;
   		....
      // 此处attrs,就是在ActivityThread的addView方法中传过来的
      mWindowAttributes.copyFrom(attrs);
  		...
}
可以看到,从ViewRootImpl的performMeasure方法开始,一开始进行测试流程的就是从DecorView的measure()操作开始的,追踪代码进入到View的measure()方法:
//=============View.java==============
/**
 * <p>
 * This is called to find out how big a view should be. The parent
 * supplies constraint information in the width and height parameters.
 * </p>
 *
 * <p>
 * The actual measurement work of a view is performed in
 * {@link #onMeasure(int, int)}, called by this method. Therefore, only
 * {@link #onMeasure(int, int)} can and must be overridden by subclasses.
 	view的实际测量工作是在onMeasure()方法中完成的,其子类可以并且必须实现该方法。
 * </p>
 *
 *
 * @param widthMeasureSpec Horizontal space requirements as imposed by the
 *        parent
 * @param heightMeasureSpec Vertical space requirements as imposed by the
 *        parent
 *
 * @see #onMeasure(int, int)
 */
public final void measure(int widthMeasureSpec, int heightMeasureSpec) {
  ....
    // measure ourselves, this should set the measured dimension flag back
    onMeasure(widthMeasureSpec, heightMeasureSpec);
  ....
}
再看我们熟悉的这个onMeasure(int,int)方法:
//=============View.java==============
**
* <p>
* Measure the view and its content to determine the measured width and the
* measured height. This method is invoked by {@link #measure(int, int)} and
* should be overridden by subclasses to provide accurate and efficient
* measurement of their contents.
* </p>
*
* <p>
* <strong>CONTRACT:</strong> When overriding this method, you
* <em>must</em> call {@link #setMeasuredDimension(int, int)} to store the
* measured width and height of this view. Failure to do so will trigger an
* <code>IllegalStateException</code>, thrown by
* {@link #measure(int, int)}. Calling the superclass'
* {@link #onMeasure(int, int)} is a valid use.
* </p>
*
* <p>
* The base class implementation of measure defaults to the background size,
* unless a larger size is allowed by the MeasureSpec. Subclasses should
* override {@link #onMeasure(int, int)} to provide better measurements of
* their content.
* </p>
*
* <p>
* If this method is overridden, it is the subclass's responsibility to make
* sure the measured height and width are at least the view's minimum height
* and width ({@link #getSuggestedMinimumHeight()} and
* {@link #getSuggestedMinimumWidth()}).
* </p>
*
* @param widthMeasureSpec horizontal space requirements as imposed by the parent.
*                         The requirements are encoded with
*                         {@link android.view.View.MeasureSpec}.
* @param heightMeasureSpec vertical space requirements as imposed by the parent.
*                         The requirements are encoded with
*                         {@link android.view.View.MeasureSpec}.
*
* @see #getMeasuredWidth()
* @see #getMeasuredHeight()
* @see #setMeasuredDimension(int, int)
* @see #getSuggestedMinimumHeight()
* @see #getSuggestedMinimumWidth()
* @see android.view.View.MeasureSpec#getMode(int)
* @see android.view.View.MeasureSpec#getSize(int)
*/
protected void onMeasure(int widthMeasureSpec, int heightMeasureSpec) {
    setMeasuredDimension(getDefaultSize(getSuggestedMinimumWidth(), widthMeasureSpec),
            getDefaultSize(getSuggestedMinimumHeight(), heightMeasureSpec));
}
方法很短,注释却很长,注意注释的第二段:当重写这个方法时,你必须调用setMeasuredDimension(int, int)方法来保存View的宽高尺寸,不然的话,会抛出IllegalStateException异常。此方法的调用,也代表着测量阶段的结束。
对于ViewGroup的测量,主要是通过measureChild方法:
/**
 * 请求所有的子View去测量自己, 要考虑到子View的测量要求MeasureSpec及其padding.
 * 会跳过所有状态为GONE的子View, 最主要的工作是在getChildMeasureSpec方法中处理的

 * @param widthMeasureSpec The width requirements for this view
 * @param heightMeasureSpec The height requirements for this view
 */
protected void measureChildren(int widthMeasureSpec, int heightMeasureSpec) {
    final int size = mChildrenCount;
    final View[] children = mChildren;
    for (int i = 0; i < size; ++i) {
        final View child = children[i];
        if ((child.mViewFlags & VISIBILITY_MASK) != GONE) {
            measureChild(child, widthMeasureSpec, heightMeasureSpec);
        }
    }
}

protected void measureChild(View child, int parentWidthMeasureSpec,
        int parentHeightMeasureSpec) {
    final LayoutParams lp = child.getLayoutParams();
    final int childWidthMeasureSpec = getChildMeasureSpec(parentWidthMeasureSpec,
            mPaddingLeft + mPaddingRight, lp.width);
    final int childHeightMeasureSpec = getChildMeasureSpec(parentHeightMeasureSpec,
            mPaddingTop + mPaddingBottom, lp.height);
    child.measure(childWidthMeasureSpec, childHeightMeasureSpec);
}

/**
  * 最繁重的工作都在此方法中,也就是为每个子View计算出它的测量规则MeasureSpec
  * 此方法在对上一小节"子View的MeasureSpec创建"的介绍中已经分析过。
  * 目标是将 ChildView 的 MeasureSpec 和 LayoutParams 结合起来去得到一个最合适的结果。
  *
  * @param spec 对该 View 的测绘要求
  * @param padding 当前 View 在当前唯独上的 paddingand,也有可能含有 margins
  *
  * @param childDimension 在当前维度上(height 或 width)的具体指
  * @return 子视图的 MeasureSpec
  */
 public static int getChildMeasureSpec(int spec, int padding, int childDimension) {
     .........
     // 根据获取到的子视图的测量要求和大小创建子视图的 MeasureSpec
     return MeasureSpec.makeMeasureSpec(resultSize, resultMode);
 }
然后回到了开始所提及的View的measure()->onMeasure()->setDimention()方法。
2.layout流程
首先子View的具体位置是相对于父View而言的,View类的onLayout()方法不需要重写,ViewGroup的onLayout是一个抽象方法,必须要实现这一方法。
layout过程,就是通过测量后的尺寸,获取到view的mMeasuredWidth和mMeasuredHeight,然后通过子View的layout(l,t,r,b)方法来确定子View在父布局中的相对位置。
从ViewRootImpl的performLayout方法开始:
private void performLayout(WindowManager.LayoutParams lp, int desiredWindowWidth,
                           int desiredWindowHeight) {
  ···
    //host,也就是setView方法传进来的DecorView
    final View host = mView;
  ···
    try {
      // 调用了DecorView的layout(r,l,t,b)方法,也就是ViewGroup的layout方法
      host.layout(0, 0, host.getMeasuredWidth(), host.getMeasuredHeight());
      ···
        if (numViewsRequestingLayout > 0) {
          ···
            if (validLayoutRequesters != null) {
              ···
                host.layout(0, 0, host.getMeasuredWidth(), host.getMeasuredHeight());
              ···
            }
        }
    } finally {
      ···
    }
  ···
}
然后看ViewGroup的layout:
@Override
// 方法被final修饰,和measure一样,不能被修改或重写
public final void layout(int l, int t, int r, int b) {
    if (!mSuppressLayout && (mTransition == null || !mTransition.isChangingLayout())) {
        if (mTransition != null) {
            mTransition.layoutChange(this);
        }
      	//直接调用了View的layout方法
        super.layout(l, t, r, b);
    } else {
        // record the fact that we noop'd it; request layout when transition finishes
        mLayoutCalledWhileSuppressed = true;
    }
}
再看View的layout方法
public void layout(int l, int t, int r, int b) {
  ···
    boolean changed = isLayoutModeOptical(mParent) ?
    setOpticalFrame(l, t, r, b) : setFrame(l, t, r, b);

  if (changed || (mPrivateFlags & PFLAG_LAYOUT_REQUIRED) == PFLAG_LAYOUT_REQUIRED) {
    onLayout(changed, l, t, r, b);
    ···
  }
  ···
}
可以看到,真正进行布局的方法是setOpticalFrame(l,t,r,b)和setFrame(l,t,r,b)方法,而setOpticalFrame里面也是调用了setFrame(l,t,r,b)方法。此方法的四个参数确定了其在父View当中的位置。
setFrame(l,t,r,b)方法中会有一个布尔值来判断是否需要对视图进行重绘。
对子View的布局都是通过onLayout()方法中进行的。
布局过程也是通过递归的方式进行的,如果子View仍然是父视图,则会继续layout下去,直到遇到子View的onlayout空方法,则该子View布局流程结束。
3. draw流程
依然先从ViewRootImpl中的performDraw()方法开始:
// ----------------ViewRootImpl---------------
private void performDraw() {
    ...
    try {
        draw(fullRedrawNeeded);
    } finally {
        ...
    }
	...
}

private void draw(boolean fullRedrawNeeded) {
    Surface surface = mSurface;
    if (!surface.isValid()) {
        return;
    }
		.......
    if (!dirty.isEmpty() || mIsAnimating || accessibilityFocusDirty) {
        if (mAttachInfo.mHardwareRenderer != null && mAttachInfo.mHardwareRenderer.isEnabled()) {
            ......
        } else {
            ......
            if (!drawSoftware(surface, mAttachInfo, xOffset, yOffset, scalingRequired, dirty)) {
                return;
            }
        }
    }
   	......
}

    private boolean drawSoftware(Surface surface, AttachInfo attachInfo, int xoff, int yoff,boolean scalingRequired, Rect dirty) {
								......
                // 此mView也就是DecorView
                mView.draw(canvas);
      					......
    }
也就是最终会调用到DecorView的draw(canvas)方法,
// ----------------DecorView---------------
@Override
 public void draw(Canvas canvas) {
   	// 调用父类的draw方法
     super.draw(canvas);

     if (mMenuBackground != null) {
         mMenuBackground.draw(canvas);
     }
}
跟踪super.draw(canvas)方法,最终会跳到View的draw方法。
   /**
     * Manually render this view (and all of its children) to the given Canvas.
     * The view must have already done a full layout before this function is
     * called.  When implementing a view, implement
     * {@link #onDraw(android.graphics.Canvas)} instead of overriding this method.
     * If you do need to override this method, call the superclass version.
     *
     * @param canvas The Canvas to which the View is rendered.
     */
    @CallSuper
    public void draw(Canvas canvas) {
        final int privateFlags = mPrivateFlags;
        final boolean dirtyOpaque = (privateFlags & PFLAG_DIRTY_MASK) == PFLAG_DIRTY_OPAQUE &&
                (mAttachInfo == null || !mAttachInfo.mIgnoreDirtyState);
        mPrivateFlags = (privateFlags & ~PFLAG_DIRTY_MASK) | PFLAG_DRAWN;

        /*
         * Draw traversal performs several drawing steps which must be executed
         * in the appropriate order:
         *
         *      1. Draw the background
         *      2. If necessary, save the canvas' layers to prepare for fading
         *      3. Draw view's content
         *      4. Draw children
         *      5. If necessary, draw the fading edges and restore layers
         *      6. Draw decorations (scrollbars for instance)
         */

        // Step 1, draw the background, if needed
        int saveCount;

        if (!dirtyOpaque) {
            drawBackground(canvas);
        }

        // skip step 2 & 5 if possible (common case)
        final int viewFlags = mViewFlags;
        boolean horizontalEdges = (viewFlags & FADING_EDGE_HORIZONTAL) != 0;
        boolean verticalEdges = (viewFlags & FADING_EDGE_VERTICAL) != 0;
        if (!verticalEdges && !horizontalEdges) {
            // Step 3, draw the content
            if (!dirtyOpaque) onDraw(canvas);

            // Step 4, draw the children
            dispatchDraw(canvas);

            drawAutofilledHighlight(canvas);

            // Overlay is part of the content and draws beneath Foreground
            if (mOverlay != null && !mOverlay.isEmpty()) {
                mOverlay.getOverlayView().dispatchDraw(canvas);
            }

            // Step 6, draw decorations (foreground, scrollbars)
            onDrawForeground(canvas);

            // Step 7, draw the default focus highlight
            drawDefaultFocusHighlight(canvas);

            if (debugDraw()) {
                debugDrawFocus(canvas);
            }

            // we're done...
            return;
        }
通过注释可以看到,一般绘制过程分为7步,但第2步和第5步通常可以忽略,大概步骤:
Step 1. 绘制背景; Step 2. 忽略跳过; Step 3. 绘制内容; Step 4. 绘制子视图; Step 5. 忽略跳过; Step 6. 绘制装饰(前景,滚动条); Step 7. 绘制默认焦点高光。
可以看到第三步onDraw(),也就是我们自定义View一般必须要重写的一个方法,该方法是空方法,因为每个子View的具体内容不一样,需要我们自己去实现逻辑。
第四步,即dispatchDraw(canvas):
// ----- View.java -----
/**
  * Called by draw to draw the child views. This may be overridden
  * by derived classes to gain control just before its children are drawn
  * (but after its own view has been drawn).
  * @param canvas the canvas on which to draw the view
  */
 protected void dispatchDraw(Canvas canvas) {

 }
可以看到View中的该方法是个空实现,但注释写的很清楚,如果该View包含子View的话,就要实现该方法,然后我们去ViewGroup的该方法中去看:
// ------ViewGroup---------
@Override
protected void dispatchDraw(Canvas canvas) {
		...
    for (int i = 0; i < childrenCount; i++) {
        while (transientIndex >= 0 && mTransientIndices.get(transientIndex) == i) {
            final View transientChild = mTransientViews.get(transientIndex);
            if ((transientChild.mViewFlags & VISIBILITY_MASK) == VISIBLE ||
                    transientChild.getAnimation() != null) {
                more |= drawChild(canvas, transientChild, drawingTime);
            }
            transientIndex++;
            if (transientIndex >= transientCount) {
                transientIndex = -1;
            }
        }
		....
}
可以看到,在遍历其子View的时候,调用了绘制子View的方法,最终调用了子View的draw方法。同样的,如果该子 View 还有子视图,也会继续遍历下去调用 drawChild() 方法,继续绘制子 View,直到叶子 View 为止,这样不断递归下去,直到画完整棵 DecorView 树。
