原文地址:blog.codemagic.io/flutter-web…
原文作者:Souvik Biswas
发布时间:2020年7月27日
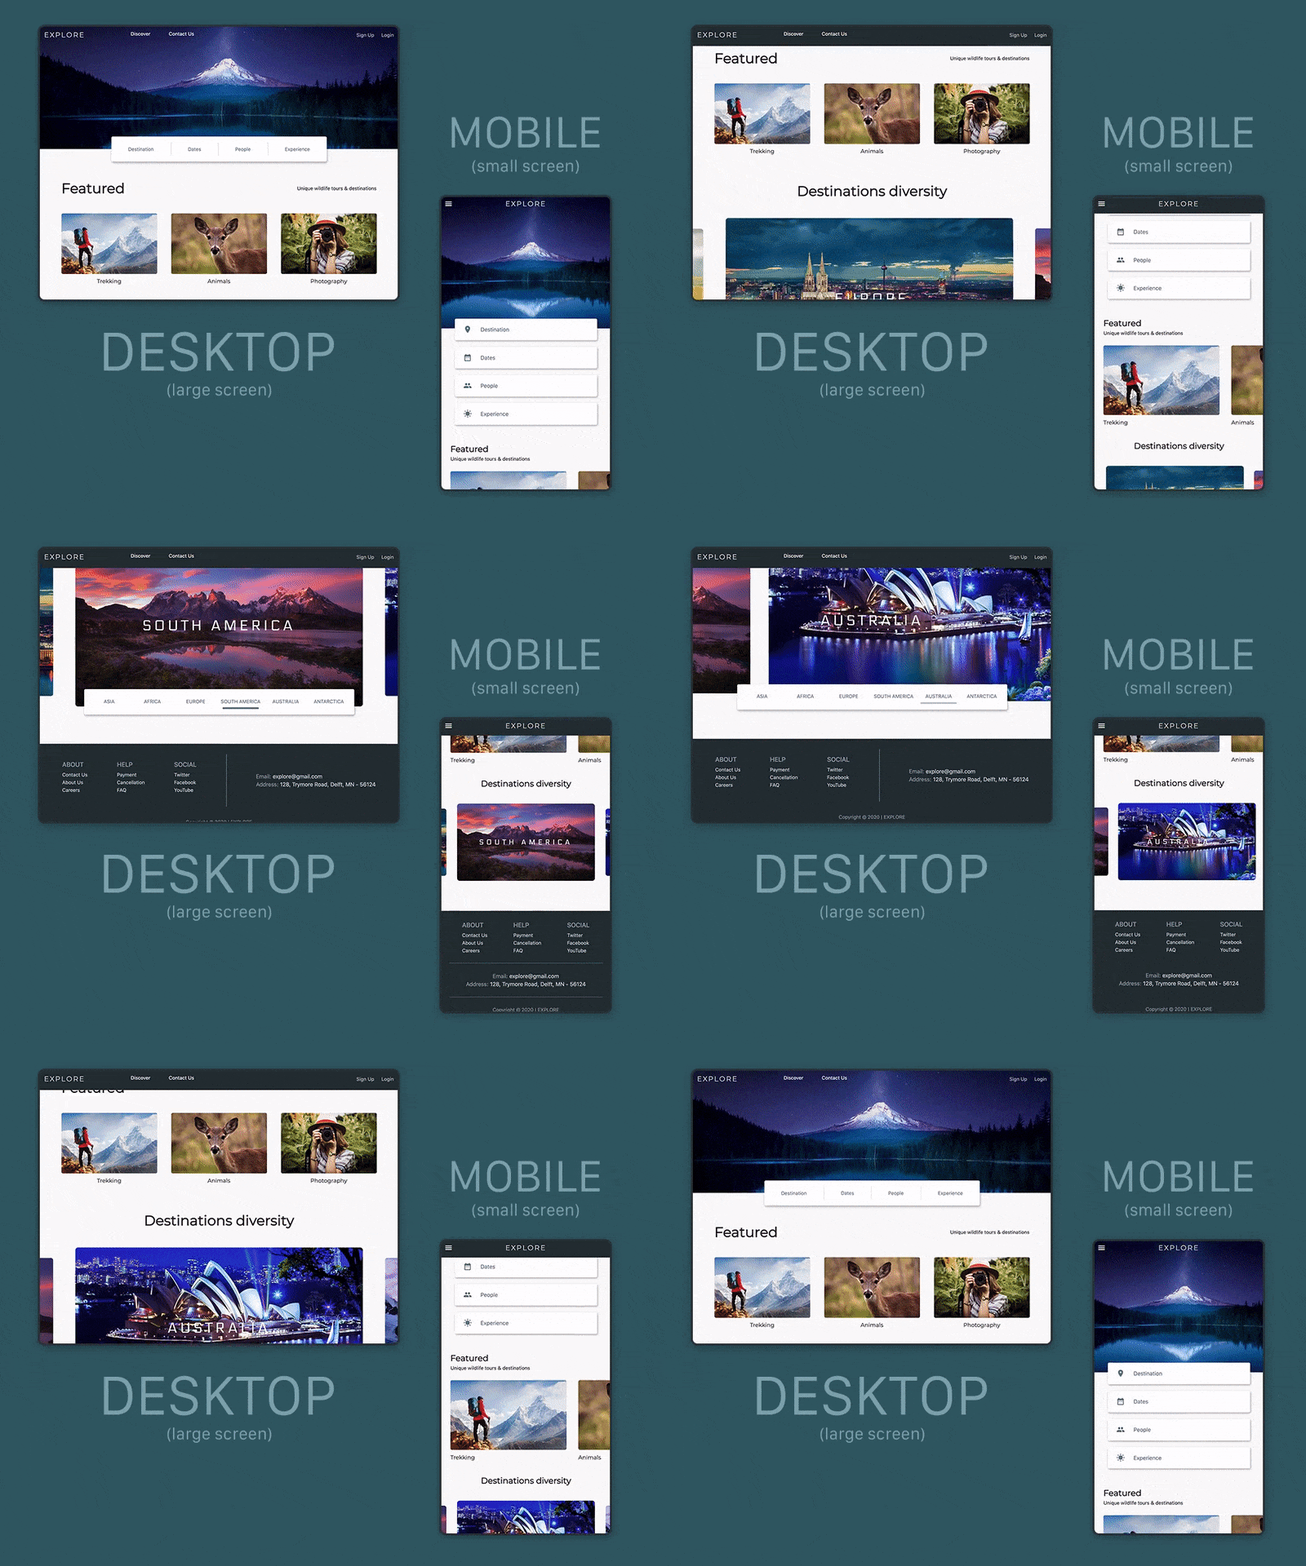
这是Flutter web系列文章的第二部分。在上一篇文章中我们完成了web应用的基本UI设计,也让它变成了响应式的。现在我们将为它添加一些动画和深色主题支持。只是为了刷新你的记忆,这就是我们上次最后的成果。

所以,让我们开始吧,让它变得更好。
Web动画
我们不会添加大量的动画,只是添加一些动画来使网页应用的用户体验更好。我们将为顶部栏和浮动选择器添加一些动画,以循环浏览目的地。
顶部栏
如果你关注上一篇文章,你可能已经注意到,在文章的最后,在最终的演示中,当用户沿着网页滚动时,顶部栏有一个漂亮的颜色过渡(从透明到蓝灰色的阴影)。我在上一篇文章中并没有介绍这部分内容。
那么我们来看看如何实现这种效果。
你只需要根据用户滚动的距离来改变AppBar的backgroundColor的不透明度就可以了。按照下面的步骤操作即可:
- 定义一个滚动控制器和两个变量来存储滚动位置和不透明度。
class _HomePageState extends State<HomePage> {
  ScrollController _scrollController;
  double _scrollPosition = 0;
  double _opacity = 0;

  @override
  Widget build(BuildContext context) {
    // ...
  }
}
- 定义一个名为
_scrollListener()的方法,如下所示:
class _HomePageState extends State<HomePage> {
  // ...

  _scrollListener() {
    setState(() {
      _scrollPosition = _scrollController.position.pixels;
    });
  }

  @override
  Widget build(BuildContext context) {
    // ...
  }
}
- 初始化控制器并将监听器附加到它上面。
class _HomePageState extends State<HomePage> {
  // ...

  @override
  void initState() {
    _scrollController = ScrollController();
    _scrollController.addListener(_scrollListener);
    super.initState();
  }

  @override
  Widget build(BuildContext context) {
    // ...
  }
}
- 在
build方法内部,根据取决于屏幕高度的滚动位置计算不透明度。由于我们定义了顶部图像与屏幕高度的关系,这将帮助你确定不透明度最大的精确位置。
class _HomePageState extends State<HomePage> {
  // ...

  @override
  Widget build(BuildContext context) {
    var screenSize = MediaQuery.of(context).size;
    _opacity = _scrollPosition < screenSize.height * 0.40
        ? _scrollPosition / (screenSize.height * 0.40)
        : 1;

    // ...
  }
}
- 将不透明度设置为AppBar的
backgroundColor,同时传递给大屏幕使用的PreferredSizewidget,同样设置颜色。
class _HomePageState extends State<HomePage> {
 // ...

  @override
  Widget build(BuildContext context) {
    // ...

    return Scaffold(
      appBar: ResponsiveWidget.isSmallScreen(context)
          ? AppBar(
              backgroundColor: Colors.blueGrey[900].withOpacity(_opacity),
              // ...
            )
          : PreferredSize(
              preferredSize: Size(screenSize.width, 1000),
              child: TopBarContents(_opacity),
            ),
      // ...
    );
  }
}
浮动选择器
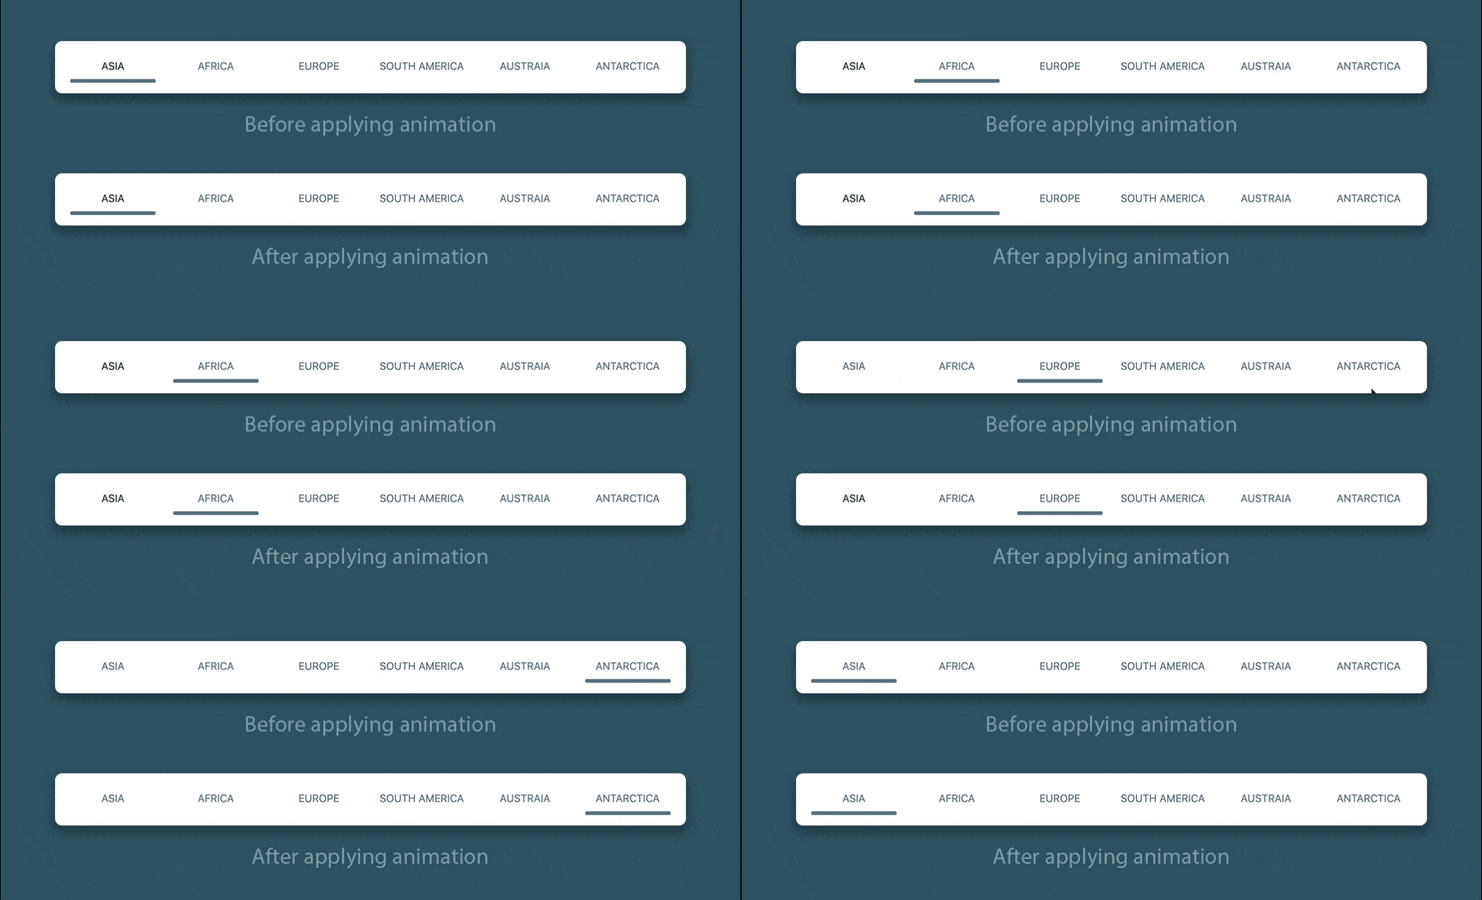
在浮动选择器中,我们将为突出显示所选目的地的下划线添加一个微妙的动画,同时在不同目的地之间进行过渡。

你可以用AnimatedOpacity widget包裹Container(用于下划线)来创建动画。
Visibility(
  maintainSize: true,
  maintainAnimation: true,
  maintainState: true,
  visible: _isSelected[i],
  // add this widget
  child: AnimatedOpacity(
    // animation duration
    duration: Duration(milliseconds: 400),
    // set opacity to the selected option
    opacity: _isSelected[i] ? 1 : 0,
    child: Container(
      height: 5,
      decoration: BoxDecoration(
        color: Colors.blueGrey,
        borderRadius: BorderRadius.all(
          Radius.circular(10),
        ),
      ),
      width: screenSize.width / 10,
    ),
  ),
)
动态主题
你可以使用一个叫做dynamic_theme的Flutter包来为web应用添加动态主题支持,并将其持久化。
- 将该包添加到pubspec.yaml文件中:
dynamic_theme: ^1.0.1
- 在
main.dart文件中,将MaterialApp小组件与DynamicTheme小组件包裹在一起,像这样:
class MyApp extends StatelessWidget {
  @override
  Widget build(BuildContext context) {
    return DynamicTheme(
      defaultBrightness: Brightness.light,
      data: (brightness) {
        // ...
      },
      themedWidgetBuilder: (context, data) => MaterialApp(
        title: 'Explore',
        theme: data,
        debugShowCheckedModeBanner: false,
        home: HomePage(),
      ),
    );
  }
}
- 在
DynamicThree的data属性中定义你想为明暗模式使用的主题:
DynamicTheme(
  data: (brightness) {
    return brightness == Brightness.light
        ? ThemeData(
            primarySwatch: Colors.blueGrey,
            backgroundColor: Colors.white,
            cardColor: Colors.blueGrey[50],
            primaryTextTheme: TextTheme(
              button: TextStyle(
                color: Colors.blueGrey,
                decorationColor: Colors.blueGrey[300],
              ),
              subtitle1: TextStyle(
                color: Colors.black,
              ),
            ),
            bottomAppBarColor: Colors.blueGrey[900],
            iconTheme: IconThemeData(color: Colors.blueGrey),
            brightness: brightness,
          )
        : ThemeData(
            primarySwatch: Colors.blueGrey,
            backgroundColor: Colors.blueGrey[900],
            cardColor: Colors.black,
            primaryTextTheme: TextTheme(
              button: TextStyle(
                color: Colors.blueGrey[200],
                decorationColor: Colors.blueGrey[50],
              ),
              subtitle1: TextStyle(
                color: Colors.blueGrey[300],
              ),
            ),
            bottomAppBarColor: Colors.black,
            iconTheme: IconThemeData(color: Colors.blueGrey[200]),
            brightness: brightness,
          );
  },
  // ...
);
- 根据您在
ThemeData小组件中定义的属性,设置不同小组件的主题。例如,您可以像这样设置AppBar的背景色。
AppBar(
  backgroundColor:
      Theme.of(context).bottomAppBarColor.withOpacity(_opacity),
  // ...
)
我希望底部栏的颜色和顶部栏的颜色是一样的,所以我根据ThemeData的
bottomAppBarColor属性来定义颜色。
快要完成了,但我们也来谈谈可定制的滚动条。
可定制的滚动条
你可能已经注意到,我们创建的网页没有一个可见的滚动条,你可以拖动。默认情况下,Flutter web不会为可滚动内容显示滚动条。
你可以像在普通的移动应用中一样,通过用Scrollbar widget包装整个网页的可滚动内容来显示滚动条。我想这可能会解决一些人的问题,但在我们的案例中并没有。
结果发现,如果你的网页里面有其他可滚动的内容,默认的
Scrollbarwidget可能会损坏。
使用Scrollbar widget有一个注意事项。实际上,它可以接收到你的应用程序中存在的每一个滚动事件(包括嵌套的可滚动部件),而不是像普通网页那样只接收主要的滚动事件。而且这个小组件并没有附带一个属性来指定深度,你可以用这个属性来限制它只对主要的滚动事件。
在我们的web应用中,我们有两个嵌套的可滚动widget,一个是用SingleChildScrollView(只适用于小屏幕)包装的Row,显示功能磁贴,另一个是带有目的地的CarouselSlider。所以,默认的Scrollbar肯定不会按照预期工作。
如何解决呢?你可以使用NotificationListener() widget来获取滚动事件的深度,并且只有当深度为0时才更新Scrollbar(主要滚动事件用0表示)。
另外,默认的Scrollbar没有任何好的自定义选项,比如改变滚动条的颜色、宽度和高度。
所以,为了解决这些问题,我创建了一个新的widget,叫做WebScrollbar。
它是一个StatefulWidget,你可以向它传递以下属性:
class WebScrollbar extends StatefulWidget {
  final Widget child;
  final ScrollController controller;
  final double heightFraction;
  final double width;
  final Color color;
  final Color backgroundColor;
  final bool isAlwaysShown;

  WebScrollbar({
    @required this.child,
    @required this.controller,
    this.heightFraction = 0.20,
    this.width = 8,
    this.color = Colors.black45,
    this.backgroundColor = Colors.black12,
    this.isAlwaysShown = false,
  })  : assert(child != null),
        assert(controller != null),
        assert(heightFraction != null &&
            heightFraction < 1.0 &&
            heightFraction > 0.0),
        assert(width != null),
        assert(color != null),
        assert(backgroundColor != null),
        assert(isAlwaysShown != null);

  @override
  _WebScrollbarState createState() => _WebScrollbarState();
}
让我们看看主要部分,知道它是如何创建的。
首先,我使用了滚动控制器,它被传递给这个widget,并给它附加了一个监听器。
class _WebScrollbarState extends State<WebScrollbar> {
  double _scrollPosition = 0;
  bool _isUpdating;
  Timer timer;

  _scrollListener() {
    setState(() {
      _scrollPosition = widget.controller.position.pixels;
    });
  }

  @override
  void initState() {
    widget.controller.addListener(_scrollListener);
    _isUpdating = false;
    super.initState();
  }

  @override
  Widget build(BuildContext context) {
    // ...
  }
}
在build方法里面,我计算了屏幕尺寸,用于设置滚动条的高度。
在_topMargin变量中,我计算了滚动条上方应该有多少空位,基本上是用来设置滚动条的位置。初始设置为零。
class _WebScrollbarState extends State<WebScrollbar> {
  // ...

  @override
  Widget build(BuildContext context) {
    var screenSize = MediaQuery.of(context).size;
    double _scrollerHeight = screenSize.height * widget.heightFraction;

    double _topMargin = widget.controller.hasClients
        ? ((screenSize.height *
                _scrollPosition /
                widget.controller.position.maxScrollExtent) -
            (_scrollerHeight *
                _scrollPosition /
                widget.controller.position.maxScrollExtent))
        : 0;

    // ...
  }
}
为了显示滚动条,我使用了一个Stack,这样我就可以把它放在传递给这个widget的子节点上。
Stack(
  children: [
    widget.child,
    AnimatedOpacity(
      opacity: widget.isAlwaysShown
          ? 1
          : widget.controller.hasClients ? _isUpdating ? 1 : 0 : 0,
      duration: Duration(milliseconds: 300),
      child: Container(
        alignment: Alignment.centerRight,
        height: MediaQuery.of(context).size.height,
        width: widget.width + 2,
        margin: EdgeInsets.only(
          left: MediaQuery.of(context).size.width - widget.width + 2,
        ),
        color: widget.backgroundColor,
        child: Align(
          alignment: Alignment.topCenter,
          child: GestureDetector(
            child: Container(
              height: _scrollerHeight,
              width: widget.width,
              margin: EdgeInsets.only(
                left: 1.0,
                right: 1.0,
                top: _topMargin,
              ),
              decoration: BoxDecoration(
                color: widget.color,
                borderRadius: BorderRadius.all(
                  Radius.circular(3.0),
                ),
              ),
            ),
          ),
        ),
      ),
    ),
  ],
),
为了只更新主滚动事件的滚动条,你必须用NotificationListener()包裹整个Stack widget并检查深度。
NotificationListener<ScrollNotification>(
  onNotification: (notification) {
    if (notification.depth == 0) {
      if (notification is ScrollUpdateNotification) {
        timer.cancel();
        setState(() {
          _isUpdating = true;
        });
      } else {
        timer = Timer(Duration(seconds: 5), () {
          setState(() {
            _isUpdating = false;
          });
        });
      }
    }
    return true;
  },
  child: Stack(
    // ...
  ),
);
你必须定义GestureDetector widget的onTapCancel、onTapDown和onVerticalDragUpdate属性,以便在滚动条被拖动时更新它的位置。
GestureDetector(
  child: Container(
    // ...
  ),
  onTapCancel: () {
    timer = Timer(Duration(seconds: 5), () {
      setState(() {
        _isUpdating = false;
      });
    });
  },
  onTapDown: (details) {
    timer.cancel();
    setState(() {
      _isUpdating = true;
    });
  },
  onVerticalDragUpdate: (dragUpdate) {
    widget.controller.position.moveTo(dragUpdate
            .globalPosition.dy +
        dragUpdate.globalPosition.dy *
            (_scrollPosition /
                widget.controller.position.maxScrollExtent) -
        (_scrollerHeight *
            _scrollPosition /
            widget.controller.position.maxScrollExtent));

    setState(() {
      if (dragUpdate.globalPosition.dy >= 0 &&
          _scrollPosition <=
              widget.controller.position.maxScrollExtent) {
        _scrollPosition = dragUpdate.globalPosition.dy +
            dragUpdate.globalPosition.dy *
                (_scrollPosition /
                    widget
                        .controller.position.maxScrollExtent) -
            (_scrollerHeight *
                _scrollPosition /
                widget.controller.position.maxScrollExtent);
      }
    });
  },
),
现在,只需将包含整个网页的SingleChildScrollView部件用WebScrollbar包裹起来即可显示。
WebScrollbar(
  color: Colors.blueGrey,
  backgroundColor: Colors.blueGrey.withOpacity(0.3),
  width: 10,
  heightFraction: 0.3,
  controller: _scrollController,
  child: SingleChildScrollView(
    // ...
  ),
),
现在你有了一个完全可定制的滚动条,可以在你的网页上使用。
整个WebScrollbar的UI代码在这里。
结束语
在这篇文章中,我们介绍了动画和动态主题。在本系列的下一篇文章中,您将学习如何在Flutter web的不同网页之间导航。
有用的链接和参考资料
Souvik Biswas是一个充满激情的移动应用开发者(Android和Flutter)。他在整个旅程中参与了大量的移动应用。喜欢开源贡献到GitHub。他目前正在印度信息技术学院Kalyani攻读计算机科学与工程专业的技术学士学位。他还在Flutter Community上写Flutter文章。
通过( www.DeepL.com/Translator )(免费版)翻译