

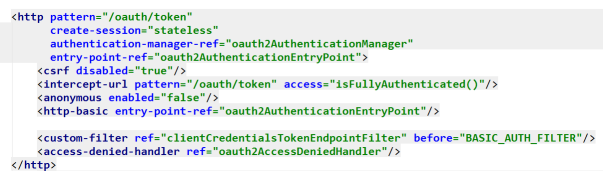
 我们的登陆配置从这里开始,OAuth2支持几种登陆方式,这里hrms采用的是用户名密码登陆。
/oauth/token?client_id=client&client_secret=secret&grant_type=password&username=10223&password=123456&p_phone_no=111111
这是一个标准的hrms登陆url,这里面的参数会被分成三个部分:
client_id=client&client_secret=secret&grant_type=password //client认证参数
username=10223&password=123456 //用户名密码
p_phone_no=111111 //其他参数
这个访问会被交到org.springframework.security.oauth2.provider.endpoint.TokenEndpoint这个类中去处理:
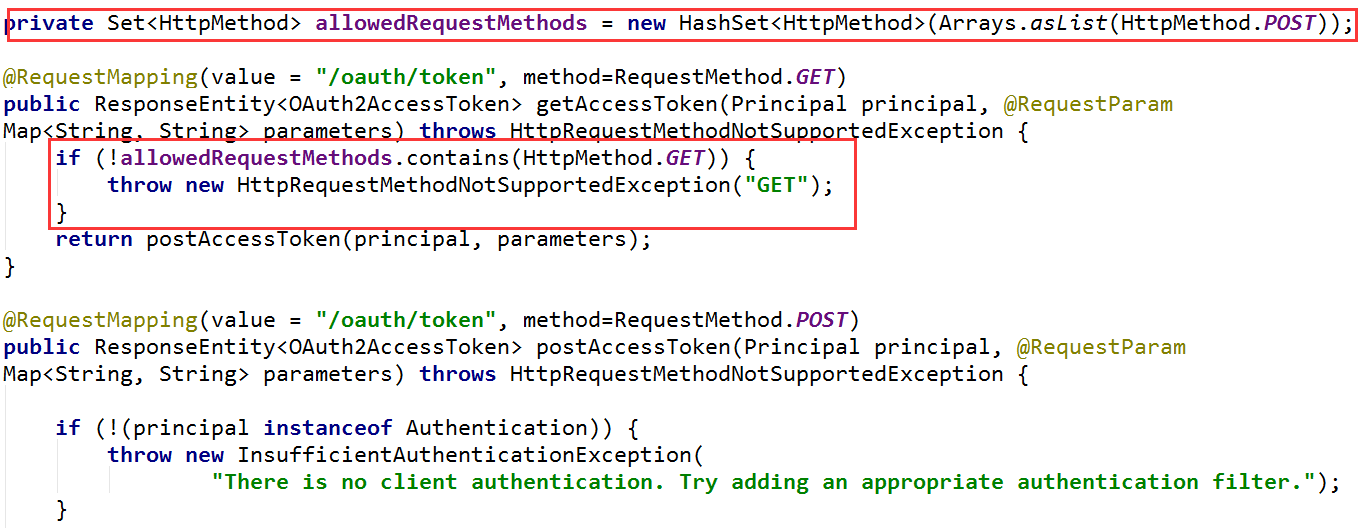
这个类里有两个/oauth/token入口,区分为get方式和post方式,这里注意观察红色部分,使用get方式提交会直接抛出异常,所以这里我们只能用post方式提交。
通过password和username换取token的过程可以大致概括为:p/u + client-->Authentication(未验证)-->Authentication(通过验证)-->token 这是一连串变化的过程,前者的信息被包含在了后者之中,下面我们细细分析
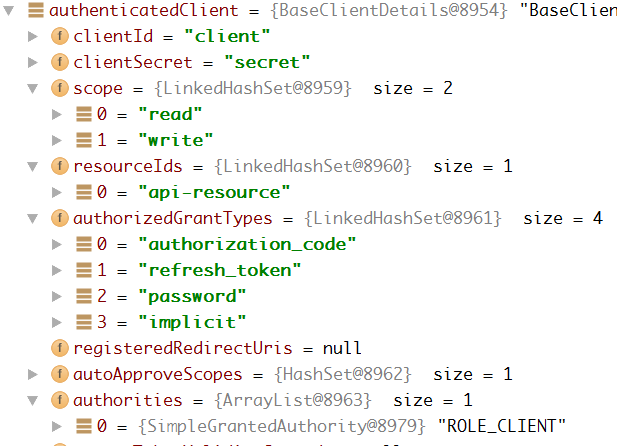
这里我们会有一个client的概念,作用是区分不同的模块(或者不同的应用)的登陆,并且不同的client会拥有不同的权限以及不同的验证方式,为了方便,我们把这些数据存在服务器数据库里,如图所示:

为了将这些client数据存在数据库里而不是写死在某个xml文件中,我们需要做如下的配置:
<beans:bean id="clientDetailsService" class="org.springframework.security.oauth2.provider.client.JdbcClientDetailsService">
    <beans:constructor-arg index="0" ref="dataSource"/>
</beans:bean>
dataSource是我们在服务器配置的jndi数据源。而JdbcClientDetailsService是实现了ClientDetailsService接口的一个实现类,另外还有InMemoryClientDetailsService可以选择。
通过JdbcClientDetailsService的loadClientByClientId方法,我们从数据库里取到了client的完整数据,并包装到ClientDetails中
用户名密码已经其他传入的参数则被包装成了TokenRequest,至此,所有需要的数据都被装载到ClientDetails和TokenRequest这两个类的实例中。接下来便是依据参数生成Authentication并进行验证,最后用Authentication换取Token并返回了。而这一串过程都被包含在了下面这一句代码中:
OAuth2AccessToken token = getTokenGranter().grant(tokenRequest.getGrantType(), tokenRequest);getTokenGranter返回给我们的是接口TokenGranter的实现类,依据我们的grant_type=password,给我们返回了专用于密码验证的ResourceOwnerPasswordTokenGranter实现类,这个类的grant方法调用了两个方法:1、自己重写的getOAuth2Authentication方法,返回Authentication。2、tokenServices的createAccessToken方法,传入Authentication返回我们最终需要的Token。-
先看第一步:
		Authentication userAuth = new UsernamePasswordAuthenticationToken(username, password);
		((AbstractAuthenticationToken) userAuth).setDetails(parameters);
		try {
			userAuth = authenticationManager.authenticate(userAuth);
		}
		catch (AccountStatusException ase) {
			//covers expired, locked, disabled cases (mentioned in section 5.2, draft 31)
			throw new InvalidGrantException(ase.getMessage());
		}
传入用户名和密码生成的Authentication进行验证,同时又返回这个经过处理的Authentication,在后面我们会看到两者的变化。注意这里的authenticationManager,它有一个集合属性
private List<AuthenticationProvider> providers = Collections.emptyList();
是的,这里的providers 便是我们在standardSecurity.xml中配置的authentication-manager:
	<authentication-manager alias="defaultAuthenticationManager">
		<authentication-provider ref="daoAuthenticationProvider"/>
		<authentication-provider ref="loginAuthenticationProvider"/>
		<authentication-provider ref="wxLoginAuthenticationProvider"/>
	</authentication-manager>
其中,loginAuthenticationProvider和wxLoginAuthenticationProvider都是我们自己定义的,而这里的getOAuth2Authentication方法中使用的是一个for循环调用Provider的authenticate方法来对Authentication进行验证
			try {
				result = provider.authenticate(authentication);

				if (result != null) {
					copyDetails(authentication, result);
					break;
				}
			}
			catch (AccountStatusException e) {
				prepareException(e, authentication);
				// SEC-546: Avoid polling additional providers if auth failure is due to
				// invalid account status
				throw e;
			}
所以有多种验证方式时,只要有一个Provider验证通过便可以获得Token,不同的验证方法可以并存。
在我们自定义的Provider中,验证通过后,通常我们会赋予其一个角色(role),用以确定其token权限:
authorities.add(new SimpleGrantedAuthority("ROLE_UNITY"));
验证之前的Authentication:
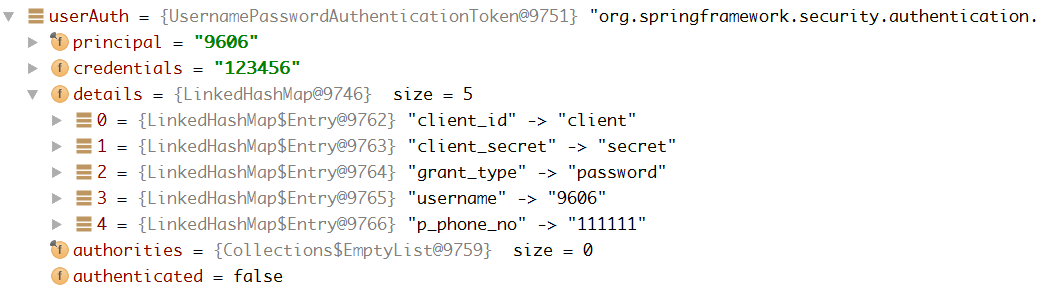
验证通过之后的Authentication:
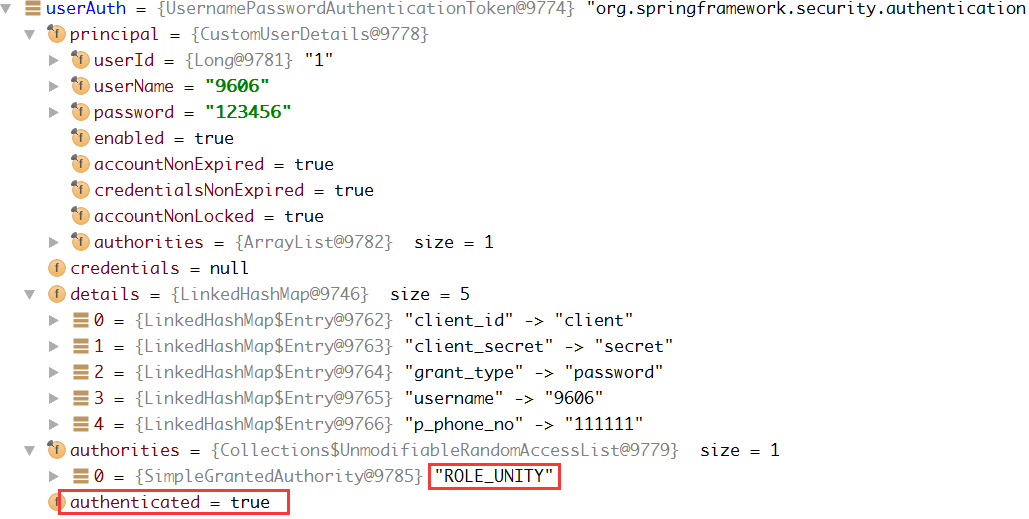
注意到我们添加的角色信息 “ROLE_UNITY“ 已经有了,并且authenticated已经通过为true。
最后是调用tokenServices的createAccessToken方法,将Authentication转化为Token,这里的tokenService也是我们在xml文件中重新指定的:
<beans:bean id="tokenServices" class="hstaff.core.token.CustomTokenServices">
    <beans:property name="tokenStore" ref="tokenStore"/>
    <beans:property name="supportRefreshToken" value="false"/>
    <beans:property name="accessTokenValiditySeconds" value="1296000"/>
    <beans:property name="clientDetailsService" ref="clientDetailsService"/>
</beans:bean>最后调用的tokenStore的getAccessToken方法将Authentication和生成的Token一一对应并保存起来,而Authentication中几乎包含了所有的参数,所以我们也就明白了通过对AccessToken的解析,我们可以重新找回认证Authentication中的所有信息,包括username,也包括后期验证通过后发放的role,甚至包括其他自定义的参数。
让tokenStore将token存入数据库中,对应xml中如下的配置
<beans:bean id="tokenStore" class="org.springframework.security.oauth2.provider.token.store.JdbcTokenStore">
    <beans:constructor-arg index="0" ref="dataSource"/>
</beans:bean>
<beans:bean id="userApprovalHandler"
class="org.springframework.security.oauth2.provider.approval.TokenStoreUserApprovalHandler">
<beans:property name="tokenStore" ref="tokenStore"/>
<beans:property name="clientDetailsService" ref="clientDetailsService"/>
<beans:property name="requestFactory" ref="requestFactory"/>
</beans:bean>至此,可配置项基本都说到了,password验证流程结束。
