

1、简介
由square公司开发的用于IO读取,是对java 标准io流的补充封装,并自带缓冲、超时机制;使用起来方便快捷;不过想要用的效率比较高,还是需要对Okio有一定体悟的
2、脉络
下面是我自己绘制的原理图,其中超时机制并没有显示出来、socket流处理也没有画出来(增加后台线程监视包装);read、write方法操作的箭头指示传入参数;其它箭头表示流方向
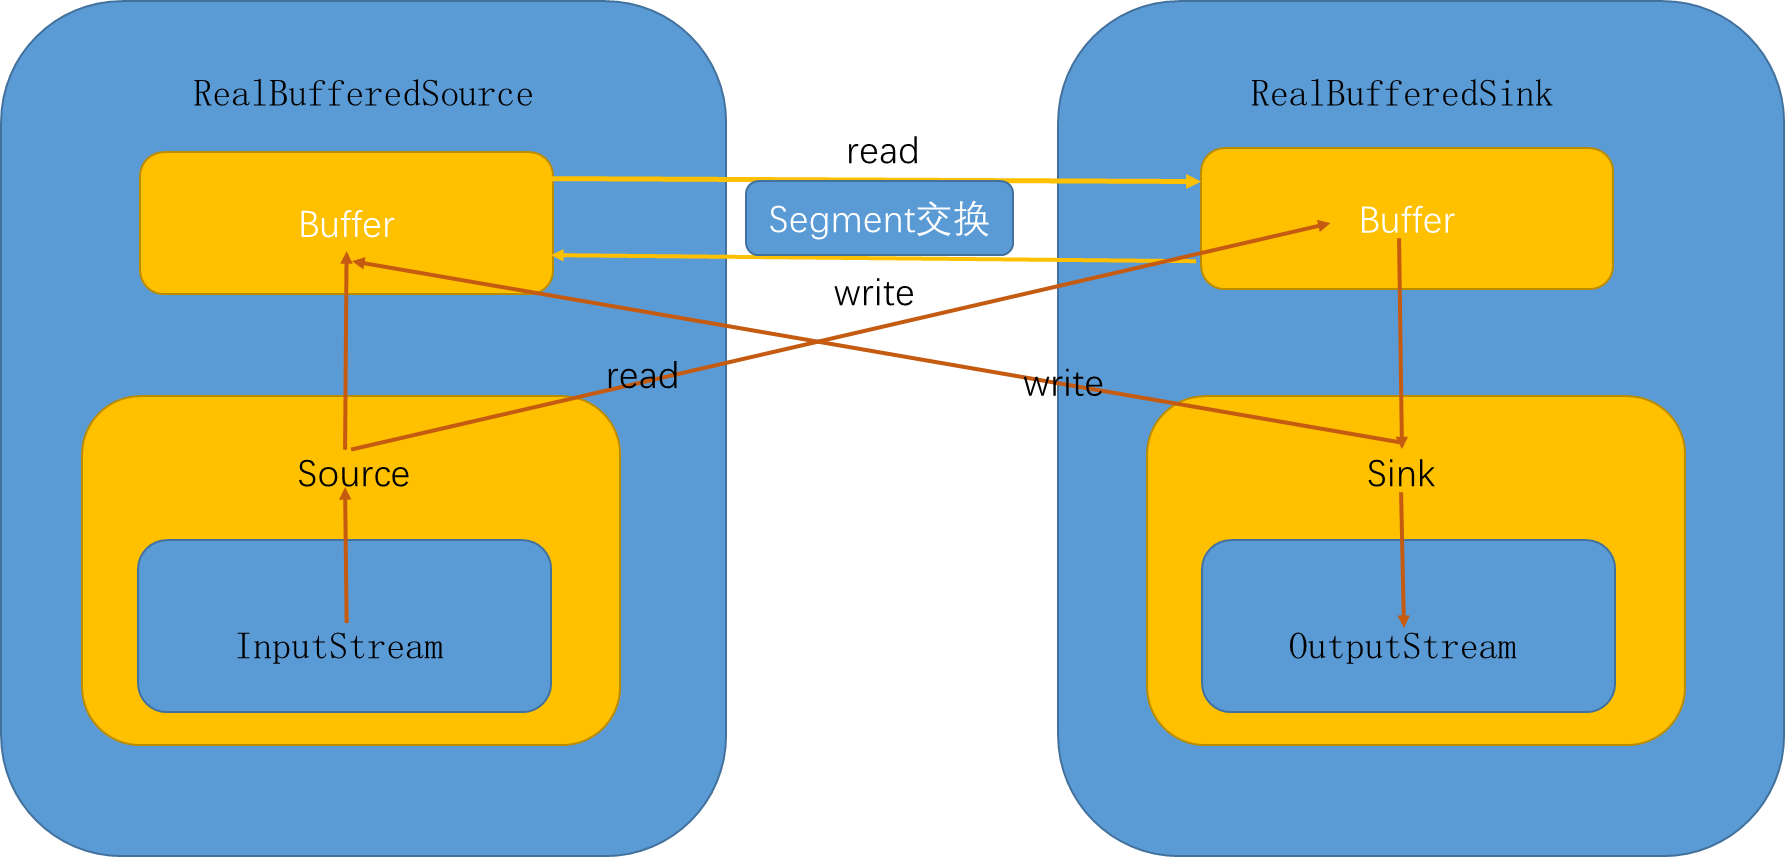
整体来说,使用了包装模式或者说装饰模式来处理
- 通过source来包装输入,sink包装输出
- 具体的数据流向头尾还是java的标准IO
- 通过不同类型的包装,来达到不同目标,比如超时包装、buffer包装
- 不需要输入输出双方都包装成RealBufferXxx类,这时可以减少操作,处理更快
默认使用了Timeout超时处理,这个处理默认并不做任何动作;buffer包装提供了数据流的搬运工和池机制,增加了复用;
下面就会一些具体的方面来进行分析,然后分析IO流的流向流程,包括
- ByteString类
- 超时机制Timeout类
- 数据类Segment以及池、Buffer
- Source、Sink
- IO完整流向源码分析;
3、ByteString
对byte数组到string的转换进行了延迟处理,并且封装了一些常用的方法
成员变量
  final byte[] data;
  transient int hashCode;
  transient String utf8;
存储了utf-8类型的字符串和其对应的byte数组,hashcode是根据byte数组来计算的
方法 方法太多,而且基本不复杂,就不每个都介绍了
- Base64编解码方法
- 静态方法of,生成实例
- 加密方法
- 16机制字符串--byte数组转换方法
- 还有一些字符串或者byte数组的常用操作方法
有点复杂的SegmentedByteString
继承ByteString类
  final transient byte[][] segments;
  final transient int[] directory;
其内部其实是存储了一个二维的数组,这个二维数据并不是所有数据有效,但是有效数据是连续的;父类data是这个二维数据一个有效整合,string对应的转换 之所以有意思,是这个数据经过了一道转换,而且数据采用java nio中Buffer(不是Okio的Buffer类)的思想;有两个关键方法
构造器
SegmentedByteString(Buffer buffer, int byteCount) {
    super(null);
    checkOffsetAndCount(buffer.size, 0, byteCount);

    int offset = 0;
    int segmentCount = 0;
    for (Segment s = buffer.head; offset < byteCount; s = s.next) {
      if (s.limit == s.pos) {
        throw new AssertionError("s.limit == s.pos");
      }
      offset += s.limit - s.pos;
      segmentCount++;
    }

    this.segments = new byte[segmentCount][];
    this.directory = new int[segmentCount * 2];
    offset = 0;
    segmentCount = 0;
    for (Segment s = buffer.head; offset < byteCount; s = s.next) {
      segments[segmentCount] = s.data;
      offset += s.limit - s.pos;
      if (offset > byteCount) {
        offset = byteCount;
      }
      directory[segmentCount] = offset;
      directory[segmentCount + segments.length] = s.pos;
      s.shared = true;
      segmentCount++;
    }
  }
segments:是存储多个Segment的byte数组数据;Segment中数据是byte数组; directory:大小是segments的大小两倍;加入segments的大小为n,那么0 - n-1对应segments相应索引之前的有效数据累加之和,n-1 -- 2*n -1 代表数据索引对应数据有效起始位置
很明显是为了Segment和String转换接轨的
4、超时机制
涉及类有Timeout、AsyncTimeout、ForwardingTimeout、PushableTimeout
基类Timeout
变量
public static final Timeout NONE = new Timeout() {
    @Override public Timeout timeout(long timeout, TimeUnit unit) {
      return this;
    }

    @Override public Timeout deadlineNanoTime(long deadlineNanoTime) {
      return this;
    }

    @Override public void throwIfReached() throws IOException {
    }
  };

  private boolean hasDeadline;
  private long deadlineNanoTime;
  private long timeoutNanos;
静态常量NONE:什么也不做
内部成员:定义等待的时间
hasDeadline,是否存在失效截至时间
deadlineNanoTime,失效截至时间,单位为纳秒
timeoutNanos,超时时长,单位为纳秒
方法
timeoutNanos的设置和获取
public Timeout timeout(long timeout, TimeUnit unit) {
    if (timeout < 0) throw new IllegalArgumentException("timeout < 0: " + timeout);
    if (unit == null) throw new IllegalArgumentException("unit == null");
    this.timeoutNanos = unit.toNanos(timeout);
    return this;
  }

  public long timeoutNanos() {
    return timeoutNanos;
  }
deadlineNanoTime、timeoutNanos的设置和获取
  public boolean hasDeadline() {
    return hasDeadline;
  }

  public long deadlineNanoTime() {
    if (!hasDeadline) throw new IllegalStateException("No deadline");
    return deadlineNanoTime;
  }

  public Timeout deadlineNanoTime(long deadlineNanoTime) {
    this.hasDeadline = true;
    this.deadlineNanoTime = deadlineNanoTime;
    return this;
  }

  public final Timeout deadline(long duration, TimeUnit unit) {
    if (duration <= 0) throw new IllegalArgumentException("duration <= 0: " + duration);
    if (unit == null) throw new IllegalArgumentException("unit == null");
    return deadlineNanoTime(System.nanoTime() + unit.toNanos(duration));
  }
清除超时信息
public Timeout clearTimeout() {
    this.timeoutNanos = 0;
    return this;
  }

  public Timeout clearDeadline() {
    this.hasDeadline = false;
    return this;
  }
超时时,转化为自定义IO异常
public void throwIfReached() throws IOException {
    if (Thread.interrupted()) {
      Thread.currentThread().interrupt(); // Retain interrupted status.
      throw new InterruptedIOException("interrupted");
    }

    if (hasDeadline && deadlineNanoTime - System.nanoTime() <= 0) {
      throw new InterruptedIOException("deadline reached");
    }
  }
获取不为0的,最小值
  static long minTimeout(long aNanos, long bNanos) {
    if (aNanos == 0L) return bNanos;
    if (bNanos == 0L) return aNanos;
    if (aNanos < bNanos) return aNanos;
    return bNanos;
  }
利用Synchronized关键字锁,使用Object对象进行挂起、唤醒操作
public final void waitUntilNotified(Object monitor) throws InterruptedIOException {
    try {
      boolean hasDeadline = hasDeadline();
      long timeoutNanos = timeoutNanos();

      if (!hasDeadline && timeoutNanos == 0L) {
        monitor.wait();
        return;
      }

      long waitNanos;
      long start = System.nanoTime();
      if (hasDeadline && timeoutNanos != 0) {
        long deadlineNanos = deadlineNanoTime() - start;
        waitNanos = Math.min(timeoutNanos, deadlineNanos);
      } else if (hasDeadline) {
        waitNanos = deadlineNanoTime() - start;
      } else {
        waitNanos = timeoutNanos;
      }

      long elapsedNanos = 0L;
      if (waitNanos > 0L) {
        long waitMillis = waitNanos / 1000000L;
        monitor.wait(waitMillis, (int) (waitNanos - waitMillis * 1000000L));
        elapsedNanos = System.nanoTime() - start;
      }

      if (elapsedNanos >= waitNanos) {
        throw new InterruptedIOException("timeout");
      }
    } catch (InterruptedException e) {
      Thread.currentThread().interrupt();
      throw new InterruptedIOException("interrupted");
    }
  }
代码流程大致:
- 如果没有超时截至时间,且等待时间为0,则挂起,等待唤醒(默认构造,就满足此条件)
- 计算等待时间,若等待时间大于0,则进行等待此时间
- 剩余时间大于等待时间,则打断当前线程,并抛出自定义io异常
ForwardingTimeout
继承TimeOut类,使用了静态代理模式,算是一个代理类
PushableTimeout
继承TimeOut类,增加了操作,并没有改变基类的操作;而是提供了对Timeout对象出、入操作
  private Timeout pushed;
  private boolean originalHasDeadline;
  private long originalDeadlineNanoTime;
  private long originalTimeoutNanos;
辅助变量,和父类变量含义一一对应,只不过它记录的是pushed变量的原有值,辅助pushed的出、入
入操作:记录入Timeout对象原始数据,并以当前Timeout的数据来修改入Timeout的截止时间、等待时间
void push(Timeout pushed) {
    this.pushed = pushed;
    this.originalHasDeadline = pushed.hasDeadline();
    this.originalDeadlineNanoTime = originalHasDeadline ? pushed.deadlineNanoTime() : -1L;
    this.originalTimeoutNanos = pushed.timeoutNanos();

    pushed.timeout(minTimeout(originalTimeoutNanos, timeoutNanos()), TimeUnit.NANOSECONDS);

    if (originalHasDeadline && hasDeadline()) {
      pushed.deadlineNanoTime(Math.min(deadlineNanoTime(), originalDeadlineNanoTime));
    } else if (hasDeadline()) {
      pushed.deadlineNanoTime(deadlineNanoTime());
    }
  }
出操作,复原pushed变量值
  void pop() {
    pushed.timeout(originalTimeoutNanos, TimeUnit.NANOSECONDS);

    if (originalHasDeadline) {
      pushed.deadlineNanoTime(originalDeadlineNanoTime);
    } else {
      pushed.clearDeadline();
    }
  }
AsyncTimeout
继承Timeout类,内部增加了单链表,并对单链表进行监听 特点: 1、单链表,以截至时间从小到大排序 2、使用后台守护线程,检测队列中执行时长,超时的调用timeout方法,这个方法重写,以通知写或者读操作,停止处理
变量
head 链表头,next下个节点
  static @Nullable AsyncTimeout head;

  private boolean inQueue;

  private @Nullable AsyncTimeout next;

  private long timeoutAt;
inQueue,是否排队,如果排队timeouAt表示截至时间(这个是根据几类中等待时长和截止时间一起来得到的)
节点进入排队监视
public final void enter() {
    if (inQueue) throw new IllegalStateException("Unbalanced enter/exit");
    long timeoutNanos = timeoutNanos();
    boolean hasDeadline = hasDeadline();
    if (timeoutNanos == 0 && !hasDeadline) {
      return;
    }
    inQueue = true;
    scheduleTimeout(this, timeoutNanos, hasDeadline);
  }

  private static synchronized void scheduleTimeout(AsyncTimeout node, long timeoutNanos, boolean hasDeadline) {

    if (head == null) {
      head = new AsyncTimeout();
      new Watchdog().start();
    }

    long now = System.nanoTime();
    if (timeoutNanos != 0 && hasDeadline) {

      node.timeoutAt = now + Math.min(timeoutNanos, node.deadlineNanoTime() - now);
    } else if (timeoutNanos != 0) {
      node.timeoutAt = now + timeoutNanos;
    } else if (hasDeadline) {
      node.timeoutAt = node.deadlineNanoTime();
    } else {
      throw new AssertionError();
    }

    long remainingNanos = node.remainingNanos(now);
    for (AsyncTimeout prev = head; true; prev = prev.next) {
      if (prev.next == null || remainingNanos < prev.next.remainingNanos(now)) {
        node.next = prev.next;
        prev.next = node;
        if (prev == head) {
          AsyncTimeout.class.notify();
        }
        break;
      }
    }
  }
大致流程如下:
- 如果没有截止时间且等待时长为0,则不需要被监视,直接退出,表示不用被后台监视,不会主动去阻止操作
- 进行排队标志置true,并进行排队操作
- 如果当且队列为空,则启用一个不需要等待的头节点,并开启后台线程监视
- 计算截止时间,保存在timeoutAt变量中
- 根据timeoutAt值,进行入队,如果入队时,只有头数据,则进行唤醒操作(在后台线程中,防止头节点被删除)
节点监视
监视线程是一个守护线程;
- 如果仅剩下头节点,则头节点置空,结束
- 如果通过awaitTimeout获取的节点为空,则继续处理;节点不为空,则执行timeout操作
也就是timeout的动作是超时执行的关键;通过异常机制,来阻止读写操作的
private static final class Watchdog extends Thread {
    Watchdog() {
      super("Okio Watchdog");
      setDaemon(true);
    }

    public void run() {
      while (true) {
        try {
          AsyncTimeout timedOut;
          synchronized (AsyncTimeout.class) {
            timedOut = awaitTimeout();
            if (timedOut == null) continue;
            if (timedOut == head) {
              head = null;
              return;
            }
          }

          timedOut.timedOut();
        } catch (InterruptedException ignored) {
        }
      }
    }
  }
awaitTimeout方法 和后台监听线程配合执行;整体来说,非头节点,等待时间过后执行timeout操作,队列中无数据1ms秒则关闭监听线程
static @Nullable AsyncTimeout awaitTimeout() throws InterruptedException {
    AsyncTimeout node = head.next;
    if (node == null) {
      long startNanos = System.nanoTime();
      AsyncTimeout.class.wait(IDLE_TIMEOUT_MILLIS);
      return head.next == null && (System.nanoTime() - startNanos) >= IDLE_TIMEOUT_NANOS ? head  : null;
    }

    long waitNanos = node.remainingNanos(System.nanoTime());

    if (waitNanos > 0) {
      long waitMillis = waitNanos / 1000000L;
      waitNanos -= (waitMillis * 1000000L);
      AsyncTimeout.class.wait(waitMillis, (int) waitNanos);
      return null;
    }

    head.next = node.next;
    node.next = null;
    return node;
  }
大致流程:
- 如果仅有一个头节点,则头节点等待1ms,在等待过程中被唤醒,说明又加入新节点了;没有,则返回头节点,由后台监视结束自己
- 如果存在数据且节点需要等待,则进行等待,等待结束后,返回null
- 节点从链表去除,并返回节点
exit方法 exit无参方法返回true,表示执行操作,false表示正常退出;因为在后台监视线程中,如果超时了,则已经退出队列了,这里返回结果就是以是否在队列中为标准的
public final boolean exit() {
    if (!inQueue) return false;
    inQueue = false;
    return cancelScheduledTimeout(this);
  }

  private static synchronized boolean cancelScheduledTimeout(AsyncTimeout node) {
    for (AsyncTimeout prev = head; prev != null; prev = prev.next) {
      if (prev.next == node) {
        prev.next = node.next;
        node.next = null;
        return false;
      }
    }
    return true;
  }

  final void exit(boolean throwOnTimeout) throws IOException {
    boolean timedOut = exit();
    if (timedOut && throwOnTimeout) throw newTimeoutException(null);
  }

  final IOException exit(IOException cause) throws IOException {
    if (!exit()) return cause;
    return newTimeoutException(cause);
  }
exit有参方法,表示抛出异常
读写操作对象生成
public final Sink sink(final Sink sink) {
    return new Sink() {
      @Override public void write(Buffer source, long byteCount) throws IOException {
        checkOffsetAndCount(source.size, 0, byteCount);

        while (byteCount > 0L) {
          long toWrite = 0L;
          for (Segment s = source.head; toWrite < TIMEOUT_WRITE_SIZE; s = s.next) {
            int segmentSize = s.limit - s.pos;
            toWrite += segmentSize;
            if (toWrite >= byteCount) {
              toWrite = byteCount;
              break;
            }
          }

          boolean throwOnTimeout = false;
          enter();
          try {
            sink.write(source, toWrite);
            byteCount -= toWrite;
            throwOnTimeout = true;
          } catch (IOException e) {
            throw exit(e);
          } finally {
            exit(throwOnTimeout);
          }
        }
      }

      @Override public void flush() throws IOException {
        boolean throwOnTimeout = false;
        enter();
        try {
          sink.flush();
          throwOnTimeout = true;
        } catch (IOException e) {
          throw exit(e);
        } finally {
          exit(throwOnTimeout);
        }
      }

      @Override public void close() throws IOException {
        boolean throwOnTimeout = false;
        enter();
        try {
          sink.close();
          throwOnTimeout = true;
        } catch (IOException e) {
          throw exit(e);
        } finally {
          exit(throwOnTimeout);
        }
      }

      @Override public Timeout timeout() {
        return AsyncTimeout.this;
      }

      @Override public String toString() {
        return "AsyncTimeout.sink(" + sink + ")";
      }
    };
  }

  public final Source source(final Source source) {
    return new Source() {
      @Override public long read(Buffer sink, long byteCount) throws IOException {
        boolean throwOnTimeout = false;
        enter();
        try {
          long result = source.read(sink, byteCount);
          throwOnTimeout = true;
          return result;
        } catch (IOException e) {
          throw exit(e);
        } finally {
          exit(throwOnTimeout);
        }
      }

      @Override public void close() throws IOException {
        boolean throwOnTimeout = false;
        enter();
        try {
          source.close();
          throwOnTimeout = true;
        } catch (IOException e) {
          throw exit(e);
        } finally {
          exit(throwOnTimeout);
        }
      }

      @Override public Timeout timeout() {
        return AsyncTimeout.this;
      }

      @Override public String toString() {
        return "AsyncTimeout.source(" + source + ")";
      }
    };
  }
在sink、source的读写操作,使用try catch,来捕获timeout方法带来的异常,进而停止读写操作
5、核心数据类
Segment是核心数据类,是一个双链表结构的数据类,并且采用了池技术
5.1 Segment类
一个首位相连的双向链表;但是我在这个类中没有找到首尾相连的证据,但是处理过程都是按照首尾相连来处理的
成员变量
  static final int SIZE = 8192;
  static final int SHARE_MINIMUM = 1024;

  final byte[] data;
  int pos;
  int limit;
  boolean shared;
  boolean owner;
  Segment next;
  Segment prev;
变量含义如下:
- SIZE 数据存储大小
- SHARE_MINIMUM深copy、浅copy大小分界;大于此值,浅copy也就是共享数据
- data ,pos, limit 数据,有效数据起始位置,和结束位置
- next、prev 链表节点
- shared、owner 表明data数据对象是否当前对象独占,还是和其它数据共享
  final Segment sharedCopy() {
    shared = true;
    return new Segment(data, pos, limit, true, false);
  }

  final Segment unsharedCopy() {
    return new Segment(data.clone(), pos, limit, false, true);
  }
共享生成新对象,为浅copy;独占生成对象为深copy
  public final @Nullable Segment pop() {
    Segment result = next != this ? next : null;
    prev.next = next;
    next.prev = prev;
    next = null;
    prev = null;
    return result;
  }

  public final Segment push(Segment segment) {
    segment.prev = this;
    segment.next = next;
    next.prev = segment;
    next = segment;
    return segment;
  }
pop出队操作;push入队操作,当前对象后面入队
分割方法
public final Segment split(int byteCount) {
    if (byteCount <= 0 || byteCount > limit - pos) throw new IllegalArgumentException();
    Segment prefix;
    if (byteCount >= SHARE_MINIMUM) {
      prefix = sharedCopy();
    } else {
      prefix = SegmentPool.take();
      System.arraycopy(data, pos, prefix.data, 0, byteCount);
    }

    prefix.limit = prefix.pos + byteCount;
    pos += byteCount;
    prev.push(prefix);
    return prefix;
  }
- 分割出去的对象数据大小,必须大于0 且小于当前有效数据大小
- 分割大小大于 SHARE_MINIMUM时,生成共享对象
- 独占对象依赖池技术获取,并且深copy数据
- 对分割后的两个对象进行有效数据位置处理
- 把分割出的数据放在当前数据前面入队
拼接方法
  public final void compact() {
    if (prev == this) throw new IllegalStateException();
    if (!prev.owner) return;
    int byteCount = limit - pos;
    int availableByteCount = SIZE - prev.limit + (prev.shared ? 0 : prev.pos);
    if (byteCount > availableByteCount) return;
    writeTo(prev, byteCount);
    pop();
    SegmentPool.recycle(this);
  }

  public final void writeTo(Segment sink, int byteCount) {
    if (!sink.owner) throw new IllegalArgumentException();
    if (sink.limit + byteCount > SIZE) {
      if (sink.shared) throw new IllegalArgumentException();
      if (sink.limit + byteCount - sink.pos > SIZE) throw new IllegalArgumentException();
      System.arraycopy(sink.data, sink.pos, sink.data, 0, sink.limit - sink.pos);
      sink.limit -= sink.pos;
      sink.pos = 0;
    }

    System.arraycopy(data, pos, sink.data, sink.limit, byteCount);
    sink.limit += byteCount;
    pos += byteCount;
  }
- 拼接数据,是和队列前一个数据拼接,并且把当前数据追加到前驱节点中,当前节点出队,并回收
- 执行拼接动作,必须前驱和当前节点不是同一个节点,且前驱节点不是共享节点,剩余的存储空间可以存下当前节点数据
- 如果拼接时,从limit开始到byte数组结尾,可以存下,直接放;不行,需要把有效数据从poscopy到0的位置
5.2 数据池 SegmentPool
一个私有构造的工具类,除了构造器就仅含有静态变量、静态方法;池中数据采用链表结构,池中Segment存在的大小最多为8个(一个Segment的容量为8kb);取出节点和回收使用了线程同步;仅仅是独占数据Segment的对象池 next:链表头节点 byteCount:池中对象可存数据大小
final class SegmentPool {

  static final long MAX_SIZE = 64 * 1024;
  static @Nullable Segment next;
  static long byteCount;
  private SegmentPool() {
  }

  static Segment take() {
    synchronized (SegmentPool.class) {
      if (next != null) {
        Segment result = next;
        next = result.next;
        result.next = null;
        byteCount -= Segment.SIZE;
        return result;
      }
    }
    return new Segment();
  }

  static void recycle(Segment segment) {
    if (segment.next != null || segment.prev != null) throw new IllegalArgumentException();
    if (segment.shared) return;
    synchronized (SegmentPool.class) {
      if (byteCount + Segment.SIZE > MAX_SIZE) return;
      byteCount += Segment.SIZE;
      segment.next = next;
      segment.pos = segment.limit = 0;
      next = segment;
    }
  }
}
take方法:取节点;如果单链表next节点不为空,表示存在数据,把next去除,并把next的next置为next,数据大小byteCount也跟着变化;否则新建节点
recycle方法:回收节点;共享、存在前驱后继的不回收,可存数据大小超标了也不回收;回收后Segment对象数据重置,并加入回收数据链表头部
5.3 Buffer类
通过读写方法实现了,流数据的转移;也可以不这么用,我觉得这是这个架构纯正的过程;单独的读、或者写,仅仅用Buffer作为数据的存储
成员变量
  Segment head;
  long size;
Segment头节点,数据总共大小
方法太多了,这些介绍几个关键方法
writableSegment方法
    Segment
    (int minimumCapacity) {
    if (minimumCapacity < 1 || minimumCapacity > Segment.SIZE) throw new IllegalArgumentException();

    if (head == null) {
      head = SegmentPool.take();
      return head.next = head.prev = head;
    }

    Segment tail = head.prev;
    if (tail.limit + minimumCapacity > Segment.SIZE || !tail.owner) {
      tail = tail.push(SegmentPool.take());
    }
    return tail;
  }
在封装io输入流时用到,获取Buffer中存入数据的队尾(队尾节点数据肯定不是满的);从这里可以看出,head数据链表是个头尾相连的结构
数据流读入方法
@Override public long read(Buffer sink, long byteCount) {
    if (sink == null) throw new IllegalArgumentException("sink == null");
    if (byteCount < 0) throw new IllegalArgumentException("byteCount < 0: " + byteCount);
    if (size == 0) return -1L;
    if (byteCount > size) byteCount = size;
    sink.write(this, byteCount);
    return byteCount;
  }
参数sink为待写入的数据,当前Buffer对象保存inputStream中读出的数据;通过写入方法来完成实际流向
写入方法
public void write(Buffer source, long byteCount) {
    if (source == null) throw new IllegalArgumentException("source == null");
    if (source == this) throw new IllegalArgumentException("source == this");
    checkOffsetAndCount(source.size, 0, byteCount);

    while (byteCount > 0) {
      if (byteCount < (source.head.limit - source.head.pos)) {
        Segment tail = head != null ? head.prev : null;
        if (tail != null && tail.owner
            && (byteCount + tail.limit - (tail.shared ? 0 : tail.pos) <= Segment.SIZE)) {

          source.head.writeTo(tail, (int) byteCount);
          source.size -= byteCount;
          size += byteCount;
          return;
        } else {
          source.head = source.head.split((int) byteCount);
        }
      }

      Segment segmentToMove = source.head;
      long movedByteCount = segmentToMove.limit - segmentToMove.pos;
      source.head = segmentToMove.pop();
      if (head == null) {
        head = segmentToMove;
        head.next = head.prev = head;
      } else {
        Segment tail = head.prev;
        tail = tail.push(segmentToMove);
        tail.compact();
      }
      source.size -= movedByteCount;
      size += movedByteCount;
      byteCount -= movedByteCount;
    }
  }
source参数为存有数据流的对象,当前对象为接收数据流的对象;基本流程
- 检验参数的合法性;数据流必须有这么多数据
- 如果可以把追加数据输出Buffer的尾节点数据中,则copy数据
- . 不行时,把输入Buffer数据分离处一个count大小的数据节点
- 输入Buffer的head数据移动到输出Buffer的尾部(这里还防止了刚分割的头数据为空的多线程问题)
- 重新执行2-4过程
由此可以看出: 新来数据追加到尾部节点,或者由输入的Segment移动过来
写入过程可以发现,读取和写入可以不是一一对应的(从Okio类中包装和RealBufferedSource的read方法,可以看出每次从imputStream流中读入自己Buffer中数据大小一定不能超过一个Segment的大小;每次写出却按照自己Buffer的总数据和要求数据求最小值也就是可能超过每次读入的数据)
6、 Okio的输入输出
其输入流是实现了Source接口的,其输出流是实现了Sink接口的;除了临时对象,其实现的只有RealBufferedSource、RealBufferedSink类
6.1 RealBufferedSource
成员变量
  public final Buffer buffer = new Buffer();
  public final Source source;
  boolean closed;
source:包括IO输入流的对象 buffer:作为从io输入流读出数据存储的地方 closed:io输入流是否关闭
介绍下主要的几个方法
读方法
  public long read(Buffer sink, long byteCount) throws IOException {
    if (sink == null) throw new IllegalArgumentException("sink == null");
    if (byteCount < 0) throw new IllegalArgumentException("byteCount < 0: " + byteCount);
    if (closed) throw new IllegalStateException("closed");

    if (buffer.size == 0) {
      long read = source.read(buffer, Segment.SIZE);
      if (read == -1) return -1;
    }

    long toRead = Math.min(byteCount, buffer.size);
    return buffer.read(sink, toRead);
  }
首先读入到自己的buffer中,然后通过buffer 读写方法进行数据转移
仅向自己的buffer中准备数据
  @Override public void require(long byteCount) throws IOException {
    if (!request(byteCount)) throw new EOFException();
  }

  @Override public boolean request(long byteCount) throws IOException {
    if (byteCount < 0) throw new IllegalArgumentException("byteCount < 0: " + byteCount);
    if (closed) throw new IllegalStateException("closed");
    while (buffer.size < byteCount) {
      if (source.read(buffer, Segment.SIZE) == -1) return false;
    }
    return true;
  }
仅仅做了从IO流中读取数据并保存到buffer中,这时的buffer可以作为Sink的写入数据Buffer
还有一些读取基本类型,byte数组,utf8字符串的方法,close等方法
6.2 RealBufferedSink
成员变量
  public final Buffer buffer = new Buffer();
  public final Sink sink;
  boolean closed;
包含IO输出流的sink,存储等待写入IO流数据的buffer,流状态closed
写方法
 public void write(Buffer source, long byteCount)
      throws IOException {
    if (closed) throw new IllegalStateException("closed");
    buffer.write(source, byteCount);
    emitCompleteSegments();
  }

  public BufferedSink emitCompleteSegments() throws IOException {
    if (closed) throw new IllegalStateException("closed");
    long byteCount = buffer.completeSegmentByteCount();
    if (byteCount > 0) sink.write(buffer, byteCount);
    return this;
  }
- 数据会从待写入buffer转移自己的buffer中(感觉流程有点浪费直接写进来不就行了吗)
- 把本身buffer中的数据写入IO输出流中
Buffer的completeSegmentByteCount方法;计算可以写入的数据时,如果尾部的Segment数据未满,则不包括
emit方法 相对于emitCompleteSegments方法,必定把buffer中数据全部写入IO输出流
  public BufferedSink emit() throws IOException {
    if (closed) throw new IllegalStateException("closed");
    long byteCount = buffer.size();
    if (byteCount > 0) sink.write(buffer, byteCount);
    return this;
  }
flush方法
会把剩余数据全部写入IO输出流,并且清理Buffer中Segment数据,并调用IO流flush方法;
public void flush() throws IOException {
    if (closed) throw new IllegalStateException("closed");
    if (buffer.size > 0) {
      sink.write(buffer, buffer.size);
    }
    sink.flush();
  }
7、IO流向源码分析
IO流向要从Okio代码来分析:
7.1 输入流InputStream的包装
public static Source source(InputStream in) {
    return source(in, new Timeout());
}

private static Source source(final InputStream in, final Timeout timeout) {
    if (in == null) throw new IllegalArgumentException("in == null");
    if (timeout == null) throw new IllegalArgumentException("timeout == null");

    return new Source() {
      @Override public long read(Buffer sink, long byteCount) throws IOException {
        if (byteCount < 0) throw new IllegalArgumentException("byteCount < 0: " + byteCount);
        if (byteCount == 0) return 0;
        try {
          timeout.throwIfReached();
          Segment tail = sink.writableSegment(1);
          int maxToCopy = (int) Math.min(byteCount, Segment.SIZE - tail.limit);
          int bytesRead = in.read(tail.data, tail.limit, maxToCopy);
          if (bytesRead == -1) return -1;
          tail.limit += bytesRead;
          sink.size += bytesRead;
          return bytesRead;
        } catch (AssertionError e) {
          if (isAndroidGetsocknameError(e)) throw new IOException(e);
          throw e;
        }
      }

      @Override public void close() throws IOException {
        in.close();
      }

      @Override public Timeout timeout() {
        return timeout;
      }

      @Override public String toString() {
        return "source(" + in + ")";
      }
    };
  }
流程如下:
- 调用timeout超时方法,如果超时就会被打断,否则不做任何处理(如果是异步超时对象相关,则可能由后台监视线程打断)
- 找到Buffer中Segment节点的队尾,依据队尾节点可以存入数据来决定io输入预期流读取数据量,返回实际读取数据量
这时数据可以读取到RealBufferSink的成员变量buffer中,RealBufferSink再调用写入操作即可
也可以进一步封装;通过buffer作为Sink对象参数达到同样的目的;不过其buffer要调用read方法读数据到buffer中
  public static BufferedSource buffer(Source source) {
    return new RealBufferedSource(source);
  }
7.2 IO输出流包装
public static BufferedSink buffer(Sink sink) {
    return new RealBufferedSink(sink);
  }

  public static Sink sink(OutputStream out) {
    return sink(out, new Timeout());
  }

  private static Sink sink(final OutputStream out, final Timeout timeout) {
    if (out == null) throw new IllegalArgumentException("out == null");
    if (timeout == null) throw new IllegalArgumentException("timeout == null");

    return new Sink() {
      @Override public void write(Buffer source, long byteCount) throws IOException {
        checkOffsetAndCount(source.size, 0, byteCount);
        while (byteCount > 0) {
          timeout.throwIfReached();
          Segment head = source.head;
          int toCopy = (int) Math.min(byteCount, head.limit - head.pos);
          out.write(head.data, head.pos, toCopy);

          head.pos += toCopy;
          byteCount -= toCopy;
          source.size -= toCopy;

          if (head.pos == head.limit) {
            source.head = head.pop();
            SegmentPool.recycle(head);
          }
        }
      }

      @Override public void flush() throws IOException {
        out.flush();
      }

      @Override public void close() throws IOException {
        out.close();
      }

      @Override public Timeout timeout() {
        return timeout;
      }

      @Override public String toString() {
        return "sink(" + out + ")";
      }
    };
  }
流程大致如下:
- 超时检测
- 写入IO流数据,每次最大为Segment的大小,从Buffer的头Segment开始
- 如果Buffer中Segment中数据写完,则回收
- 重复执行2-3,知道写入到预期数据
7.3 Socket的包装
  public static Sink sink(Socket socket) throws IOException {
    if (socket == null) throw new IllegalArgumentException("socket == null");
    if (socket.getOutputStream() == null) throw new IOException("socket's output stream == null");
    AsyncTimeout timeout = timeout(socket);
    Sink sink = sink(socket.getOutputStream(), timeout);
    return timeout.sink(sink);
  }

    public static Source source(Socket socket) throws IOException {
    if (socket == null) throw new IllegalArgumentException("socket == null");
    if (socket.getInputStream() == null) throw new IOException("socket's input stream == null");
    AsyncTimeout timeout = timeout(socket);
    Source source = source(socket.getInputStream(), timeout);
    return timeout.source(source);
  }
比普通的IO流操作多了:timeout的进一步包装和AsyncTimeout的timeout方法(AsyncTimeout中空实现)实现;
实现timeout方法:关闭流,当再进行操作时会出现异常
进一步包装:增加后台超时监视,这时会调用timeout方法
8、原理小结
- io流到Buffer的数据转移,每次必定少于1KB;buffer到buffer的转移,大小不限制
- 普通io仅仅对读写过程中做了超时检测停止操作;而socket网络io增加了后台线程超时监视,主要解决网络两端传递超时
- RealBufferedXxx,这两个流类,实现了缓存数据存储在Buffer中,而且IO读取至少是Segment.SIZE的大小(暂时为8KB)
- RealBufferedSource的流到RealBufferedSink的流动,每一次流动操作低于Segment.SIZE,拆分移动;应尽量减少拆分
- 每次读写到Buffer中时,流操作个数随意时,会存在拆分重组
- 类中还有一些细节这里并没有写出,有兴趣的同学可以细品,有利于我们更高效的使用
由于看第三库源码,那么对每个类的认知讲解就不会那么详细,但这些细节需要自己去消化,如果没有消化,你对整体的脉络肯定疑问重重;如果有什么问题,欢迎大家留言讨论
技术变化都很快,但基础技术、理论知识永远都是那些;作者希望在余后的生活中,对常用技术点进行基础知识分享;如果你觉得文章写的不错,请给与关注和点赞;如果文章存在错误,也请多多指教!
